
Buns
How Do You Make Bao Buns
Jan
How To Make Bao Buns – Mantou Chinese Steamed Buns
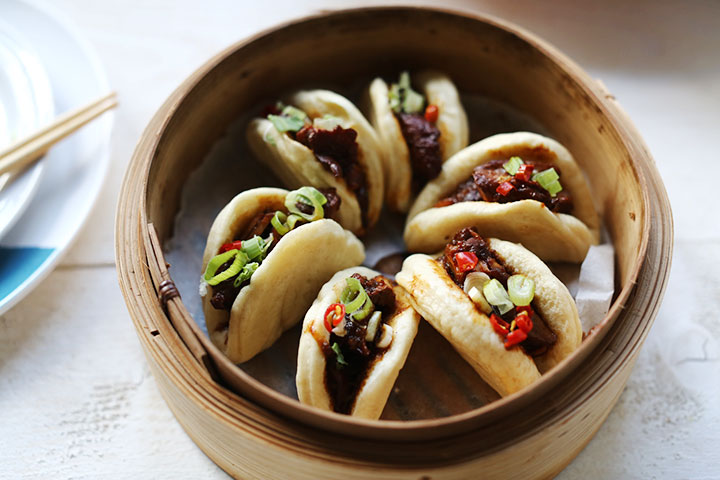
Photograph courtesy of Lizzie Munro/Tasting Table A variety of delectable fillings are used to assemble these Chinese-style buns by Johanna Ware, owner ofSmallwares in Portland, Oregon. Ware steams the buns to a light and fluffy perfection, but you may also fry them if you so like. Fun fact: When the buns are fried plain, they are referred to as mantou, and when they are filled, they are referred to as baozi. More information may be found in the book ” Breaking Bao.” Johanna Ware, Smallwares, Portland, OR, provided the inspiration for this recipe.
- A total of 133 cup warm water, 2 teaspoons quick yeast, 2 tablespoons sugar, 1 tablespoon canola oil, and 114 cups whole wheat bread flour, plus more flour as needed 1 teaspoon kosher salt
- 14 teaspoon baking soda
- 1 teaspoon cayenne pepper
- A total of 133 cup warm water, 2 teaspoons quick yeast, 2 tablespoons sugar, 1 tablespoon canola oil, and 114 cups all-purpose flour, plus more flour if needed one-fourth teaspoon baking soda
- One-fourth teaspoon kosher salt
| Calories per Serving | 66 |
| Total Fat | 1.3 g |
| Saturated Fat | 0.1 g |
| Trans Fat | 0.0 g |
| Cholesterol | 0.0 mg |
| Total Carbohydrates | 11.7 g |
| Dietary Fiber | 0.5 g |
| Total Sugars | 2.0 g |
| Sodium | 67.5 mg |
| Protein | 1.8 g |
Edamam’s best guess based on available ingredients and cooking methods is represented in the table above. It should not be construed as a substitute for the advice of a licensed professional nutritionist.
Steamed Bao Buns
Edamam’s best guess based on the ingredients and preparation methods available at the time of writing. If you are a professional nutritionist, this information should not be regarded a substitute for his or her expertise.
How to Make Steamed Bao Buns
Are you ready to start cooking? What you need to do is as follows: To begin, prepare the dough. Combine the dry yeast, sugar, and warm water in a large mixing bowl and let aside for 5 minutes, or until the yeast begins to bubble. Next, in a large mixing bowl, combine the dry ingredients, then add the yeast mixture and avocado oil. Stir well to blend. Form a rough ball out of the mixture. Turn the dough out onto a lightly floured surface and knead it vigorously for approximately 5 minutes, or until it is smooth and elastic in texture.
- After the dough has risen, cut out the bao buns with a sharp knife.
- Then, using a drinking glass, cut out three-inch circles of dough and lay each one on a sheet of parchment paper to set aside.
- Wrap the buns in plastic wrap and set them aside to rise for another hour or two.
- Finally, get to cooking!
- Cover and steam for 9 to 11 minutes, or until the rice is puffed.
Bao Buns Filling
Traditional bao buns are stuffed with seasoned pork belly, but I choose to use a plant-based filling instead of the traditional meat. Making sweet and savory hoisin tempeh using my preferred tempeh cooking method (steaming, marinating, and baking) is easy! Tofu that has been marinated and baked would be a fantastic addition to this dish as well. While the tempeh bakes, I prepare the fresh vegetable toppings by washing and slicing them. This dish is always served with thinly sliced carrot and/or cucumber, fresh cilantro or mint, avocado, chilies, and sesame seeds on top.
Immediately after taking them out of the steamer, stuff them with the filling because they are at their finest when they are warm and tender. Extra tempeh marinade, soy sauce, tamari, and a generous squeeze of lime juice can be drizzled over the top before serving.
Bao Bun Recipe Tips
- Make use of a neutral oil. In my recipes, I nearly always ask for extra-virgin olive oil, but I prefer avocado oil in this situation. Because of its neutral flavor, it helps the rich fillings in this dish to really stand out. If you are unable to locate avocado oil, use another neutral oil, such as grapeseed oil, for it. If the dough is too dry, add a tablespoon at a time of water until it is moistened. This bao bun recipe yields a tough dough, so don’t be discouraged if it takes a few minutes longer to create a ball than expected. The dough should be moist enough to hold together, but not too moist. Allow the dough to rise in a warm place until it doubles in size. Because yeast responds to heat, it is preferable to allow your dough to rise in a warm environment to achieve the greatest results. We prefer to set ours up on a sunny ledge, and we like to serve the bao buns hot from the steamer as well. The steamed buns are at their finest right after they’ve been taken off the heat, while they’re still soft and supple. If you have any leftover buns, they may be frozen.
More Favorite Date Night Recipes
If you and your spouse like cooking together, consider one of these enjoyable culinary projects next:
- Maki Sushi
- Fresh spring rolls or avocado summer rolls
- Baked green chile tacos
- Crispy baked falafel with pickled onions and tahini sauce
- Baked green chile tacos Best Vegetarian Lasagna
- Eggplant Parmesan
- Best Vegetarian Lasagna
For even more Valentine’s Day inspiration, check out my25 Best Pasta Recipes or Favorite Vegan Desserts collections. Preparation time: 2 hours and 15 minutes Cooking Time: 10 minutes Serves12buns These steamed bao buns are really tasty and a lot of fun to put together! With fragrant marinated tempeh and plenty of fresh ingredients, I stuff the soft, fluffy buns with deliciousness!
Bao Buns
- For even more Valentine’s Day inspiration, check out my25 Best Pasta Recipes or Favorite Vegan Desserts. 2.15 hours and 15 minutes of preparation time Approximately ten minutes to prepare Serves12buns Making these steamed bao buns is a lot of fun and quite tasty! Using tasty marinated tempeh and plenty of fresh ingredients, I stuff the soft, puffy buns.
Filling
- Avocado slices
- 8 ounces tempeh, divided into 12 strips and cooked
- 6 tablespoons hoisin sauce
- 3 tablespoons sriracha
- 1 teaspoon fresh ginger, grated
- 1 teaspoon lime zest Cucumber and/or carrot slices, if desired
- Mint or cilantro are good choices. Thai chilies, diced
- Lime wedges, for serving
- Thai basil
- Avocado slices
- 8 ounces tempeh, divided into 12 strips and cooked
- 6 tablespoons hoisin sauce
- 3 tablespoons sriracha
- 1 tablespoon fresh ginger, grated
- 1 teaspoon lime zest Cucumber and/or carrot slices, if desired. Mint or cilantro are both good choices here. Thai chilies, diced
- Lime wedges, for serving
- Thai basil.
The recipe for the buns was borrowed from The Elizabeth Street Café Cookbook.
The BEST Bao Buns Recipe & Video
- 1/3 cupwarm water
- 1/2 cupwarm milk
- 1 tbspactive dry yeast
- 4 tbsp sugar, divided in half
- 2 tbspavocado, vegetable or canola oil
- 2 1/2 cupsall purpose flour (use blenched flour if you want completely white buns)
- 1/2 tspbaking powder
- 1/4 tspsalt
- 2 1/2 cups
Instructions
- Warm the water, milk, active yeast, sugar, and oil together in a large mixing bowl. Whisk to combine the yeast and sugar, then set aside for 5 to 10 minutes to let the yeast to active. In the meantime, combine the flour, sugar, baking powder, and salt in the bowl of a stand mixer. You may also build something with your hand if you like
- The wet components should be added to the dry ingredients combination. Begin by mixing on a low speed to slowly combine all of the ingredients together, then increase the speed to medium until the mixture forms a dough shape. For 3 to 4 minutes at a medium tempo, keep your knees bent. The dough should be elastic and extremely soft, but it should not stick to your fingers or to the mixing bowl
- Remove the dough from the mixing bowl and shape it into a ball with your hands. Location the dough back in the mixing basin, cover with plastic wrap, and allow it to rise in a warm place for about 2 hours, or until it has tripled in size. Allow it to rest for an additional 15 minutes if necessary
- Place the rising dough on a working surface. Roll out the dough to a thickness of 1/4 inch. Sprinkle four is not required, but if you do, make sure you use the smallest amount possible. Using a ring mold or a glass, cut a 3 1/2-inch circle out of the dough (I used a wine glass). This recipe will yield between 14 and 16 baos. Fold the baos in half, making a half moon shape, after lightly brushing or spraying oil on one side of them. Gently press each bao with a roller before placing them in a steamer coated with parchment paper or coffee filters. Add a further 30 minutes of resting time by covering with a lid
- In the meantime, heat water in a wok or steamer pot until it is boiling. Place the steamer with the baos on top of the wok/pot of boiling water with care. Make certain that water does not get into contact with the baos. Steam for 8 to 12 minutes under a tight-fitting lid. Cooking is complete when the lid is tilted just a little to allow for gradual air circulation for around 2 to 3 minutes before removing the cover. To keep the dough from adhering to the coffee filter, spray it with water first. As an accompaniment or as a sandwich, this bao is delicious! Enjoy
Warm the water, milk, active yeast, sugar, and oil together in a large mixing bowl until well combined. Mix flour, sugar, baking powder, and salt in a stand mixer until well combined. Whisk in yeast and sugar until well combined, then set aside for 5 to 10 minutes to allow the yeast to activate; If you like, you may even build something with your hand. The wet components should be added to the dry ingredient combination. Reduce speed to low and carefully integrate all of the ingredients together, then increase speed to medium and continue mixing until the dough forms a ball shape.
- Using the dough hook, remove the dough from the mixing bowl and shape it into a ball.
- Depending on how long it needs to sit, turn it out onto a working surface.
- Even if you want to use the sprinkle four, keep the amount used to an absolute minimum.
- Approximately 14-16 baos will be produced from this recipe.
- Use a rolling pin to gently flatten each bao into shape, then lay them on a steamer lined with parchment paper or coffee filter.
- Prepare a wok or pot of boiling water by carefully placing a steamer with the baos on top of it.
- Allow 8 to 12 minutes of steaming time.
- To keep the dough from adhering to the coffee filter, spray it with water.
- Enjoy;
Related
As of August 2021, this post has been updated to reflect current information. I’ve decided to donate all of the advertising money produced by this blog article in the wake of recent racially motivated attacks and hate crimes against Asian people (any previous ad revenue generated in 2021 as well as revenue from the remainder of 2021) A network for East and South East Asian individuals in the United Kingdom is tobesea.n. As well as other essential efforts to achieve equity for this marginalized community, they aim to combat negative perceptions and give materials to promote a positive depiction of ESEA persons in the United Kingdom media.
These soft and fluffy steamed buns are really tasty, and they’re typically not too expensive to buy in large quantities.
Because the prospect of steaming bread might be intimidating, I’ve gone into as much detail as I possibly can here. My family and I have cooked these several times at home, and while I am by no means an expert, I believe I can provide some suggestions based on what I have learned.
Contents:
- Videos on how to roll and shape bao
- A bao recipe What is a bao bun, and where can I get one? Is it possible to create vegan bao? What is the best way to steam bao? Is it possible to freeze bao? What is the best way to reheat frozen bao? What is the best way to keep steamed buns warm? What’s up with my bao? It’s not white. Is it possible to produce wholewheat bao?
A version of this recipe was adapted from School of Wok By Jeremy Pang.
- The following ingredients: 420g (3 1/2 cups) plain white flour (all-purpose flour), plus more flour for kneading
- 2 1/4 tsp (1/4 oz or 7g) quick bake yeast (instant yeast)
- 2 1/4 tsp (1/4 oz or 7g) instant yeast
- Baking powder
- 1 tablespoon of sugar
- 1 teaspoon of salt
- 250 g (1 cup) warm water
- 2 tablespoons vegetable oil, plus enough for the bowl and brushing
- 1 tablespoon baking powder
Make the doughfirst rise:
- In a large mixing basin, combine the flour, yeast, sugar, and salt. Stir everything together to ensure that it is well-combined. To make a rough dough, combine the warm water and vegetable oil in a mixing basin until it comes together. Empty the contents of the bowl onto a work surface and knead them together, sprinkling gently with more flour if necessary to keep the dough from sticking to the surface (just try to add as little extra flour as possible). Knead the dough for around 10 minutes
- It will be slightly sticky and rather soft, but it should be flexible and smooth when finished. A stand mixer with the dough hook attachment can also be used to make the dough, if that is what you prefer. Extra vegetable oil should be poured into the bowl you were previously using. Toss the dough into the pan and flip to coat it with oil. Remove from the heat and set aside for 1 hour to rise until doubled in volume (I put it in my oven with the door closed and a baking tray full of boiling water on the rack below – this creates an ideal warm, steamy atmosphere for the dough to rise in)
- Once the dough has doubled in size, turn it out onto your work area and pat it into a broad rectangle with your hands. Sprinkle the baking powder evenly over the surface of the dough, roll it up, and then knead for another 5 minutes to ensure that all of the baking powder is integrated.
Shape the bunssecond rise:
- Divide the dough into 20 pieces that are equal in size. Toss each one of them into a ball and sprinkle them with more flour as required to keep them from sticking to the work surface
- Make 20 pieces of baking paper, each about 3.5 inches (9 cm) wide
- Assemble the squares as follows: Take each ball of dough and flatten it out into an oval approximately 3.5 by 4.5 inches in size, then cut it into squares (9 x 12 cm). Vegetable oil should be lightly brushed onto the surface of each oval before baking it. Each oval should be folded in half to form a half-moon shape. Place the individual squares of baking paper on top of the molds. Allow them to rise for 20 minutes on your counter to allow them to get a little puffy
Steam the buns:
- Remove some of the raised buns from the oven and gently place them into your bamboo steamer – I can fit 3 buns in each tier of my steamer, for a total of 6 buns. Make cautious not to squash the buns when you do this, so drop them into the pan by grabbing the corners of the baking paper square with your fingers. Leaving room for expansion is also important since the buns will rise even higher after they are steamed
- Be careful not to let them touch one other or the rims of your steamer or they will cling together. Place the remaining raised buns on a baking sheet and place them in the refrigerator to prevent them from overproofing while the first batch steams
- Fill a broad saucepan halfway with water, about 1 inch (3 cm) deep. Bring the water to a boil over medium heat, then drop the bamboo steamer into the pot and cover it with the lid. Reduce heat to a simmer and let the buns steam for 6 minutes, or until they are cooked through. Allow it to cool somewhat before removing it from the steamer so that you can steam the next batch
- You may need to top up the water to keep the steamer from running out of water (you may take the dough right from the fridge, there is no need to let it warm up beforehand)
- Eat the buns while they’re still warm! You may reheat them once more by steaming them for about 2 minutes longer if they have cooled down.
FREEZING BUNS:
- Steam all of the buns according to the directions above. Allow the mixture to cool to room temperature before placing it on a baking sheet (with the baking paper squares still attached). Place the tray in the freezer for 1-2 hours, or until it is firm. Place the frozen buns in a resealable plastic bag that has been labeled and dated. Keep frozen for up to 3 months
- To reheat, insert frozen buns into a steamer and steam until warm. Steam for 5-8 minutes, or until the interior is boiling hot.
- If you don’t have easy bake/instant yeast, you may substitute melted butter or lard in lieu of the vegetable oil if you want a softer outcome. If you don’t have easy bake/instant yeast, you can substitute a dry yeast mix in place of the water in the dough. In a large mixing basin, combine the yeast and warm water
- Leave aside for 5 minutes to allow the mixture to bubble up before pouring into the flour, salt, sugar, and oil mixture.
What is a bao bun?
To be honest, naming these bao buns is inaccurate (bao is a Chinese word that meaning bun, so calling them bao buns would be like calling them bun buns). They’re commonly referred to as gua bao, but they’re also referred to be Taiwanese hamburgers in some circles. Although its popularity in the West has expanded with the redundant term bao buns, we find ourselves in this situation. The most common filling is glazed pork belly, although you can very much stuff them with anything you want. In terms of vegetarian fillings, I believe the following formula works well: grilled/deep fried veggies (or tofu/seitan) + anything crunchy (lettuce, carrot ribbons, shredded cabbage) with sauce + pickles (kimchi, red onion/radish, kraut).
Where can I buy bao?
Although I enjoy cooking from scratch, there are times when I simply want something quick and fast, and frozen bao are a blessing in this situation. I get frozen bao in bulk from the large chest freezers in my neighborhood Chinese food store. They go by a number of different names, including ‘gua bao’, ‘double slice bun’, ‘Hirata bun’, and ‘Taiwan burger bun’, among others. If you want to manufacture them yourself, though, continue reading.
Can I make vegan bao?
Yes! Unless otherwise specified, the dish following is vegan (with non-vegan substitutions available if desired). Because I only use water and vegetable oil in this recipe, it is quite simple to prepare. In addition, they are just as fluffy and soft as the ones made with milk and cream. In addition, I have a few of vegan filling options: –Bao with Grilled Asparagus–Bao with Gochujang Tofu
How do you steam bao?
When I lived in Leeds, I bought a 2-layer bamboo steamer from a Korean grocery, which I still have. Online or at bigger Korean, Chinese, or Japanese food stores are good places to look for them. In the absence of a bamboo steamer, a metal steamer will suffice; however, you will not be able to fit as many buns into it as you would with a bamboo steamer (as they are stackable). In order to properly steam bamboo, set the steamer into a large saucepan or pot that it can fit comfortably inside. Fill the pan halfway with water; I normally fill it to about an inch deep and top it off as required while steaming to keep it from drying out.
The most crucial is that the water level does not rise over the base of the steamer, since you do not want the water to come into direct touch with whatever is in the steamer.
Cover with the lid and steam for 20-30 minutes.
Allow the buns to steam for 5-6 minutes before removing the cover to prevent the buns from being overcooked. I use a pair of kitchen tongs to carefully remove each layer of the bamboo steamer from the pan in order to avoid being burned by the steam.
Can you freeze bao and can you reheat frozen ones?
When I make bao, I normally prepare a large batch so that I can freeze the majority of them for later use as quick meals. To accomplish this, steam all of the bao per to package directions. Once they are all lined up on a baking sheet, leave the small paper square on the bottom of each bun so that it may be used to warm them later. Freeze the buns for 1-2 hours on a baking sheet before transferring them to a resealable bag. Make a note of the date and label them for future reference. You may reheat the bao straight from the freezer; simply place a couple into your steamer and steam for 5-8 minutes, or until the bao is heated in the center.
How do you keep steamed buns warm?
Keep them steaming in the bamboo steamer with the cover well closed. They should remain heated in this position for around 10 minutes. Cooking all of the bao ahead of time and reheating them one at a time by steaming for 1-2 minutes before serving them is my preferred method when serving them for supper. As a result, you will always have hot ones to eat.
Why are my bao not white?
The addition of baking powder/bicarbonate of soda to the dough may result in the dough being yellow after it has been steamed. If you don’t properly knead the baking powder into the dough, you may notice that the buns will have small yellow spots on them (this is only an aesthetic issue; the buns will still taste delicious). If you use unbleached flour, which is what most people in the UK use, your buns will not be as white as they may be, which is why they are yellow. If you’re truly wanting that pure white appearance, you may purchase bleached white flour from various Chinese grocery chains.
Can I make wholewheat bao?
Yes! Simply use wholemeal (wholewheat) bread flour for one-third of the flour in the following recipe. They’ll be a little denser and chewier than usual, but they’ll still be wonderful. The use of 50% or 100% wholemeal flour would result in buns that are overly thick and lack fluffiness; this is something I would avoid.
Steamed bao buns
- 525g plain flour, with a little more for dusting
- 525g butter
- 12-tablespoon caster sugar, plus a pinch
- 1 teaspoon quick-action dry yeast
- 50mL milk, 1 tablespoon sunflower oil, plus additional for brushing on top and rubbing on the bottom of the bowl
- 1 tablespoon white vinegar
- 1 teaspoon baking powder
Method
- 500g plain flour (plus extra for dusting)
- 525g butter (plus extra for spreading)
- 1 12 tablespoons castor sugar (plus an additional sprinkle)
- 1 teaspoon quick-action dry yeast
- 50 mL milk
- 1 tablespoon sunflower oil (plus additional for brushing on top and to coat the bottom of the mixing bowl)
- Baking powder
- 1 tablespoon rice vinegar
- 1 teaspoon salt
RECIPE TIPS
Up to the conclusion of step 3, the dough may be readily prepared in a mixer fitted with a dough hook.
FREEZING THE BUNS
The buns can be frozen once they have been cooked. Simply reheat in a steamer once it has been defrosted.
Goes well with
Recipe adapted from the February 2015 issue of Good Food magazine.
Steamed Bao Buns
Detailed instructions and photographs on how to create the ideal, soft, and fluffy steamed bao buns. To create the ultimate handmade bao buns, follow these tips and methods. They’ll be excellent for stuffing with your favorite fillings. In this section, you will find methods for steaming bao buns on the stovetop and in a steam oven.
Bao Buns
It was about 2004 that David Chang introduced his version of Pork Belly Buns to the menu of his restaurant, Momofuku Noodle Bar in New York, and no one could have imagined that the modest bao buns would go on to become an international gastronomic sensation. Even I made a point of getting a table at Momofuku every time I was in New York, no matter how lengthy the line was.
His concept of transforming a normal bao bun into a sandwich or hamburger of sorts, packed with delicious pork belly and a simple garnish of pickled cucumbers, was absolutely brilliant to me.
Homemade Bao Buns
Bao buns were not to be found in Zurich’s stores or restaurants (and this is still the case in 2019! ), so I set out to make my own using a recipe from David Chang’s cookbook, Momofuku, to make steamed bao buns from scratch. After a few years of experimentation (David Chang’s bao bun recipe yields almost 50 buns! ), I settled on the recipe below, which I use on a regular basis throughout the year.
Why This Recipe Works
- Bao buns are a steamed bun that is light, fluffy, and pillowy in texture, and they are ideal for stuffing with your favorite ingredients. Make the bao buns anyway you like using this recipe
- It’s all up to you. This recipe may be used to make bao buns that are filled or stuffed. Once the buns have been rolled out, all that is left to do is fill and shape them before allowing them to rise for the second time according to the instructions. After they’ve been cooked, the bao buns may be frozen and then warmed in the steamer
Steamed Buns
Buns are traditionally circular in form, with a filling that is either char siu or minced pork mixed with slices of Chinese lap cheong sausage and boiled egg. Char siu pork is the most common filling, although other fillings are also popular. Steamed buns can also be cooked simple, that is, without any filling, to serve as an appetizer. Traditionally, in my family, we prepare simple steamed buns, which are circular in form and tied at the top with a twisted knot, to go with roast duck on Sundays.
Bao Buns Recipe
If you’re lucky, your local Asian supermarket may have pre-made bao buns in the freezer part of their establishment. It is possible that this simple bao bun recipe will need some planning and preparation, but you will be rewarded with delectably fluffy handmade buns that will thrill everyone who tries them.
How to Make Bao Buns
Bao buns are made with both yeast and baking powder, which helps the buns rise to their full potential. Begin by combining all of the dry ingredients in a large mixing basin and mixing well. Then, using a measuring jug, pour the heated water and oil into the pan. The water should be somewhat warmer than lukewarm in order to aid in the activation of the yeast, but it should not be boiling hot.
Step 2
The dough for my bao buns is made in my electric stand-mixer; however, you may certainly create everything by hand if you so choose. Using a dough hook on a medium speed, incorporate the liquid components into the dry ones. If you are using a different type of flour than that specified in the recipe, you may require more or less liquid than that specified. You just need a small amount of liquid to bring everything together into a soft dough. Next, with the mixer still running on medium speed, knead the dough until it is soft and smooth to the touch.
Step 3
After the dough has become soft and smooth, I recommend kneading it by hand for a few more minutes on the kitchen counter top to finish it off. In order to determine whether the dough is ready, push your finger into the dough and produce an imprint in the dough. If the dough bounces back, it indicates that it is ready.
If the imprint is still visible, you will need to knead the dough a little longer. Place the ball of dough back into the (clean) mixing basin and set the bowl somewhere warm for around 60 to 90 minutes, or until the dough has doubled in size, to rise and expand.
Step 4
As soon as the dough has doubled in size, punch it down and knead it by hand for around 5 minutes to remove any air bubbles that may have formed in the dough. Afterwards, roll out the dough until it is approximately one centimeter in height. Rub a little amount of oil onto the surface of the dough with your hands. Using this method, you will be able to avoid the dough from sticking together later on while shaping the buns.
Step 5
To cut out rounds from the dough, use an 8 cm (3 inch) diameter cookie cutter. Continue to re-roll the dough as needed until you have used up all of the dough in the recipe.
Step 6
Place the rounds on a small sheet of baking paper – I prefer to use simple white cupcake wrappers that I flatten with a rolling pin to make them easier to handle. This saves me the time and effort of having to cut a sheet of baking paper into little pieces before using it. Then, using a rolling pin, carefully flatten the dough to make the bun shape. Repeat with the remaining rounds.
Step 7
Set everything on a big baking sheet, cover with a tea towel, and set it aside somewhere warm for approximately 30 minutes to let the buns to rise again and become more puffed. It should have taken around 10 minutes for the bao buns to rise somewhat and puff out a little.
Step 8
In the meantime, heat the steamer on the stovetop (see notes below). The buns should be steamed in batches for 10 to 12 minutes, or until they are fluffy and soft, and the insides are cooked through.
How to Proof Dough
The yeast in the dough must be activated in a warm atmosphere in order for the dough to rise properly. You might try one of the following suggestions if you don’t have a warm spot in your house:
- In the oven with the oven light turned on (this is only applicable to certain ovens)
- On the lowest shelf of the oven, there is a baking plate filled with boiling water. Use around 1 litre (4 cups) of water, then top it up after approximately 1 hour of cooking
- Cook at a low temperature of around 25-40°C (77-104°F) in the oven or a steamer oven
How to Steam Bao Buns
- Using a bamboo steamer to steam bao buns is a terrific way to save money, and Asian grocery shops usually have a big selection of sizes available at reasonable costs. Aside from the low cost, another advantage of bamboo steamers is that they are attractive when used to serve food at the table. I recommend that you get the largest steamer that will fit your saucepan and stovetop. In order for it to work properly, the bamboo steamer must be the same size as the saucepan you are using below it. To illustrate this point further, if you are using a bamboo steamer with a diameter of 12 inches, your saucepan should likewise be 12 inches in diameter
- If you plan to make bao buns (or even dumplings) on a regular basis, I recommend purchasing at least two steamer baskets that can be stacked on top of each other to reduce cooking (and waiting) time
- If you plan to make dumplings, I recommend purchasing at least two steamer baskets that can be stacked on top of each other. For those who are serious about creating bao buns, I recommend investing in a multi-tiered metal or stainless steel steamer, which can be found at most Asian grocery shops or online. These are also available in a variety of sizes and have the added benefit of being dishwasher-safe
- Fill the saucepan about one-third of the way with boiling water, and then lay the steamer baskets on top of that. Place the pot with the steamer baskets on the stove over a low-medium heat and cook for 10 minutes. There is a chance that the bao buns will overcook or even turn soggy if you steam them at a high enough temperature
- However, if you steam them at a lower temperature, the buns will be OK. Place the bao buns in each steamer basket, leaving enough space between them for them to rise and expand during cooking. Cover and steam for approximately 10 to 12 minutes, or until the buns have risen and are light and fluffy when opened.
Tips For Making Bao Buns
- Plain flour (all-purpose flour) is fine for this recipe, since the cornflour (cornstarch) will aid in giving the buns a light and fluffy texture due to the use of cornstarch. It is not necessary for the buns to be a blinding white as those available in Chinese restaurants
- Nonetheless, the taste and texture should remain the same. To get the pure white appearance of buns found in Chinese restaurants, I recommend using bleached flour, which can be obtained at Asian grocery shops or online. In order for the dough to rise properly, it must be kneaded for the necessary period of time. It is possible that failing to knead the dough adequately can result in buns that are blotchy in appearance (but still taste delicious), and this is due to not mixing the ingredients together well enough and/or failing to remove all of of the air bubbles from the dough. To prevent the buns from becoming soggy, steam them on a low-medium heat until they are just cooked through.
How to Make Steamed Bao Buns with a Steam Oven
The following methods should be followed for proving the dough as well as steaming the bao buns in an electric steam oven or a combi-steam oven:
- First Proof: Place the dough in a large basin that has been gently greased and let aside for 30 minutes. Use some cling film or a disposable bowl cover to keep the contents of the bowl safe. For approximately 1.5 hours, or until the dough has doubled in size, proof the dough in the steam oven/combi-steam oven at 40°C / 104°F
- First, form the bao buns and set them on a tiny piece of baking paper each, then transfer them to a big tray that will fit inside your steam oven/combi-steam oven. Second, proof the bao buns. I can put a big sheet pan into my steam oven, which will adequately accommodate 12 bao buns. There is no need to wrap the buns with plastic wrap. Proof the bao buns in their formed forms at 40°C / 104°F for around 30 minutes, or until the buns have swelled up significantly
- Steaming the Bao Buns: Remove the tray of bao buns from the steam oven/combi-steam oven and place it on a baking sheet. Raise the temperature to 100°C / 212°F if necessary. As soon as the steam oven/combi-steam oven has reached the desired temperature, return the tray of bao buns to the oven and steam them for 10-12 minutes.
Freezing Bao Buns
Bao buns are ideally consumed fresh, and as soon as they are steamed, if at all possible. Bao buns can be preserved in zip-lock bags in the freezer for up to two months if they are not used immediately. To reheat frozen bao buns, just steam them for about 5 minutes, or until they are thoroughly warmed through.
What to Serve with Bao Buns
One of my favorite ways to serve bao buns is to stuff them with char siu pork and pickled veggies that I make in a flash. For further information, please refer to my recipe for Sticky Pork Bao Buns. Other excellent toppings for bao buns include the following: Braised Short Ribs with Asian Flavors Pickled Chillies, Chinese Barbecue Pork (Char Siu Pork), and other condiments Print
Steamed Bao Buns
★★★★★4.8from32reviews
- The resting time is 2 hours, the preparation time is 1 hour, the cooking time is 10 minutes, and the total time is 1 hour 10 minutes. This recipe makes 12-16 buns. Recipe Type:Bread
- Cooking Method:Stovetop
- Cuisine:Chinese
Instructions on how to create the ideal, soft and fluffy steamed bao buns, complete with images. To create the ultimate handmade bao buns, follow these tips and methods. They’ll be excellent for stuffing with your favorite fillings. There are directions for steaming the bao buns on the stovetop and in a steam oven included in the recipe.
Ingredients
- 300 g (2 cups) plain flour (all-purpose flour) or unbleached flour
- 125 g (1 cup) cornflour (cornstarch)
- 5 tablespoonscaster sugar (super-fine sugar)
- 1 teaspooninstant yeast (also known as instant dried yeast or fast-action dried yeast) (see Kitchen Notes)
- 2 1/2 teaspoons baking powder
- 180 ml (3/4 cup) warm water
- 60 ml (1/4 cup) vegetable oil, plus extra
- 300 g (2 cups) plain flour (
Instructions
a total of 300 g (2 cups) plain flour (all-purpose flour) or unbleached flour; 125 g (1 cup) cornflour (cornstarch); 5 tablespoonscaster sugar (super-fine sugar); 1 teaspooninstant yeast (also known as instant dried yeast or fast-action dried yeast) (see Kitchen Notes); 2 1/2 teaspoons baking powder; 180 ml (3/4 cup) warm water; 60 ml (1/4 cup) vegetable oil, plus extra; a total of 300
- In a large mixing bowl or the bowl of an electric stand-mixer (if using), combine all of the dry ingredients
- Mix well. Using a measuring jug, pour the heated water and oil into the pan. The water should be somewhat warmer than lukewarm in order to aid in the activation of the yeast, but it should not be boiling hot. Mixing the liquid components into the dry ingredients using the dough hook at a medium speed is recommended. If you are using a different sort of flour than what is specified in the recipe, you may require more or less liquid than is specified in it. Continue kneading the dough on medium speed until the dough becomes soft and silky to the touch until you’ve achieved a sticky dough consistency. This should take around 10 minutes with a stand mixer on medium speed, or approximately 5 minutes if done manually. After the dough has become soft and smooth, I recommend kneading it by hand for a few more minutes on the kitchen counter top until it is elastic. Replacing the ball of dough in the (now-empty) mixing bowl
- Use some cling film or a disposable bowl cover to keep the bowl covered. Placing the bowl in a warm location for 60 to 90 minutes will allow the dough to rise and double in size.
In order to form the buns
- To remove any air bubbles that may have formed in the dough, punch it back and knead it by hand for around 5 minutes after it has doubled its size. Then, using a rolling pin, roll out the dough until it is approximately 1 cm in height. Rub a little oil into the surface of the dough with your hands
- To cut out rounds from the dough, use an 8 cm (3 inch) cookie cutter. Re-roll the dough as many times as necessary. Place these circles on a small piece of baking paper – I prefer to use simple white cupcake wrappers that I flatten with a rolling pin – and set them aside to dry. Fold each circle in half and then gently flatten the dough with a rolling pin to make the bun shape
- Set everything on a big baking sheet, cover with a tea towel, and set it aside somewhere warm for approximately 30 minutes to let the buns to rise again and become more puffed. After this period of time, the bao buns should have inflated up a little.
In order to steam the buns
- In the meantime, prepare the steamer on the stove (see the Kitchen Notes section below). Puff and soften the buns by steaming them in batches for 10 to 12 minutes or until they are completely cooked through
- Serve the buns as soon as possible.
Kitchen Notes
The many types of yeast* Please keep in mind that there is a difference between instant yeast (also known as quick dried yeast or fast-action dried yeast) anddried yeast while baking (also calledactive dry yeast). When in doubt about the sort of yeast you have, look for instructions on how to utilize it on the package. If you use instant yeast, you may add it right to the flour mixture without having to wait for it to activate first. If you don’t have instant yeast, I would recommend using the same quantity of dried yeast as you would with instant yeast.
- Combine the dry ingredients in the recipe above with the yeast mixture and vegetable oil, and mix well.
- Although the buns will be a pale yellow in color, they will taste delicious.
- INSTRUCTIONS FOR STEAMING BAO BUNS* Place the steamer basket (whether bamboo or other material) directly on top of a saucepan that has the same size and shape.
- ***Place the steamer basket on top of the saucepan.
- Place the lid on top of the steamer basket and close the lid tightly.
- How to Make Bao Buns in a Steam Oven*First Proof: Cover the bowl with cling film or a re-usable bowl cover to prevent the buns from drying out.
- There is no need to wrap the buns with plastic wrap.
- * Preparing the Bao Buns by steaming them: Take the tray of bao buns out of the steam oven/combi-steam oven and set it aside.
- As soon as the steam oven/combi-steam oven has reached the desired temperature, return the tray of bao buns to the oven and steam them for 10-12 minutes.
To reheat frozen steamed buns, place them in a stovetop steamer for approximately 5 minutes, or until they are completely warmed through. CONVERSIONSIf you need to convert from cups to grams, or vice versa, you may use this handyConversion Chart for Fundamental Ingredients.
eatlittlebird
This recipe was initially published on May 17, 2019 and has since been updated. More detailed recipe notes have been added to the original version.
How to Make Steamed Bao Buns (Gua Bao Buns)
Do you enjoy bao buns? They’re wonderful for adding an Asian flair to sandwiches, and because they’re created with such simple ingredients, they’re even better than buying them from the bakery in the first place! Bao buns are a wonderful thing to have on hand at all times. Gua Bao is a dish that I particularly enjoy creating, and that is where these bao buns come in. They are a necessary element in the preparation of gua bao, however a variety of other delights can be placed inside these buns as well.
When it comes to the fillings, you have a lot of freedom.
Steamed bao buns have a light, fluffy texture, which is due to the steaming process.
Bao Buns cooking process
While the components are simple, the method of creating steamed bao buns may be a little difficult, even with the simple ingredients. So, when you check down below, you’ll find I’ve prepared extremely extensive step-by-step directions, along with images and a video, so you’ll feel as if I’m right there with you in your kitchen, preparing delicious bao buns. I’ve also attached some troubleshooting notes for your reference.
Part 1 – prepare the dough1st rise
- In a large mixing bowl, combine all of the dry ingredients
- Add the wet ingredients to the dry ingredients
- Then, using an electric mixer (although this step can be completed by hand), knead the dough. Allow the dough to rest for 10 minutes once it has been covered. Knead the dough for a minute or two. Allow the dough to rest for another 1 hour or more.
Part 2 – divide the dough
- After the dough has doubled in size, it is ready to be used. Make one more gentle kneading motion with the dough
- Cut the dough into pieces that are equal in size. Bringing the dough together into a ball is the next step. Rolling the dough will help it to become a dough ball even more. Keep the dough covered with plastic wrap at all times when working on the remainder of the dough
Part 3 – form the buns, 2nd risecook
- Each dough ball should be rolled out into a long oval shape. Apply oil to it (this will allow the bun to split more readily afterwards)
- To form the bun, fold the oval dough in half. Place it on a piece of parchment paper
- Then fold it in half. Allow the buns to rise one more before baking
- In the case that you’re using a metal steamer, place some towels beneath the lid to prevent the water from leaking onto the buns. Before serving, steam the buns for a few minutes and then set them aside, covered with a lid. You may either serve the buns right now or save them in the freezer for later use.
The keys to making bao buns and troubleshooting
This is a fairly typical problem with steamed buns, and it’s usually caused by a rapid rise and/or drop in pressure when the buns are being steamed. You should do the following to avoid it:
- Slowly bring the bun dough to a boil in the steamer. Do not bring the water to a boil in the steamer and immediately add the steaming rack. Instead, lay the steamer over the pot of water and begin cooking immediately. As a result, the temperature of the steamer rack would steadily rise
- During the steaming process, use a medium or medium-low heat setting. A combination of high heat and fast steam may also cause the buns to burn. After cooking the buns, allow them to cool for at least 10 minutes without lifting the cover. This is critically crucial. As a result, the pressure in the steamer will gradually decrease.
The buns deflate after steaming
Over-proofing is frequently the source of this problem. If the dough has risen too much, it will expand during the cooking process before collapsing. However, the problematic part is that the proofing time can vary significantly depending on your location and the components you choose (e.g. how fresh your yeast is). In order to avoid this problem, we utilize instant yeast instead of active dry yeast in our recipe. You will, however, need to keep an eye on the dough and use your judgment and expertise to determine when the dough has risen sufficiently.
The buns have expanded too much and look weird
Excessive proofreading might also contribute to this problem. The buns will be particularly fluffy after they are finished baking, and this will have no effect on the flavor, but they will not be as attractive. In order to get the solution, you can refer to the text above.
Afterthoughts
Making flawless bao buns takes a little patience and a lot of experience, but it is possible. However, the end effect is quite satisfying. Once you’ve created them, you’ll discover a plethora of applications for them. Make sandwiches out of them using leftover meat from supper and fresh vegetables, and take them to work for lunch. Add some quick pickled shallots to them for an extra kick of flavor. Believe me when I say that you will discover ways to make bao buns a mainstay in your kitchen. Because making bao buns is a time-consuming procedure, you may (and should!) create more than one batch.
They are freezer and refrigerator safe, so you may have a supply of them on hand at all times for emergencies. After that, it would be simple to indulge in bao buns whenever the mood hits. Look for my Gua Bao recipe to discover one of the most delicious ways to eat your bao buns!
How to use bao buns
Try these recipes for the ingredients you’ll need to make exquisite Asian sandwiches in your own home!
- Chinese BBQ Pork (Char Siu, )
- Chinese Bang Bang Chicken (Bang Bang Chicken, )
- Chinese Pickled Peppers (Quick Pickled Pao Jiao)
- And more dishes. Duck Breast with Moo Shu Vegetables and Homemade Hoisin Sauce
- Crispy Chinese Duck Breast
Are you interested in learning more about Chinese cooking? To receive the 5-Day Chinese Cooking Crash Course and recipe updates, please sign up for my mailing list here. Be the first to know about new recipes from our 5-Day Chinese Cooking Crash Course! Subscribe
How to Make Steamed Bao Buns (Gua Bao Buns)
Do you enjoy bao buns? They’re wonderful for adding an Asian flair to sandwiches, and because they’re created with such simple ingredients, they’re even better than buying them from the bakery in the first place! Course:Side Cuisine:Chinese Keyword:restaurant-style Preparation time: 30 minutes Preparation time: 20 minutes 1 hour and 30 minutes of resting time Time allotted: 2 hours and 20 minutes
- 2 cups all-purpose flour
- 3g (1 teaspoon)instant yeast
- 3g (1 teaspoon)baking powder (double-acting)
- 10g (2 teaspoons)sugar
- 1/8 teaspoon salt
- 180ml (3/4 cup)full-fat milk, cool or at room temperature
- Vegetable oil for brushing
- 290g (2 cups)all-purpose flour
Form the Dough + 1st rise
- In the bowl of a stand mixer fitted with the paddle attachment, combine the flour, yeast, baking powder, sugar, and salt. Slowly pour in the milk, stirring constantly using a spoon or spatula to incorporate the flour. Once the liquid has been completely incorporated, switch on the mixer and knead for 5 minutes, or until the dough has formed a hard and gritty ball. Alternative method: Knead the dough with your hands for about 10 minutes until it becomes smooth and elastic. Allow the dough to rest for 10 minutes once it has been covered with plastic wrap. After 10 minutes, knead the dough with your hands for another minute or so, until it is smooth and elastic. Wrap the dish with plastic wrap. Allow the dough to rest for approximately 1 hour, or until it has doubled in size. While the dough is rising, cut out 10 squares of parchment paper approximately the size of your hand to use as a steaming tray for the buns while they steam
- Optional: If you’re cooking the gua bao filling and quick pickled shallots on the same day, prepare them at this time
- Otherwise, wait until the next day.
Divide the dough
- As soon as the dough has doubled in size, gently punch the dough with your palm to remove the air bubbles trapped inside. Knead the dough for 1 minute
- Divide it into 2 equal pieces, and then further split each piece into 5 smaller pieces
- Set the dough aside. In order to achieve a more exact result, weigh the dough to ensure that it weighs 48 grams each piece on the scale
- Using one at a time, work on the dough pieces, shaping them into balls by squeezing the loose ends into the base until the dough is tight and spherical. Then, using a hand that is formed like a dome, roll the dough on the table, softly pushing the dough to make a spherical ball. To keep the dough balls from drying out, place them on a big platter and cover them with plastic wrap
Shape the buns2nd rise
- Place the dough balls on a clean work area with the pinched side facing down. Roll each ball into a 1/4′′ (1/2 cm) thick oval that is twice as long as it is broad (about 2.25″ x 4.5″/ 5.5 cm x 11 cm) with a rolling pin. In order to smooth out the dough oval, flip it over and softly roll it again. Brush a small coating of oil on the top of the dough oval (*Footnote 1), fold the oval in half, and set it on a piece of parchment paper that you previously prepared
- Stack the formed buns in a steamer basket, allowing at least 1 inch (2.5 cm) of space between each bun. Cover and let aside for another 15 to 30 minutes before cooking, or until the dough has increased in size by 1.5 times.
Cook the buns
- As soon as you have finished shaping the first batch of buns, start preparing the steamer by filling the bottom with water. When the buns have risen for the second time, place the covered steamer rack with the raised buns over the steamer and cover the steamer with a lid. In order to prevent water from leaking through the lid of a metal steamer, place two layers of clean kitchen towels between the steamer rack and the container lid. Cook, covered, over medium heat until steam begins to escape from the pot, then reduce the heat to medium-low and continue cooking until the steam stops. Continue to steam for another 10 minutes
- After 10 minutes, turn off the heat but keep the cover on for another 5 minutes to finish steaming. Close the cover tightly for the time being. If the buns are not given enough time to rest, they may deflate. Remove the buns from the oven and place them on a wire rack to cool. The rest of your buns may be cooked in the same steamer as the first batch.
Workflow note
- It is likely that depending on the size of your steamer, you may need to cook the buns in many batches. While you’re heating the first batch of buns, the second or third batches of buns may have been created and rested while you were cooking the first batch. In this scenario, put the buns to a large dish and wrap them tightly in plastic wrap to keep them fresh. Place the buns in the refrigerator to allow the rising to be slowed. Wait until the previous batch of buns has been baked and cooled. Start by removing the buns from the fridge and allowing them to come to room temperature for 2 minutes before beginning to steam them. It is critical not to allow the buns to rise too much throughout the baking process. If the buns are allowed to rest for an excessive amount of time, they will get deflated when steamed.
Serve, storereheat
- Once the buns have been steamed and allowed to cool somewhat, you may use them to create gua bao, serve them with moo shu chicken, or stuff them with any braised meat of your choice. Storage options include storing the steamed buns in an airtight container in the refrigerator for up to 4 days or in a firmly sealed ziplock bag in the freezer for up to three months. If you want to reheat the chilled buns, set them on a dish and cover them with a layer of damp paper towels before heating them in the microwave. If you like a softer outcome, you may steam the buns instead of baking them. In order to reheat the frozen buns, place them immediately in a steamer without first thawing them, and steam until they are completely melted. The buns should be thawed before reheating in the microwave
- Else, they will be soggy.
- Using oil will prevent the buns from sticking together and allowing them to be easily separated once they have been steamed
Serving:1serving, Calories:118kcal, Carbohydrates: 24g, Protein: 3.5g, Fat: 0.6g, Saturated Fat: 0.2g, Cholesterol: 1 mg, Sodium: 37 mg, Potassium: 72 mg, Fiber: 0.9g, Sugar: 1g, Calcium: 14 mg, Iron: 1 mg Please let us know if you give this dish a go. Comment, rate it (once you’ve tried it), and upload a photo to Instagram with the hashtag #omnivorescookbook to show your support! I’m looking forward to seeing what you come up with.
More homemade dim sum recipes
- Baked BBQ Pork Buns (Char Siu Bao)
- Chinese Scallion Pancakes ()
- Pineapple Buns (Bolo Bao)
- Wonton Soup
- Chinese Turnip Cake (Lo Bak Go, )
- Chinese Turn
Lilja Walter is a member of the Omnivore’s Cookbook team, and she collaborated with Maggie on the development and testing of this particular dish.