
Buns
How To Do Different Buns
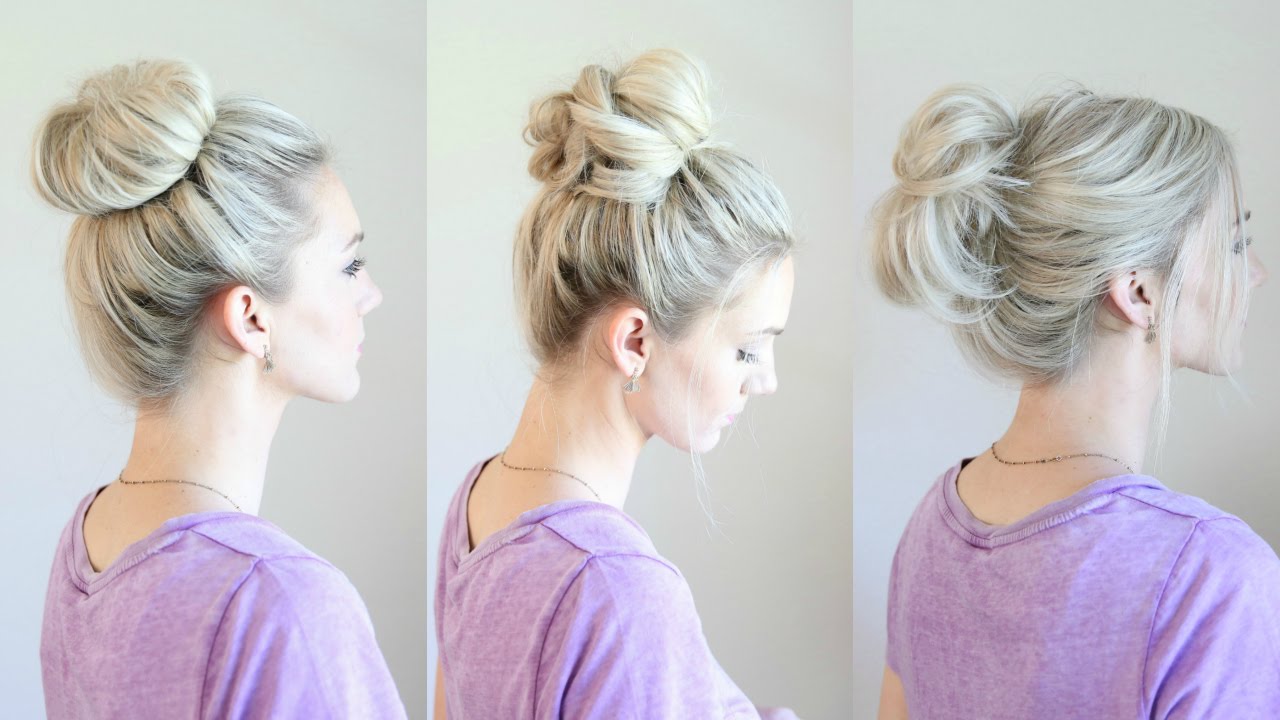
Jan
Top 25 Messy Hair Bun Tutorials Perfect For Those Lazy Mornings! – Cute DIY Projects
What if you wake up late for work and discover that your hair has taken on a life of its own and refuses to stay in one style no matter how hard you try to make it seem nice? If you are a professional who strives to maintain a professional appearance for work, you will undoubtedly appreciate these messy hair bun techniques, which will allow you to get the ultimate look in minutes with nothing more than a few hair pins and some hairspray as an accessory! Here are 25+ fantastic instructions to get you started on your next project!
1. Dutch Braids Combined With A Low Messy Bun
The high messy bun, which is a perfect choice for sophisticated ladies who want to present themselves in a more official and professional manner, and the low messy bun, which has a more relaxed appearance, are two distinct sorts of messy buns that you may choose from. You will learn how to create basic yet appealing Dutch braids and how to arrange them into a charming tiny low messy bun in this great hair video that only takes 6 minutes to complete. Despite the fact that it is rather volatile, this technique is ideal for a casual night out with your friends, however it may also be worn to work during the day.
Also, although though this hair lesson is done on a light-haired lady, it will work just as well on ladies with slightly darker tones of hair, so feel free to give it a shot!
2. An Insight Into The Art Of Messy Buns!
On the surface, sloppy buns appear to be a bit “forgotten,” but if you pay attention to the minor details (which can sometimes make the difference between a brilliant hairstyle and an amateur one), you will notice that there is a whole strategy behind the traditional messy bun. This is a basic lesson that will guide you through the process of creating the ideal messy bun in three simple steps: After you have pulled your hair into a loose and relaxed ponytail, gently separate the different portions of your hair, and teasing the sections that lack volume, the next step is to style your hair as desired.
Simply spritz your hair with hairspray to keep everything in place and you’re set to go!
3. Bouffant Bun!
While the French term “Bouffant” actually alludes to the high volume that many women like in their hair, this great hair lesson on how to get a stunning, natural bouffant bun is the ideal one for you if you have extremely thin and brittle hair and you feel that it looks boring and lacks volume. However, if your hair is not as “rich” as the rest of the girls’ and you find that it always adheres to your head (particularly during those terribly hot summer days), the bouffant bun is the best option for you.
Furthermore, with a few bobby pins, you may customize your bun to fit your work or leisure clothes nicely!. Freckled-fox is the source of this tutorial and the tutorial itself.
4. Two Minute Elegant Bun!
The French word “Bouffant” actually refers to the extreme volume that many women enjoy in their hair – if you have very thin and frail hair and you are concerned that it appears dull and lacks volume, then this amazing hair tutorial on how to create a lovely and natural bouffant bun is the best one for you! Most of the females can easily tie their hair into a bun and get away with it, but if your hair is not as “rich” and you feel that it continually adheres to your head (particularly during those incredibly hot summer days), the bouffant bun is the correct choice for your style.
Furthermore, with a few bobby pins, you may customize your bun to match your work or leisure clothing nicely!
5. Messy Top Knot!
The following is yet another incredibly quick and uncomplicated hair bun lesson that has a somewhat disheveled touch to it – a touch that makes it stand out and that matches great with any casual wear! However, this messy top look can be created with only a few bobby pins or an elastic band, since all that is required is that you pull all of your hair together and bind it on top of your head with the elastic band or bobby pins. As a last touch, be sure to leave two little parts on either side of your face – you may either straighten them or curl them, depending on whether you want to go for an angular or chiseled style.
6. Messy Bun Updo!
When it comes to updos, there is nothing better than a messy bun updo: it is quick and easy to do while still being adaptable enough to be worn for special occasions and parties. This sloppy side bun will express “I want to look beautiful and I like to experiment with new styles,” on the other hand, if you are the stylish sort of girl who always dresses to impress and who wants to appear immaculate at any moment of the day. As a whole, the messy side bun updo is a fantastic choice for teens and young adults, but it would also look amazing on girls in their early 30s.
pophaircuts.com is the source and tutorial for this haircut.
7. Make Your First Messy Bun!
If you have never attempted a messy bun before and are feeling a little lost, Marie Claire will come to your aid with this comprehensive and very detailed instruction on how to construct a wonderful messy bun, from beginning to finish, from beginning to end. In addition to having an entire section dedicated to beauty, Marie Claire is one of the most widely read women’s fashion and lifestyle magazines in the world. If you enjoy wearing loose clothing and experimenting with different hairstyles, this messy bun is a fantastic choice for you.
For those of you who enjoy combining different clothing pieces and adding your own unique touch to them, this haircut will undoubtedly be right up your alley, as it will give flair and individuality to your ensemble. marieclaire is the source and the tutorial.
8. Simple Messy Bun For Medium Long Hair
Making a messy bun appears to be a very basic and uncomplicated operation, regardless of whether you have shoulder-length hair or waist-length hair, but the reality is that the longer your hair is, the more difficult it is to tie it up in a bun that will last the entire day. You should be able to pull off a stunning bun with shoulder-length hair, and this guide will show you how to do it in minutes if you have shoulder-length hair. Using the proper elastic bands for hairstyles is critical – ones that are not intended for general usage can only harm your hair, so exercise caution while using them.
9. Versatile Messy Bun
This messy bun technique is particularly noteworthy due to the fact that it is intended not only for ladies with extremely long hair, but also for those with hair that is rather short in length. To be clear, the training will be beneficial to every woman, including those with really thin hair. In order to add volume to your thin hair, start by teasing it with a little comb and hair spray, then pulling it up and securing it in a sloppy high bun with elastic bands. If, on the other hand, Mother Nature has been very kind to you and your hair is so rich that you have a difficult time keeping it in a bun, you may wish to straighten it first before attempting to capture it in a bun.
byebyebeehive.com is the source and tutorial.
10. Sexy Loose Buns For Those Lazy Days!
Sometimes you just want to seem effortlessly trendy and beautiful, and who says you can’t do that with a little effort? For a polished appearance, you don’t need to spend hours in front of the mirror – instead, all you need is a dark red lipstick, some mascara, and this lesson that will teach you how to create your own seductive loose bun. In situations where you have a tight schedule at work or are running late for a date, this seductive loose bun lesson may truly rescue the day – have a look at it and the loose bun will soon become your new favorite beauty trick!
11. Simple Messy Hair Updo In Seven Easy Steps!
Was it that your hair became tangled and oily, but you just did not feel like washing it at that time? If this is the case, you already know that you need to tie your hair up in a bun or a tight updo, because wearing it loose will simply make it seem greasy and untidy, which is not what you want. With a few elastic hair bands, you can easily create a basic but extremely elegant untidy hair updo in only seven simple steps, as demonstrated in the video below. All that is required after you have thoroughly combed your hair is for you to tie your hair up in a loose ponytail, then grab one end of the ponytail and carefully wrap it around the base of your head – once you have completed this step, the final step is to secure your messy hair updo with another elastic band.
To ensure that your updo remains in place for the duration of the day, you may try winding the band around it two or three times around the hairstyle. Weheartit.com is the source and tutorial for this image.
12. Simple Fancy Bun!
Obviously, this isn’t the sort of bun that you’d want to put on all of the time, but it’s a fantastic option for those special events or times where you want to save money by doing your own hair instead of hiring a professional. This simple fancy bun tutorial requires only a hair curler, which you will use to carefully curl all of the sections of your hair, some gentle styling products, such as hair balm or oil, which will add extra shine and smoothness to your hair, and finally, some elastic bands and bobby pins, which will assist you in creating the fancy updo bun and keeping it all in one place.
Peinar is the source and the tutorial.
13. Perfect Messy Bun For Music Festivals
Summer has finally here, and we all know what that means — it’s time for the music festival season to get underway! When it comes to long hair, no matter how lovely and feminine it is, it may become exceedingly tough to manage during the hot summer days, when you tend to sweat and your hair can become tangled. If you are unable to cut your hair during the summer months, don’t worry — there is always a remedy for almost every hair problem you may be experiencing. As a result, a wonderful messy bun is created, which is excellent for hippies and other cool ladies who enjoy attending outdoor music festivals — and not only for those reasons.
Freckled-fox is the source of this tutorial and the tutorial itself.
How to Do a Messy Bun? 10 Easy Bun Hairstyle Tutorials for 2021
When your alarm clock goes off half an hour ago and you have less than 10 minutes to get dressed and be on time, it’s an embarrassing situation to be in. God rescue the sloppy bun, top knot, or «I ain’t got time for this today» bun from becoming a thing of the past! Whatever you choose to name it, one thing is certain: we can’t get enough of these quick and simple messy buns. What is the best way to style a sloppy bun? This quick, cute, and uncomplicated hairdo can suit your comfort demands for an evening exercise or a barbecue weekend, will fit the dress code for the office, and will showcase your charm on a date with your significant other.
How to – Easy Messy Bun Tutorials 2021
Follow me on Instagram: cravemyvibess You can get lost in the sea of do-it-yourself hair bun lessons on Instagram, but here’s how to make a messy bun that won’t fall apart. TikTok videos, Missy Sue life hacks on how to do easy hair buns for beginners, and YouTube messy bun videos are all examples of what you may find. So, what is the step-by-step procedure for creating a messy bun? Are you still perplexed? Please have a look at our super-easy instructions for all hair types. Additionally, you may view this video instruction.
16 Untraditional Ways to Wear Your Hair in a Bun
The bun is a tried and true hairstyle that has stood the test of time. With the bun, you can toss your hair up in a secure bun for the gym, for work, or even for a night out on the town, all while feeling comfortable, appearing calm, and looking fashionable. What is the bun’s secret to doing so much?
We think it’s past time to offer something back. Even while your regular old bun is perfectly OK, it’s past time to spice things up a little bit! Consider incorporating one (or all) of these 16 unusual buns into your daily routine to add some flare to your hairdo.
Slicked Looped Bun
- Cosmopolitan The ideal hair bun for the second day. In order to get the desired style, apply some oil to your hair for an extra slick finish, and make sure your part is really precise. In order to create the bun, draw your hair into a low ponytail and pull it through the hair tie, but not all the way, to create a clearly looped bun. Almost everything in this style exudes coolness
Knot Bun
- Refinery29 This tied bun is one of the simplest hairstyles you can find. Separate your hair into two parts and knot them together in the same manner as you would your shoelaces to finish. Depending on how long your locks are, you may need to tie them many times. Then, using bobby pins, secure the ends of the bun and keep it in place.
Pretty Pinned
- Cosmopolitan Your bun enjoys a little glitz and glam, just as much as you do! Choose a stunning pin to truly bring attention to your bun. You can’t go wrong with glistening metallics, can you?
Rolled Bun
- Hairstyles that are currently popular Instead of twisting or tying your bun, consider rolling it for a more distinctive appearance. Begin by separating your hair into two low pieces that are both twisted, then tying them both together in the back. Continue to roll your gorgeous new bun upward after looping the pony tail through the opening you’ve created. Pin the bun into place and take ownership of it
French Braided Bun
- CosmpolitanNot only is this bun wonderful to wear to brunch with the gals, but it could also be worn as an easy updo for a more formal occasion! Begin by creating an inverted French braid (in which the pieces are positioned under rather than over the braid to give it a broader appearance) on the top of your head, beginning at the hairline. Tie the surplus of hair back into a bun
Twisted Top Knot
- Lipstick Alley is a slang term for a collection of lipsticks. Given that we’re on the subject of braids, we’re particularly taken by this twisted top knot. Braid your hair all the way up. As soon as all of the strands are braided (and the braids may be whatever size or shape you choose) gather the braids on top of your head and bind them into a single large braided ponytail. Create a quirky, twisted top knot by twisting the parts over each other and putting them in place anywhere you wish.
The Double Bun
- Cosmopolitan This is a highly popular fashion trend right now. Make two sections of hair: one bigger section at the nape of your neck for the top layer of your hair and one smaller section at the base of your neck for the under layer of your hair. Pull both sections of hair into sloppy buns for an immediate dose of elegance. What’s the other way to wear this look? You may also try a double bun on either side of your head, similar to pigtails. just buns are available
The Cotton Candy Bun
- Vanilla Extract is a flavoring agent that is used to enhance the flavor of baked goods. It sounds delectable, doesn’t it? Although you can’t eat it (that would be odd.), it appears to be almost as entertaining as cotton candy itself! The secret to creating this gorgeously frizzy bun is a generous amount of hairspray and a technique known as “teasing,” which is just brushing your hair backwards to produce intended frizz. We never believed we’d say something like that
Half-Bun
- CosmopolitanFor a simple, uncomplicated appearance, take the top layer of your hair from behind your ears and twist it into an untidy little half-bun on top of your head. To complete the appearance, be sure to drag some pieces down in front of your ears. (P.S. I’m now sporting this hairdo, which I really like.)
Braid Around Bun
- The Department of Cosmetics If you have a lot of hair, this is a terrific method for you. No matter how many bobby pins you use to hold your hair back in a bun, if your hair is heavy, it may tend to sag when you pin it up. You might try wrapping your hair up around your bun to keep it supported (while still maintaining its attractive appearance). After you’ve removed the underlayer from the bun, you’ll braid the layer in portions. To create a practical and fashionable appearance, wrap the braids around the bun.
Hide That Tie
- The Department of Cosmetics Do you have a neon yellow hair tie that you’re not really pleased with? While it’s possible to require it, that doesn’t imply you have to display it. Construct a bun on the top of your head, then spread the ends out and pin them in a position that you find appealing. If there is any extra sticking out of your hair tie, this is what you will utilize to wrap around the hair tie. If you don’t see it’s there, you wouldn’t know it was there! This method works for short hair as well
- The bun will just be smaller and nicer as a result.
Fake Bangs
- Darling, you are really stunning. Are you looking to experiment with your appearance? Without obtaining bangs, you can experiment with different styles of hair. Faux bangs may be created with a simple bun by tying the ends of your hair together. A terrible haircut, on the other hand, is far more readily rectified.
The S-Bun
- The Department of Cosmetics If you have curly hair, the S-bun will quickly become your new bestie. You’ll want to twist parts of your hair, pinning them in place as you go, then pin them to the other side of your head. If you have any surplus hair on the other side, twist those strands and pin them the opposite direction. This easy-to-follow instruction makes it straightforward to get this complicated-looking haircut.
14.The Pencil Bun
Hairstyles for Girls That Are Adorable This basic pencil may not appear to be particularly attractive, but it can do wonders for your hair and has a strikingly original appearance. You may easily style your hair with a pencil in a few simple methods that take only a few seconds!
15.Simple Messy Side Bun
Hair of the Highest Quality Messy buns are really popular right now. It’s all about the frizz and stray bits when it comes to this style. This sloppy side bun embodies everything we adore about the current fashion trend. It is possible to do this by grabbing little bits and dragging them backwards. Essentially, you’re teasing your hair in little bits with your fingertips to achieve this look. For a voluptuous messy bun, pin each small part in place.
16.Headband Hack
BuzzFeed There are no bobby pins to be found? Seriously, where do they go when they vanish? It’s one of life’s great puzzles, to be sure. In any case, don’t be concerned; you can get the similar appearance by wrapping your hair around a simple headband. Simply put on the headband as you would normally do, and it will effortlessly keep your “bun” in position. This is a fantastic hack for anyone who enjoys working out. So let’s embark on an adventure through this bun-Renaissance (bun-aissance?).
DIY Messy Buns That Only Take Minutes
Messy buns have been in fashion for a long time, but they’re always changing and evolving. Every day, the accessories and methods become sweeter and cuter! Obtaining the ideal balance between untidy and cute, on the other hand, is not always straightforward. Check out these tips to learn how to achieve the ideal messy bun style for your appearance in no time!
1. Reverse braid messy bun
The trend for messy buns has been around for a long time, but the style is always changing. Daily, new accessories and approaches are introduced. Being able to strike the exact balance between sloppy and charming is not always simple, though. Check out these tips to learn how to achieve the ideal messy bun style for your appearance in no time.
2. Back brushed messy bun
Back brushing is a fantastic method for adding volume and thickness to an untidy bun! Using WikiHow, you may learn how to back brush your hair without allowing things to go too out of control.
3. Dutch braid and low messy bun
Missy Sue demonstrates how to get a style that is both quirky and messy! Braids and buns go together like peanut butter and jelly.
4. Three step messy bun
Alternatively, are you more of a step-by-step learner rather than a visual learner? Check out Makeup’s tutorial, which breaks down the method into three easily understandable phases.
5. Bouffant bun
The Freckled Fox demonstrates how to create a little sloppy bun with a traditional bouffant at the front for balance and volume in this video. This design is ideal for both casual and formal attire!
6. Wrapped messy bun
A messy bun is created by wrapping little strands of hair around your ponytail until all of the ends are gathered up, as demonstrated by Makeup Wearables. The end effect is crisp, yet it has a textured appearance!
7. Messy top knot
A high messy bun with bits left hanging is a great way to combine a classic look with a contemporary style!
Three Sweet Peas tells you how it’s done in their own way.
8. Tucked up messy bun
In order to get this messy bun appearance, Pophaircuts pinched the hair and tucked it up and below in portions. As long as you have a sufficient number of bobby pins, this approach is simple.
9. Knotted messy bun
Using Marie Claire’s knotted method, you may get a somewhat more unconventional untidy appearance! Using your hair to tie itself around itself again and over again creates beautiful, untidy loops.
10. Looped messy bun
The technique used by Bye Bye Beehive, which involves looping the hair through an elastic and allowing the ends to hang loose, is ideal for medium to shoulder length hair!
11. Multiple loops messy bun
In the event that your hair is a little longer, consider Bye Bye Beehive’s technique of looping the hair several times instead! The final product will be a little larger and more bold.
12. Curled messy bun
How to make your bun have a little more substance by curling your hair beforehand is demonstrated at Saks. You’ll have more to work with when you start wrapping and tucking parts because of the generous curls in your hair.
13. Messy donut bun
Create a sloppy bun style around a foam hair donut with the help of We Heart It’s video tutorial! The end effect is spectacularly large, bold, and stunning!
14. Loosely tied messy bun
The loose messy bun design from The Freckled Fox is excellent for folks who have long, thick hair and want to look stylish. Wrap an elastic around the bun once or twice and let it to pinch and stick out in the places that it chooses to do so. A pair of pins and other accessories can assist you in keeping stray hairs contained!
15. Reverse side braid messy bun
This is a sophisticated, intricate, and lovely idea that is also rather simple to execute. In this video, Missy Sue demonstrates how to make your swooping sideways braid finish in a sloppy, high side bun. Does anybody else have a favorite sloppy bun technique that isn’t included on this list? Let us know how you do it in the comments section!
50 Pretty Bun Hairstyles with All Types of Buns
This is a sophisticated, intricate, and cute idea that is also rather simple to implement. Make your swooping sideways braid finish in a sloppy, high side bun with the help of Missy Sue’s tutorial. What sloppy bun techniques do you like that we don’t have listed here? In the comments, please describe how you do it.
What Types of Bun Hairstyles Are There?
Buns can be edgy, conservative, trendy, classic, or vintage-inspired – it all depends on your personal choice and the style of your dress. These are the sorts of hair buns that are used to produce the most popular bun hairstyles:
- Low buns: These buns are worn at the nape of the neck and can be either sloppy or sleek in appearance depending on the occasion. When styling the low bun hairstyle, bouffants, twists, braids that go into a bun, and well-chosen accessories are frequently utilized to boost the look. Top knots: Whether it’s a high knotted bun, a sloppy bun, or a cornrow bun, the objective is the same: place the bun on top of the head for maximum exposure. When done correctly, updos with high buns may be quite eye-catching and help to extend the face. The attractiveness of low buns is enhanced by side buns, which do not require any particular introduction because they are plainly seen from the front. These are unquestionably among the most versatile and flirtatious styles of buns to experiment with
- Boiled buns: This hairstyle is formed by braiding hair and then twisting it into a bun, as shown above. It may be as basic as twisting a braided ponytail or as complex as constructing a seashell out of a side fishtail braid
- The possibilities are endless. Chignon buns: Reminiscent of a French twist, chignon bun hairstyles preserve the vibes of trend and sophistication while maintaining their simplicity. An excellent pick for a formal occasion
Half-up buns, pigtail buns, space buns, and bantu knots are all popular hairstyles right now. These are the bun hairstyles that add a humorous twist to your hairdo, whether you’re heading to a festival or just want to celebrate youth and joy in the midst of your normal routine.
Bun Hairstyles Ideas and Inspiration
In addition to half up buns, pigtail buns, space buns, and bantu knots, other hairstyles are also popular right now. The bun hairstyles below will add a humorous twist to your hairdo whether you’re heading to a festival or just want to celebrate youth and pleasure in the midst of your daily routines.
1: French Fishtail into a Lace Fishtail Bun
Braids have evolved into excellent partners for bun hairstyles, but no one has ever integrated a fishtail into a bun quite like this before.
The braid may not completely encircle the bun, but it is an integral element of it! This is just great!
2: Low Bun with a Side Part and Accesories
An ultra-slim side part and a natural cowlick complement each other well in this sophisticated look. To achieve the basic elegance and perfection, twisted buns are a good choice for this long, thick hair, and stylish accessories assist to complete the look.
3: Textured Low Bun Hairstyle
Hairstyle with a textured bun that appears both intricate and effortless at the same time Take note of how the dimensional hair color draws attention to the subtle features of the style.
4: A Perfect Dreadlock Bun
Bun hairstyles are made even more noticeable by the use of unusual colors and textures. It is possible to see the bang part that falls to one side in these rich, burgundy dreadlocks, which have been neatly bunned. You might add a few gleaming beads as an accent to complete the look.
5: Front-Braided Messy Bun Hairstyle
When experimenting with different updos, having a good time with braids is an important part of the process. A waterfall twist may be used as a headband braid, and the rest of the hair can be pulled into a sloppy bun. This sloppy bun updowill look much more attractive with a little bouffant in the back.
6: Basket Weave Braid and a Bun
Abasket weave braids include more strands than a regular French braid, resulting in a chunkier and more intricate-looking plait that may be used to add variety to your updos by including a bun into the design. You may also use a Dutch braid in place of the basket weave to create a charming and somewhat different appearance.
7: Fishtail Braided Bun
Using this fascinating fishtail braid style as inspiration for low bun hairstyles can give you a tremendous surge of inspiration. Stray hairs are a delightful element that lends the braid the appearance of a spikelet, which is what it is. In addition, the fact that no style products are visible is a positive.
8: Loose Side Bun for Wavy Hair
When texture takes the show in your hairstyle, the design may and should be kept as basic as possible to complement the texture. It’s safe to say that this romantic curly bun is sensitive and wonderful to look at. It doesn’t matter if you have naturally curly or wavy hair or use a curling iron to add structure to your hair; the appropriate curls are the most critical part of producing the hairdo you’re going for. Simply direct the waves to one side to make a bun, and then pin it loosely in place until you have an abundance of loose waves throughout your entire head.
9: Upside-Down French Braid into a High Bun
It is possible and desirable to keep the design of your hairdo basic when texture is the main attraction. If there’s one word to describe this romantic curled bun, it’s soft and wonderful. It doesn’t matter if you have naturally curly or wavy hair or use a curling iron to add structure to your hair; the perfect curls are the most critical component of any haircut. Once you have an abundance of loose waves scattered across your entire head, just direct them to one side to make a bun, and then pin it in place with bobby pins.
10: Cornrow Braids into a Bun
When texture takes center stage in your hairstyle, the design may and should be kept as basic as possible. This soft and charming curly bun is the epitome of romance. It doesn’t matter if you have naturally curly or wavy hair or use a curling iron to add structure to your hair; the appropriate curls are the most critical part of producing the hairdo you desire.
Simply direct the waves to one side to make a bun, and then pin it loosely in place until you have an abundance of loose waves all over your head.
11: Fishtailed Seashell Bun
The fact that this specific bun creation is positioned on the side adds to its fun. Because of the texture of the hair and the wispy flyaways, it appears very active and naturally adorable. The fishtail braid, on the other hand, is meticulously wrapped up into a perfectly formed seashell bun.
12: Side Bun with Fishtail and Dutch Braids
With this specific bun creation, the side position contributes to the overall fun. Because of the texture of the hair and the wispy flyaways, it has a very vibrant and natural charming aspect. The fishtail braid, on the other hand, is meticulously coiled up into a perfectly round seashell bun.
13: Cute Short Hair Bun
It is not necessary to have long hair in order to style it in an updo. To get a delicate short hair bun at the nape of your neck, use a few boby pins to hold it in place.
14: Scarf Bun
Are you looking for fashionable ways to use hair scarves? Hairstyle ideas that include twisting it into your braid and then braiding it again are wonderful for adding volume and a burst of color to your look.
15: Messy Side Bun with a Braid
Balayage coloring and a huge, loose braid demonstrate that they are capable of standing the test of time and adding some spice to a plain low side bun. Despite the fact that there are no flyaways, the updo itself is actually rather easy, effortless-looking, and sloppy, thanks to the use of a bun that is properly put to one side.
16: Half Up Half Down Seashell Bun
Balayage coloring and a huge, loose braid demonstrate that they are capable of standing the test of time and bringing some spice to a mundane low side ponytail. Despite the fact that there are no flyaways, the updo itself is actually rather easy, effortless-looking, and sloppy, thanks to the use of a bun strategically put off to one side.
17: Two Buns in One
Two buns instead of one is a modern twist on a traditional hairstyle that is frequently called to as “boring” due to the fact that it is seen on so many young female models. Double buns have the added benefit of seeming more voluminous, especially when they are accompanied with a wrap around their base.
18: Messy Top Bun and Face-Framing Pieces
Using two buns instead of just one is a modern twist on a traditional hairstyle that is frequently regarded to as “boring” due to the fact that it is seen on so many young female models. Double buns have the added benefit of seeming more voluminous, especially when they are topped with a wrap around their base.
19: Goddess Braids into a Large Bun
Cornrows braided closely together provide a beautiful invisible braids effect, while a large-sized bun makes it truly stand out. You may keep this protective hairdo for several weeks, but keep in mind that the bun will be heavy, and you will have to carry it about on your head on a daily basis. If you are not physically strong, box braids that can be done in a variety of ways may be a better alternative for you.
20: Low Braided Bun
In order to create this updo, two distinct types of braids are used: a vertical French braid for the upper piece of hair and a fishtail braid wrapped in a bun for the lower section of hair. When this untidy bun is gently placed at the nape of the neck, it helps to tie the entire ensemble together.
21: Pinned Mini Buns
Using two distinct types of braids, this updo is created: a vertical French braid for the top piece of hair and a fishtail braid wrapped in a bun for the bottom section of hair.
Everything comes together because of the way this sloppy bun lays softly at the nape of the neck.
22: Polished Chocolate Brown Chignon Bun
Many of the most stunning bun designs may be achieved by just the most basic of tools. Featuring everything from a deep chocolate brown hair color to a sleek twist around the base, this is a beautiful formal bun that is also suited for the office.
23: Bulky Bun with Twists
Sometimes the most attractive bun styles are the ones that are the simplest to achieve and maintain. It’s a stunning formal bun, but it’s also suited for the workplace because of the deep chocolate brown hair color and smooth twist over the base.
24: Intricate Braid and Looped Pony
Rather than a simple bun hairstyle, this is an ornate updo with exquisite features and a sloppy finish to the overall appearance. In order to duplicate it, you simply need to narrow down the style procedure to the aspects that are manageable even for a novice. A gigantic dutch braid topped with a fishtail, as well as a looped ponytail, are examples of these styles.
25: Curly Loose Bun
In this case, subtle highlights for black hair are a fantastic way to add depth and character to your locks, and they look especially lovely in curly updos like this one. It would be appropriate for a formal event such as a wedding or an outdoor party. Flowers in the hair are frequently considered to be the most attractive hair accessory.
26: Alluring Bantu Knots Hairstyle
Hair is divided into sections, and then buns are twisted out of each portion to create the bantu knots look. Enjoy your new hairdo after applying some edge control for a sleeker appearance. Additionally, you’ll be able to experience beautiful, consistent curls after twisting the buns out.
27: Medium-Sized Braided Bun
In this hairstyle, a braided ponytail is used to create a traditional braided bun, which can be achieved in minutes by following the instructions on the box. The best results, of course, are achieved with long hair, because more strands result in a larger bun.
28: Blonde Bun with Side Braid
Featured here is a charming bun hairstyle that’s completely informal and simple to do, even if it’s your first time attempting an updo on your own. This bun is accentuated by a single side braid, which is matched with wispy side bangs on either side.
29: Afro Puffs
Never before has wearing your hair in two buns been quite as charming as it is in this photo. In addition to being a charming twist on the more classic bun or pineapple appearance, curly buns for natural hair are also equally whimsical and attractive. To finish off this modern twist on the updo, the bright red specks offer just the right amount of pop of color.
30: Coiled Side Bun
It’s not terribly large or dramatic, but it’s small, lovely, and really feminine. Even with extremely fine hair, this twisted low side bun looks respectable on the shoulders. Sections should be twisted loosely and pinned in loops that are reminiscent of flower petals.
31: Two Sculpted Buns
Two buns of this size demand a lot of hair, so you may want to consider using hair extensions or puffing your hair with a pick to achieve them. With professional sculpting and smoothing, each bun achieves a faultless appearance that is sure to turn heads.
32: Festival Hairstyle with Space Buns
What could be more perfect for a summer festival hairdo than long beach waves and two adorable space buns?
Incorporate sunkissed hair highlights into the style for a look that is guaranteed to make a lasting impact.
33: Four-Strand Braid and Messy Bun
If you want to make a broad braided headband, a four-strand braid is the finest option. Finish it off with a sloppy bun and a second, smaller four-strand plait to create a casual hairdo that’s appropriate for a special occasion.
34: Sleek Bun with a Mini Hair Bow
Upgrade your sock bun by adding a twist at the base and a sassy accent, such as a bow fashioned from your hair, to make it more interesting. Located just beneath the twisted base and slightly to the side, it adds an unexpected yet edgy element to the design, adding a little of intrigue.
35: Red Hair Bow Bun
The fire engine red hair color draws your attention, but it is the large, stunning hair bow that truly captures your imagination. Nowadays, cute bun hairstyles may be seen in a variety of variations.
36: Sleek Bun with Full Bangs
Buns with bangs are popular, but you seldom see ones that are as smooth and tidy in appearance. There is not a single hair out of place in the thick bangs that are clipped precisely above the eyebrows. With a single pearl hair ornament, the bun is constructed just below the crown and appears to be romantic and feminine.
37: Half Up Bun with a Front Braid
Again, the half-up, half-down appearance is in style, and this time it’s enhanced with a particularly thick central braid. When styling a charming half bun, a loosely braided plait is the greatest method to draw attention to the crown – the point from which the locks fall – and make it stand out.
38: Big Ballerina Bun
This style, which demonstrates that hair extensions and hair accessories can be combined to create the ideal bun, is a perfectly-rounded marvel. Image courtesy of Getty Images In order to get the sculpted roundness, you might use numerous hair extensions, or you could simply use a bun-maker hair item, which you would place on a ponytail and twist to form a bun around it.
39: Sleek Rainbow-Shaped Bun
This style is distinguished by its stunning black hair, which contrasts with the bright red lips and a matching clothing. However, it is worth noting that the design of the voluminousrainbow bunis is also noteworthy. This hairstyle is in the shape of a half-crescent, and it has been smoothed to perfection, with no stray or stray strands of hair left out.
40: Sleek Topknot Power Bun
Looking to tame your naturally curly hair? Dress up your hair in this dramatic and bold topknot style that is perfect for bringing attention to your facial features and long, graceful neck. The enhanced sleekness of this haircut results in a hairdo that is highly secure and compact while yet looking lovely.
41: Greek Style Messy Updo
When it comes to a particularly special event when you want to seem very feminine, braided bun hairstyles can be done in the Greek style and coupled with an empire waist dress. This blonde bun is a little chaotic and embellished with a fishtail braid, but you may use the idea as a starting point and play around with other textures and decorations.
42: Pine Cone Bun Braided Around
This bun is shaped like a pine cone, and it is a unique twist on the conventional bun. Add a side braid and a braided rim to your bun updo to take it even farther in terms of personalization. This is especially great for a more casual look.
43: Dutch Pigtail Braids into Buns
Pigtail braids work very well with buns, resulting in a lovely bun hairdo.
Making buns that resemble pinned curls alludes to the loose, stretched to the sides loops of the braids, which are represented by the buns.
44: Twisted Low Blonde Bun
Turning a low ponytail into a chignon is a stylish way to dress up a plain look. The blonde twist bun, which is worn exactly at the nape of the neck, is made up of basic touches that come together to form a distinctive updo. Twisting may be seen at the base of the bun as well as around the sides of the bun. Before collecting the hair at the nape of the neck, loosen the hair that covers the crown a little bit further.
45: High Bun for Thick Hair
Another option for keeping your bun atop your head at a high level is to make it particularly thick. Because the real bun is the main attraction, there is no need for any other ingredients to detract from it. Once the hair is put into a bun, it is separated into three pieces and backcombed, pinned, and tucked into thick rolls that provide depth and character to the look of the bun.
46: Sleek Fancy Bun Updo
Take, for example, this emphasized, sculpted style that is reminiscent of an origami flower, which shows how side buns can be both creative and functional. Something like this would be worn for a really important occasion, such as a wedding or prom, therefore if you like the design, you should entrust the creation of this masterpiece to a professional.
47: Overlapping Blonde Bun
A huge bun and a formal bun are combined to create an exceptionally lovely updo that is perfect for a wedding or formal event. The bun is covered with thick strands that are arranged at different angles, giving the classic hairdo a contemporary aspect.
48: Side-Braided Bun
Experimenting with braids is a terrific way to personalize your bun while also injecting a little spice into it. Hair braided on one side adds a beautiful finishing touch to your basic ballerina bun, transforming it into an elegant updo. The bun is also adorned with a single twist braid that wraps around the top. The finished product appears to be easy, with just a hint of edginess.
49: Bedhead Bun Hairstyle
The nicest part about a messy top knot bun is that it takes very little effort to style it, and the fact that it is sloppy is precisely what makes it so appealing to me. Style with no previous combing and lightly tug at the bun after it’s completed to loosen some sections more than others, according on your preference.
50: Bun Hairstyle with Strategic Twists and Highlights
The twist bun’s unique method will have you performing a double take once you see the highlights for the first time. What distinguishes this updo from others is that it looks to have been put together without effort; but, upon closer investigation, you will notice that the twisting, tucking, and pinning of the hair into a bun was done with great care and precision. If you have a large number of bun hairstyles to select from, it is easy to become overwhelmed. To avoid becoming overwhelmed, save the ones that you like the most and would like to attempt in the near future.
The one thing that is certain is that when you choose a bun, there is never a boring time.
Mastering the Messy Bun: Seven Tutorials for a Chic Mess
For years, I believed that sloppy buns were impossible to pull off with my hair. I attempted to recreate the charming appearance I saw on the women in my immediate vicinity on occasion, but I always ended up with a flat, floppy, falling-out disaster that was anything but fashionable. Then my sister emailed me a video instruction on how to do sloppy buns, and it all changed. I then realized why my prior attempts had failed: there is an art to achieving this seemingly simple appearance, and I had been missing it.
If you’ve ever been bewildered as to how to produce a classy shambles, you’re at the right place. This collection of lessons breaks down many messy bun techniques; with so many options, you’re bound to discover one that complements your hair type and unique sense of style.
One tutorial, six different styles
This is the instruction that got everything started for me! Annie leads viewers through six distinct messy bun styles, each of which results in a somewhat different appearance. The first is a very standard sloppy bun, and the second is a little more low on the brow. One of them entails less mess and better organization, while another contains some attractive twists. Try your hand at one or all of them to find which one works best for your personality. Annie also has a novel tip: to control flyaways, she recommends using clear eyebrow gel.
A soft, elegant messy bun
A full discussion of how to get a style that is “more lived-in soft bun, less cheerleader” is provided by Kate. While her video lesson is slow enough to allow you to follow along and style your hair in real time, you’ll want to gather the following things first: a brush, a hairspray, a ponytail holder, a comb, texture spray or dry shampoo (if you have either), and a few of bobby pins. The trick, according to her, is correctly prepping your hair: “If you want your bun to be a sloppy bun, you have to make a mess.”
A textured bun that’s quick and easy
This high bun with a lot of texture rests high on the top of the head and takes only a minute or two to put together. As mentioned above, teasing is an important component of this style, which is one of the reasons it works well even if your hair is not as thick as Alexsis Mae’s. To execute the directions in real time while viewing, I recommend first watching the video through to the end and then trying them out while watching it a second time, stopping as required. I hope this helps!
A round messy bun with minimal work
The following recipe is ideal if you are seeking for a bun that does not take a lot of time, preparation, or resources. It may be completed in under a minute, however it may take a bit longer the first few times as you become accustomed to the process. Due to the fact that it is positioned near to the head and has a more spherical form than some of the other buns, it has a more streamlined appearance. Because it requires you to wrap your hair around a ponytail holder multiple times, it is most effective on hair that is longer.
A tall, twisty messy bun
Attempt this bun if you want to add some height to your appearance. Unlike many other messy buns, this one sits higher on the head and has a taller form than many others on the market. Following the division of her ponytail into two halves, Vivienne completes the bun with a few ultra-simple twists and a little wrapping.
A messy bun for short hair
When you have shoulder-length hair, it is easy to make a large, fluffy messy bun, and hairstylist Devon demonstrates how she accomplishes it. You should observe her trick if the hair right above your neck has a tendency to slip out of its ponytail holder. She employs an easy method that is both neat and attractive.
A French braid into a messy bun
If you have a little extra time on your hands and want something a little more complicated than a standard sloppy bun, jump to 5:33 in this video and attempt this updo created by Missy Sue.
It begins with a French braid on top of the head and then transforms into a giant sloppy bun. It doesn’t require any teasing, and the completed ‘do has a sleek, polished appearance with a hint of messy-bun fun.
20 Stunningly Easy DIY Messy Buns
As a child, I’m sure your mother did everything she could to ensure that your hair was never unkempt or frizzy. However, now that you’re an adult, having disheveled hair is the most fashionable appearance to have! Messy hairdos have seized the globe in the same manner as Thanos did, and it is scarcely surprising that they have done so. Messy hairstyles have a hippie and carefree vibe to them that it’s difficult not to adore them. They’re similar to that one cool person in high school who everyone admires and respects.
You can get that flawless I-just-got-up-and-I-look-this-awesome look in just 5 minutes with the messy bun, which is one of its finest features.
20 Incredible And Easy DIY Messy Buns
- Separate your hair into two parts and pin them back. Hold them in such a way that they resemble two pigtails
- Tie the two parts together with a knot. Take an elastic band and wrap it around the knot below the knot’s center
- Separate the hair below the elastic band into two sections and tie them together in another knot if necessary. Another elastic band should be tied under this second knot. According to the length of your hair, the number of knots you’ll need to tie is determined by this. You should tie two knots in your hair if it is shoulder length. However, if your hair is longer, you will require more knots. The knots should be folded up and pinned in place, with the ends left out. Tugging the hair at the crown will help to create more volume at the top and make the hairstyle appear more messed up. Finish with a spritz of hairspray to keep the style in place
- And
2. Messy Sock Bun
- Leave your bangs out of your hair and pull it back into a high ponytail using an elastic band
- Placing the donut band at the base of the ponytail is the first step. Relax and let your hair to fall over the doughnut band. Make your hair into a bun so that it completely covers the band
- Maintain the style of the covered hair by binding it with an elastic band. Wrap the remainder of your hair around the base of the bun and secure it with a hairpin
3. Messy Wrap Around Bun
- Using a mid-level ponytail, tie your hair back at the front, leaving some hair hanging loose. To hide the elastic band, take a short length of hair from the ponytail and wrap it gently over the base of the ponytail. Make cautious not to wrap the hair too tightly
- Otherwise, it may break. To do this, take another portion of hair from the ponytail and wrap it around the section you just wrapped around. Repeat the process until the ponytail is completely wrapped and secured in a bun. Make a sweeping motion with the front area of hair to one side (mimicking side-swept bangs). Make a comb out of it and neatly wrap it around the base of the bun. If you have short hair, you may pin this portion just above the bun
- If you have longer hair, you can pin it just below the bun.
4. Messy French Fishtail Bun
- Take a section of hair from the front and pull it gently to one side. Separate it into two pieces
- And Make a French fishtail braid out of the two pieces you just created. Continue to weave the braid while adding more hair to it. Despite the fact that the braid begins at the side of the head, it will eventually go to the middle of the crown. Hold the braid in place with a pin. Pull the remainder of your hair into a high ponytail and secure it with an elastic band. To do this, take an elastic band and slip your hair through it somewhat, but not entirely. Bring the elastic band around to the opposite side by twirling it around. Ideally, the top part of your hair should be pulled back into a bun. Put part of your hair in a bun and wrap it around it. Make the bun appear larger by pancake-ing it. It should be pinned at the sides.
5. Messy Double Knotted Bun
- Start with freshly cleaned and blow-dried hair. Using a comb or a brush, detangle your hair. Make a dividing line through your hair
- Make a low ponytail out of your hair and secure it with an elastic band. Create two portions out of your ponytail: one on the right side and one on the left side of your ponytail Tie the two parts together with a knot. Make certain that the knot is loose and that there is some space between it and the elastic band. Underneath the initial knot, tie another knot. If you have long hair, you can add a couple additional knots to your style. Tie an elastic band under the second knot to keep both of the knots together for safety. This will result in a braided knot
- To make a bun, lift the twisted braid and wrap it up. Hair pins should be used to hold the knotted bun in place. Hairspray should be applied in order for the hairstyle to last for a few hours.
6. Messy Double Braid Bun
- Backcomb part of the hair near the crown to create a tease effect. To make this section more orderly, comb the top of it. All of your hair should be pulled back and tied in a high ponytail, with only your bangs left out
- Separate the ponytail into two halves. Make each part into a three-strand braid in the traditional manner. Make the braids into pancakes. Don’t try to smooth the stray hair down because you want the hairstyle to look a little disheveled. Take one braid and wrap it around the base of the ponytail
- Repeat with the other braid. Hold it in place with a pin
- Make a duplicate of the first braid with the second braid
- To keep it in place, put some hairspray over it
7. Messy Flipped-In Bun
- To make a high ponytail, gather your hair and tie it up tightly. After flipping your hair over, pull it through the ponytail until it reaches just before the elastic band. Pass it through but don’t let it go through entirely. Form a bun by wrapping the lower part of one’s hair around the bun’s foundation and pinning it in place. Make the bread into a pancake
8. Messy Low Side Bun
- Detangle your hair by comb it through
- Make a low side ponytail out of your hair by gathering it and holding it in place. Leaving a few strands of hair out in the front, secure the upper part of your hair in a bun with an elastic band and allow the lower half to hang loose. The bun must have a sloppy appearance
- Bun up the bottom part of your hair, letting the ends to hang loosely, then pin it up beneath and around the bun
9. Messy Braid Bun
- Detangle your hair by comb it through. Part it the way you normally would
- Separate your hair into two pieces, and then braid each portion into a loose braid on the other side. In addition to traditional braids, pull-through braids and basic twists are all options. This hairstyle may be achieved with any braid. One braid should be aligned along the hairline at the nape of your neck so that the end of it reaches the ear on the opposite side of your head. Pins should be used to hold it in place. If your hair is lengthy, tuck the additional section within the braided section that is aligned with your face. Make a duplicate of the first braid with the second braid
10. Messy Braid Wrapped Bun
- Tie your hair up in a high ponytail at the back of your head, leaving the hair closest to your hairline out of the ponytail
- Make a ponytail out of your hair and clip it up. Divide the remaining hair in half and braid each side into a braid to complete the look. Wrap the ponytailed hair into a bun and secure it with a hairpin
- The braids should be crossed such that the left braid ends up on the right side of the bun, and the same goes for the right braid. Hold the braids in place using pins.
11. Messy Two-Minute Bun
- Make a low ponytail out of all of your hair and secure it with an elastic band. Make a slit in your hair just above the elastic band to create a space
- The ponytail should be pulled up and passed through this opening. Roll the ponytail’s tail upwards and pin it up over the space in the ponytail
12. Messy Double Flipped-In Bun
- Organize your hair into a low ponytail, leaving some hair on the sides and the front to show through. The ponytail should be pulled up and inside itself just above the elastic band. Taking the hair from both sides, knot it in a ponytail that sits directly on top of the first ponytail
- Pass the second ponytail through the second ponytail, just before the elastic band, to secure it. Tie the ends of both ponytails together with an elastic band after gathering all of the hair
- Flip the hair over and tuck the tied-up ends between the first two ponytails to complete the look. If you want to keep the bun in place, you can use pins.
13. Messy Double Dutch High Buns
- From the front of your head to the nape of your neck, divide your hair in half. Begin at the nape of your neck and work your way up, creating a Dutch braid with the hair on your right side
- Once you reach the top of your head, you can stop braiding your hair. Wrap the rest of your hair into a haphazard, untidy ponytail. You may use your hair to make the bun appear larger by pancakeing it. To complete the left side, repeat the process.
14. Messy Double Braid Bun
- Make a slanting part in your hair
- Make a section in the front of your hair
- Hairstyle: Part your hair in half at the back of your head
- Make a sloppy bun out of one part by twisting it around the other half. Allow the ends to fall out on their own. Continue with the second half of the sandwich
- Make two braids (one on each side) out of the side-parted hair you had left out in the front of your hair. Pin both braids over the bun, tucking the ends of the braids into the bun
15. Messy Criss Cross Top Knot
- Separate your hair into two sections: one for the top and another for the lower half. Wrap the top part of your hair in a bun and secure it with a pin. Divide the bottom half into two equal halves
- Take the right half and cross it over to the left side to complete the division. Using the ends of the bun, wrap them around it
- Then take the left portion and cross it over to the right section. It should be wrapped around the bun. Make a copy of the left portion and repeat the process. Stabilize the hairstyle in place using bobby pins
16. Messy Twisted Top Knot
- Make a high ponytail out of all of your hair and divide it in half
- Turn both parts of the ponytail in the same direction. Bun the twists together by wrapping them around each other. Pin the bun in place with a hairspray, and style as desired.
17. Loose Messy Top Knot
- Using a comb, detangle your hair
- Tease your hair from root to tip. Your hair should appear thicker as a result of this. Take care to gather all of your hair, leaving a few strands free at the back of your head. You’ll see a pouf-like shape towards the entrance of the room. Hold your hair in a high ponytail and softly twist it. Make a bun out of your hair and fasten it with an elastic band and hair pins
- You have the option of curling or leaving the loose strands as they are.
18. Messy Knotted Bun
- Dividing your hair into three portions: one huge center section and two little side sections
- Dividing your hair into three sections Take the huge middle part and divide it in half
- This will provide two halves. Make a knot with both sections of the rope
- Continue tying knots in your hair until you reach the end, depending on how long or short it is. Pin the twisted bun in place using safety pins. The two smaller side parts should be tied together in a knot just below the knotted bun. Continue tying knots in your hair until you are practically at the end of it, depending on how long your hair is. Tie the ends of the twisted bun together
19. The 10-Second Top Knot
- First, screw up your hair
- Then, mess up your clothes. Gather all of your hair into a high ponytail and secure it with a hair tie. With one hand, keep the base of the ponytail in place while the other holds your hair out of the way. Make a twist on your hair
- Form a bun out of the knotted hair by wrapping it around itself. Make it possible for the ends to slip free
- Lifting the bun higher will give a pouf effect. Make a bun and secure it with an elastic band and a few hair pins.
20. The Perfect Messy Bun
- Gather all of your hair together and tie it up in a high ponytail with one hand
- Pulling a few hairs from the front hairline to frame your face with your other hand is a nice touch. One end of an elastic band should be held at the base of the ponytail, and the other end should be pulled over your hair. Don’t put all of your hair through the elastic band at the same time. Remove the ends from the equation. A bun is formed by twisting and leaving the ends hanging loose
- To fix the bun, twist the elastic band and pass it over it many times, enabling the loose ends to be knotted in as well. You’ll find that this causes your hair to become tangled
- With a few bobby pins, you can secure the ends even more in place.
Listed here are 20 sloppy updos that are simple and quick to do. The sloppy pouf bun is one of my favorite hairstyles. Which one is your favorite, and how did you find out? Please let me know by leaving a comment below! Was this article of assistance? The following two tabs alter the content of the section below.