
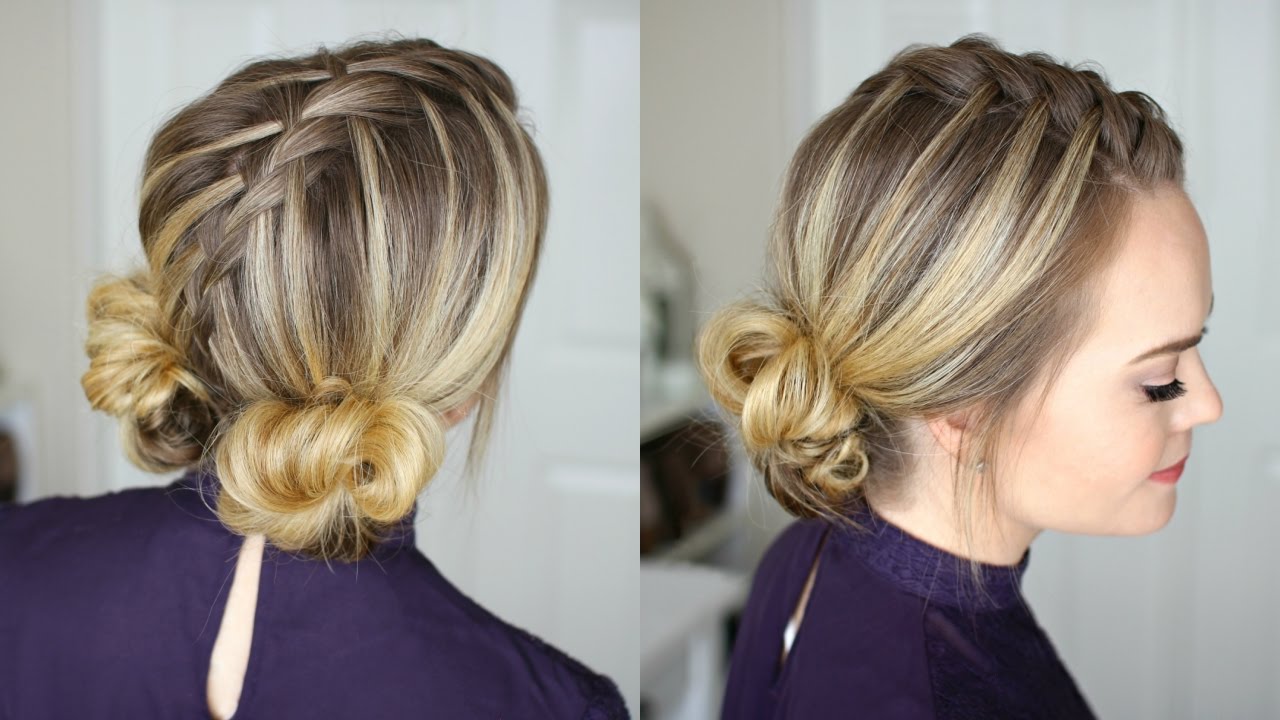
Buns
How To Do Low Space Buns
Jan
How to Do a Two Buns Hairstyle With Sophie Hannah Richardson
After all, why limit yourself to one bun when you could have two buns? Space buns are another term for the two bun hairstyle that was made popular by Star Wars heroine Princess Leia (therefore the other common name for the hairstyle: space buns). After then, it became fashionable in the 1990s thanks to celebrities such as the Spice Girls and Gwen Stefani (during herNo Doubtdays). Fast forward to the present day, and this haircut can be found pretty much anywhere—from festivals to your local streets to the red carpet and runway, and everywhere in between.
the festival hair queen!) to demonstrate how to get them.
First, we’ll have a look at what to do.
Divide your hair into two sections.
Begin by dividing your hair (down the center) into two equal portions with a comb or your fingers, then styling them as desired. Next, bind each portion into two low ponytails using hairbands to complete the look. To make your double low buns seem especially smooth and sleek, apply a serum such as theTONI GUY Shine Gloss Serum to help slick down any flyaways and give shine to your hair. Step No. 2
Tease and twist your pigtail.
It’s now time to get down to business! Take your first ponytail and gently twist it all the way down to the end of your hair. Repeat with your second ponytail. Step number three.
Create a bun.
To make a bun form, begin by wrapping your hair around the base of the ponytail and continuing to wrap until you have a bun shape. Once you’ve achieved the desired shape, pin it in place with as many bobby pins as necessary to keep the style in place. Step number four.
Create your second bun.
To construct your second bun, tease and twist your second ponytail like you did with the first. Step number five.
Your two buns hairstyle is complete!
The result is a pair of sparkling double low buns that will steal the show at your next gathering! Suggestions for styling: Worried that your perfectly coiffed buns may come undone? Put some VO5 Ultimate Hold Hairspray on them and they’ll be ready for any party you can throw. In addition to helping to keep your buns in place all day, this fast-drying hairspray will also protect your hair from frizz and humidity. Isn’t that interesting?
Sign up to our newsletter and get exclusive hair care tips and tricks from the experts at All Things Hair.
Articles before and after this one
Hot Right Now
Documentation Download Documentation Download Documentation The ultimate updo if you’re searching for something a little more out of this world than a ponytail or a top knot, space buns are the way to go. Space buns are casual, fun, and fashionable, and they look excellent whether you’re attending a music festival or watching Star Wars with your buddies. Seeing as it appears that space buns will not be departing our planet anytime soon, we’ve put together this guide to walk you through the process of making space buns from scratch.
We’ll also show you how to achieve half-up and braided space buns, so you’ll have a variety of galaxy hairstyles to pick from when traveling through space. Don’t be concerned; making space buns isn’t rocket science at all.
- Using a comb, brush your hair and part it down the center. Comb your hair until it’s smooth and free of knots or tangles, then style it as desired. And make a center part for your hair, use the handle of a rat-tail comb to run it down the middle of your head from your forehead to your nape
- 2 Make two pigtails in a row. Choose whether you want them to be high on the top of your head or low on each side of your nape—experiment to find out what works best for you. Smooth down the hair that will be pulled into the pigtails so that they are smooth and neat when they are finished. Hair ties in the color of your hair should be used to secure the pigtails.
- Allow a few strands around your forehead to hang free for a smoother finish.
- 3 Tease your pigtails if you want to add additional volume to your look. Start by lifting up your first pigtail and combing it a few times, starting at the tips and working your way down to the end of the hair tie. This should be done with the second pigtail as well. If you have thin hair, this is a fantastic idea since it will make your hair look thicker and result in larger space buns at the end of the day.
- If you like, you may wrap three-combhair extensions around the base of your pigtails as an alternative option. This will assist you in getting a bit greater volume
- 4Make your initial pigtail into a rope by twisting it over itself. Take one of your pigtails and twist it away from your face, forming a rope around your neck. The tighter you twist the rope, the sleeker and smaller your bun will come out
- 5Circle the rope into a bun and secure it with a hair band to keep it from falling down. Wrap the rope around the base of the pigtail to secure it in place. To avoid damaging your face, wrap the scarf away from you rather than towards it. Tuck the end of your hair into the bun, and then wrap another hair tie around the base of the bun
- 5 To make the second bun, repeat the procedure. Twist the second pigtail into a rope, then wrap it into a bun to finish it off. Secure the bun with a hair tie after tucking the ends of the rope under it 7 Make any necessary adjustments to your buns. Here’s where you may let your imagination run wild. Using your fingers, gently tug on the outside edges of the buns to loosen the strands if you want them to be messier or more voluminous. To add even more volume to your buns, gently tug on the hair that is being pulled into them to loosen it up. Consider the hair on the top of your head and the sides of your head
- If you accidentally left strands out of your buns, straightening them with a flat iron may be an option. Allowing them to have a wispier appearance by bending the iron towards your face rather than straight down
- 8Spray the space buns with hairspray to hold them in place. If your buns are feeling a little loose, use bobby pins to hold them in place. You can use as many bobby pins as you need. To finish your look, spritz it with hairspray and let it to dry.
- 1Brush your hair and then make a center part with it. Make sure your hair is lovely and silky by combing it. The handle of a rat-tail comb may be used to create a center part in the midst of your hairstyle. Begin at the top of your head and work your way down to the nape of your neck. Using your left half of your hair, drape it over your left shoulder, and your right half over your right shoulder
- 2 Pull one-half of your hair up into a loose bun to keep it off of your face and out of your way. Take the right part of your hair and bind it up with a hair tie to keep it in place. You can wear your hair in a loose bun or even pigtails. This is irrelevant
- The aim is to keep this part of your hair out of your way while you work on the other half. 3 On the left side of your head, pull your hair into a half-up ponytail. Create a horizontal portion on the left side of your head, about at the level of your eyebrows. Make a center part in the rear of your head, beginning at the hairline and finishing at the center part in the front of your head. Organize the hair above the part into a high ponytail and tie it off with a hair knot.
- If you want to wear your ponytail on the top-side of your head, rather than the back-center of your head, do so like a dog ear.
- 4If wanted, tease your ponytail a little. Because you will be dealing with less hair than you would while constructing a standard space bun, it would be a good idea to tease your ponytail a bit before you start working. Backcomb your ponytail towards the hair knot with a brush after lifting strands of hair from your ponytail
- 5 Twist the ponytail into a bun and bind it with a hair tie to finish the look. To begin, twist the ponytail away from your face to form a rope with your hair. After that, coil the rope around the base of the ponytail to form a bun with the hair. Tuck the ends of the rope beneath the bun and secure it with a hair tie at the base
- If you twist the space bun tightly enough, it will become smaller and sleeker in appearance.
- 6Untie the temporary bun from the other side and repeat the process on the opposite side. Return your attention to the right side of your head and remove the loose, temporary bun you formed previously. Create a second half-up ponytail, tease it, and then wrap it into a bun for another look. Another hair tie should be used to secure the bun. 7 If you like, you can tease the remainder of your hair. You are not have to do this, but it is a fantastic way to complete the vintage 90s style in your wardrobe. Alternative: If your buns are beautiful and smooth, you may straighten the remainder of your hair instead.
- Even more volume may be achieved by loosening the hair that is being pulled into the buns. During this stage, you should concentrate on the sides and top of your head
- It is fine if the section in the back-center of your head disappears. You don’t require it any more
- Finish by misting the space buns with hairspray after you’ve made any last adjustments. If your buns are feeling a little loose, use bobby pins to bind them to your hair. Once you’re satisfied with the overall appearance, softly spritz your hair with hairspray to finish it off. Allow the hairspray to dry completely before heading out
- Using a comb, brush your hair and part it down the center. Make sure your hair is lovely and silky by brushing it out. With the handle of a rat-tail comb, part your hair along the center from your forehead to your nape
- 2 Pull your hair into two pigtails and knot them together using hair ties to finish the look. Here’s where you may let your imagination run wild. It’s possible to wear two high pigtails at the crown of your head, or two low pigtails at the base of your neck. In order to get a Princess Leia-inspired style, you can even put the pigtails on the sides of your head, just over your ears.
- If you’re looking for something a little more complicated, consider half-up pigtails.
- 3 Braid the pigtails and bind them with clear hair elastics to complete the look. The initial pigtail should be divided into three equal sections. Cross the left and right sections over the central strand to form the braid. Once you’ve used up all of your hair, bind the braid with a clear hair elastic wrapped around the end of it. Repeat this procedure with the other pigtail as well.
- 3 Clear hair elastics are used to secure the pigtails in place. The first pigtail should be divided into three equal sections. Cross the left and right sections over the central strand to produce the braid. Once you’ve used up all of your hair, secure the braid with a clear hair elastic wrapped around the end. Carry on with same procedure with the other pigtail as well.
- 4 If desired, pull on the outside loops of the braids to make them appear more volumized. You are not need to do this, but it is a fantastic technique to add volume to your hair, especially if it is really thin in the first place. Gently tug on the outer loops of the braid starting at the bottom and working your way up till the top
- Repeat the same with the other braid
- If you used a 2-strand rope braid, you may skip this step. It is important not to pull too hard or the braid will come undone.
- 5 Tie the braids into buns and fasten them with hair ties to keep them in place. Pick up the left braid and wrap it around the hair tie to form a bun on the top of your head. Tuck the braid’s end beneath the bun, and then wrap another hair tie around the bun’s base. Repeat with the other braid. Then repeat the process for the other braid.
- If you want to make a regular bun, do not twist the braids into a rope like you would for that.
- 6 Make any necessary adjustments to your hair, then spritz it with hairspray. If your buns are feeling a little loose, pin them down along the side borders to the rest of your hair, using as many bobby pins as necessary. As soon as you are satisfied with the appearance of your space buns, spritz them with hairspray and allow the hairspray to dry
- Straightening the remainder of your hair for a smoother look is recommended if you wore braided half-up buns.
Create a new question
- QuestionWhat should I do if I have really curly hair? Straightening procedures that do not require heat are available (check out How toStraighten Your Hair Without Heat). In fact, I believe that messier, curlier buns look better than perfectly straight ones. I’ve seen folks with really curly hair pull it off without having to straighten their hair beforehand. In the event that it is really difficult to create an even part or to get the hair to twist, dry the hair rather than leaving it moist. Question How can I accomplish this with hair that is prone to tangling? There are a plethora of solutions available to help you untangle your hair. Aside than that, I recommend moving extremely slowly and gently, combing your hair and untangling any tangles as you go
- Question Is it possible to braid the pigtail instead of twisting it? Certainly, braid the ponytails, then wrap them around like buns and put them in place with bobby pins
- Question What is the best way to get my hair straight without brushing it too hard? Mackenzie RomeroAnswer from the Community You may always use a straightener, but be sure to maintain the heat on a low setting. It is not required to be perfectly straight. If it doesn’t function on low, try increasing the volume one notch. Question What is the best way to make bigger buns? Making the buns looser will make them look larger, and this is something you can do
- Question Is it still possible for me to do it if I have really long hair? EmmaLee HudginsAnswer from the Community Yes, it is possible. They may appear larger, though, depending on how tightly you twist or braid your hair
- Question What can I do to make them seem more even? Make sure your middle parting is equal and straight. As a last suggestion, I’d suggest utilizing a large number of bobby pins and beginning by placing them in pigtails. Question Is it possible to accomplish this with short hair? It is recommended to use low buns instead of high buns if the length of your hair is insufficient to reach high up onto your head
- Question How can I make them even and ensure that they don’t wriggle around? Use bobby pins to keep them from wriggling, and if you don’t have any bobby pins, use more hair ties to keep them in place. Take your hair and equally divide it down the center, using the middle hair line, to get an even distribution. Question Is it still possible to do space buns if my hair is barely up to my shoulders? A half-up, half-down style, as seen in part 2, should be doable with your current amount of hair.
More information on the replies Inquire about something There are 200 characters remaining. Include your email address so that you may be notified when this question has been resolved. Submit
VideoRead Video Transcript
- Make the space buns as clean and elegant as you like, or as loose and sloppy as you want
- The choice is yours. Make some streaks in your hair with hair chalk before you begin to give it a more vivid appearance.
Make the space buns as clean and elegant as you like, or as loose and sloppy as you want; the possibilities are endless. Preparing your hair with chalk before you begin can give it a more vivid appearance.
Things You’ll Need
- Hairbrush, rat-tail comb, four hair ties, Bobby pins, hairspray
- Hairbrush, rat-tail comb, four hair ties, Bobby pins, hairspray
- Hairbrush, rat-tail comb, 4 hair ties, Bobby pins, hairspray
About This Article
Brush; rat-tail comb; 4 hair ties; Bobby pins; hairspray
Did this article help you?
As a girl with bob-length hair, I understand the frustration of waking up late and wanting nothing more than to toss your hair up in a messy bun, only to find yourself unable to do so because you don’t have enough hair to do so. Please do not misunderstand me. I really enjoy having short hair. However, the messy-bun existence is one that I occasionally yearn for. There is some bad news, though, in that buns with short hair aren’t nearly as straightforward as they are for people who have 12 inches of hair to play around with.
In fact, it’s more than probable that this will happen.
For all of my short-haired sisters out there, this one is for you.
On the days when you don’t feel like pulling out your curling iron or straightening iron, simply refer to this list for inspiration.
Braided Topknot
Getty 1.Distribute a dry texture spray, such as Obrie’sDry Texturizing Spray($22), evenly throughout hair to provide more grip. 2.Pull your hair into a super-high ponytail and tie it with an elastic band. Don’t be concerned about making things seem nice! 3.Pull the ponytail all the way down and secure it with a clear elastic band at the bottom. Using a bobby pin, bind the braid around itself, starting at the base and working your way up the length. 5.After the braid has been coiled all the way up into a bun, fasten it with a couple more bobby pins to finish it off.
7.Spray your hair with a flexible-hold hairspray.
8.
Sporty Space Buns
Getty1.Space buns are all the rage this summer, and now it’s your opportunity to show off your own style. To finish, part your hair down the center and spray all over with Rusk’sTexture Dry Finishing Spray ($25). 2.Pull the hair from either side of your head into a high, tight ponytail on one side. Wrap each ponytail around itself and tie it with a couple of bobby pins to finish the look.
4.The more muddled, the better! Pull each bun outward to add volume, then pull out a few loose strands to frame your face with a few loose strands. • Use a flexible-hold hair spray, such as DevaCurl’s Flexible-Hold Hair Spritz ($25), to spray all over your hair.
Boho Double Knot
Image courtesy of Getty1. A dry shampoo, such as Living Proof’sPerfect Hair Day (PhD) Dry Shampoo ($25), or a greattexture spray is the key to this casual summer style. Spray evenly from the middle of the shaft to the ends. 2.Split your hair into four equal portions, two on either side of the front and two on either side of the back, and pin them up in a high ponytail. 3.Take a portion from the rear of the bun and coil it around the base to form a bun shape. Bobby pins can be used to keep the hair in place.
You should be left with two areas that have not been touched up front.
Roll the tail of the front piece over the rear bun and secure it with a safety pin.
Take a few face-framing items and you’re ready to go!
Bedhead Bun
Getty1.Have you not heard the news? Compared to the topknot of yesteryear, the low bunis is incomparably cooler and colder to wear. To create the desired effect, softly back-comb the hair at the top of your head to give it lift. Make a loose, sloppy ponytail at the back of your neck and tie it off with an elastic band. Simply hold it in place for the time being; do not bind it with an elastic. (3) Twist the ponytail around itself using your other hand to form a bun shape, and fasten with pins.
Messy Half-Knot
Getty1.For short-haired girls, this is the ultimate bun to achieve. Begin with strands that have not been washed. It doesn’t matter how filthy the environment is. Using your hair, create two sections on either side of your crown. Keep the components as straight as possible because they will be apparent in the final product. 3.Make a high ponytail out of the hair between the two pieces and place it exactly on top of your head. Make sure not to drag the ponytail through the elastic on the final loop; otherwise, you’ll end up with a loose bun.
Instead of leaving the ends sticking out the bottom of the bun, just wrap them around the base of the bun and pin them in place!
Modern Milkmaid Bun
Getty1. Although this is more of an updo than a classic bun, it still serves the purpose of keeping your hair out of your face in a stylish manner. Begin by splitting your hair down the center and dividing it into two equal parts with your fingers. To give your hair near the crown of your head a little additional volume, back-comb it a few times. 3) Create a French braid on one side of your head, starting near to your face and working your way out to form a braided pigtail. 4. Clear elastic is used to keep it in place.
Using a bobby pin, pin the end of the first French braid behind your head to keep it in place.
7.Spray the braid with a medium-hold hair spray, such as L’Oréal Tecni, to keep it in place. Art Infinium 3 Medium Hold Working Spray ($17) is a medium hold working spray.
Classic Ballet Bun
Getty1. However, while this is more of an updo than a classic bun, it is still a stylish method to keep the tresses out of your face. Starting with a center parting, divide your hair into two equal portions and pin them up. To give your hair near the top of your head a little additional volume, back-comb it a little bit. 3) Make a French braid on one side of your head, starting near to your face and working your way out to form a braided pigtail. 4. Clear elastic is used to hold it all together.
Using a bobby pin, pin the end of the first French braid behind your head to keep it in place.
Do the same with the end of your second braid so that it overlaps with the first and pin it down with one last bobby pin to finish it off.
Infinium 3 Medium Hold Working Spray (about $17).
Sleek Low Bun
Getty1.A slicked-back hairstyle that screams “cool chick” will have you looking as effortlessly elegant as Rihanna. This is one of the few occasions in which Rihanna wore her natural, blown-out hair without the use of extensions. Before you begin, smooth your hair back into a bun with a boar bristle brush, such as the DenmanBoar Bristle Ceramic Brush ($26). Secondly, let some of your flyaways and sideburns to dangle loosely. Don’t be concerned with everything being in exactly the right position.
3.Pull your hair back into a ponytail with the help of an elastic.
Take a second elastic band and wrap it around your topknot to secure it.
Embellished Top Knot
Getty1. Hair ornaments are timeless and will never go out of style. Furthermore, they quickly transform any bun from plain to badass. Take inspiration from Issa Rae’s Black Panthermoviepremiere performance. Begin by parting your hair into three sections in the center of your head with a rattail comb, such as Krest’sPintail Combs ($5). 2.After that, braid three little cornrows and tie them together at the crown of your head or wherever you want your bun to end up. 3.Put your hair and the ends of your three braids into a ponytail and secure it with an elastic band.
Using circular motions, wrap your braid around the rest of your hair to form a braided topknot.
6.
Install gold cuffs throughout your braid to give it a little extra flair.
Backwards Braided Bun
Getty1. Hair accessories are something that will never go out of style! They also quickly transform any bun from ordinary to extraordinary. If you’re looking for inspiration, go no farther than the Black Pantherfilm’s premiere. First, divide your hair into three sections in the center of your head with a little rattail comb such as Krest’sPintail Combs ($5). 2.After that, braid three little cornrows and tie them together at the crown of your head or wherever you want your bun to rest. 3.Put your hair and the ends of your three braids back into a ponytail with an elastic band to secure them.
Using circular motions, wrap your braid over the top of your head to form a braided topknot.
To keep your braid in place, use a second elastic band to wrap around it. 6. Take a bobby pin and put it precisely at the front of your bun, using a hair item such as thesebeads($10). For an extra splash of color, include gold cuffs into your braid. 7.
How To: Low Space Buns
- Features include: school, competition, all-stars, daily life, tryouts, camp, community, style, and step by step instructions.
Posted on March 20th, 2019 by Kelsey Werling|Comments Off on PreviousNext 16:21:59-05:00 Posted by Style & Trends on March 17th, 2019. 12:12 p.m. on March 17th Style Kelsey Werling’s article First, we’ll have a look at what to do. Make two low pigtails at the nape of your neck by separating your hair. Elastic hair ties can be used to keep the hair in place. Pages:123456
Related Posts
- May 16th, 2020|0 Comments
- Auburn’s Traditions Run Deep
Auburn’s Traditions Run Deep
- New Year- New Decade- New York
- January 15th, 2020|0 Comments
- New Year- New Decade- New York
New Year- New Decade- New York!
- 13th of January, 2020|0 Comments
- Hot Fall Fashion Trends to Keep You Warm This Season
Hot Trends to Stay Warm This Fall
- Things I would say to the young cheerleader I used to be on November 3rd, 2019|0 Comments
- Things I would say to the young cheerleader I used to be
Things I Would Say to the Young Cheerleader I used to be
Alessio Botticelli courtesy of GC Images When you double the bun, you get double the enjoyment. ofia Richie and Cara Delevingne have been rocking the messy bun and the top knot for quite some time, so it was only a matter Isa time until they were tired with their hairstyles. While the sort of bun you wear on a daily basis says a lot about you, it says even more about you when you’re prepared to branch out and try something completely different. As celebrity hairdresser Suzie Kim explained, “Most people are scared by a double-bun style because it might appear immature, but it’s a really exciting, of-the-moment haircut for summer.” In case you’re interested in giving it a shot, here are three straightforward variations you may attempt at home!
- Melissa Hebeler is a reporter for E!
- The first step is to divide your hair down the center and tie each piece into two low ponytails.
- News.
- Step 2: In Suzie’s opinion, “you may spritz a little dry shampoo on the area before you tease to give it a little texture if desired.” Melissa Hebeler is a reporter for E!
- Tie the hair around the base of the head and fasten with bobby pins.
- According to Suzie, “This is an editorial style, so you should only take this path if you’re a high-fashion sort of lady seeking for some fresh edge.” Melissa Hebeler is a reporter for E!
- In the first step, instead of splitting your hair down the center as you normally would, separate it horizontally, dividing it into two portions.
Melissa Hebeler is a reporter for E!
3.Place the bottom bun in the center of the lower part and wrap both buns loosely together, taking careful not to pull your hair all the way through the loops.
“This double wrap gives you volume without the need to tease your hair,” the stylist said to clients.
News.
And that’s the end of it!
Melissa Hebeler is a reporter for E!
The first step is to part your hair vertically down the middle and tie it into pigtails at the top and center of your head.
Using your fingers, gently tease the bottom of each ponytail to give the bun a little extra volume.
News.
“I believe it looks better if you leave the tails out because it gives it a dirtier, more playful air,” the expert said.
Melissa Hebeler is a reporter for E! News. Step 4: Examine them in the mirror to ensure that they are evenly spaced. “If you make a mistake, feel free to pin it away until it is exactly where you want it,” Suzie said. That’s what we call buns in this part of the world, hun.
How to Do Space Buns
Artist Alessio Botticelli (GC Images) has created this image. Adding a second bun means more enjoyment. Because celebrities such as Cara Delevingne and Sofia Richie have become familiar with the messy bun and the top knot, they were bound to get tired with them sooner or later. While the sort of bun you wear on a daily basis says a lot about you, it says even more about you when you’re ready to branch out and try a rad, new style on the regular. As celebrity hairdresser Suzie Kim explained, “Most people are scared by a double-bun style because it might look immature, but it’s a really exciting, of-the-moment haircut for summer.” In case you’re interested in giving it a shot, here are three easy variations you may attempt at home!
- News photographer Melissa Hebeler The first step is to part your hair down the center and tie each section into two low ponytails.
- News photographer Melissa Hebeler Using an ateasing brush, tease each ponytail upwards while twisting it loosely.
- News photographer Melissa Hebeler To finish, wrap a bobby pin around the base of the hairstyle.
- According to Suzie, “This is an editorial style, so you should only take this path if you’re a high-fashion girl searching for a newfound edge.” E!
- Step 2: “Position the top bun where it feels most comfortable on your head—if you have a round face, place it higher up on your head; if you have a longer face, place it lower,” explained Suzie.
- News photographer Melissa Hebeler 3.Place the bottom bun in the center of the lower part and wrap both buns loosely together, being careful not to pull your hair all the way through the buns.
- A professional said that “this double wrap offers you volume without the need to tease your hair.” E!
This is the end of your work!
E!
To ensure that your eyebrows are evenly spaced and that they aren’t too far apart, the stylist recommends checking yourself in the mirror.
E!
“I believe it looks better if you leave the tails out because it gives it a messier, more playful air,” the pro said.
E! News photographer Melissa Hebeler In Step 4, check to see if they are evenly spaced in the mirror. “If you make a mistake, feel free to pin it away until it is exactly where you want it,” Suzie added. That’s what we call buns in this part of the world, huh?
HOW TO GET A SPACE BUNS HAIRSTYLE
Gather your materials and then begin working on your space bun style. What you’ll need is the following: a brush for your hair Elastics that are transparent Bobby pins are a kind of pin. Advanced Hairstyle from L’Oréal Paris LOCK IT DOWN Controlling the Weather Hairspray How to get the look:
STEP1: BRUSH YOUR HAIR
While this step may seem self-explanatory, it’s critical to begin by combing your mane to verify that it’s free of any tangles or knots before proceeding.
STEP2: PART YOUR HAIR
By making a center part in your hair, you may divide it into two equal portions. It is critical to ensure that your part is as straight as possible, with the equal amount of hair on either side, since this will make or break your overall space bun appearance!
STEP3: CREATE SOME PONYTAILS
One part of hair should be gathered and tied into a ponytail at the top of your head, toward the back. Make sure to smooth out any kinks that may occur during the process. Your ponytail’s location can be customized to suit your needs; however, bear in mind that the base of your ponytail will be located where your space bun is. Following the completion of one ponytail on one side of your portion, proceed to build a duplicate ponytail on the other side. You don’t want your space buns to seem asymmetrical, so make sure you duplicate your positioning!
STEP4: MAKE YOUR BUNS
To make your space buns, you’ll want to wrap the length of your hair around the base of your ponytail from the front to the back. Hold this freshly created bun in place as you pin it down with bobby pins to finish it off. Make sure to use bobby pins that are the same color as your hair for a seamless appearance! Repeat the process on the opposite side.
STEP5: SEAL THE DEAL
Hairspray should be used to finish the appearance since you don’t want all of your hard work to go to waste. That’s all there is to it, unless you want to go all out and accessorize your space buns for a truly beautiful look. More on it in a moment!
3 WAYS TO MAKE YOUR SPACE BUNS OTHER-WORLDLY
Want to improve the look of your space bun style even further? There are a variety of ways you can make your space buns seem extraterrestrial, and we’ve included three of our favorites below.
OPTION1: ADD COLOR
Surely you agree that such a colorful haircut goes wonderfully with such a joyful color palette? Make your buns pop with a temporary hair color from theL’Oréal Paris Colorista 1-Day Spray or theL’Oréal Paris Colorista Hair Makeup 1-Day Colorlines. Get creative with your hair color! It’s easy to maintain your space buns hairdo with temporary hair colors from both lines because they wash away in only one shampoo. Instead of going full out with color, you may use the wash out hair color to highlight your roots only—this is one of our favorite festival season looks.
OPTION2: ADD GLITTER
Besides being a major hair color trend right now (hello, festival hair), glitter roots are also the perfect technique to help your space buns style seem like it came straight out of the Milky Way. Sprinkle some glitter throughout your roots and finish the look with some hairspray for a quick and easy look.
OPTION3: ADD FUN HAIR TIES
When everything is said and done, there is no easier way to personalize a space buns hairstyle than by using a few colorful hair ties to bring it all together. Remove the transparent elastics from your wardrobe and replace them with cuffs, coils, and bows. After you’ve finished building your space buns, you can dress them up with a colorful accessory such as a hair clip or a flower crown. You have the entire universe of accessorizing at your disposal.
Now that you’ve learned how to do space buns, as well as a few tips and tricks for taking your space buns hairdo to the next level, why not learn how to create the ideal makeup look to go with them? Here are three galaxy-inspired makeup ideas for an out-of-this-world appearance.
20 Low Messy Bun Hairstyles That Work for Any Hair
Low messy buns are one of those hairstyles that can be worn for any occasion and are quite versatile. However, it is also one of the most popular wedding-day hairstyles for brides, especially when their hair is unclean and they don’t want to bother with a shampooing session. Therefore, we have created a brief guide on how to achieve a lovely low messy bun, which is complemented by an extensive list of 20 attractive hairdo alternatives.
How to Do a Low Messy Bun
Step 1: Comb your hair through and make a side part with your fingers. Make sure you tease the top section of your hair or even use dry shampoo or baby powder if you’re attempting this hairstyle on filthy hair so that it doesn’t end up looking flat and greasy. Make a low ponytail out of your hair, ensuring sure it’s not too slick and that you’ve left a bit of volume above it. Step 2: Create a low bun by twisting the ponytail in the opposite direction of the twist. To keep the pun in place, knot it with an elastic hair tie.
Allow a few strands of hair from your bangs to fall out.
Watch the video below to learn how to make a DIY Messy Low Bun in a Quick and Easy Way.
How to Do a LowMessy Bunon Thin Hair
Almost any type of updo, especially when done with thin hair, may seem flat and lackluster at times. Although the length is ideal for achieving the proper volume and texture, it might be difficult to attain the required result. Spending a little additional time teasing your hair to give it more volume is a natural way to create more volume. For those who still want that large, rich texture, apply hair extensions before putting your hair up in a bun, since this is the most efficient method for maximizing your styling possibilities.
Mesmerizing Low Messy Bun Hairstyles
The bun for women is a timeless style that will never go out of style. We’ve gathered some lovely ideas for how to arrange a low messy bun for ladies right here.
1. Messy Low Bun with Halo Twist
You could find that this hairstyle becomes one of your go-to everyday hairstyles if you enjoy messing with your hair. However, it looks equally as good with a cocktail dress for a beautiful evening outing. Face shapes like as square and oval are best suited for this product. How to dress with style: Roll your hair into halo shapes around your face and put them in place with bobby pins. Make a mess of them. Hairspray will help keep this fantastic low messy bun in place. Create it with bobby pins and then secure it with hairspray.
2. Layered and Twisted Messy Low Bun
Messy hairstyles are fantastic for when you don’t want to seem too formal, but that doesn’t mean they can’t be tidy and beautiful as well as they may be. Ideal for: Faces with a heart or round shape. How to dress with style: Make sure that the hair outside of the bun is smooth but not flat in order to contrast with the untidy bun on the inside. Afterwards, style your hair into this twisted and layered sloppy low bun.
3. LowMessy Bun for Curly Hair
Low messy buns look amazing on naturally curly hair or hair that has been permed. And they’re a terrific method to keep those curls under control.
All facial shapes will benefit from this product. How to dress with style: When securing your bun, use bobby pins rather than an elastic band since they will better compliment the texture of your hair. Leave a few stray curls here and there.
4. Careless Low Bun
Are you spending your time at home doing absolutely nothing? You can still look amazing even if your hair is in an untidy low bun style. All facial shapes will benefit from this product. How to style: I went completely ad hoc.
5. Messy LowBun with a Braid
When worn with braids, a low sloppy bun may look fantastic. For those who want to dress in a more relaxed manner, this haircut is ideal. Face shapes such as square and round are best suited for this style. How to dress with style: Begin with the sides of your head and work your way up. Allowing your bangs to flow freely around your face, construct a sloppy low bun below the braid to complete the look.
6. Low Messy Bun for Thin Hair
This low updo style for thin hair is adorned with a medium-sized crown braid that wraps around the entire head. To add softness to the hair near the temples, pull a portion of it loose.
7. Low Messy Bun for Thick Hair
A sloppy bun takes only a few minutes to put up and is excellent for controlling thick hair. Generally speaking, the more waves you have, the more beautiful the end product is.
8. Low Messy Bun for Wedding
For those who want their hair off their shoulders on their wedding day, a low messy bun is a classic style. For a romantic look, drape a lace crown or headband over your hair.
9. Loose Low Messy Bun
A low loose bun is particularly appealing for those with short hair. Simply comb hair back with your fingers and fasten it above the neck with a brightly colored scrunchie.
10. Smooth Low Bun
This low bun hairstyle is ideal for formal situations where you need to present a refined and delicate appearance. Buns should be secured with a lovely ribbon in the same colors as the bun.
11. Messy Low Double Bun
In 2021, it is quite fashionable to play with one’s hair. Double messy low buns are a hairstyle that will never go out of style since they are so charming and useful for everyday wear. Face shapes such as square and oval are best suited for this style. How to dress with style: Create these very cute low messy buns by dividing your hair in half at the back of your head. They should be fanned out to make them less tight and to give them more volume. Bangs are a great way to dress up this updo.
12. KnottedLow Messy Bun
The following hairstyle would be excellent for a particular, formal occasion if you don’t want to spend the evening fretting about whether or not every strand is in place and whether or not the updo isn’t tumbling out of your hairdo. Faces with a round or heart shape are the best candidates. How to dress with style: In general, this is a simple knotted low bun with a twist. The advantage of this is that it is a sloppy mess, which means it requires less accuracy. The section above the bun should be purposefully messed up, and the bangs should be left out of the bun.
13. Messy Low Side Bun
Side buns are a terrific method to make your face appear more asymmetrical if you feel that the lines of your face are too soft and round in the first instance. Ideal for: Faces with an oval or round contour. How to dress with style: Make a side part with your hair and create a low untidy bun on the opposite side of your head from the part.
14. Big, Relaxed, Bun
It’s both daring and romantic at the same time to wear a bun in your hair.
Face shapes that work well include square and heart-shaped faces. How to dress with style: Make your hair into lovely, loose waves by curling it. Hair is held up with bobby pins, and a few strands are left free all around the haircut for a more natural look.
15. Simple Low Messy Bun
Low buns don’t necessarily have to be sleek and tight to be considered classic. Even when they’re a little sloppy, they may be rather attractive. All facial shapes will benefit from this product. How to dress with style: Make a traditional knotted bun without being concerned about a few strands of hair peeking out of it. It’s a little bit of a thing.
16. Messy Boho Bun
Throughout the previous several years, messy, bohemian wedding hairstyles have grown increasingly trendy. And it’s easy to see why. They are simple to make, trendy, functional, and aesthetically pleasing. Shapes such as squares and ovals are ideal. How to dress with style: The ability to create tight curls may be really beneficial for this type of twisted low messy bun hairdo. Finally, embellish the bun with delicate flower arrangements for that gorgeous fairy-like appearance on your wedding day.
17. Messy Low Bun with Side Braid
This side French braidedmessy low bun is a terrific way to kick off this list with a hairstyle that is ideal for brides on their most important day. It looks fantastic with highlighted hair since it brings out the texture of the hair. Face shapes such as square and round are best suited for this style. How to dress with style: Using curling irons, curl your hair, but make sure the curls are not too tight. Create a braid on either side of your head and use bobby pins to attach the strands of hair that create the bun as well as the braids that vanish into the top of your head.
18. Meghan Markle’s Bun
Meghan Markle has been sighted with this low messy bun hairdo on several occasions, despite the fact that it has landed her into problems in previous years. And it’s for this reason that it’s becoming iconic. Ideal for: Faces with a heart or round shape. How to style: Using one twist of your hand, create a low bun in your untidy hair and fasten it with bobby pins to keep it from falling out. To show your face, tuck your bangs behind your ears and pull them back.
19. LowMessy Bun for Short Hair
You might have believed it was impossible, but females with shorter hair can also pull off a bun with confidence. Even more so if it’s a low and untidy bun. Ideal for: Faces with an oval or heart shape. How to dress with style: To create a fully random form at the back of your head, twist your hair around an elastic hair tie and secure it with it. Leave your bangs out to create a beautiful framing for your face.
20. Headband Messy Low Bun
This hairstyle is a playful variation on the low messy bun that is ideal for long hair that is not too thick. Face shapes such as square and oval are best suited for this style. How to dress with style: If you’re wearing a headband, place it or tie it a little bit beyond your hairline rather than tying it underneath your hair as you typically would. Then, as indicated in the photo, tuck hair from behind the headband all the way over the top of the headband.
Make it a little messy so that it appears more like a genuine bun, then spray it with a little hairspray to finish it off. This collection of low messy bun hairstyles is astounding in both its beauty and adaptability, and there is something for everyone among them.
Double Twist Low Buns
Posted on February 10, 2018 in Hair I don’t think I need to tell you how much I appreciate this particular style. (: Now that March is just around the corner, it’s giving me all of the Spring and Summer feelings I could ask for. If you don’t feel like washing your hair, this style can be achieved in only a few minutes and is a lot of fun. So if you’re in the mood for a bun (or two! ), I hope you’ll give this recipe a shot! Double Twist Low Buns Materials and Equipment:
- A rattail comb, two elastic bands, ten to twelve Bobby pins, and medium-hold hairspray
Instructions for making Double Twist Low Buns:
- To begin, separate the hair slightly off center and to the right, as shown in Step 1. Afterwards, zig zag the portion along the back of the head to complete the look. Step 3 / Take a portion of hair from the left side of your head and separate it into two smaller sections
- Step 4 / Cross the left strand across the right strand to complete the cross. Now, insert a new hair section into both sides and cross the left strand across the right strand once again
- Step 5 / Step 6 / Insert a new segment of hair into both sides and cross the left strand over the right strand to complete the look. Continue to add fresh parts to the braid by crossing the left strand over the right strand, and repeating the process until all of the hair from the left side is brought into the braid. Continue twisting the hair until it reaches the bottom of the braid, then secure the end with a clear elastic band. Wrap the braid over the nape of your neck and secure it with a few bobby pins
- Step 9 Now, using the hair on the right side of your head, repeat the previous procedures to construct a second rope braid. Tie the braid into a bun at the nape of the neck and secure it in place with bobby pins for the last step. Step 12 / Now, insert bobby pins into the twist to assist hold them in position
- Afterwards, go back over the twists and tug on the edges to make them appear larger. To finish, spritz the style with a medium-hold hairspray and smooth any flyaways down. Step 14 /
Reader Interactions
Aren’t space buns just the cutest thing ever? If you look around on the internet, it appears that space bun hairstyles are popular. Whether you are searching for sloppy space buns, braided space buns, low space buns, or half-up space buns, we will provide you with the necessary information in this post. Continue reading to find out how to make space buns the simplest way.
What are space buns?
Despite the fact that some individuals style them as low space buns or as a half-up hairstyle, the majority of people consider space buns to be two buns on top of your head.
(Example of two buns on the top of the head aka “space buns.”)
Space buns can be styled in the same way as sloppy buns. Alternatively, you may do ballerina buns. You may even want to experiment with braided buns. There’s a hairdo for every occasion, even formal occasions. What I like about the space bun hairstyle is that it is easygoing and enjoyable. It’s something I can’t seem to get enough of. Check out these simple step-by-step instructions on how to create beautiful space buns for your hair if you’re interested in doing the same with your hair. But first and foremost, here’s what you’ll need to get things started.
Space Buns Step By Step Instructions
You’ll need to prepare your hair for space buns before you can start styling it in them. First and foremost, brush your hair. This will assist you in keeping your hair free of knots and tangles after washing it.
2. Split your hair.
Now that you’ve finished cleaning your teeth, let’s go on to the next stage. Using a comb, separate your hair into two portions. In an ideal situation, you would split it along the center, resulting in two equal portions. Because I’m a stickler for perfection, I recommend separating your hair as straight and evenly as you possibly can. To create the portion, a pick or a small comb might be used. Make use of a mirror to double-check the accuracy of your space buns component. It is important to take your time with this stage since uneven volumes of hair can ruin your entire space bun hair style.
3. Add the ponytails.
Let’s get started with the ponytails once you’ve divided your hair into two equal sections. What you want to do is clump a piece of your hair together in one place. After that, pull your hair into a ponytail. Then position it so that it rests on the top and back of your head. You want to make sure that all of the bumps and clusters are smooth and uniform. As for the positioning of the hair, you may simply alter it later on to suit your own desire. Just keep in mind that the base of the ponytail will be the location of your space bun.
Make sure the second one is identical in appearance to the first one. Even more significantly, make sure to verify your positioning in the mirror before proceeding; otherwise, you will wind up with a crooked space bun hair.
4. Start working on the space buns.
It’s time to put the finishing touches on your ponytails by creating your space buns. Wrap the length of your hair around the base of your ponytail; this will serve as the focal point of your space buns. Next, use bobby pins to hold the freshly created buns in place while they dry. I would recommend that you use bobby pins that are the same color as your hair (or accessories, if there are any). This will allow you to get a seamless appearance. If you need assistance with this stage, you may view this video instruction on space buns.
5. Seal it with your spray.
You don’t want all of your hard work to go to waste once you’ve finished both sides, do you? Now that you have your space buns in position, the following step is to secure them. Make use of hairspray to get this look. After you’ve finished styling your adorable space buns, spritz them with hair spray.
Space Bun Hairstyle Ideas
Are you looking for additional space bun designs? Here are some fashionable suggestions for you to consider!
1. Space buns with braids
Do you want to learn how to create space buns with braids? Braided space buns elevate your look to a higher level of sophistication.
2. Half up space buns
Half-up space buns are a delightful variation on the classic. When you desire the comfort of letting your hair down but also want the trendy look of space buns, they are the perfect solution for you!
3. Messy Space Buns
What female doesn’t like a messed-up hairstyle? Messy space buns, on the other hand? That’s even better! Messy space buns are a great casual hairstyle for any occasion and can be worn at any time of year.
4. Space Buns For Short Hair
Interested in learning how to achieve space buns on short hair? This video is for you if you have hair that is at least shoulder length or longer.
5. Curly Hair Space Buns
Space buns may be worn by curly females as well! Your curls will give your space buns an extra layer of volume and elegance.
6. Low Space Buns
When most people think of space buns, they see them as being high on the head, yet low space buns are also quite popular. Follow along with this technique to achieve a fashionable low space buns appearance.
Space Bun Inspiration
Are you looking for some creative space bun ideas? Listed below are some other space bun ideas that you will adore!
1. Half Up Pink Space Buns
We can’t get enough of these adorable pink space buns that are half up.
2. Braided Pink + Rainbow Space Buns
What do you get when you combine a rainbow and space buns? Talk about a match made in heaven with these couple!
3. Edgy Purple Space Buns
Totally punk, these chaotic space buns with a flash of purple are perfect for a night out.
4. Space buns on natural hair with gold accents
Make your space buns more interesting by adding some unique decorations like these!
5. Low space buns with braids
This is a style that I’m really enamored with. Everything about these space buns is wonderful, from the braids to the buns to the buns themselves!
6. Space buns for kids
Can you believe how cute these space buns on this tiny child are? Space buns are a truly unique and entertaining mommy and me look.
With space buns, boring hair is a thing of the past.
Do you want to infuse a sense of playfulness and carefreeness into your personal style? Then you should try space buns! They were huge in the 1990s and are now making a resurgence in the 2000s. Are you looking for additional fashionable hairstyles?
- In 2021, you may experiment with 20 different fun rainbow hair color ideas. Try these 30 rose gold hairstyles for a fresh look in 2021. 50 Stunning Long Layered Hairstyles for the Year 2021
- How to Curl Your Hair With a Curling Wand: Tips and Tricks You Should Know
- Nine of the best dreadlock shampoos to use in 2021
From Ballet Buns to Space Buns, the Conair Bun-2-Done Brings Hairstyle History into the Future!
No one can deny that buns are now in style, whether they’re huge buns, tiny buns, side buns, high buns, low buns, double buns, untidy buns, or everything in between. If you do a little online investigation, you’ll find that the hashtag bunstyle has over 15,000 posts on Instagram alone. Bun That, I’ve been there! No one can deny that buns are now in style, whether they’re huge buns, tiny buns, side buns, high buns, low buns, double buns, untidy buns, or everything in between. A quick search on the Internet reveals that bunstyle has over 15,000 posts on Instagram alone, and that Pinterest has page after page of bun styling ideas!
Pull your hair back, pin it, and you’re ready to go!
A Different Approach to Rolling The use of a flexible heating wand is a new, practical, and simple method of creating the ideal bun, or two, or three!
Then, pull it out and let it unfold to make magnificent waves, just like that!
Conair Bun-2-Done is available in two color options: brown and blonde.
Place a heated wand in the centre of your hair and wrap your hair around the length of the wand to ensure uniform heat distribution.
And here’s a piece of advice: Alternatively, you may tie your hair into a ponytail and secure it with a ponytailer elastic before wrapping the wand around it.
After that, wrap your hair around the wand, making care to thoroughly cover it with your hair.
Make sure to leave the wand in place for at least 15 minutes for loose waves, or leave it in place all day for an on-trend bun.
Keep in mind that the look will vary based on how long your hair is up in the bun, as well as your hair type and texture.
Several wands are provided — split some with a pal to get twice the look!
One, two, or even three are OK!
Alternatively, you can bun your hair for a short period of time before flaunting your wonderful curls wherever life takes you.
Man, what a man!
View some of the Terracotta Warriors that date back to the third century!
Even Buddha, who lived in the sixth century, had a bun on his head.
The Maori referred to their man buns as tikitiki, and they were only allowed to be worn by those of the highest social status.
It’s all in Greek to me.
To demonstrate their social standing, Greek women tied their hair in buns at the back of the neck and accessorized their buns with jewels.
Generally speaking, the longer it took a lady to master her braided bun, the wealthier (and consequently more lovely) she was considered to be.
Hair that is too long The coiffures of fashionable women in 18th-century France were constructed from horsehair pads or wire cages.
The bun was considered overdone in ancient times!
In the 18th century, the French monarch Marie Antoinette was seen as a fashion idol, and her followers were encouraged to mimic her more ornate hairstyles.
Women in Regency England (1795-1830 or thereabouts) had a great crush on the old classical aesthetic — they copied the clothes of Greece and Rome and took the bun, but raised it higher in the air in order to modernize the look.
The hair was separated in the center, and the bun was emphasized with corkscrew curls around the head.
Buns in the Style of the Royal Victorians In fact, Queen Victoria was not exactly a party girl – and the buns that were popular during her time evolved into a more severe form, which was in keeping with the repression of the era that bears her name.
It was subsequently replaced by the bob, which became popular with flappers.
As the twentieth century proceeded, buns went in and out of fashion, and they came to be linked with a prim and correct demeanor and look.
Our wallflower takes her glasses off and unfurls her bun to display her real beauty, to to the delight of everyone around her!
Boogie Woogie in the Space Bundle A specific science-fiction film made its debut in the 1970s, and buns made a triumphant return to the world of food!
Space buns were launched into orbit thanks to the power of the movies.
Times of the Modern Era Even today, the bun is so intimately associated with the ballet that ballerinas sometimes refer to themselves as “bunheads.” Buns, on the other hand, are numerous and popular among both men and women nowadays.
There is something for everyone. Bun-2-Done® makes it simple to create the most delicious buns possible.