
Buns
How To Make Double Buns
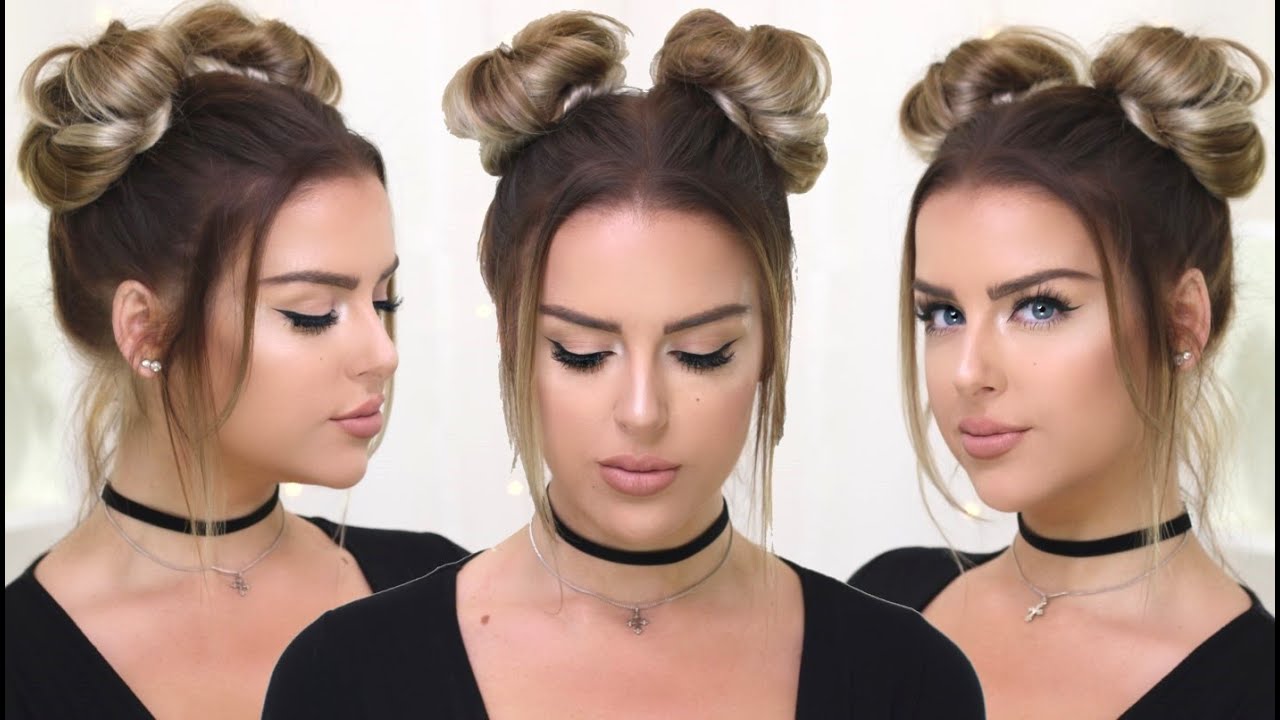
Jan
As we all know, two buns are always preferable to one, which is why today’s DIY hair lesson is a double bun! Despite the fact that this hairstyle is a little more whimsical than others, it is also really utilitarian due to the fact that it is extremely secure. So you could wear it for a casual day with friends or something more active like doing errands, exercising, or playing double dutch with a group of pals. Put yourself in touch with your inner Miley Cyrus with this 5-minute double bun DIY.
How to achieve the look.
Lightly tease each ponytail and then wrap each pigtail into a bun and fix it in place with bobby pins.
Pull pieces out slightly that appear to be being pulled tightly in the bun and fix them with hair pins to hold them in place in order to make each bun a bit broader.
Amelia Tatnall is a model represented by Rachel Brewer.
For anyone wondering why today’s hair tutorial appears to be familiar, it’s because I gave you a sneak peak at it when I posted thesunny striped DIY nailstutorial a few of weeks ago.
I’d be interested in hearing your thoughts.
How to Do Space Buns
Documentation Download Documentation Download Documentation The ultimate updo if you’re searching for something a little more out of this world than a ponytail or a top knot, space buns are the way to go. Space buns are casual, fun, and fashionable, and they look excellent whether you’re attending a music festival or watching Star Wars with your buddies. Seeing as it appears that space buns will not be departing our planet anytime soon, we’ve put together this guide to walk you through the process of making space buns from scratch.
Don’t be concerned; making space buns isn’t rocket science at all.
- Using a comb, brush your hair and part it down the center. Comb your hair until it’s smooth and free of knots or tangles, then style it as desired. And make a center part for your hair, use the handle of a rat-tail comb to run it down the middle of your head from your forehead to your nape
- 2 Make two pigtails in a row. Choose whether you want them to be high on the top of your head or low on each side of your nape—experiment to find out what works best for you. Smooth down the hair that will be pulled into the pigtails so that they are smooth and neat when they are finished. Hair ties in the color of your hair should be used to secure the pigtails.
- Allow a few strands around your forehead to hang free for a smoother finish.
- 3 Tease your pigtails if you want to add additional volume to your look. Start by lifting up your first pigtail and combing it a few times, starting at the tips and working your way down to the end of the hair tie. This should be done with the second pigtail as well. If you have thin hair, this is a fantastic idea since it will make your hair look thicker and result in larger space buns at the end of the day.
- If you like, you may wrap three-combhair extensions around the base of your pigtails as an alternative option. This will assist you in getting a bit greater volume
- 4Make your initial pigtail into a rope by twisting it over itself. Take one of your pigtails and twist it away from your face, forming a rope around your neck. The tighter you twist the rope, the sleeker and smaller your bun will come out
- 5Circle the rope into a bun and secure it with a hair band to keep it from falling down. Wrap the rope around the base of the pigtail to secure it in place. To avoid damaging your face, wrap the scarf away from you rather than towards it. Tuck the end of your hair into the bun, and then wrap another hair tie around the base of the bun
- 5 To make the second bun, repeat the procedure. Twist the second pigtail into a rope, then wrap it into a bun to finish it off. Secure the bun with a hair tie after tucking the ends of the rope under it 7 Make any necessary adjustments to your buns. Here’s where you may let your imagination run wild. Using your fingers, gently tug on the outside edges of the buns to loosen the strands if you want them to be messier or more voluminous. To add even more volume to your buns, gently tug on the hair that is being pulled into them to loosen it up. Consider the hair on the top of your head and the sides of your head
- If you accidentally left strands out of your buns, straightening them with a flat iron may be an option. Allowing them to have a wispier appearance by bending the iron towards your face rather than straight down
- 8Spray the space buns with hairspray to hold them in place. If your buns are feeling a little loose, use bobby pins to hold them in place. You can use as many bobby pins as you need. To finish your look, spritz it with hairspray and let it to dry.
- 1Brush your hair and then make a center part with it. Make sure your hair is lovely and silky by combing it. The handle of a rat-tail comb may be used to create a center part in the midst of your hairstyle. Begin at the top of your head and work your way down to the nape of your neck. Using your left half of your hair, drape it over your left shoulder, and your right half over your right shoulder
- 2 Pull one-half of your hair up into a loose bun to keep it off of your face and out of your way. Take the right part of your hair and bind it up with a hair tie to keep it in place. You can wear your hair in a loose bun or even pigtails. This is irrelevant
- The aim is to keep this part of your hair out of your way while you work on the other half. 3 On the left side of your head, pull your hair into a half-up ponytail. Create a horizontal portion on the left side of your head, about at the level of your eyebrows. Make a center part in the rear of your head, beginning at the hairline and finishing at the center part in the front of your head. Organize the hair above the part into a high ponytail and tie it off with a hair knot.
- If you want to wear your ponytail on the top-side of your head, rather than the back-center of your head, do so like a dog ear.
- 4If wanted, tease your ponytail a little. Because you will be dealing with less hair than you would while constructing a standard space bun, it would be a good idea to tease your ponytail a bit before you start working. Backcomb your ponytail towards the hair knot with a brush after lifting strands of hair from your ponytail
- 5 Twist the ponytail into a bun and bind it with a hair tie to finish the look. To begin, twist the ponytail away from your face to form a rope with your hair. After that, coil the rope around the base of the ponytail to form a bun with the hair. Tuck the ends of the rope beneath the bun and secure it with a hair tie at the base
- If you twist the space bun tightly enough, it will become smaller and sleeker in appearance.
- 6Untie the temporary bun from the other side and repeat the process on the opposite side. Return your attention to the right side of your head and remove the loose, temporary bun you formed previously. Create a second half-up ponytail, tease it, and then wrap it into a bun for another look. Another hair tie should be used to secure the bun. 7 If you like, you can tease the remainder of your hair. You are not have to do this, but it is a fantastic way to complete the vintage 90s style in your wardrobe. Alternative: If your buns are beautiful and smooth, you may straighten the remainder of your hair instead.
- 6Untie the temporary bun from the other side and repeat the process from the beginning. Return your attention to the right side of your head and remove the loose, temporary bun you formed earlier in this process. Twist and tease your hair into a second half-up ponytail before wrapping it into a bun. Another hair tie is used to secure the bun. 7 If desired, tease the remainder of your hair. Even while it is not required, it is a fantastic way to complete the vintage 1990s style. As an alternative, if you’ve made your buns lovely and smooth, you may straighten the remainder of your hair instead
- Finish by misting the space buns with hairspray after you’ve made any last adjustments. If your buns are feeling a little loose, use bobby pins to bind them to your hair. Once you’re satisfied with the overall appearance, softly spritz your hair with hairspray to finish it off. Allow the hairspray to dry completely before heading out
- Using a comb, brush your hair and part it down the center. Make sure your hair is lovely and silky by brushing it out. With the handle of a rat-tail comb, part your hair along the center from your forehead to your nape
- 2 Pull your hair into two pigtails and knot them together using hair ties to finish the look. Here’s where you may let your imagination run wild. It’s possible to wear two high pigtails at the crown of your head, or two low pigtails at the base of your neck. In order to get a Princess Leia-inspired style, you can even put the pigtails on the sides of your head, just over your ears.
- If you’re looking for something a little more complicated, consider half-up pigtails.
- 3 Braid the pigtails and bind them with clear hair elastics to complete the look. The initial pigtail should be divided into three equal sections. Cross the left and right sections over the central strand to form the braid. Once you’ve used up all of your hair, bind the braid with a clear hair elastic wrapped around the end of it. Repeat this procedure with the other pigtail as well.
- Instead, a 2-strand rope braid can be used to create a more distinctive design. This method is very effective for natural hair.
- 4 If desired, pull on the outside loops of the braids to make them appear more volumized. You are not need to do this, but it is a fantastic technique to add volume to your hair, especially if it is really thin in the first place. Gently tug on the outer loops of the braid starting at the bottom and working your way up till the top
- Repeat the same with the other braid
- If you used a 2-strand rope braid, you may skip this step. It is important not to pull too hard or the braid will come undone.
- 5 Tie the braids into buns and fasten them with hair ties to keep them in place. Pick up the left braid and wrap it around the hair tie to form a bun on the top of your head. Tuck the braid’s end beneath the bun, and then wrap another hair tie around the bun’s base. Repeat with the other braid. Then repeat the process for the other braid.
- If you want to make a regular bun, do not twist the braids into a rope like you would for that.
- 6 Make any necessary adjustments to your hair, then spritz it with hairspray. If your buns are feeling a little loose, pin them down along the side borders to the rest of your hair, using as many bobby pins as necessary. As soon as you are satisfied with the appearance of your space buns, spritz them with hairspray and allow the hairspray to dry
- Straightening the remainder of your hair for a smoother look is recommended if you wore braided half-up buns.
Create a new question
- QuestionWhat should I do if I have really curly hair? Straightening procedures that do not require heat are available (check out How toStraighten Your Hair Without Heat). In fact, I believe that messier, curlier buns look better than perfectly straight ones. I’ve seen folks with really curly hair pull it off without having to straighten their hair beforehand. In the event that it is really difficult to obtain an even part or to get the hair to twist, try drying it rather than getting it wet. How can I accomplish this with hair that is prone to tangling? There are a plethora of solutions available to help you untangle your hair. Aside than that, I recommend moving extremely slowly and gently, combing your hair and untangling any tangles as you go
- Question Is it possible to braid the pigtail instead of twisting it? Certainly, braid the ponytails, then wrap them around like buns and put them in place with bobby pins
- Question What is the best way to get my hair straight without brushing it too hard? Mackenzie RomeroAnswer from the Community You may always use a straightener, but be sure to maintain the heat on a low setting. It is not required to be perfectly straight. Once on low, increase the intensity by one level
- Question everything. What is the best way to make bigger buns? Making the buns looser will make them look larger, and this is something you can do
- Question Is it still possible for me to do it if I have really long hair? EmmaLee HudginsAnswer from the Community Yes, it is possible. They may appear larger, though, depending on how tightly you twist or braid your hair
- Question What can I do to make them seem more even? Answer from the Writersgem Community Make sure your middle parting is equal and straight. Using a large number of bobby pins and beginning with pigtails is also a good idea. Is it possible to accomplish this with short hair? It is recommended to use low buns instead of high buns if the length of your hair is insufficient to reach high up onto your head
- Question How can I make them even and ensure that they don’t wriggle around? Use bobby pins to keep them from wriggling, and if you don’t have any bobby pins, use more hair ties to keep them in place. Take your hair and equally divide it down the center, using the middle hair line, to get an even distribution. Question Is it still possible to do space buns if my hair is barely up to my shoulders? A half-up, half-down style, as seen in part 2, should be doable with your current amount of hair.
More information on the replies Inquire about something There are 200 characters remaining. Include your email address so that you may be notified when this question has been resolved. Submit
VideoRead Video Transcript
- Make the space buns as clean and elegant as you like, or as loose and sloppy as you want
- The choice is yours. Make some streaks in your hair with hair chalk before you begin to give it a more vivid appearance.
Thank you for submitting a suggestion for consideration!
Things You’ll Need
- Hairbrush, rat-tail comb, four hair ties, Bobby pins, hairspray
- Hairbrush, rat-tail comb, four hair ties, Bobby pins, hairspray
- Hairbrush, rat-tail comb, 4 hair ties, 2 clear hair elastics, Bobby pins, hairspray, and a hair tie holder
About This Article
Summary of the ArticleXTo style your hair into space buns, part your hair down the center. Then, using hair ties, knot each part of your hair into a pigtail on the other side. Twist one of the pigtails with both hands to make it a little more secure. You will achieve smaller and firmer space buns if you twist your hair in a tighter manner. Continue wrapping the twisted hair around the base of the pigtail many times until you have around 4 inches (10 cm) of hair remaining. Put the end of your pigtail below the bun you’ve just created, and secure the bun by putting a bobby pin in the end of your hair where it tucks under the bun and through the bun.
Finally, spritz your space buns with hairspray to ensure that they stay in place throughout the day.
Continue reading for more information, including instructions on how to create braided space buns. Did you find this overview to be helpful? The writers of this page have together authored a page that has been read 552,378 times.
Did this article help you?
After all, why limit yourself to one bun when you could have two buns? Space buns are another term for the two bun hairstyle that was made popular by Star Wars heroine Princess Leia (therefore the other common name for the hairstyle: space buns). After then, it became fashionable in the 1990s thanks to celebrities such as the Spice Girls and Gwen Stefani (during herNo Doubtdays). Fast forward to the present day, and this haircut can be found pretty much anywhere—from festivals to your local streets to the red carpet and runway, and everywhere in between.
the festival hair queen!) to demonstrate how to get them.
First, we’ll have a look at what to do.
Divide your hair into two sections.
Begin by dividing your hair (down the center) into two equal portions with a comb or your fingers, then styling them as desired. Next, bind each portion into two low ponytails using hairbands to complete the look. To make your double low buns seem especially smooth and sleek, apply a serum such as theTONI GUY Shine Gloss Serum to help slick down any flyaways and give shine to your hair. Step No. 2
Tease and twist your pigtail.
It’s now time to get down to business! Take your first ponytail and gently twist it all the way down to the end of your hair. Repeat with your second ponytail. Step number three.
Create a bun.
To make a bun form, begin by wrapping your hair around the base of the ponytail and continuing to wrap until you have a bun shape. Once you’ve achieved the desired shape, pin it in place with as many bobby pins as necessary to keep the style in place. Step number four.
Create your second bun.
To construct your second bun, tease and twist your second ponytail like you did with the first. Step number five.
Your two buns hairstyle is complete!
The result is a pair of sparkling double low buns that will steal the show at your next gathering! Suggestions for styling: Worried that your perfectly coiffed buns may come undone? Put some VO5 Ultimate Hold Hairspray on them and they’ll be ready for any party you can throw. In addition to helping to keep your buns in place all day, this fast-drying hairspray will also protect your hair from frizz and humidity. Isn’t that interesting?
Sign up to our newsletter and get exclusive hair care tips and tricks from the experts at All Things Hair.
Articles before and after this one
Hot Right Now
Who doesn’t like a good bun? Much while buns are a terrific method to style your hair, did you know that there is something even better than buns? Double buns, please! The double bun hairstyle is a charming technique to arrange your hair and dress it up a little bit more. There are a variety of methods to style this stylish do in order to be ready for your next music festival appearance.
1. Braided Double Buns
This hairdo is perfect for anyone who enjoys buns and braids as a style. It is possible to braid your hair in the back before creating double buns with your hair. This offers you a bohemian and adorable appearance. Your hair will look fantastic from both the front and the rear of the head.
2. Half Up Half Down Buns
This is for anyone who like wearing their hair in buns or letting their hair down.
You may wear your hair in two little double buns and leave the rest of it down if you want. Curling your hair or giving it beach waves can make your double bun hairstyle even adorable, so experiment with it!
3. Basic Double Buns
This is for the females who just want their double buns and want to make things as simple as possible. Having half your hair down or in braids isn’t what you’re looking for? Isn’t it true that the simpler the solution, the better? If that’s the case, this double bun hairstyle is perfect for you!
4. Slight Pigtail Double Buns
This is the style for you if you enjoy letting some of your hair down. A double bun, in essence, with the strands of your hair showing through is what this is. Whoever likes adorable pigtails at the rear of their heads will enjoy wearing this. Your hair will look wonderful in this style, and it’s charming.
5. Half UpHalf Down Curly Buns
Take note of all the curly-haired ladies out there! Yes, it is still possible to wear double buns with curly hair. This is a fantastic technique to style your hair and keep your lovely curls in place. Although it is basic and straightforward, the curled locks will give your hair a more formal appearance.
6. Double Buns With Bangs
Is it true that some individuals are infatuated with bangs? If this is the case, then this double bun hairstyle is perfect for you. Simply twist your hair into two double buns and leave your bangs out to create a charming style for yourself. For those who want their double buns to appear even better, you may also add fake bangs to your hairstyle.
7. Braided Double Buns
This hairstyle is identical to the first double bun, but instead of braiding in your buns, this hairstyle just includes two basic braids in the back to complete the look. Because there are no braids in the actual space bun, this is another another wonderful hairstyle for you all to replicate and experiment with!
8. Half Down, Half Up, And Braided Double Buns
The majority of your hair will be left down for this particular haircut. The braids, on the other hand, are the nicest part. Your braids will be in the front of your head in a diagonal line, leading up to your double buns at the back of your head. This is a really fashionable appearance for anyone who wishes to experiment with a boho haircut.
9. Lower Double Buns
Double buns are worn all the way to the top of the head by the majority of the population. The low-key double bun is the perfect hairstyle for anybody who prefers a more understated look. Due to the fact that you tie them at the rear of your head rather than the top, it’s similar to pigtails with buns.
10. Hair Chain Double Bun
With a hair chain, you can get a half-down, half-up style that’s a bit more sophisticated than the last one. Anybody who is ready to experiment with this boho hairstyle will be pleased with the results. It’s fashionable, which makes it ideal for festivals and the summer months!
11. Fishtail Double Bun
This fishtail braided double bun hairstyle is perfect for anyone who is infatuated with fishtail braids. Basically, you’ll have your fishtail braids at the top of your head that will flow into a double bun in the back. At the rear of your head, your double buns will be positioned at the bottom.
12. Fishtail Half Down, Half Up Double Buns
This is a haircut that is similar to the one described above. The fishtail braids in this hairstyle, on the other hand, are at the front and top of your head, and they lead into double buns at the top of your head, rather than the back of your head.
You’ll also have half of your hair down, which is a nice touch. This double bun hairstyle is ideal for you to try out this season!
13. Twisted Double Buns
You’ll twist strands of your hair before wrapping it into a double bun for this basic yet adorable hairdo. Image courtesy of Shutterstock. The twisted double buns hairstyle will result as a result of this. The top of your hair will be made up of twisted strands of hair that will be tied into buns.
14. Loose Braided Double Buns
This is the perfect hairstyle for anyone who is infatuated with loose and huge braids like I am. The rear of your head will be covered with dramatic braids that will lead to double buns at the top. These double buns will be little and will be located at the back of your head at the bottom, but it is still a cute style that you can simply replicate.
15. Straight half down, half up look
This hairstyle is identical to the previous two, except instead of having wavy hair, the bottom half of your hair will be smooth and straight. Afterwards, you’ll have two adorable buns at the crown of your head for a charming hairdo. These double hair bun designs are ideal for festivals, as well as for everyday use in the spring and summer months. They make such a powerful statement, yet they’re also quite easy to execute. Some styles will take longer to complete than others, but in general, your hair will be the center of attention, and everyone will be envious of how fashionable your hair will be!
Would you rock a double bun hairstyle? Let us know in the comments below!
Linda Tran is a student at Southern New Hampshire University, where she is majoring in Marketing with a focus on Social Media.
Double Buns: 3 Rad Ways to Wear the ’90s Hairstyle
Alessio Botticelli courtesy of GC Images When you double the bun, you get double the enjoyment. ofia Richie and Cara Delevingne have been rocking the messy bun and the top knot for quite some time, so it was only a matter Isa time until they were tired with their hairstyles. While the sort of bun you wear on a daily basis says a lot about you, it says even more about you when you’re prepared to branch out and try something completely different. As celebrity hairdresser Suzie Kim explained, “Most people are scared by a double-bun style because it might appear immature, but it’s a really exciting, of-the-moment haircut for summer.” In case you’re interested in giving it a shot, here are three straightforward variations you may attempt at home!
- Melissa Hebeler is a reporter for E!
- The first step is to divide your hair down the center and tie each piece into two low ponytails.
- News.
- Step 2: In Suzie’s opinion, “you may spritz a little dry shampoo on the area before you tease to give it a little texture if desired.” Melissa Hebeler is a reporter for E!
- Tie the hair around the base of the head and fasten with bobby pins.
- According to Suzie, “This is an editorial style, so you should only take this path if you’re a high-fashion sort of lady seeking for some fresh edge.” Melissa Hebeler is a reporter for E!
- In the first step, instead of splitting your hair down the center as you normally would, separate it horizontally, dividing it into two portions.
Melissa Hebeler is a reporter for E!
3.Place the bottom bun in the center of the lower part and wrap both buns loosely together, taking careful not to pull your hair all the way through the loops.
“This double wrap gives you volume without the need to tease your hair,” the stylist said to clients.
News.
And that’s the end of it!
Melissa Hebeler is a reporter for E!
The first step is to part your hair vertically down the middle and tie it into pigtails at the top and center of your head.
Using your fingers, gently tease the bottom of each ponytail to give the bun a little extra volume.
News.
“I believe it looks better if you leave the tails out because it gives it a dirtier, more playful air,” the expert said.
Melissa Hebeler is a reporter for E! News. Step 4: Examine them in the mirror to ensure that they are evenly spaced. “If you make a mistake, feel free to pin it away until it is exactly where you want it,” Suzie said. That’s what we call buns in this part of the world, hun.
How to Do Space Buns
Artist Alessio Botticelli (GC Images) has created this image. Adding a second bun means more enjoyment. Because celebrities such as Cara Delevingne and Sofia Richie have become familiar with the messy bun and the top knot, they were bound to get tired with them sooner or later. While the sort of bun you wear on a daily basis says a lot about you, it says even more about you when you’re ready to branch out and try a rad, new style on the regular. As celebrity hairdresser Suzie Kim explained, “Most people are scared by a double-bun style because it might look immature, but it’s a really exciting, of-the-moment haircut for summer.” In case you’re interested in giving it a shot, here are three easy variations you may attempt at home!
- News photographer Melissa Hebeler The first step is to part your hair down the center and tie each section into two low ponytails.
- News photographer Melissa Hebeler Using an ateasing brush, tease each ponytail upwards while twisting it loosely.
- News photographer Melissa Hebeler To finish, wrap a bobby pin around the base of the hairstyle.
- According to Suzie, “This is an editorial style, so you should only take this path if you’re a high-fashion girl searching for a newfound edge.” E!
- Step 2: “Position the top bun where it feels most comfortable on your head—if you have a round face, place it higher up on your head; if you have a longer face, place it lower,” explained Suzie.
- News photographer Melissa Hebeler 3.Place the bottom bun in the center of the lower part and wrap both buns loosely together, being careful not to pull your hair all the way through the buns.
- A professional said that “this double wrap offers you volume without the need to tease your hair.” E!
This is the end of your work!
E!
To ensure that your eyebrows are evenly spaced and that they aren’t too far apart, the stylist recommends checking yourself in the mirror.
E!
“I believe it looks better if you leave the tails out because it gives it a messier, more playful air,” the pro said.
E! News photographer Melissa Hebeler In Step 4, check to see if they are evenly spaced in the mirror. “If you make a mistake, feel free to pin it away until it is exactly where you want it,” Suzie added. That’s what we call buns in this part of the world, huh?
HOW TO GET A SPACE BUNS HAIRSTYLE
Gather your materials and then begin working on your space bun style. What you’ll need is the following: a brush for your hair Elastics that are transparent Bobby pins are a kind of pin. Advanced Hairstyle from L’Oréal Paris LOCK IT DOWN Controlling the Weather Hairspray How to get the look:
STEP1: BRUSH YOUR HAIR
While this step may seem self-explanatory, it’s critical to begin by combing your mane to verify that it’s free of any tangles or knots before proceeding.
STEP2: PART YOUR HAIR
By making a center part in your hair, you may divide it into two equal portions. It is critical to ensure that your part is as straight as possible, with the equal amount of hair on either side, since this will make or break your overall space bun appearance!
STEP3: CREATE SOME PONYTAILS
One part of hair should be gathered and tied into a ponytail at the top of your head, toward the back. Make sure to smooth out any kinks that may occur during the process. Your ponytail’s location can be customized to suit your needs; however, bear in mind that the base of your ponytail will be located where your space bun is. Following the completion of one ponytail on one side of your portion, proceed to build a duplicate ponytail on the other side. You don’t want your space buns to seem asymmetrical, so make sure you duplicate your positioning!
STEP4: MAKE YOUR BUNS
To make your space buns, you’ll want to wrap the length of your hair around the base of your ponytail from the front to the back. Hold this freshly created bun in place as you pin it down with bobby pins to finish it off. Make sure to use bobby pins that are the same color as your hair for a seamless appearance! Repeat the process on the opposite side.
STEP5: SEAL THE DEAL
Hairspray should be used to finish the appearance since you don’t want all of your hard work to go to waste. That’s all there is to it, unless you want to go all out and accessorize your space buns for a truly beautiful look. More on it in a moment!
3 WAYS TO MAKE YOUR SPACE BUNS OTHER-WORLDLY
Want to improve the look of your space bun style even further? There are a variety of ways you can make your space buns seem extraterrestrial, and we’ve included three of our favorites below.
OPTION1: ADD COLOR
Surely you agree that such a colorful haircut goes wonderfully with such a joyful color palette? Make your buns pop with a temporary hair color from theL’Oréal Paris Colorista 1-Day Spray or theL’Oréal Paris Colorista Hair Makeup 1-Day Colorlines. Get creative with your hair color! It’s easy to maintain your space buns hairdo with temporary hair colors from both lines because they wash away in only one shampoo. Instead of going full out with color, you may use the wash out hair color to highlight your roots only—this is one of our favorite festival season looks.
OPTION2: ADD GLITTER
Besides being a major hair color trend right now (hello, festival hair), glitter roots are also the perfect technique to help your space buns style seem like it came straight out of the Milky Way. Sprinkle some glitter throughout your roots and finish the look with some hairspray for a quick and easy look.
OPTION3: ADD FUN HAIR TIES
When everything is said and done, there is no easier way to personalize a space buns hairstyle than by using a few colorful hair ties to bring it all together. Remove the transparent elastics from your wardrobe and replace them with cuffs, coils, and bows. After you’ve finished building your space buns, you can dress them up with a colorful accessory such as a hair clip or a flower crown. You have the entire universe of accessorizing at your disposal.
Now that you’ve learned how to do space buns, as well as a few tips and tricks for taking your space buns hairdo to the next level, why not learn how to create the ideal makeup look to go with them? Here are three galaxy-inspired makeup ideas for an out-of-this-world appearance.
Two Buns Hairstyle: 19 Ways to Wear Double Buns
Everyone reaches a point where their top knot has reached its maximum potential. A certain amount of time spent wearing your hair in the same style might leave you feeling like you’re stuck in a rut with your hairstyle. Even though you were once infatuated with your top knot, you may now find yourself yearning for newer designs to incorporate into your routine. What is a female to do in such a situation? The knotted hairstyle does not have to be fully abandoned, though. Alternatively, you may divide it in half and go for a stylish double bun appearance.
If you have worn your hair in the same two buns hairstyle for the most of the decade, you will be pleased to hear that there are a variety of other possibilities to check out this time around.
With everything from tightly braided knots to gravity-defying buns, you’ll never get tired of this hairstyle for a long time.
Click through the picture for some double bun hair ideas, and you could just find yourself entirely forgetting about your old top knot.
20 Stunningly Easy DIY Messy Buns
As a child, I’m sure your mother did everything she could to ensure that your hair was never unkempt or frizzy. However, now that you’re an adult, having disheveled hair is the most fashionable appearance to have! Messy hairdos have seized the globe in the same manner as Thanos did, and it is scarcely surprising that they have done so. Messy hairstyles have a hippie and carefree vibe to them that it’s difficult not to adore them. They’re similar to that one cool person in high school who everyone admires and respects.
You can get that flawless I-just-got-up-and-I-look-this-awesome look in just 5 minutes with the messy bun, which is one of its finest features.
20 Incredible And Easy DIY Messy Buns
- Separate your hair into two parts and pin them back. Hold them in such a way that they resemble two pigtails
- Tie the two parts together with a knot. Take an elastic band and wrap it around the knot below the knot’s center
- Separate the hair below the elastic band into two sections and tie them together in another knot if necessary. Another elastic band should be tied under this second knot. According to the length of your hair, the number of knots you’ll need to tie is determined by this. You should tie two knots in your hair if it is shoulder length. However, if your hair is longer, you will require more knots. The knots should be folded up and pinned in place, with the ends left out. Tugging the hair at the crown will help to create more volume at the top and make the hairstyle appear more messed up. Finish with a spritz of hairspray to keep the style in place
- And
2. Messy Sock Bun
- Leave your bangs out of your hair and pull it back into a high ponytail using an elastic band
- Placing the donut band at the base of the ponytail is the first step. Relax and let your hair to fall over the doughnut band. Make your hair into a bun so that it completely covers the band
- Maintain the style of the covered hair by binding it with an elastic band. Wrap the remainder of your hair around the base of the bun and secure it with a hairpin
3. Messy Wrap Around Bun
- Using a mid-level ponytail, tie your hair back at the front, leaving some hair hanging loose. To hide the elastic band, take a short length of hair from the ponytail and wrap it gently over the base of the ponytail. Make cautious not to wrap the hair too tightly
- Otherwise, it may break. To do this, take another portion of hair from the ponytail and wrap it around the section you just wrapped around. Repeat the process until the ponytail is completely wrapped and secured in a bun. Make a sweeping motion with the front area of hair to one side (mimicking side-swept bangs). Make a comb out of it and neatly wrap it around the base of the bun. If you have short hair, you may pin this portion just above the bun
- If you have longer hair, you can pin it just below the bun.
4. Messy French Fishtail Bun
- Take a section of hair from the front and pull it gently to one side. Separate it into two pieces
- And Make a French fishtail braid out of the two pieces you just created. Continue to weave the braid while adding more hair to it. Despite the fact that the braid begins at the side of the head, it will eventually go to the middle of the crown. Hold the braid in place with a pin. Pull the remainder of your hair into a high ponytail and secure it with an elastic band. To do this, take an elastic band and slip your hair through it somewhat, but not entirely. Bring the elastic band around to the opposite side by twirling it around. Ideally, the top part of your hair should be pulled back into a bun. Put part of your hair in a bun and wrap it around it. Make the bun appear larger by pancake-ing it. It should be pinned at the sides.
5. Messy Double Knotted Bun
- Start with freshly washed and blow-dried hair. Using a comb or a brush, detangle your hair. Make a dividing line through your hair
- Make a low ponytail out of your hair and secure it with an elastic band. Create two sections out of your ponytail: one on the right side and one on the left side of your ponytail Tie the two parts together with a knot. Make certain that the knot is loose and that there is some space between it and the elastic band. Underneath the first knot, tie another knot. If you have long hair, you can add a couple more knots to your style. Tie an elastic band under the second knot to keep both of the knots together for safety. This will result in a braided knot
- To make a bun, lift the knotted braid and roll it up. Hair pins should be used to hold the knotted bun in place. Hairspray should be applied in order for the hairstyle to last for a few hours.
6. Messy Double Braid Bun
- Backcomb part of the hair near the crown to create a tease effect. To make this section more orderly, comb the top of it. All of your hair should be pulled back and tied in a high ponytail, with only your bangs left out
- Separate the ponytail into two halves. Make each part into a three-strand braid in the traditional manner. Make the braids into pancakes. Don’t try to smooth the stray hair down because you want the hairstyle to look a little disheveled. Take one braid and wrap it around the base of the ponytail
- Repeat with the other braid. Hold it in place with a pin
- Make a duplicate of the first braid with the second braid
- To keep it in place, put some hairspray over it
7. Messy Flipped-In Bun
- To make a high ponytail, gather your hair and tie it up tightly. After flipping your hair over, pull it through the ponytail until it reaches just before the elastic band. Pass it through but don’t let it go through entirely. Form a bun by wrapping the lower part of one’s hair around the bun’s foundation and pinning it in place. Make the bread into a pancake
8. Messy Low Side Bun
- Detangle your hair by comb it through
- Make a low side ponytail out of your hair by gathering it and holding it in place. Leaving a few strands of hair out in the front, secure the upper part of your hair in a bun with an elastic band and allow the lower half to hang loose. The bun must have a sloppy appearance
- Bun up the bottom part of your hair, letting the ends to hang loosely, then pin it up beneath and around the bun
9. Messy Braid Bun
- Detangle your hair by comb it through. Part it the way you normally would
- Separate your hair into two pieces, and then braid each portion into a loose braid on the other side. In addition to traditional braids, pull-through braids and basic twists are all options. This hairstyle may be achieved with any braid. One braid should be aligned along the hairline at the nape of your neck so that the end of it reaches the ear on the opposite side of your head. Pins should be used to hold it in place. If your hair is lengthy, tuck the additional section within the braided section that is aligned with your face. Make a duplicate of the first braid with the second braid
10. Messy Braid Wrapped Bun
- Tie your hair up in a high ponytail at the back of your head, leaving the hair closest to your hairline out of the ponytail
- Make a ponytail out of your hair and clip it up. Divide the remaining hair in half and braid each side into a braid to complete the look. Wrap the ponytailed hair into a bun and secure it with a hairpin
- The braids should be crossed such that the left braid ends up on the right side of the bun, and the same goes for the right braid. Hold the braids in place using pins.
11. Messy Two-Minute Bun
- Make a low ponytail out of all of your hair and secure it with an elastic band. Make a slit in your hair just above the elastic band to create a space
- The ponytail should be pulled up and passed through this opening. Roll the ponytail’s tail upwards and pin it up over the space in the ponytail
12. Messy Double Flipped-In Bun
- Organize your hair into a low ponytail, leaving some hair on the sides and the front to show through. The ponytail should be pulled up and inside itself just above the elastic band. Taking the hair from both sides, knot it in a ponytail that sits directly on top of the first ponytail
- Pass the second ponytail through the second ponytail, just before the elastic band, to secure it. Tie the ends of both ponytails together with an elastic band after gathering all of the hair
- Flip the hair over and tuck the tied-up ends between the first two ponytails to complete the look. If you want to keep the bun in place, you can use pins.
13. Messy Double Dutch High Buns
- From the front of your head to the nape of your neck, divide your hair in half. Begin at the nape of your neck and work your way up, creating a Dutch braid with the hair on your right side
- Once you reach the top of your head, you can stop braiding your hair. Wrap the rest of your hair into a haphazard, untidy ponytail. You may use your hair to make the bun appear larger by pancakeing it. To complete the left side, repeat the process.
14. Messy Double Braid Bun
- Make a slanting part in your hair
- Make a section in the front of your hair
- Hairstyle: Part your hair in half at the back of your head
- Make a sloppy bun out of one part by twisting it around the other half. Allow the ends to fall out on their own. Continue with the second half of the sandwich
- Make two braids (one on each side) out of the side-parted hair you had left out in the front of your hair. Pin both braids over the bun, tucking the ends of the braids into the bun
15. Messy Criss Cross Top Knot
- Separate your hair into two sections: one for the top and another for the lower half. Wrap the top part of your hair in a bun and secure it with a pin. Divide the bottom half into two equal halves
- Take the right half and cross it over to the left side to complete the division. Using the ends of the bun, wrap them around it
- Then take the left portion and cross it over to the right section. It should be wrapped around the bun. Make a copy of the left portion and repeat the process. Stabilize the hairstyle in place using bobby pins
16. Messy Twisted Top Knot
- Make a high ponytail out of all of your hair and divide it in half
- Turn both parts of the ponytail in the same direction. Bun the twists together by wrapping them around each other. Pin the bun in place with a hairspray, and style as desired.
17. Loose Messy Top Knot
- Using a comb, detangle your hair
- Tease your hair from root to tip. Your hair should appear thicker as a result of this. Take care to gather all of your hair, leaving a few strands free at the back of your head. You’ll see a pouf-like shape towards the entrance of the room. Hold your hair in a high ponytail and softly twist it. Make a bun out of your hair and fasten it with an elastic band and hair pins
- You have the option of curling or leaving the loose strands as they are.
18. Messy Knotted Bun
- Dividing your hair into three portions: one huge center section and two little side sections
- Dividing your hair into three sections Take the huge middle part and divide it in half
- This will provide two halves. Make a knot with both sections of the rope
- Continue tying knots in your hair until you reach the end, depending on how long or short it is. Pin the twisted bun in place using safety pins. The two smaller side parts should be tied together in a knot just below the knotted bun. Continue tying knots in your hair until you are practically at the end of it, depending on how long your hair is. Tie the ends of the twisted bun together
19. The 10-Second Top Knot
- First, screw up your hair
- Then, mess up your clothes. Gather all of your hair into a high ponytail and secure it with a hair tie. With one hand, keep the base of the ponytail in place while the other holds your hair out of the way. Make a twist on your hair
- Form a bun out of the knotted hair by wrapping it around itself. Make it possible for the ends to slip free
- Lifting the bun higher will give a pouf effect. Make a bun and secure it with an elastic band and a few hair pins.
20. The Perfect Messy Bun
- Gather all of your hair together and tie it up in a high ponytail with one hand
- Pulling a few hairs from the front hairline to frame your face with your other hand is a nice touch. One end of an elastic band should be held at the base of the ponytail, and the other end should be pulled over your hair. Don’t put all of your hair through the elastic band at the same time. Remove the ends from the equation. A bun is formed by twisting and leaving the ends hanging loose
- To fix the bun, twist the elastic band and pass it over it many times, enabling the loose ends to be knotted in as well. You’ll find that this causes your hair to become tangled
- With a few bobby pins, you can secure the ends even more in place.
Listed here are 20 sloppy updos that are simple and quick to do. The sloppy pouf bun is one of my favorite hairstyles. Which one is your favorite, and how did you find out? Please let me know by leaving a comment below! Was this article of assistance? The following two tabs alter the content of the section below.
25 Cutest Two Bun Hairstyles for Women
Double buns are currently at the height of their popularity, and there appears to be no end in sight. And with so many various styling possibilities, it’s really no surprise that this charming hairdo has risen to the top of the hairstyling world’s popularity rankings.
Origin of Double Bun
Do you believe that Miley Cyrus’ twerking head was where the double bun initially appeared? Reconsider your position! The two cinnamon buns have a lengthy history, which may be traced back to Princess Leia, who wore double cinnamon buns in the Star Wars film series. Since then, the trend has developed from Brandy’s stunning twocornerbuns in Moesha to Gwen Stefani’s rockstar platinum blonde mini bun hairstyles to Gwen Stefani’s rockstar platinum blonde mini bun hairstyles.
The two buns hairstyle has gained in popularity in recent years, as seen by celebrities such as Kylie Jenner and Rita Ora. Simple double top knots to more boho-inspired half updos with disheveled double buns and wavy hair below, there is a style for everyone.
How to Do Two Buns
Two bun hairstyle is quite simple to get. Two elastic hair ties and a handful of bobby pins are all you’ll need to complete this look. Pulling your hair up into two ponytails and wrapping them into buns is what you’ll be doing. Using bobby pins, secure the hair securely and you’re done! In less than 5 minutes, you’ll have a gorgeous, highly stylish haircut on your head. Watch the following video to learn how to arrange your hair in a double bun.
How to Style Two Buns with Hair Down
With the exception of the fact that you will need to cut off portion of your hair to leave down, creating a double bun hairdo with the hair down is practically the same as creating a conventional bun hairstyle. Sectioning your hair into two high ponytails on top can help to keep the top strands in place. You will next wrap the hair into smaller sized double buns and secure them with bobby pins to keep them in place. After that, you may style the remainder of your hair anyway you want: straight, highlighting natural curls, or curling/crimping to your heart’s content.
How to Style DoubleBraided Bun
If you want to place braids in your two buns hair, all you have to do is take a segment of hair and braid it before tying it into a ponytail, as seen below. If, on the other hand, you simply want the braid to be incorporated in the actual bun, draw your hair into a ponytail first and then plait your braids before wrapping them into buns. The braid style you pick will determine the sort of sectioning that will be done. For example, braids starting at the nape of the neck will be French braided all the way up to a high ponytail before being bunned together.
Always keep in mind that when creating any sort of two bun hairstyle, you should adhere to the same basic structure:
- Make a section in your hair
- Braid your hair to begin, or pull it into high or low ponytails wherever you choose
- Tie your hair around the elastic and secure it with bobby pins
- If you’re making a half-updo, feel free to style the loose strands anyway you want
Create and style two braided buns with the help of the video tutorial below.
Double Buns vs Space Buns
Space buns and double buns are essentially the same item, and the terms can be used interchangeably when referring to the same thing. While some may claim that space buns have a larger appearance and are put more on the sides of the head, two buns may be worn in a variety of fashions including a half updo, tight at the top of the head, and loosely pushed together, among others.
Amazing Two Buns Hairstyles
The following are the many bun hairstyles that Princess Leia wore in Star Wars. Take a look at these two buns to see how you may change your look.
1. StackedBallerina Buns
A haircut like this should be used as inspiration if you wish to achieve elegance in your appearance. Her two buns are placed on top of one other and neatly wrapped to form the traditional, stylish ‘ballet bun.’ The elegance and beauty of ballerina buns are undeniable, but we adore how she added a modern twist to her style by stacking them one on top of the other. The addition of the beaded hairpiece completes the look with a nice finishing touch.
Pull your hair back into two little ponytails that are stacked on top of one another. Wrap your hair tightly into buns and put them in place with bobby pins. Check to see if the buns have been touched. If desired, add a hairpiece like this to complete the look.
2. Rocker Buns
The idea of this punk rock ensemble is one of individuality and creativity. Colors like deep scarlet and violet-blue are thrilling and punk, while the themessy bunhalf updo keeps things appearing modern and entertaining. The rich colors she chooses for her appearance lend a personal touch, and the strands of hair left out of her bun and in front of her face give her hair some character and dimension. Even if you don’t have brightly colored hair, you can pull off this look. Separate your hair into two sections: top and bottom.
It’s important not to wrap the buns too tightly since you want some strands to slip out.
3. LowDutch Braided Buns
This outfit exudes every ounce of appeal you could possibly desire. Double low buns with a Dutch braid are a wonderful hairstyle that combines the softness of a Dutch braid with the pleasant design of two low buns. What was the ultimate result? A brilliant and beautiful finish that is appropriate for any and all occasions. Despite its delicate shape, this hairstyle is quite feminine, making it ideal for the woman who prefers to have a softer, more ladylike appearance. Organize your hair by splitting it down the center and starting with a Dutch braid on both sides.
At this stage, you can begin to twist the ends together to produce buns that are not too tightly wound.
4. Ninja Buns withSide Bangs
Quirky? Cute? Kittenish? What do you think about all of the above? This outfit exudes every ounce of coyness you could ever want in a person. It’s just oh, so darn adorable! Hairstyle two buns is a basic and incredibly lovely way to wear your hair, and the side-swept bangs provide a touch of sensuality and modernity to your appearance. The trick to this style is to wear your hair in tight buns! Just make sure you don’t let your side bangs get in the way of the game.
5. Double Bun withNape Undercut
Talk about being feisty. When it comes to displaying a distinct personality and displaying strong ingenuity, this style knows no bounds. The planned fade in the rear is really captivating, and the double buns at the top let the fade to take center stage without competing with the buns. To put it simply, this outfit is brimming with 1960s-style sophistication. It’s a failsafe way to create both assertiveness and beauty at the same time. You’ll need to start with a fade to get things going. It is not required that you utilize this exact design.
Wrap the remaining hair into two enormous buns that are high on the head.
6. Mousey Two Buns
Seeing this appearance and immediately conjuring up images of Minnie Mouse, you’d be absolutely correct. On either side of the head, this attractive hairstyle contains two buns that are brimming with height, while the rest of the main is wonderfully curled just a tad to provide a sense of seductive appeal to the whole look.
It’s adorable and feisty, and it makes a statement in a crowded room. On either side of the head, you will want to make incredibly high and voluminous buns. The remainder of the hair will be lightly curled and ruffled up for a flirty look that will complement the rest of the outfit.
7.Half Up Half Down
With braids, you can never go wrong when it comes to hairstyling. Many two braided bun hairstyles need you to piece the braids back together, but she opts for a more elegant and clean appearance by eliminating the extra plaits and throwing them all into her buns instead. This look is nothing short of perfect. This sensationally delicate finish is created by the silky and straight hair that lies behind the tightly wrapped braids, which might be seen in even the most opulent of settings. Begin by splitting your hair into two sections: the top and bottom half.
Wrap the strands tightly around your fingers and tighten the knots.
8. Classic Double Bun DO
With this style, you may go back to the origins of double updos. It’s up to date to the extreme and has a flirtatious, playful finish that’s perfect for school or summer activities. Space buns were the first hairstyle to gain popularity, and they continue to do so now. It’s simple and quick to put together, as well as charming and flirtatious. This is the ideal mix! This style may be completed in a matter of minutes. All you have to do is part your hair down the center and draw it into two ponytails on opposing sides of your head, which you will then wrap into tight buns to finish.
9. Flowery Two Buns
A two-bun hairstyle does not have to be about being a fashion-forward queen all of the time! The beauty of buns is that they can be worn in a variety of ways. For example, if you want something more elegant and sweet, you can vary it up by adding a flower hairpiece to your bun. It takes a plain bun and transforms it into an attractive style in a matter of seconds. Style your Princess Leia-inspired buns in the same way you normally would. Check to see that the buns are tight and that there are no excess strands hanging out of the top.
10.Braided Space Bun
Earlier, we discussed the casual attractiveness of very tousled french braids; however, this diva takes a completely different approach to her hair. She is influenced by bohemian tastes, and her plaits are tight and lead back to rustled buns that are delicately rustled. She adds a little flow to her tresses to complete off her boho bun look. Stunning! Everything with a bohemian motif is popular these days, so this is a surefire hit with the whole community. This is a simple style to achieve. You want to divide your half into two halves: the top half and the bottom half.
To add waves to the rest of your hair, use a heated tool or a hair product to create movement.
11. Posh Stacked Mini Buns
This hairstyle exudes high-fashion glamazon appeal, thanks to the tightly wrapped micro braids that are layered directly on top of one another in this style. This modelesque look, created by having strands neatly glazed back to two little buns, keeps strands out of the face and allows facial features to be more visible.
Simple styling is required: simply pull back hair into two ponytails in the centre of the head, then wrap into tight buns to finish. Keep your hair out of your face and away from your ears, although a little looseness in the bun is OK.
12.Japanese Bun Hairstyle
Is your hair refusing to cooperate today? Do you just want to add a splash of color and flair to your ensemble? The addition of an accessory like this makes it simple to change your appearance. The headband adds a pop of intrigue and joy to her complete ensemble while also giving her a more distinct and individualistic appearance. All you have to do to get this style is tie your hair into two buns like you normally would. Finally, add your chosen headpiece, whether it is a bright broad headpiece like this or something more slender and one-toned.
13.Cornrow MohawkBuns
The only thing we can say about this outfit is that it is stunning. With a side-by-side double bun pattern that replicates the modernbun Mohawk, this look is a charming blend of neatly wrapped cornrows with strong attitude. Everything about this style oozes with originality and a strong sense of self-expression. It’s completely one-of-a-kind, extremely dazzling, and a real head-turner. Cornrows should be ideally positioned to begin. Bring them up into two large buns with lots of height, one in front of the other, and secure them with a hair tie or a hair clip.
14. Unicorn Buns
Hair like a unicorn. How many times do we have to tell you how much we adore these buns?! The unicorn tints in her hair are truly stunning, and when placed into two loose buns, we get a haircut that is both fashionable and competitively effective. The topknots should be tied together with a little additional hair dangling out the sides.
15. Zig-Zag Parted Messy Two Bun
Despite the fact that this style appears to be a variation on the classic two-messy buns for long hair, the zig-zag pattern in the design adds a little additional spice to it. With the addition of patterns, this design takes a traditional, on-trend appearance and gives it a completely new spin. In addition, you are not limited to zig-zag patterns alone. Make it your own by choosing from a choice of various patterns that are all produced just for the crown! When you separate your hair before tying it up into buns, you’ll want to use a somewhat sharp object to implant the zig-zag pattern into the crown of your hair before wrapping it up into buns.
16.Crown BraidBuns
A splash of softness to your low buns drastically changes the look of the hairstyle. It is possible to attend any formal event, such as a wedding or graduation, while sporting this delicate ‘do. The addition of a braided plait to offer these bun hairdos more suppleness and tenderness around the face enhances the sassy appeal of these bun hairdos. Beginning at the base of the hairline, part your hair down the center and braid it. Follow the braid all the way down the side of your head to the back of your head.
Bobby pins can be used to keep the hair in place.
17. BraidedBow Bun
Double bow buns are really popular right now, but sticking with the same old design might get boring after a while. Try incorporating some of your own personality into this design, like this nice lady did, to make it a little more distinctive. This outfit exudes a carefree, ‘just rolled out of bed’ attitude that is both casual and fashionable. You’ll want to divide your hair into two sections for this look: the upper section and the lower section.
Make a split along the middle and braids on both sides of the split. Wrap it all up in a tangled bun. The strands of the French braid should be pulled lightly in order to get a more relaxed, scrunched-up finish.
18.French Braided Buns
Who said braids have to be on the top of the head all the time? With this amazing style, you may switch things up a bit and draw attention to the rear of your head. By incorporating upside down French braids from the bottom to the top of the head on the back of the head, she achieves an overall style that is highly pleasing to the visual senses. It appears as though she is braiding the rest of her hair as well, which adds complexity and nuances to her bun. Begin by separating your hair in half and braiding it from the bottom of your head upward.
Maintaining the ponytailed strands all the way to the ends, wrap them into a bun on both sides and tying them neatly together.
19. GlitteryMessy Topknots
When it comes to glitter, you can’t go wrong, as this outfit demonstrates. Sassy yet sweet, her style is a winning combination if you want to keep everyone’s attention for the duration of the evening. Using Dutch braids in a half updo is a fantastic way to stay on trend, and we love enjoy this style. The first step in styling this style is to divide your hair into two half. Double Dutch braids leading back to the buns should be plaited with the upper half. Add a layer of glitter along the centre, like this charming lady did, for a little more pizazz.
20. Double Bun withPompadour
We’re all familiar with the appeal and popularity of the pompadour, and it looks even better when it’s coupled with a trendy two-bunned half-updo hairdo like the one seen here. With the additional height provided on top for a pompadour, you may lengthen your face and make it look more slim in comparison to other styles. As far as the half updo is concerned, it is really fashionable and is given an attractive makeover by the neatly curled curls at the bottom of the hairstyle. Tease, tease, and more tease!
Tease your hair in the front with a lot of force before rolling it into two side-by-side buns.
21. FunkyLow Messy Buns
Low buns don’t necessarily have to be tight, beautiful, or precisely placed; they can be casual and relaxed. With her hair spiking up on top, this woman chooses to change things up a bit and give the overall look some bounce and fun personality to it. It’s a lot of fun, and it’s really cool! Make sure to leave some excess hair out on the ends of low buns so that they can’spike’ up and provide volume and complexity to the style.
22. Extra Braided Low Buns
French braids, Dutch braids, no braid; no one ever mentions the term “additional braids” anymore. To embrace the well-known saying “the more the merrier,” this woman incorporates a range of various braids into her two low bun hairdo, creating a lovely collection of plaits that offer a great deal of texture. All of the braids give this style a whole new level of depth, resulting in a finished look that is not only unusual, but also highly coveted.
Whether you want one, two, three, four, or as many braids you want, you can do it! Bring them all together into two low ponytails, and then braid them all the way to the ends. Wrap it all up in thick, wonderful low buns that show off those outstanding plaits to their best advantage.
23. Half up Two Buns
The secret to this half-elegance updo’s is its simplicity, and we couldn’t be more in love with it. The stacked buns have the appearance of a bouquet of flowers, which elevates this style to a feminine powerhouse that is guaranteed to be admired. Pull the top of your hair back into two ponytails that are piled one on top of the other while putting your half updo together. Wrap the ends into braids and you’re finished!
24. Buns withFrench Bangs
The fact that your bangs can fit into your double updo does not always imply that they should. Allowing your bangs to droop over your eye will give you a more coquettish finish that will make any man’s heart skip a beat. A playful and exciting style is achieved with the use of her bangs, which infuse a new lease of youthful vitality into her overall appearance. Leave your long bangs out of your double buns hairstyle as you’re putting it together. Gently curl the ends of your lashes in so that they gradually flow over your eye for a delicate, elegant appearance.
25. DoubleChignon Buns
A chignon will always be the most beautiful hairstyle ever. I don’t know what it is about those tiny twists of hair, but they create a beauty that can’t be adequately articulated. You may, however, make a traditional chignon even more delectable by adding a lowFrench buninspiration as a finishing touch. It’s exquisite, it’s soft, and it’s one of the most traditional and rich haircuts we’ve ever seen, and it’s perfect for any occasion. Not to mention the fact that it has an overpowering stylish feel to it!
Toss onto two separate buns that are placed next to each other.
When it comes to trendy hairstyles, two buns hairstyles are now the most popular, and they don’t appear to be losing their appeal anytime soon.