
Pie
How To Make Hot Dog Buns Soft
Jan
Buns can be handled in a number of different ways. Hot dog establishments all around the country steam them, while many others toast them on a griddle. You make the decision.
Steaming your buns
Hard buns are something I only eat at my health club. Heating the buns warms and softens them, but steaming them for an extended period of time makes them mushy and sticky. There are various methods for steaming buns at home, including: 1) Bring a little amount of water to a boil in a double boiler or Chinese bamboo steamer, and then place the buns in for around 20 seconds. That is all they require. 2nd, dampen a sheet of paper towel by sprinkling water on it softly until about 20 percent of its surface area is wet.
If the bread is frozen, microwave it for 30 seconds to thaw it out.
3) Bring a large saucepan of water to a boil.
If you’re dealing filthy water dogs, this is the quickest and most straightforward way.
Toasting your buns
Because I grill the majority of my franks, I toast the buns right next to the meat on the grill to keep them warm. My method is to simply open them up and place them on the grates. They can burn in as little as 30 seconds, depending on how hot the grill is, so don’t leave your buns unattended while you’re cooking them. Keep an eye on them on a regular basis. It is usually possible to scrape away the char with a serrated knife if they become a little too black around the edges. Alternatively, you can brush a little butter or oil on the cut face of the buns before grilling them if you really want to go all out.
Hamburger or Hot Dog Buns
- To prepare the dough, combine the following ingredients: In a large mixing basin, whisk together the sugar and yeast until completely dissolved. To the yeast mixture, add the milk, oil, salt, and 3 cups of flour. Stir well. For 2 minutes, aggressively beat the eggs. 1/4 cup at a time, gradually incorporate the flour until the dough begins to pull away from the sides of the mixing bowl. To begin, turn the dough out onto a lightly floured work surface. Knead the dough for a few minutes until it is smooth and elastic. It’s possible that using a bowl scraper or a bench knife will be useful in scooping up the dough and folding it over on itself because the dough is so loose. Place the dough in a lightly greased mixing basin. Turn the dough ball once more to ensure that the entire surface is coated with oil. Place a tightly woven moist cloth over the dough and let it to rise until it has doubled in size, about one hour. Using a small coating of oil, spread the dough out onto your work area. Divide the mixture into 18 equal portions. This is accomplished most easily by first dividing the dough into thirds, then splitting those thirds into half, and finally dividing the halves into thirds
- Form each piece into a ball by rolling it between your hands. Flatten the balls into 3 1/2″ disks if you’re making hamburger buns. Roll the balls into cylinders that are 4 1/2″ in length to use as hot-dog buns. Simply press down on the cylinders a little
- Because dough rises more in the middle, this will result in a softly rounded top rather than a high one. Place the soft-sided buns on a baking sheet that has been well-seasoned, about half an inch apart, so that they will grow together as they rise. Place the buns 3″ apart to get crisper buns. Alternatively, you may form buns and bake them in either our hot dog bun pan or our hamburger bunpan. Lastly, cover tightly with a towel and allow to rise until almost doubled, around 45 minutes
- Preheat your oven to 400 degrees Fahrenheit fifteen minutes before you plan to bake your buns. Sprinkle the buns with whichever seeds take your fancy just before baking them
- Just before baking, gently brush the tops of the buns with the egg wash. To prepare the buns, follow these steps: Preheat the oven to 190°F and bake for 20 minutes, or until the bread is cooked through. (Using a dough thermometer eliminates the guessing in this process.) The buns should be cool on a wire rack when they have been removed from the baking sheet when finished. In order to avoid the crust from turning soggy, follow these steps:
Tips from our Bakers
- We provide you with this quite large range of options for a variety of reasons. You’ll discover that you’ll need a little more flour in the summer to absorb a given quantity of liquid as you will in the winter, for a variety of reasons. This is due to the fact that it is humid, and as a result, the flour behaves almost like a little soaked sponge. First and foremost, this specific dough should be fairly loose, that is, highly relaxed, in order to produce soft and supple buns, as described above. So you want to add only enough extra flour, past the 6-cup limit, to make the dough barely kneadable
- Sprinkle only enough more to keep it from sticking to you or the board
- Want to keep your rolls fresher longer? Try the tangzhong technique, an Asian approach for improving the softness and shelf life of yeast bread and buns. Begin by weighing out the flour, milk, and water you’ll be using in the recipe. Add 2 tablespoons water to what you’ve measured for a total of 1/2 cup + 2 tablespoons (150g) (150g). A generous 1/2 cup (68g) of the measured flour and 3/4 cup + 1 tablespoon (190g) of the measured milk are combined in a pot set over medium-high heat and cooked until the flour is completely absorbed. Cook the mixture, whisking continually, until it thickens and becomes a thick slurry, about 1 1/2 to 2 1/2 minutes (depending on your blender). Transfer the cooked mixture (slurry) to a bowl, and allow it cool to lukewarm. Combine the slurry with the rest of the flour, milk, and other dough ingredients in a large mixing bowl. Proceed with the recipe as suggested
Burger or Hot Dog Buns
This is a recipe that I’ve been cooking for a number of years. If you have a bread maker, it will be even simpler. All you have to do is toss everything into the bread maker, being sure to softly beat the egg first. Set it on the dough cycle and let it do its thing. Once it is completed, proceed with the rest of the recipe starting with step 3. More information can be found at
Most helpful critical review
Overall, this dish was nice; however, it was not quite as good as some of the reviews I had read previous to cooking it. The rolls were a touch heavier in weight than I had hoped for when I ordered them. I did discover that, as other reviewers have indicated, you must allow them to rise for much longer than the recipe calls for; I let mine rise for 2 hours. I made 12 hamburger buns, but they weren’t quite as large as I would have liked them to be. Next time, I’d just create nine to obtain the exact size I’m looking for.
- 5star ratings received: 746
- 4star ratings received: 180
- 3star values are 79, 2star values are 28, and 1star values are 31.
This is a recipe that I’ve been cooking for a number of years. If you have a bread maker, it will be even simpler. All you have to do is toss everything into the bread maker, being sure to softly beat the egg first. Set it on the dough cycle and let it do its thing. Once it is completed, proceed with the rest of the recipe starting with step 3. More information can be found at
- I began a baking and culinary company, and I created them to go with shredded barbecue beef for sandwiches as part of my first batch of orders.
- After the dough has been prepared and kneaded, I allow it to rise in a greased and covered basin for approximately one hour.
- I roll them into balls and place them on a prepared baking pan, flattening them.
- After they have risen, I brush some egg white on four of them and sprinkle with sesame seeds before baking them according to the package directions.
To make these, I simply add 2 Tablespoons dried minced onion and 1/2 Teaspoon onion salt (reduce regular salt to 1 Teaspoon) to the flour mix (before adding the milk and eggs), and after the second rising, I brush them with egg white and sprinkle them with additional dried minced onion before baking.
- Allow it to prove before adding it to the recipe, and allow for two rises.
- I replaced one cup of white flour with the following ingredients: half cup whole wheat flour, 1/4 cup oat bran, and 1/4 cup flax meal.
- It has a whole different flavor and is a little thick, but it is still delicious and far superior than store-bought!
- ***TIP*** After kneading the dough, place it all in an oiled basin, cover it, and set it aside for an hour in a cold oven (without turning on the oven).
- then pull it out and shape it whatever you like (they also make excellent rolls) on a pan or on a cookie sheet (you can also bake them in the oven).
- Remove them from the oven, uncover them, and brush them with melted butter or an egg wash before turning on the oven and allowing it to warm.
- In my opinion, this bread is the most wonderful and soft bread I have ever had.
The ideal temperature is reached when the combination is quite heated, but not too hot to the point where you can stick your finger in it without burning yourself.
*** 1 tablespoon of instant yeast is equal to 1 package of instant yeast.
So, if you’re not using the packets, you can just use a spoonful of the mixture.
I made these using the dough cycle on my bread machine, and they turned out perfectly.
After that, I allowed the buns to rise for 35 minutes.
- The rolls were a touch heavier in weight than I had hoped for when I ordered them.
- I made 12 hamburger buns, but they weren’t quite as large as I would have liked them to be.
- Continue readingAdvertisement This is a fantastic dish!
- I won’t be purchasing anything from a store any longer.
- I would retest the recipe with a little extra yeast this time around.
- It yielded eight hamburger buns that were flat and solid in texture.
A Quick And Easy Hot Dog Buns recipe
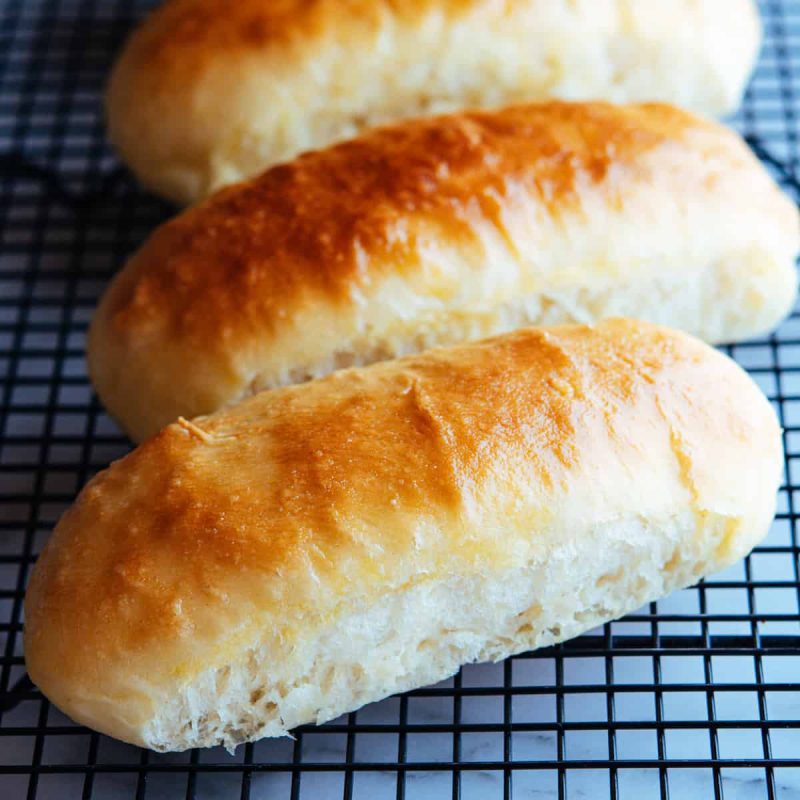
The most recent update was made on August 5th, 2021 at 10:25 a.m. A quick and simple hot dog buns recipe that can be completed in about an hour from start to finish. Even though these buns are quite soft, and they continue to be soft the following day and the day after that, their strength is sufficient for them to stand up under even the thickest of hot dogs and sausages. They’re light and fluffy, and they’re delectable.
Hot Dog Buns
Putting hot dogs and buns together is a marriage made in heaven. In fact, I have a recipe for hot dog buns where I wrap the dough around the hot dog and bake them together in the oven! Our is one of the most popular posts on this platform according to our readers. In addition, if you haven’t already, you might want to look at the recipe. Recipe for sausage bread rolls may be found here. With these buns, you may enjoy sandwiches and hot dogs for breakfast, lunch, or supper. They’re also wonderful for BBQ cookouts, family reunion tailgating, birthday celebrations, holidays and other events as well as for everyday use.
By now, you all (or at least those who are familiar with my work) know that I like baking bread in whatever form.
Flavor and Texture
When it comes to bread, flavor and texture are the two most crucial aspects for me to consider. I understand that bread-making may be time-consuming, and I’m not a fan of bland bread that tastes like cardboard or bread with an awful hard feel to it. That is why I am constantly on the lookout for methods to make bread recipes in a much simpler and more uncomplicated manner without losing flavor and texture.
Easy Hot Dog Buns Recipe
I consider flavor and texture to be the most significant aspects of bread when making a selection. Yes, I understand that bread manufacturing may be a time-consuming endeavor, and I am not a fan of bland bread that tastes like cardboard or bread with horribly hard textures. That is why I am constantly on the lookout for methods to make bread recipes in a much simpler and more uncomplicated manner without compromising flavor or texture.
Step by step instructions to make tasty, soft, and fluffy Hot Dog Buns.
With only six common household ingredients and a few basic directions, you can whip up a batch of freshly baked hot dog buns in no time at all. Step 1: Verify that the yeast is active. If you don’t have instant yeast on hand, you may use active dry yeast in an equivalent amount. There is no need to prove it; it may just be added in with the other components. Step 2: Combine the dry ingredients, stir thoroughly, and set aside. It is critical that the dough is allowed to rest at this point in the process.
Step 3: Knead the dough again and let it aside for another 30 minutes.
That’s perfectly OK!
Even though the dough will still be sticky at this point, resist the temptation to add additional flour since else the finished buns will be thick and tough.
Using the egg wash, coat the surface of the cake. Allow for another 15 minutes of resting time before baking. Here’s where you can see the recipe video:
If you enjoy this recipe, here are some of our favorite bread recipes you might want to try:
- Bread Rolls
- No-Knead Sandwich Bread Recipe
- How to Make Bread Rolls
- Sausage Bread Rolls
- No-Knead Bread Rolls
- No-Knead Bread-Garlic Knots
- Chicken Stuffed Braided Bread
- Crusty No-Knead Dutch Oven Bread
- No-Knead French Bread
- Raisin Bread Rolls
- Easy Honey Whole Wheat Bread
- Sweet Milk Bread Recipe
- No-Knead Fo
- This recipe may be used to create hamburger buns or hot dog buns, depending on your preference. This recipe yields 8 Hot Dog Buns, but it may easily be doubled or tripled depending on your needs. The buns keep well in the freezer, so you may make extra and store the rest for another time. A warm milk may be felt as it comes into contact with the yeast, indicating that it is ready to use. If the yeast is proofed with cold milk, it will not be activated, and if the yeast is proofed with hot milk, it will be killed.
- Sugar, 12 teaspoon salt, 2 eggs, 3 tablespoons melted butter, 1 cup warm milk, 234 cups flour, 2 teaspoon yeast
- Combine the yeast, 1 teaspoon sugar, and warm milk in a mixing bowl and let aside for 5 minutes to proof. By carefully scooping flour into a cup and sweeping away the excess with the dull edge of a table knife, you can get an accurate measurement. 2 1/2 cups flour, sugar, and salt should be combined. Make a thorough mix. Using a heavy-duty spoon, stir in the proofed yeast, one egg, and melted butter, until the dough comes together in a shaggy, rough lump. Allow for five minutes of resting time after covering with plastic wrap or a tight-fitting lid. Remove the cover, transfer the dough to a lightly floured work surface, and knead the dough while gradually adding the remaining quarter cup of flour — your dough will still be soft, so resist the temptation to add more flour
- Return the dough to the bowl and lubricate the surface with a little oil or melted butter, then cover with plastic wrap or a tight-fitting lid and set aside for 30 minutes to rest. Remove any trapped air from the dough by punching it down and transferring it back to a lightly floured work surface
- Using your hands, divide the dough into 8 pieces and roll each one out to about 6 inches long, pinching the sides and ends together. Place the buns, seam-side down, on a baking sheet coated with parchment paper
- Make the egg wash by whisking one egg, and then brush the egg wash onto the buns to finish. Cover the loaves with plastic wrap and let them aside for 15 minutes to rise. They should develop a nice puffy appearance. Bake for 12 to 15 minutes at 350 degrees Fahrenheit in a preheated oven.
- Set aside for about 5 minutes to prove the yeast mixture with 1 teaspoon sugar and warm milk. Remove any extra flour from a cup by gently scooping it into it and then sweeping it away with the dull edge of a table knife
- Prepare the dough by combining 2 1/2 cups flour, sugar, and salt. well-combined Use a firm spoon to combine the proofed yeast, one egg, and melted butter until everything comes together in a shaggy lump of dough
- Allow for five minutes of resting time after covering with plastic wrap or a tight-fitting lid: Turn out the dough onto a lightly floured work surface and knead it in, gradually adding the remaining quarter cup of flour — the dough will still be soft, so resist the temptation to add more flour
- Re-place the dough in the bowl and lubricate the surface with a little amount of oil or melted butter
- Cover with plastic wrap or a tight-fitting lid and set aside for 30 minutes to rest. Remove any trapped air from the dough by punching it down and transferring it to a lightly floured work surface. Using your hands, divide the dough into eight pieces and roll each out to approximately 6 inches long, pinching the sides and ends together
- Using a baking sheet lined with parchment paper, arrange the buns seam-side-down. One egg is whisked together to make the egg wash, which is then used to brush the buns. For 15 minutes, cover the loaves with plastic wrap and set them aside. Their puffiness should be rather pleasing. Bake for 12-15 minutes at 350 degrees Fahrenheit in a preheated oven.
A serving contains: 0g|240kcal|37g carbohydrate |7g protein |7g fat |4g saturated fat |55mg cholesterol |212mg sodium|101mg potassium |1g fiber|5g sugar |240IU vitamin A|48 mg calcium|2mg iron|0 calorie per serving Thank you for taking the time to visit. Let’s get together! You may find me on social media platforms such as Facebook and Instagram. Maintaining contact with everyone of you is a pleasure for me!
Soft Homemade Hot Dog Buns – Milk and Pop
With this recipe, you can make outstanding hot dog buns that will elevate your hot dog game! These hot dog buns are one of the simplest breads to make, and they are sure to be a hit in your house! They are soft and flavorful, thanks to the generous amount of butter used.
Why you should make your own hot dog buns
Isn’t it true that hot dog buns may be found just about anywhere? Because there are a plethora of various brands available on the market, purchasing them is far more convenient than spending a significant amount of time baking them. So what’s the point of baking hot dog buns when you have them there in front of you in a zip-top bag?
- These buns will not include any of the chemicals found in the ones you purchase. Store-bought buns need the use of these chemicals in order for them to survive longer on store shelves.
- There are no artificial flavors. It is possible that the chemicals listed above will result in a more artificial-tasting bun, which is something that your bread will not contain.
- Hot dog buns baked from scratch have greater structure. The majority of the buns I’ve purchased have just vanished in my mouth. Almost like they aren’t even there anymore! Despite the fact that these buns are still soft, they have far more structure than store-bought buns.
- You may cut them to the size that you require. Do you want a super-sized hot dog? What is the standard size? Mini buns, perhaps? When making homemade buns, you can make them in any size you want.
- They have a delectable flavor. This recipe is produced with eggs and butter, which means that it is similar to a brioche hot dog bun, and it has the most delicious flavor possible.
Oh, and they don’t come packaged in a plastic bag; instead, they’re hot out of the oven. Are these the PERFECT hot dog buns, or are they not? Since the first batch of buns I prepared, those are the only buns I’ve been able to store in my apartment.
How To Make Them
Are you a bread baker who is just getting started? Check out my greatest strategies for ensuring that you always have fresh bread right here. Bread should not be difficult, and this recipe will demonstrate that it is not: it is simple and straightforward! This recipe may be divided into three major parts: the initial rise, the second rise, and the baking time. The cooling period is vital since it is necessary to wait a few minutes after the bread has been baked before slicing the loaf (but who am I to say that).
- Form the dough and knead it thoroughly.
- Next, stir in the egg, butter, and water using a spoon or spatula until a dough is formed, about 5 minutes.
- The dough should not stick to the sides of the bowl, and only a small amount should stick to the bottom of the bowl.
- The first to rise.
- Cover with a damp towel, plastic wrap, or beeswax wrap to keep the moisture in.
- Divide the dough into portions.
- 4.
Then, tightly roll each open piece up, tucking the ends in and sealing the edges.
5.
Place your buns in a baking tray after they have been formed.
Allow it to rise for 1 hour, or until it has more than doubled in size.
Egg wash (optional).
7.
Bake the buns for 15 to 20 minutes, or until they are golden brown on the top, depending on how big they are.
8. Allow them to cool before continuing. When the hot dog buns are finished baking, take them from the oven and lay them on a cooling rack. Allow for a 15-minute cooling period before slicing and serving.
How To Shape Them
When it comes to shaping this dough into hot dog buns, I only use one method. After the first rise, I divide the dough into portions and shape each component separately. Lightly flour the surface of your workstation. Each half should be rolled out flat and then tightly rolled up, tucking in and sealing the sides so that you have an equally shaped cylinder. It may appear small at first, but don’t be concerned; it will grow to double its original size. Place the formed dough into the sheet pan that has been prepped for the second rise.
Tips for getting perfect buns
- Take care when handling the liquid. Make careful to accurately measure all of the liquid components so that you don’t end up with more liquid than you need. Keep in mind that you can always add more, but you can’t take anything away. If you have any questions about the dough consistency or how to shape the dough, watch the recipe video. To increase the amount of fiber in your hot dogs, you can substitute 1 cup of white bread flour for 1 cup of whole wheat flour. Are you looking for small hot dog buns? Divide the dough into 20 equal pieces. These hot dog buns include dairy, but you may make a dairy-free hot dog bun by substituting the ingredients listed below.
Ingredient Substitutions
There are a few substitutes that may be used in this recipe, but keep in mind that each one will have a different effect on the final flavor. Eggs: You can use a flax egg in place of the egg that was used in the dough. You may substitute coconut oil for the egg wash, but the flavor will be a little different this time. Butter: Vegetable, canola, or sunflower oil can be used for dairy butter, as can vegan butter. Bread flour can be used in place of all-purpose flour, but the structure of the bun will be slightly compromised.
- As previously stated, you may use whole wheat flour for the all-purpose flour in this recipe.
- Soy, rice, or other vegan milk powders can be used in place of regular milk powder, but the final flavor will be affected.
- Yeast: You may use active dry yeast, but remember to prove it before using it.
- Please remember that the proofing water should be lukewarm (not hot!) at all times.
Can I use this dough to make hamburger buns?
Yes, it is possible! Alternatively, this recipe may be used to create delectable hamburger buns. Simply divide the dough into 8/10/12 pieces, form each piece into a ball, and flatten each disk into a 3 inch disk before placing them onto the baking pan that has been prepared. The rising time and baking time for hot dog buns are the same as for hot dog buns.
Storing and Freezing
Maintaining the softness of your hot dog buns by storing them at room temperature in an airtight container/plastic bag or bread keeper can help them last longer. Buns that are not covered will dry out. These buns will keep in the refrigerator for 4 to 5 days. If the buns begin to lose their freshness after 2 days, I find that reheating them for 5 minutes at a medium temperature in the oven usually restores their freshness. They come out looking as though they were freshly cooked! These buns may also be frozen as soon as they are completely cooled, which should be within 4 to 5 hours of baking.
The dough should not be frozen before baking, in my opinion. To defrost, reheat for 10 minutes at 250°F in an oven that has been prepared. You can also heat them in the microwave or simply leave them out at room temperature for 1 to 2 hours before serving.
What to serve with them
Aside from hot dogs, you may use this bread to serve almost anything you desire!
- Toss this bun into a meatball sandwich for lunch
- Serve it for breakfast with a pat of butter on top
- Jams, as well as Nutella, are very wonderful served with this bread.
In addition, if you’re preparing a hot dog:
- Make an attempt to include chili into it
- Make your hot dogs more interesting by using smoked sausages
- Have you ever experimented with caramelized sauerkraut? It’s absolutely delicious
Are you ready for a better hot dog experience?
More Easy Buns and Rolls Recipes
Rolls that are ideal for sandwiches Dinner Rolls Made with Whole Wheat Orange Cinnamon Buns are a delicious treat. Preparation time: ten minutesCooking time: fifteen minutes Extra Time is available. 2 hours30 minutesTotal Time2 hours55 minutesTotal Time2 hours30 minutes
Ingredients
- Bread flour: 4 cups, 1 teaspoon salt, 14 cup powdered milk, 2 tablespoons sugar, 2 teaspoon instant yeast, 1 egg, 3 tablespoons melted butter, 1 13 cup plus 2 tablespoons water, and 1 egg for the egg wash
Instructions
- Bread flour: 4 cups, 1 teaspoon salt, 14 cup powdered milk, 2 tablespoons sugar, 2 teaspoon instant yeast, 1 egg, 3 tablespoons melted butter, 1 13 cup plus 2 tablespoons water, and 1 egg for the egg wash.
Nutrition Information:
1Serving Size (in grams): Calories:224 5 g of total fat 2 g of saturated fat 0 g of Trans Fat 2 g of unsaturated fat Cholesterol:54mg Sodium:244mg Carbohydrates:36g Fiber:1g Sugar:3g Protein:8g Only an estimate of the nutritional value may be given; actual values will differ based on the replacements made and/or the brands utilized.
1-Hour Hot Dog Buns, Homemade Hot Dog Buns
Check to verify that the oil and egg are both at room temperature. Is there no mixer? Simply combine the ingredients in a mixing dish by hand, kneading for approximately 150 turns. Ingredients:
- 2 1/2 cups all purpose flour (Aerate Flour Before Measuring -See How)
- 2 teaspoons (1 packet / 7g) instant yeast (or active dry yeast)
- 2 Tablespoons sugar
- 1 teaspoon salt
- 1 cup milk (reduced fat or whole milk), heated to 120-130° F for instant yeast (or 110-120°F for active dry yeast)
- 2 Tablespoons vegetable oil
- 1 egg
- About 1/4 cup additional flour
- 1 beaten egg for egg wash
- 1 teaspoon baking
Instructions:
- In a large mixing basin, combine the flour, yeast, sugar, and salt
- In a separate bowl, whisk together the milk, oil, and egg
- 2 minutes of high-intensity beating Slowly add about 1/4 cup of flour at a time until the dough comes together in a ball. Prepare a floured surface and knead the dough for 50 rotations
- Cover with plastic wrap and set aside for 10 minutes. Meanwhile, prepare a baking sheet by lining it with parchment paper. Cut the dough into eight equal pieces. Using floured hands, press each into a rectangle measuring 4 x 6 inches. Roll the 6-inch side firmly into a log and tuck the ends in
- Repeat with the other side. Lie them on a baking sheet, seam-side down, and cover with a cloth. Allow them to rise in a warm place until they have doubled in size, about 30 minutes. In the meantime, preheat the oven to 375 degrees Fahrenheit. Just before baking, brush each roll with egg wash to seal in the moisture. Preheat the oven to 350°F and bake for 12 minutes.
Bakery-Style Hot Dog Buns
This recipe for Bakery-Style Hot Dog Buns produces a bun that is incredibly soft and fluffy at the same time. It’s the ideal receptacle for a hotdog or a smokie. – Prepare this recipe at home, and you’ll never have to buy hotdog buns from the grocery store again. Hot dogs and hamburgers are two of the most popular summertime foods. Even though we don’t consume a lot of hotdogs, when we come across ones that aren’t loaded with nitrates, we’ll give the boys a special treat.
Why you’ll love this recipe
When you make these Bakery-Style Hot Dog Buns, you will get a bun that is incredibly soft and fluffy all at the same time. It’s the ideal receptacle for a hotdog or a smokie. Prepare this recipe at home, and you’ll never need to buy hotdog buns from the grocery store again. In the summer, hot dogs and hamburgers are a must-have meal. However, when we discover hotdogs that do not have any extra nitrates in them, we will give them to the boys as a special treat.
Ingredients you’ll need
In total, there are only six ingredients in these buns. There are just three components in the tangzhong, and they are all included in the overall ingredient list.
- Whole milk: you can use milk or a non-dairy option in place of whole milk. Use normal flour or, if you have it on hand, bread flour as your all-purpose flour substitute. active dry yeast: makes the buns light and airy since it is active
- The addition of a big egg helps to keep the dough soft and pliable. The addition of granulated sugar provides a subtle sweetness. If you don’t want to use sea salt, you may use kosher salt.
How to make the buns
To make the tangzhong, boil the milk and flour in a small saucepan over medium heat until the flour is completely dissolved. Whisk until the mixture is thickened and paste-like in consistency. Remove from the heat and set aside to cool somewhat. Make the dough by combining the following ingredients: In a mixing basin, combine the yeast, sugar, and warm milk. Toss it around and let it aside for a few minutes, or until the yeast starts to bubble. In a stand mixer bowl fitted with a dough hook attachment, combine the flour, salt, egg, and oil until well combined.
- Using a lightly greased bowl, transfer the dough and cover it with a clean kitchen towel.
- Preheat the oven to 350 degrees Fahrenheit.
- Roll the dough into an oval shape approximately 7″ in length, using a rolling pin to help it along.
- Place the seam side down on a baking sheet coated with parchment paper.
Repeat the process with the remaining ingredients and cover with a clean cloth or plastic wrap. Allow for a few minutes of resting time till somewhat puffy. Milk should be brushed on the tops. Preheat the oven to 350°F and bake for 18-20 minutes.
How to servestore
Using the freshly baked hot dog buns, serve the hotdogs with a steamed or boiled hotdog, or with BBQ’d or grilled sausage. Alternatively, the hot dog buns may be used as a bun for a sausage and pepper sammich as well. Buns may be kept at room temperature for up to 2 days if they are stored in an airtight container or freezer bag. Keeping the buns in the fridge for up to 1 week is recommended. Buns can be stored in the freezer for up to three months. In order to reheat the buns, microwave them from frozen for 40-60 seconds, or until they are thoroughly warmed through.
Variations
To make hamburger buns, roll out the dough and cut it into rounds. To create bigger sub-style buns, divide the dough into eight equal halves.
Other recipes you may like
Don’t forget to check out these delicious recipes: Pepperoni Buns made by Mom Activated Charcoal in a dark brown color Buns for Hot Dogs Braided Pork Floss is a type of braided pork floss. Buns with Green Onions Coconut Buns are a delicious treat (Chinese Cocktail Buns) 雞尾包 If you try this recipe, please let me know what you think – I’d love to see your results! Please tag me on Instagram @siftandsimmer or leave a comment/rating in the section below!
Bakery-Style Hot Dog Buns
Recipe for bakery-style hot dog buns that are light and fluffy, created with only six ingredients. Preparation time: 15 minutes Cooking Time: 20 minutes 1 hour and 30 minutes of rest 2 hours and 5 minutes in total Side Dish is the course of action. Cuisine:American 10 servings; 196 calories per serving When weight (metric) measurements are available, use them in baking recipes to ensure accuracy and precision.
Tangzhong:
- Active dry yeast (9g), sugar (15g), warm whole milk (115ml), all-purpose flour (300 g), sprinkle of sea salt, 1 big egg, 60ml avocado oil or neutral vegetable oil (60ml avocado oil or neutral vegetable oil)
For brushing:
- Stir together the milk and flour in a small saucepan over medium heat until the mixture thickens, about 3-4 minutes. Remove from heat and set aside. The paste will appear to be extremely thick and gluey at first glance. Remove the pan from the heat. Allow for a brief cooling period.
Make the dough:
- In a mixing basin, combine the yeast, sugar, and warm milk. Give it a good stir and set it aside for a few minutes until the yeast starts to bubble. In a stand mixer bowl fitted with a dough hook attachment, combine the flour, salt, egg, and oil
- Mix until well combined. Fill the bowl halfway with the activated yeast mixture and the lightly cooled tangzhong mixture, and knead until the dough is smooth, shiny, and elastic. Wrap a clean kitchen towel around the dough and set it aside to rest. Allow the dough to rise in a warm place for around 1-1.5 hours, or until it has doubled in size. Preheat the oven to 350 degrees Fahrenheit/177 degrees Celsius. Divide the buns into 10 equal pieces, each weighing approximately 62g
- Make an oval form out of the dough using a rolling pin that is approximately 7″ in length
- Form a log shape out of the dough by coiling it up lengthwise and pinching the seams together. Place the seam side down on a baking sheet coated with parchment paper
- Repeat the process with the remaining ingredients and cover with a clean towel or plastic wrap. Allow to sit for a few minutes until somewhat puffy. Lightly coat the tops of the muffins with milk using a pastry brush
- Preheat the oven to 350°F/177°C for 18-20 minutes, or until the buns are softly golden brown. Remove from the heat and set aside on a wire rack to cool.
Amount of calories: 196kcal|Carbohydrates: 27g|Protein: 5g|Fat: 7g|Saturated Fat: 1g|Trans Fat: 1g|Cholesterol: 19mg|Sodium: 17mg|Potassium: 77mg|Fiber: 1g|Sugar: 3g|Vitamin A: 59IU|Vitamin C: 1mg|Calcium: 32mg | The nutritional information provided should be regarded as approximate and should not be relied upon for accuracy. Please use your best judgment to verify that food is cooked properly and/or that it is a suitable fit for your dietary needs. King Arthur Flour provided the inspiration for this recipe.
Homemade Hot Dog Buns
Hot dogs have a special place in my heart since they remind me of my youth. Summer days at the pool, birthday parties with water balloons and a slip ‘n slide, and the occasional get-together around a blazing hot grill just for the purpose of getting together are all brought to memory. While we never had homemade hot dog buns, we almost always had at least one pack of “American hot dogs,” as my grandmother used to refer to them, on hand at our barbecue grill. In the end, the buns we did have for the delectable sausage were virtually always a mass-produced bun that would practically never live up to their promise of quality.
They were usually a last-minute consideration: the bread that no one wanted but that everyone needed.
As an alternative, let’s construct our own, sturdier version that is packed with flavor and has a light, airy feel.
Also, if the dough is soft and tacky, as is typically the case with a hamburger dough, molding the thin tubes to accept hot dogs can be a bit difficult (in my view, it is simpler to shape a round shape rather than an oval shape if the dough is sticky).
All of this comes from a dough that is much easier to work with than traditional yeast dough.
An option: homemade New England hot dog buns
Hot dogs have a special place in my heart since they remind me of happy memories from my youth. They bring back memories of hot summer days spent at the pool, birthday parties complete with water balloons and a slip ‘n slide, and the occasional get-together around a blazing hot grill just for the purpose of getting together. While we never had homemade hot dog buns, we usually always had at least one pack of “American hot dogs,” as my grandmother used to refer to them, on hand at the barbecue.
- The flavorless vehicle was either dry and mealy or too wet, and it was quite likely that it would lose all structural integrity the moment ketchup was added to the equation.
- Let’s take a different approach with the hot dog bun from the shop.
- Past experiments with producing sourdough hot dog buns using my brioche hamburger bun recipe (which was a touch too buttery) and my soft potato bun recipe (which was a little too soft) have yielded satisfactory but not outstanding results.
- Using natural leavening, this recipe produces handmade hot dog buns that are light and firm, a little buttery and sweet, and with a richer flavor as a result of the extended fermentation period inherent in the process.
- On the top, there is a split directly down the middle
- The center has a tall rise that softly tapers
- The sides are shorter.
a split down the middle of the upper surface; The center has a tall rise that softly tapers; the sides are narrow.
Flour selection
Tradition dictates that hot dog buns be prepared entirely of white flour, but I prefer to incorporate 20 percent whole wheat flour into my buns. The use of a combination of all-purpose white flour and whole wheat flour results in a sturdier—and somewhat more nutritious—bun. Furthermore, whole wheat adds taste to the dish, both in terms of the flour itself and in terms of the extra organic acids produced as a result of the fermentation process. If you don’t want to use whole wheat flour in these buns, simply substitute additional all-purpose flour for the whole wheat flour in the recipe.
Baking schedule
There’s nothing complicated about this recipe, which is perfect for those impromptu weekend grill sessions that always seem to pop up during the summer. There is no need to create a long levain or do an autolyse; simply use your mature sourdough starter and incorporate it into the dough. When you come back to the house in the late afternoon, your handmade hot dog buns will be ready just as the grill is getting hot. If you wish to prepare them ahead of time, I recommend retarding the dough in bulk at the conclusion of the three-hour room temperature fermentation time recommended.
Remove the dough from the container the following day and form it as indicated. Proof them on the counter until they’re extremely soft and light, which might take 2 to 3 hours depending on the temperature of the room.
Homemade hot dog buns formula
| Total dough weight | 1,050 grams |
| Sourdough starter in final dough | 28.00% |
| Yield | 10 x 100g hot dog buns |
Total formula
The desired dough temperature is 75 degrees Fahrenheit (24 degrees Celsius). For additional information on the target and final dough temperatures, please see my guide to dough temperatures. To make the egg wash, in addition to the items listed below, you’ll need one whole egg and around a tablespoon of whole milk for each egg.
| Weight | Ingredient | Baker’s Percentage |
|---|---|---|
| 398g | Medium-protein bread flour or All-purpose flour (~11% protein, Central Milling Artisan Baker’s Craft or King Arthur Baking All-Purpose) | 80.00% |
| 100g | Whole wheat flour (Central Milling High Pro Fine or King Arthur Baking Whole Wheat Flour) | 20.00% |
| 274g | Water | 55.00% |
| 55g (one whole egg) | Egg | 11.00% |
| 50g | Butter, unsalted | 10.00% |
| 25g | Caster sugar | 5.00% |
| 9g | Fine sea salt | 1.90% |
| 139g | Ripe sourdough starter (100% hydration) | 28.00% |
Hot dog buns made from scratch served on biodegradable wooden trays. Oh, and if you’re wondering what the snazzy hot dog holders in the photo above are, they’re biodegradable hardwood hot dog trays that can contain your own sourdough hot dog bun, sausage, and any fixings you can think of.
Homemade hot dog buns method
To begin, remove the butter from the refrigerator and cut it into 1/2-inch pats. Place the butter on a dish and allow it to come to room temperature while you continue to stir the ingredients. Pour all of the ingredients into the bowl of a stand mixer fitted with the dough hook attachment and mix on low speed until the dough comes together. Combine the ingredients on speed 1 (stir on a KitchenAid) for 1 to 2 minutes, or until they are well combined. Mix for 4 to 5 minutes, increasing the mixer speed to 2 (2 on a KitchenAid), until the dough begins to thicken and clump around the dough hook (about 4 to 5 minutes).
Even while the dough won’t entirely detach itself from the bottom of the bowl, and it will still be shaggy, most of it should clump together around the dough hook.
Your butter should be at room temperature at this point; a finger should easily slide into it and leave an impression.
Because this is a very strong dough, it won’t take long to include all of the butter and bring the dough back together and smooth, which should take no more than 3 to 5 minutes.
2. Bulk fermentation – 9:30 a.m. to 12:30 p.m.
A warm room temperature of 74-76°F (23-24°C) should allow for bulking to take around 3 hours. To stretch and fold the dough, perform three sets at 30-minute intervals, beginning 30 minutes into bulk fermentation and ending 30 minutes after bulk fermentation. For more information on this technique, please see my guide to stretching and folding dough during bulk fermentation.
- Dough right after mixing
- Dough after the third set of stretches and folds
- Dough right after baking.
The evolution of the dough during bulk fermentation. After the last set, cover the homemade hot dog bun dough with plastic wrap and leave it aside until the completion of the bulk fermentation process.
3. Chill dough – 12:30 p.m. to 1:30 p.m.
Placing the covered bulk fermentation container containing the dough in the refrigerator for one hour will allow the dough to cool, making it easier to shape in the future.
When in a hurry, you may skip this stage and move right to shape, however you should be aware that it will be more difficult (I’ve done it with no difficulty, though).
4. Divide and shape – 1:30 p.m.
Using parchment paper, line one full sheet pan or two half sheet pans and place them close to where you will be working. The photo below shows my dough after three hours of bulk fermentation and one hour in the refrigerator. However, it feels hard and chilly to the touch despite the fact that it is well-risen, frothy, and light in texture. After chilling in the refrigerator, the hot dog bun dough is ready to use. Uncover and gently flour the top of the bulk fermentation container after removing it from the refrigerator for the first time.
- Attempt to split the dough into tiny rectangles in order to make shaping the dough more manageable.
- Then, starting at the top edge (which is the side that is furthest away from your body), begin rolling it down toward your body.
- Continue to roll and press, roll and press, until a tube has been formed.
- When each piece has been molded, set it on the sheet pan that has been prepared, leaving space between each piece.
- Hot dog buns made with sourdough starter.
7. Proof – 1:45 p.m. to 3:45 p.m.
A big, reusable plastic bag should be used to cover the sheet pan and seal it securely. Allow about two hours of proofing time on the counter (be sure to preheat the oven about 30 minutes before the end of this time).
8. Bake – 3:45 p.m.
Preheat an empty oven to 425°F (220°C), with a rack in the bottom-third of the oven. For the egg wash, whisk together one whole egg and one tablespoon of whole milk in a small mixing basin. As soon as the oven is prepared, remove the dough from the refrigerator and brush it with a thin coating of the egg wash. Preheat the oven to 200 degrees F and bake for 20 minutes—be sure to keep a check on them at the end of this time frame and reduce the oven temperature if they begin to brown too quickly.
Remove from the oven and bake for a further 10 minutes, or until the tops are golden brown but the sides are still pale yellow.
These buns are delicious when they are buttered and cooked before being served.
Furthermore, the flavor and texture of these are years ahead of anything you’d get in a plastic bag at the supermarket.
No matter how you prepare your hot dog, with these homemade hot dog buns, your next summer gathering will be even more enjoyable than your childhood memories—just don’t forget the water balloons! We’re never too old for such kinds of things. Thank you for your time and consideration. Print
Description
These homemade sourdough hot dog buns are sturdy, light, and airy, and they are absolutely delicious. They will take your next hot dog to the next level.
Main dough
- 398gmedium-protein bread flour or all-purpose flour
- s 100gwhole wheat flour
- s 274gwater
- s 55g(onewhole egg) egg
- s 50gbutter, unsalted
- s 25gcaster sugar
- s 9gfine sea salt
- s 139gripe sourdough starter (100 percent hydration)
Egg wash
- Combine two or more ingredients in a mixing bowl (9:00 a.m.) Cut the butter into 1/2-inch pats and set aside to warm to room temperature while you prepare the rest of the ingredients. Add the water, flour, sourdough starter, egg, sugar, and salt to the bowl of a stand mixer fitted with the dough hook attachment. Mix on low speed until the dough comes together. Toss the items together for 1 to 2 minutes on speed 1 until everything comes together. Increase the speed of the mixer to 2 and mix for 4 to 5 minutes, or until the dough begins to strengthen and clump around the dough hook (about 4 to 5 minutes). Allow the dough to rest in the mixing basin for 10 minutes before continuing. Turn the mixer to speed 1 and add the room temperature butter, one pat at a time, making sure to wait until the previous pat has been completely absorbed before adding the next. Because this is a very strong dough, it won’t take long to include all of the butter and bring the dough back together and smooth, which should take no more than 3 to 5 minutes. Fermentation in large quantities (9:30 a.m. to 12:30 p.m.) Transfer the dough to a large mixing bowl and allow it to ferment for 3 hours at 75°F (23°C) before using. Perform three sets of stretch and folds every 30 minutes for 30 minutes. Refrigerate the dough (12:30 p.m. to 1:30 p.m.) Place the closed bulk fermentation container in the refrigerator for at least 1 hour to let the contents to get properly chilled. Rolls should be divided and shaped (1:30 p.m.) Prepare a full sheet pan, or two half sheet pans, with parchment paper and place them close to your work area to facilitate mixing. Using a scale, weigh out ten pieces of dough, each weighing 100g. Using your hands, shape each into a tube about 4-inches long and arrange them on the sheet pan with space between them
- Demonstration (1:45 p.m. to 3:45 p.m.) Cover the dough with a big, airtight cover, making sure that the cover does not come into touch with the dough (grease it with oil if necessary to prevent sticking). For a two-hour proofing period, let the dough at room temperature
- Make a cake (3:45 p.m.) Preheat an empty oven to 425°F (220°C), with a rack in the bottom-third of the oven. For the egg wash, whisk together one whole egg and one tablespoon of whole milk in a small mixing basin. As soon as the oven is hot, remove the dough from the pan and coat it with a thin layer of egg wash. Preheat the oven to 200°F and bake for 20 minutes on a baking sheet. After that, turn the pan around so that the bottom is facing up and lower the oven temperature to 350°F (175°C). Remove from the oven and bake for a further 10 minutes, or until the tops are golden brown but the sides are still pale yellow. After the buns have finished baking, take them from the oven and let them to cool on a wire rack for 15 to 30 minutes before slicing. If you butter and fry the buns before serving them, they are really delicious.
Notes
- Making these buns New England-style involves proofing them in a single row, side by side on a full sheet pan.
Soft Fluffy Hotdog Rolls • Tamarind & Thyme
Recently, I’ve been extremely dissatisfied with the quality of the bread rolls I’ve purchased. We don’t eat a lot of bread, but when we do, I want to know that it’s been freshly baked before I consume it. My children enjoy the occasional hotdog every now and then, so I decided it was past time to make my own Soft Fluffy Hotdog Rolls from scratch. I know I often tell you that everything is simple, and I mean it when I say that. Soft Fluffy Hotdog Rolls were made with no fanfare on my part, and yet they turned out really delicious.
After all, it’s all about the end result, right?
When I returned, it was already prepared to be placed in the oven.
While we’re on the subject of breakfast, I have to mention this.
For breakfast, we went to Harper’s, which is one of our favorite restaurants.
Because I do visit them on occasion, but not always with my family, this came as a surprise to me.
He went on to say, “I was told to provide excellent service to you guys.” Wow, the service was just fantastic.
And it was completely free of charge.
How wonderful it is to be acknowledged and appreciated as a client by those who genuinely care about you.
Thank you!
Bring it on back to my Hotdog Rolls, shall we?
They were so soft and fluffy that I immediately slathered some butter on top as soon as I took them out of the oven.
I’m not sure why I don’t cook bread more regularly.
There is a lot that goes into preparing bread, and I am by no means an expert.
It will provide you with all of the necessary knowledge on kneading as well as how to determine if your dough is excellent.
Hotdog Rolls that are soft, fluffy, and delicious. They’ll be fantastic as burger buns, as well. Bread, hotdog rolls, and soft buns are examples of cuisine general keywords. Preparation time: 1 hour 45 minutes 15 minutes to prepare Time allotted: 1 hour 45 minutes Servings8
- Sugar
- 1 1/2 teaspoon instant dry yeast
- 2 tablespoons melted butter plus more for sprinkling on top
- 1 1/2 teaspoon instant dry yeast 1/2teaspoonsalt
- 1 cup warm milk (see note 2), 2 cups cake wheat flour (see note 3).
- All of the dry ingredients should be combined in a large mixing basin or stand mixer fitted with a dough hook. Microwave the milk and butter until the milk is warm, not hot, and the butter is melted. It is not necessary for the butter to be completely melted. Using your hands, combine the milk/butter and dry ingredients until you have a soft dough
- To make the dough ball, knead it by hand for 10 minutes or in a stand mixer for 8 minutes until smooth and elastic. More melted butter or oil should be used to grease the bowl. In a large mixing bowl, place the dough and cover with a kitchen towel or plastic wrap. Put it in a warm location for an hour before using. You should see a significant increase in the size of the dough. In colder conditions, the process may take longer. The dough should be kneaded down. The dough should be divided into 8 equal pieces. This was accomplished through the use of a scale. Each of the pieces weighted around 70-74 grams. Alternately, if you like, you may build 6 bigger ones. Each component should be rolled into a ball. Flatten the ball and, using a rolling pin, roll each piece into an oval shape, starting with the largest piece. Prepare the rolls by rolling each oval into a cigar-like shape
- Using the palms of your hands, roll out the cigar shape into a thin, long roll
- Place them next to each other, sealed edge at the bottom, with a little space between them on a baking sheet lined with parchment paper. Cover the rolls with a clean kitchen towel and set aside for half an hour to rest
- Bake at 180 degrees Celsius for 15 minutes, or until the rolls are just beginning to brown
- Brush the rolls with some melted butter. Remove the pan from the oven and brush with extra melted butter to finish. It is best if served warm.
- If you are not using instant yeast and are instead using active yeast, you will need to prove your yeast before using it. It should be added to a mixing bowl together with the sugar and some warm water, and allowed to foam. Only after that should the butter, milk, salt, and flour be added. Because hot milk can kill the yeast and prevent the dough from rising, it is important that the milk not be hot. Maintain a mild temperature for your milk (slightly warmer than your body temperature)
- It is possible to manufacture burger buns out of the dough. Before baking, divide the dough into 8 pieces and roll each piece into a ball before baking. Despite the fact that I recommend to knead for 10 minutes, your dough may be ready sooner. A “windowpane” test can be used to determine if your dough has been sufficiently kneaded. You start with a little piece of dough, roughly the size of a golf ball. You expand the dough by holding it between your thumb and first 2 fingers of both hands and moving it around. If it can be stretched without breaking, your dough is ready to be rolled out. On thekitchn.com, you’ll find a wealth of useful information. In order to obtain optimal results, your dough must be allowed to rise properly. Make sure it is maintained in a draft-free environment that is neither too warm nor too cold. Since sugar functions as a natural tenderiser, you may use a little additional sugar to ensure that your rolls stay softer for a longer period of time