
Food
How To Make Rice Buns
Jan
Rice Burger Buns (Gluten-Free)
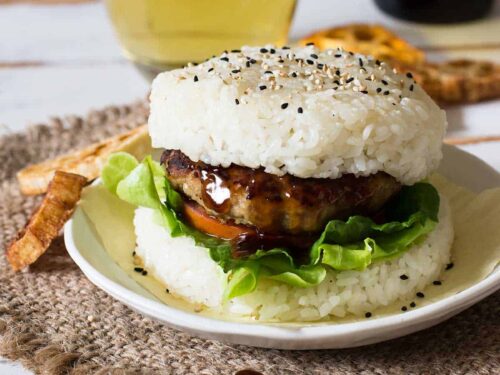
Rice Burger Buns – What a great idea! Recipe and visual guide for making gluten-free rice buns from scratch using sticky rice. This easy approach produces beautifully crispy yet squishy buns that are perfect for any style of meat burger or sushi burger you can imagine. My boyfriend found sushi burgers on social media a few weeks ago and immediately became obsessed. Everything in my thoughts exploded, with my heart swooning and soul soaring, and all of the joyful heart emojis flew all over the place.
Making salmon poke and crab salad is straightforward, so I knew the most difficult step would be assembling the rice buns.
Sushi is traditionally made with white rice, vinegar, and sugar — the same sort of rice that is used for making genuine sushi.
After making rice burger buns several times, I don’t believe it is necessary to prepare a sushi rice dish that includes vinegar and sugar, however you surely can if you so choose.
- The buns are still made with circular cookie cutters to ensure they are exactly round, but you may create them without the use of cookie cutters by shaping patties with your hands.
- However, some people like to deep fry the rice in order to create extremely crispy buns that stay together like a dream; however, neither of us are fans of deep frying, and we are also OK with a tiny amount of crumble in our buns.
- It wasn’t until a few weeks after cooking the first batch of sushi burgers (that is, just two days ago) that I realized I was craving a huge beef burger.
- And now we’ve reached the pinnacle of our profession.
- But, in all seriousness, we adore these items.
- It will cover everything from what kind of rice to use to how to form the buns and how to cook them so that they stay together.
What Kind of Rice to Use for Rice Burger Buns:
Rice buns can be made using either sushi rice or short-grain white rice. These two foods are quite starchy, and the starch helps to hold the rice buns together! Even while I haven’t tried creating buns using other types of rice, I believe it is feasible to do so. However, you may need to add additional ingredients to help bind the buns together, such as an egg, breadcrumbs, tapioca flour, or potato starch in addition to the rice. If you’re using a less starchy rice like basmati or brown rice, it may be more difficult to obtain the desired result of buns that stay together while you’re eating the burger, which may be challenging.
Please let us know if you attempt preparing buns with a different variety of rice and what you think of the outcome.
What Kind of Oil Should I Use for Frying?:
Make sure to use a high-temperature cooking oil, such as algal oil, avocado oil, or coconut oil, while preparing the dish. Coconut oil is my preferred cooking oil since it imparts a natural sweetness and nuttiness to the bun. In order to get a flavor other than coconutty, use a flavorless oil such as avocado oil or algal oil, which are both non-perfume-producing. Having put down all the most significant pieces of information, let’s go to work on them!
How to Make Rice Burger Buns:
In a saucepan, combine the rice, water, vinegar (if using), and sea salt. Bring to a boil, stirring constantly. Bring the pot to a full boil while covering it. After that, turn the heat to low and continue cooking for 15 to 20 minutes while keeping the lid on (depending on package instructions). Remove the rice from the heat and give it a good toss. Replace the lid and remove the rice from the heat for 10 minutes while it is still covered. Remove from the oven and place in a tupperware container in the refrigerator until cold.
- The first method, which involves using your hands, is to take around 12 cup to 34 cup of rice in your palms and mold it into a ball.
- Option 2: If you’re using an around cookie cutter, lay it on a plate, cutting board, or baking sheet before cutting out the shapes (a flat surface).
- My boyfriend often consumes burgers weighing between 13 and 12 pounds, so he uses a 3.5-inch cutter, but my burgers weigh between 13 and 13 pounds, so I use a 3.1-inch cutter.
- Firmly press the rice into the pan to create a very compact patty.
- The rice bun should be carefully removed from its cookie cutter form.
- In a large nonstick pan, heat 2 to 3 tablespoons coconut oil (or other high temperature cooking oil of choice) over medium high or high heat until hot but not smoking (heat level will depend on your stove top).
- Allow a few minutes for the skillet to become thoroughly heated before using it.
- Pro Tip: I feel that using a spatula to transfer the rice bun to the hot skillet is the most convenient method since the bun will be firmly pushed onto the plate.
- Continuing to cook without touching the rice bun for 10 to 12 minutes, or until it is golden brown and crispy (this could take less time at lower elevations, so for your first round, you may want to check on the buns after 6 minutes).
- Repeat the process with the remaining rice bun patties.
You are now prepared to put the rice buns to good use! Make burger buns out of them and enjoy your favorite burger. For the Teriyaki burgers seen in the images, we followed these steps: Meat for the Teriyaki Beef Burger is as follows:
- 1/4 cup sea salt
- 1 pound grass-fed ground beef
- 3 Tbsp teriyaki sauce (I use paleo teriyaki sauce)
- 2 stalks green onion, roughly chopped
- 1 lb grass-fed ground beef
- Pineapple rings, avocado, and teriyaki sauce for drizzling are among the ingredients.
To summarize, here are some suggestions for making successful rice buns:
Tips For Rice Buns That Hold Together Well:
- Make sure they are THICK!– We found that rice buns that are less than 12 inches thick are still usable, but we determined that 12 inches is the sweet spot. Yes, a lot of rice is required, but it is necessary for the buns to stick together. A round cookie cutter or similar shape may be used to construct the buns
- While you can make the buns with your hands, they will be simpler to manipulate and will stay together better if they are shaped using a round mold. Make use of a rice with a lot of starch, such as sushi rice. Using a lot of oil– Cook the rice buns in a lot of high-temperature cooking oil – we choose coconut oil since it has an incredible taste and produces a wonderful crisp on the outside of the rice buns.
Take pleasure in all of your rice bun burgers! If you want to share your burger recipes with me, please do so in the comments section below. In case you’re looking for burger inspiration, here are a few of my favorite burger recipes to get you started:
- Bison Burgers with Havarti and Pesto in a Skillet
- Baked Salmon Burgers
- Avocado Stuffed Turkey Burgers with Chipotle Aioli
- And more. Pesto Burgers with Caramelized Onions and Mushrooms
- The Ultimate Grilled Portobello Burger
- Pesto Burgers with Caramelized Onions and Mushrooms
My cookbook,Paleo Power Bowls, is now available!CLICK HEREto check it out. Thank you for your support!
Prepare sure to take a photo of your finished product and tag @TheRoastedRoot on Instagram if you make this recipe!
Instructions
- In a saucepan, combine the rice, water, vinegar (if using), and sea salt. Bring to a boil, stirring constantly. Bring the pot to a full boil while covering it. After that, decrease the heat to low and continue cooking for 15 to 20 minutes, covered (depending on the package directions). Remove the rice from the heat and give it a good toss. Replace the lid and remove the rice from the heat for 10 minutes while it is still covered. Remove from the oven and place in a Tupperware container in the refrigerator until cold
- Rice patties may be formed with your hands or with round cookie cutters. Make a 1/2-inch-thick rice patties with the ingredients you have. In a large nonstick pan, heat 2 to 3 tablespoons coconut oil (or other high temperature cooking oil of choice) over medium high or high heat until hot but not smoking (heat level will depend on your stove top). Keep in mind that you’ll need enough oil to generously coat the surface, so don’t scrimp on the quantity! Allow a few minutes for the skillet to become thoroughly heated before using it. Place the rice bun patties on the heated surface (they should sizzle when they come into contact with the hot pan) and cook them without touching them for 10 to 12 minutes, or until the rice bun is golden brown and crispy. Carefully flip the pan over and cook for another 10 to 12 minutes, or until the pan is golden and crispy on both sides. Repeat the process with the remaining rice. To make your favorite burgers, use rice buns instead of regular buns.
Nutrition Information
Yield8Serving Calories per serving221 Calories per serving1 rice patty 0gSaturated Fat0gCarbohydrate35gFiber0gTotal Fat7gUnsaturated Fat0g Sugar0g Protein3g
Rice Bun Burgers
Befor I get started with this piece, I just wanted to let everyone know that I will be taking a two-week hiatus from the blog, which will begin today. This summer, I’ll be enjoying a large family vacation to Italy, and I couldn’t be more excited! I haven’t taken a true vacation in a very long time, and I am looking forward to being completely disconnected from the internet and the real world and simply enjoying myself while seeing and eating new and interesting things. Now, let’s get to the point of this piece.
- It’s fine, though, because I believe the taste profile was significantly improved the second time around, and I had no issue indulging in these incredible burgers twice in one week!
- This burger was marinated in a mixture of fish sauce, rice vinegar, sriracha, and sugar before being grilled.
- Sushi rice is prepared and blended together.
- Then fry the patties on one side only, until they are golden brown.
- These burgers are unbelievable in their deliciousness!
- The cucumber and mint were the finishing touches on this sandwich.
- This recipe makes 2 burgers.
It is not necessary to rinse the rice.
Reduce the heat to low and continue to steam until the rice is cooked, around 15/20 minutes depending on your rice.
Allow for 15 minutes of resting time, covered and away from the heat.
Fold or chop the rice with the vinegar, salt, and sugar once it has been added.
In the meantime, combine the fish sauce, sugar, rice vinegar, and sriracha in a small bowl to make a sauce.
Marinate for 30 minutes, turning once or twice during the process.
Form the sushi rice into four patties that are the same size as the burgers, using damp hands to keep it from sticking.
Remove the pan from the heat after it has browned.
Burgers should be grilled. Peanuts should be sprinkled on top of the bottom rice patty. Then place the burger on top, followed by the sliced cucumber, mint leaves, and the top rice patty, arranging the browned rice at the top and bottom of the sandwich so that you can hold it in your hands. Serve!
Notes
Befor I get started with this piece, I just wanted to let everyone know that I will be taking a two-week hiatus from the blog, which will begin today. This summer, I’ll be enjoying a large family vacation to Italy, and I couldn’t be more excited! I haven’t taken a true vacation in a very long time, and I am looking forward to being completely disconnected from the internet and the real world and simply enjoying myself while seeing and eating new and interesting things. Now, let’s get to the point of this piece.
- It’s fine, though, because I believe the taste profile was significantly improved the second time around, and I had no issue indulging in these incredible burgers twice in one week!
- This burger was marinated in a mixture of fish sauce, rice vinegar, sriracha, and sugar before being grilled.
- Sushi rice is prepared and blended together.
- Then fry the patties on one side only, until they are golden brown.
- These burgers are unbelievable in their deliciousness!
- The cucumber and mint were the finishing touches on this sandwich.
Japanese Rice Burger Recipe by Tasty
For3servings
- 2 cups cooked white rice (460g)
- Cooking spray
- 1 tablespoon oil
- 1 lb 80 percent leanground beef(455g)
- 12 onion, finely chopped
- 12 cup panko breadcrumbs(25g)
- 1 egg
- 1 teaspoonsalt
- 1 teaspoon pepper
- 1 lb 80 percent leanground beef(455g)
- 1 lb 80 percent lean
- 1 cup beef gravy (240g), or demi-glace
- 3 eggs, fried
- 13 cup green onion (35g), thinly sliced
- 1 cup sour cream (60g)
- Remove the rice from the bottom of a greased 1 cup measure after it has been pressed into it for 13 cup (75 g). Repeat the process with the rice until you have six buns. Fry the buns in a pan over medium-high heat until they are lightly browned on both sides
- Place a paper towel on a table and set aside
- Combine all of the patties ingredients in a large mixing bowl until well blended. Make three patties out of the meat. Heat the oil in a pan over medium heat until shimmering
- 3 minutes on the first side, then turn and cook for another 6 minutes on the other side
- Assemble the burgers by layering the rice buns, beef gravy, egg, and green onions on top of each other. scallions
- Enjoy
For3servings
- 2 cups cooked white rice (460g)
- Cooking spray
- 1 tablespoon oil
- Cooking spray
- 1 tablespoon oil
- 2 cups cooked white rice (460g)
- 1 cup beef gravy (240g), or demi-glace
- 3 eggs, fried
- 13 cup green onion (35g), thinly sliced
- 1 cup sour cream (60g)
- Remove the rice from the bottom of a greased 1 cup measure after it has been pressed into it for 13 cup (75 g). Repeat the process with the rice until you have six buns. Fry the buns in a pan over medium-high heat until they are lightly browned on both sides
- Place a paper towel on a table and set aside
- Combine all of the patties ingredients in a large mixing bowl until well blended. Make three patties out of the meat. Heat the oil in a pan over medium heat until shimmering
- 3 minutes on the first side, then turn and cook for another 6 minutes on the other side
- Assemble the burgers by layering the rice buns, beef gravy, egg, and green onions on top of each other. scallions
- Enjoy
Rice ‘Bread’ Buns
For genuine food connoisseurs, it is often tough to find “healthy” dishes that meet our requirements for flavor, texture, and overall yumminess while remaining within our budget. I’m always on the lookout for healthier alternatives to the meals I enjoy, without sacrificing their flavor in the process. Every now and then, I stumble across something that is not only healthful, but also significantly improves the taste of a food. To create rice buns, which may be used as a substitute for bread buns, I’ll teach you how to prepare them.
- It could surprise you.
- The crunch, along with the taste, is almost like eating chips for breakfast – delectable.
- Rice cakes are puffed and dry as a result of the method of preparation used to make them.
- Because the rice patties are crisped on both sides, they are also ideal for dipping in sauces because the sauce will not seep into the rice buns and make them mushy.
- (This is a culinary tip.) Make careful to pack the rice into the molds as tightly as possible.
- Depending on how long it has been browning (approximately 4-5 minutes), either shake the pan or use a spatula to dislodge it.
- 4 minutes for either side With Your Favorite Sandwich, of Course!
Lightly grease muffin pans with extra-virgin olive oil.
Rice should be compressed using a spoon.
2.
Unmold the rice buns and cook them for approximately 4 minutes on each side.
It is important not to stir the rice while it is browning, since this will cause it to stick.
After 4 minutes, shake the pan to allow the buns to soften a little further. A spatula can also be used to loosen the patty if it becomes too tight. 3. Place the buns on a dish to allow them to dry and cool. Use with a variety of sandwich meats and sauces as you see fit.
Soft Fluffy Chinese Gluten-Free Meat Steamed Buns (Mantou/Baozi)
It is essential that you try these gluten-free Chinese steamed buns (mantou/baozi) with their delectable gluten-free pork filling if you are looking for soft, fluffy Chinese steamed buns that are not made with gluten. They were light and fluffy, and no xanthan gum was employed in their preparation. All of the information you need to know about making delicious gluten-free steamed buns. Steamed Chinese Meat Buns (Mantou/Baozi) that are soft and fluffy and free of gluten. Although I am not required to follow a gluten-free diet, gluten-free steamed buns have been on my to-do list for quite some time.
After months of research and several rounds of testing various gluten-free steamed bun recipes, I am thrilled to finally be able to share with you these delicious gluten-free Chinese steamed buns with beef filling (or whatever filling you choose to use).
I was on the verge of throwing in the towel and giving up on this project.
In the end, everyone in the family thinks that these are the tastiest gluten-free steamed buns they’ve ever eaten.
The recipe rundown
Taste: It has a very pleasant taste, similar to that of conventional steamed buns. There are some differences between this and conventional steamed buns (there can’t be any when there isn’t any gluten! ), but it is quite near, and I am pleased with the outcome. Texture:At long last, it has that soft and fluffy texture that allows me to peel the buns apart without them falling apart because they were previously so hard and dry. The level of difficulty is medium. Advantages: 1. There is no usage of xanthan gum.
- 2.
- 3.
- When working with gluten-free dough, you don’t have to do any kneading at all (great!).
- You may make a basic dough and fill it with a variety of sweet or savory fillings, or you can leave it plain.
- If you are making this for the first time, it may be a little difficult to get the dough to the appropriate consistency, but I hope the step-by step directions and video will guide you through it.
Gluten-free flour/starch I use in this recipe
Food quality: It is comparable to that of conventional steamed buns in terms of flavor. There are some differences between this and conventional steamed buns (as there can’t be when there’s no gluten! ), but it’s quite similar, and I’m pleased with the outcome. Finallty, it has that soft and fluffy texture that allows me to take the buns apart without them breaking apart because they were before so hard and dry to tear apart Moderate levels of difficulty are encountered. 1. There is no usage of xanthan gum.
2.
The lack of kneading is another plus.
If you are using gluten-free dough, you won’t need to knead it too much (which is great!).
It’s all up to you. If you are making this for the first time, it may be a little difficult to get the dough to the proper consistency, but I hope the step-by step directions and video will guide you through it.
Can I use premix gluten-free all-purpose or bread flour?
Not with this particular recipe, at least. Every brand I’ve tested has had a distinct set of ingredients in it, which I’ve discovered after trying numerous. Each brand requires a unique set of changes, and I was unable to get a consistent outcome. As a result, I opted to forego it. It’s possible that you won’t be able to get the same brand of gluten-free flour that I use, or that I won’t be familiar with the brand you use, so there are too many variables in this recipe. Even while it is said that gluten-free all-purpose flour or bread flour may be used to substitute conventional flour cup for cup, I discovered that this is not always the case, at least when it comes to baking gluten-free steamed buns (see recipe below).
Other Ingredients for the dough
Yeast is the first of them. You may use either quick yeast or active dry yeast for this recipe. Baking powder is number two on the list. My typical steamed buns recipe does not call for baking powder, but the gluten-free dough is “denser,” and the baking powder helps to leaven the dough more, resulting in fluffier buns. The third ingredient is oil, which may be any neutral smelling cooking oil. Although the recipe does not call for much oil, it is essential in keeping the dough wet, which is especially crucial with gluten-free dough, which is often drier.
Liquid substances You may use either dairy or nondairy milk in this recipe, as well as water.
I believe that a touch of salt and sugar enhances the flavor of the steamed buns, therefore I propose that you should not leave them out.
How to make really good gluten-free steamed buns
1. Make the filling according to package directions. Preheat a skillet or wok on high heat. Cook the onion until it is tender and fragrant, about 3 minutes, in the cooking oil until it is soft and aromatic. Combine the chicken flesh and the remaining ingredients in a large mixing bowl. If you are using raw meat, continue to cook until the meat is completely cooked through. Take a whiff of it. The filling should have a combination of savory and sweet flavors. To taste, adjust the seasonings by adding additional tamari/coconut aminos and/or brown sugar.
- To thicken the mixture, combine the cornstarch and water in a small bowl and pour it into the skillet or wok.
- 2.
- Combine all of the ingredients in a large mixing basin and whisk well.
- As long as there is foaming and bubbling in the mixture, this shows that the yeast is still active.
- 3.
- To combine all of the dry ingredients in a large mixing basin, stir them vigorously.
- Make a dough with one of your clean hands by kneading it in.
If the dough appears to be dry, cracking, and falling apart, add a teaspoon at a time of extra liquid until it comes together.
Proofing the first time till it doubles in size Cover the dough with plastic wrap and set it aside in a warm area.
To double in size, the dough required a little more than an hour to rise.
Depending on the temperature, it may take less time or more time.
Prepare a working surface by gently dusting it with cornstarch or tapioca starch and transferring the proofed dough to it (if you replace cornstarch with tapioca starch).
Work with one dough at a time, keeping them covered while you do so.
Using your thumb, gently push the dough into a round ball, then to the side, to make a bowl-shaped structure (as shown in the photo and video) Insert the filling material into the cavity.
If the dough becomes dry and crackly at any time throughout the process, dab the dough with a small amount of water and roll it into a smooth spherical ball.
Repeat the process with the remaining dough balls.
A second round of proofreading Location the formed buns in a warm place once again to let them to proof until they are approximately half the size of their original size (they will not double their original size).
When you raise them up, the dough should feel a little lighter and around 50 percent puffy, according to the recipe.
Prepare the steamer by bringing the water in the steamer to a full rolling boil before using it.
Cook for 8 minutes on medium heat before lowering the heat to low and waiting 1 minute before lifting the lid to remove the steamed buns from their pan. Allowing them to cool on the cooling rack will prevent the bottom from becoming soggy and moist.
What to expect from this gluten-free steamed buns recipe
1.Steamed buns should be soft and fluffy when still warm, and it is ideal to serve them while they are still warm2. Once the steamed buns have been allowed to cool fully, they will begin to firm slightly. It’s typical for them to be very harsh after chilling, so don’t worry about it. It is sufficient to heat them briefly in the steamer or microwave to restore them to their former glory.
Other filling ideas for these gluten-free steamed buns
The following ingredients: red bean paste, mung bean paste (just substitute all-purpose flour with cornstarch or tapioca starch), and black sesame paste
Can I make the dough ahead?
Yes, it is possible. I’ve tried preparing the dough up to 24 hours in advance. Here’s how it’s done: 1. Prepare the dough up to the point of the first proofing2. Allow the dough to prove in a warm location for one hour before transferring it to a refrigerator. 3. When you are ready to begin working with the dough, remove it from the refrigerator and allow it to settle for approximately 1 hour at room temperature before continuing with the shaping and the remainder of the instructions on the package.
Why gluten-free steamed buns are tough after steaming?
It’s possible that the dough is too dry or that it hasn’t been proofed long enough. When you proof them, make sure that they double in size the first time and that they are approximately 50 percent puffy the second time you proof them.
Why the gluten-free dough is dry and cracking?
When compared to ordinary dough, gluten-free dough need the addition of extra moisture. You may always dab the dough with some water at any point throughout the shaping process to assist you in rolling it into a smooth dough.
How to store and reheat gluten-free steamed buns
1. Allow the steamed buns to cool fully before arranging them on a baking sheet so that they do not touch one another. Place the entire baking sheet in the freezer for approximately 1 hour. They will solidify, but they will not be entirely frozen at this time. Transfer to a freezer bag, and they will no longer be able to attach to one another. Try not to retain it for more than a month or two2. When you’re ready to consume them, you can simply transfer them from the freezer to the steamer. Steam them for 5 minutes on high heat, or until they are completely cooked through and they are as good as new.
After realizing that when you remove something as essential to bread or bun production, you have to come up with something to replace it that has a nearly same texture and taste, I recognized that it was not a simple task to do.
I can’t expect it to be exactly the same since it isn’t the same when gluten is removed from the equation.
However, I can assure you that the texture and flavor will be pleasing to you, as I believe.
Gluten-Free Cheese Bread made in the Air Fryer in Under 30 Minutes! (No Yeast) You might enjoy these gluten-free recipes as well. Pandan Chiffon Cake is a light and airy gluten-free cake that is soft and fluffy. Mini Cheddar Mochi Bread is a quick and simple recipe.
Did you make this gluten-free meat steamed buns recipe?
I love it when you guys take a picture and tag me on Instagram to show me what you’ve created. Simply tag me on Instagram with the hashtags @WhatToCookTodayWhatToCookToday and I’ll be sure to pop by and have a look in person! This dish is derived from Victoria Glass’s appearance on The Great British Chefs, with a few minor changes.
Soft Fluffy Chinese Gluten-Free Meat Steamed Buns (Mantou/Baozi)
- Preparation time: 15 minutes Cooking Time: 8 minutes 1hr53mins is the total time. 8 big buns are served.
Ingredients
- 1 1/2 teaspoons quick yeast
- 1 teaspoon sugar
- 2 tablespoons warm water (not boiling)
Dry ingredients for the dough (I highly recommend using a measuring scale):
- 88 g cornstarch (1/2 cup) + 4 tbsp (spoon and level), plus additional cornstarch for dusting if necessary Take a look at the notes. 45 grams of glutinous rice flour (6 tablespoons plus 1 tablespoon (spoon and level)
- 50 grams of rice flour (6 tablespoons plus 1 tablespoon (spoon and level)
- 1 teaspoon baking powder
- 14 teaspoon salt
- 30 grams of sugar2 1/3 tablespoons
- 43 grams of potato starch4 tablespoons plus 1 tablespoon (spoon and level)
Wet ingredients for the dough:
- Thirty milliliters of water or dairy/nondairy milk (1/2 cup plus 1 tablespoon)
- 30 milliliters of cooking oil (about 2 tablespoons)
For the gluten-free meat filling (you can use whatever filling you like):
- One big onion, peeled and coarsely chopped
- One tablespoon of frying oil If you don’t have any leftover chicken meat (chopped or shredded), you may use raw chicken or pork (approximately 200 grams/7 oz) and 1 tablespoon of Tamarior coconut aminos. More or less to your liking
- 2 tablespoons brown sugar or more or less to your liking 1 teaspoon sesame oil
- 14 teaspoon powdered black pepper
To thicken the filling:
- Preheat a skillet or wok on high heat. Cook the onions until they are tender and fragrant, about 3 minutes, in the cooking oil once they have been added. Combine the chicken flesh and the remaining ingredients in a large mixing bowl. If you are using raw meat, continue to cook until the meat is completely cooked through. Take a whiff of it. The filling should have a combination of savory and sweet flavors. Add additional tamari/coconut aminos and/or brown sugar to your liking to make it more palatable. When you are completely satisfied with the flavor. To thicken the mixture, combine the cornstarch and water in a small bowl and pour it into the skillet or wok. Remove the filling from the heat and allow it to cool fully before wrapping it or storing it in the refrigerator if it is not going to be used right away.
Activate the yeast:
- Combine all of the ingredients in a large mixing basin and whisk well. Allow for a 10-minute resting period. This shows that the yeast is still active in the mixture, which should be frothy and bubbly in appearance. If it doesn’t after 10 minutes, the yeast is no longer active and you will need to replace it before continuing with the procedure.
Prepare the dough:
- To combine all of the dry ingredients in a large mixing basin, stir them vigorously. Add the yeast mixture to the pan. Then, stirring constantly, gradually add the water/milk and oil until everything is well combined. Don’t add all of the water/milk at once
- Start with around 80 ml and gradually increase the amount. Make a dough out of it by kneading it with one of your clean hands. The dough should feel a little damp and moist to the touch, but not sticky to the touch. If the dough appears to be dry, cracking, and falling apart, add a teaspoon at a time of extra liquid until it comes together. It should have the feel of “playdoh.” No flexibility can be found in the dough.
First proofing until doubles in size:
- Cover the dough with plastic wrap and set it aside in a warm area. I bake my in the oven with the “bread proof” mode turned on and it comes out perfectly. To double in size, the dough required a little more than an hour to rise. Don’t be concerned about the time. Depending on the temperature, it may take less time or more time.
Shape and fill the dough:
- Scoop out the proofed dough onto a gently powdered work surface that has been lightly coated with cornstarch. Using clean hands, pull the dough back together into a single big ball, and then divide it into eight equal sections. Work with one dough at a time, and keep them covered while you do so. Prepare a small cup of water next to you in case you need it to assist you in shaping the dough throughout the shaping process. Using your thumb, gently push the dough into a round ball, then to the side, to make a bowl-shaped structure (as shown in the photo and video). Insert the filling material into the cavity. Gently press the dough into the filling to seal it. If the dough becomes dry and crackly at any time throughout the process, dab the dough with a small amount of water and roll it into a smooth spherical ball. Place this on a baking sheet lined with parchment paper and cover with a moist cloth. Repeat the process with the remaining dough balls.
Second proofing:
- Location the formed buns in a warm place once again to let them to proof until they are approximately half the size of their original size (they will not double their original size). This round will be shorter, lasting around 15-30 minutes, but please do not hurry to finish. When you raise them up, the dough should feel a little lighter and around 50 percent puffed
- Otherwise, they will be tough.
Steaming:
- Prepare the steamer by bringing the water in the steamer to a full rolling boil before using it. Place the formed buns in a steaming basket or on a steaming rack while they are steaming. If you have a steamer with three tiers, you can steam them all at the same time. Aside from that, you’ll have to steam in batches. Reduce the heat to medium and continue to steam the buns for another 8 minutes. Then remove the pan from heat and let it sit for 1 minute before lifting the lid. Remove the steamed buns from the steamer and set them aside on a cooling rack to cool completely. This is done in order to avoid the bottom of the steamed buns from becoming soggy due to moisture that has collected at the bottom.
Serve:
- Warm gluten-free steamed buns (or any steamed buns, whether they are gluten-free or not) are preferred over cold ones. Gluten-free steamed buns will firm significantly once they have been allowed to cool fully and after they have been refrigerated. Using a microwave or steamer, reheating them will restore them to near-new condition.
Notes
Some individuals have had experience substituting tapioca starch for cornstarch in baking and baking recipes. I haven’t personally tested it, but in case you are interested, it may be worth your while to do so.
Marvellina
Marvellina is a food blogger, recipe creator, photographer, and publisher at What To Cook Today. She has written for a variety of publications. A cuisine site dedicated to sharing tried and tested Asian dishes with you.
Rice Buns
Rice Buns are a food item that the player has the ability to prepare. The recipe for Rice Buns may be obtained from Chef Mao for 1,125Mora (about). Rice Buns may restore 8 / 9 / 10 percent of maximum health and an extra 800 / 1,000 / 1,200 health to the target character, depending on the quality of the bun. In Co-Op Mode, this meal does not have the ability to target the characters of other players.
Contents
- 1) The recipe
- 2) Trivia
- 3) Other Languages
- 4) Change History
- 5) References
- And 6) Navigation.
Recipe
- Cooking 1Rice, 1Rice, 1Horsetail, 1Horsetail, 1Rice Buns, 1Rice Buns Buns made with rice Creates Rice Buns (one)
Trivia
- The Chinese name for the dish translates to “Rice Wowo” (Chinese:Mwwo), and it is most likely a reference to wotou (Chinese:wtóu, “nest-thing”), a sort of steamed bread popular in northern China.
- When compared to today’swotou, which is most usually made of cornmeal, during the middle Qing period (around 1800), it was referred to aswowo (Chinese: ww) and was predominantly made of glutinous rice.
Other Languages
| Language | Official Name | Literal Meaning |
|---|---|---|
| English | Rice Buns | — |
| Chinese(Simplified) | 米窝窝mǐ wōwo | Rice Steamed Buns |
| Chinese(Traditional) | 米窩窩mǐ wōwo | |
| Japanese | 米まんじゅうKome Manjyuu | Rice Manju |
| Korean | 쌀 찐빵Ssal Jjinppang | Rice Steamed Buns |
| Spanish | Bolitas de harina de arroz | |
| French | Boules de riz gluant | Sticky Rice Balls |
| Russian | Рисовые пампушки | |
| Thai | Rice Bun | — |
| Vietnamese | Bánh Gạo | Rice Cake |
| German | Klebreisbällchen | Glutinous Rice Buns |
| Indonesian | Rice Bun | — |
| Portuguese | Bolinha de Arroz |
Change History
Version 1.6 of the software was made available.
References
| Potions | |
|---|---|
| AnemoCryoElectroGeoHydroPyro | |
| DMG-Boosting | |
| RES-Boosting |
Bulgogi Rice Burger
An excellent way to enjoy Bulgogi in rice patty buns, the Bulgogi rice burger is an excellent way to enjoy Bulgogi in rice patty buns! Rice buns are a unique and tasty snack that is also a healthy option! I’m so thrilled to share today’s dish with you, which is Bulgogi rice burger ( )! It is one of the iconic fast food Korean meals, and several of you have asked for the recipe for quite some time. So here it is. The first time I had a Bulgogi rice burger was so long ago that I can’t recall the date.
- I ordered it since it was a new line of burgers that had just been released, and the fact that the buns were made of rice piqued my interest immediately!
- My encounter, according to my hazy recollection, was only mediocre.
- I’m preparing Bulgogi rice burgers in the comfort of my own home!
- It was quite enjoyable.
- Since last Monday, I’ve made this a total of eight times!
- Bulgogi rice patties are a delicious way to use up any leftover Bulgogi you may have.
- If you enjoy Bulgogi, be sure to check out these recipes!
Watch How to Make Bulgogi Rice Burger (video tutorial)
- It’s a terrific way to enjoy Bulgogi in rice patty buns! Bulgogi rice burgers are a delicious way to enjoy Bulgogi! A unique, tasty, and healthier option, rice buns are becoming increasingly popular. I’m so thrilled to share today’s dish with you, which is Bulgogi rice burger ( ). One of the most iconic fast food Korean meals, and several of you have asked the recipe for quite some time. So, here it is. The first time I had a Bulgogi rice burger was so long ago that I can’t recall. In a little part of Lotteria, it feels like it was at least a decade ago (a Korean fast food chain equivalent to McDonalds in Korea). In order to try a new line of burgers that had just been released, I chose this one since the buns were made of rice, which piqued my interest right away! Surely no one could be surprised! My experience, as far as I can recall, was merely average. Everything seemed phony, and I couldn’t get used to the “rice bun thing,” to put it mildly. Look at me now, we’ve arrived in the moment. Bulgogi rice burgers are being made in my own kitchen! Furthermore, it feels and tastes authentic. Everything about it was superb. That is to say, it is excellent! Since last Monday, I’ve made this eight times. While this was largely due to the fact that I was testing my recipe, the fact remains that it is a simple dish to prepare if you have mastered the skill of creating the rice bun without it falling apart. Bulgogi rice patties are a delicious way to use up any leftover Bulgogi you have lying around the kitchen. This is undoubtedly one of my favorite non-traditional ways to consume bulgogi, along with my bulgogi spring rolls and bulgogi taco barrecipe. If you enjoy Bulgogi, you should definitely try these! Enjoy!
- 1 teaspoon (black) roasted sesame seeds
- 1/4 teaspoon fine sea salt
- 1/4 teaspoon sesame oil
- 1 teaspoon sesame seeds
- 2 tablespoons brown sugar
- 1 tablespoon soy sauce
- 1 tablespoon water
- 2 tablespoons rice wine
- 1/4 teaspoon oyster sauce (msg free)
- 18 tablespoons sesame oil
- 1/2 tablespoon brown sugar
Agent for thickening the Bulgogi burger sauce (mix these in a bowl)
- As a rice bun mold, use two (or more) round cake pans with the diameter of 11.6cm/4.5 inch (the pan used in the recipe has an 11.6cm/4.5 inch diameter). Alternatively, 2 tuna cans that have been cleaned and emptied might be used. If you choose a smaller-sized mold, you may instead create three medium-sized burgers. Wrapping food in plastic (cling wrap)
- Using nonstick baking paper
*1 tablespoon equals 15 milliliters, 1 cup equals 250 milliliters** If you want to learn more about Korean cooking components, have a look at my list of the 30 most important Korean cooking ingredients!
How to Make Bulgogi Rice Burger
1. In a small saucepan, prepare the Bulgogi burger sauce. Using a heatproof pan, pour the Bulgogi burger sauce in and bring it to a boil over low heat for 10 to 20 seconds. Stir in the thickening agent until the sauce has reached the desired consistency. (A higher temperature causes the sauce to thicken more quickly.) Remove the sauce from the pan and place it on a dish to cool. Place the steaming rice in a large mixing bowl and stir in the rice seasoning sauce I. 3. Set them aside after thoroughly mixing them.
Wrap some plastic wrap over the rice bun mold to keep it from sticking.
The thickness of my rice bun was around 2 cm/0.8 inch in diameter.
Allow the rice bun to rest in the mold for approximately 5 minutes.
4.
Rice seasoning sauce II should be applied to the tops of the rice buns.
While it’s cooking, spread the rice seasoning sauce II over top of the bun to make it seem more appealing.
To prevent the rice from sticking to the dish, place the bun on a piece of nonstick baking paper and press down firmly.
(Place two rice buns on each nonstick baking sheet lined with parchment paper.) Continue in similar manner for the remainder of the rice buns.
Continue to cook the Bulgogi in a pan until it is completely done.
Assemble the burger in the following manner:Enjoy!
- Spread some mayonnaise on the rice buns and make sure it is evenly distributed. If you don’t care for mayonnaise, you may omit this step. Spread the Bulgogi burger sauce on the rice buns and serve immediately. You may also use this sauce to brush on top of the meat. Place lettuce leaves, perilla leaves, and bulgogi on top of the sauce. If you can’t get perilla leaves, you may substitute lettuce or other herbs that you prefer instead. Toss in some pickled white radish slices and/or Kimchi for good measure. Wrap the rice bread around it. The nonstick baking paper should be used to wrap the burger so that you can catch it if anything falls off.
Note
- I bought my cake moulds at a local Daiso store for AUD $2.80 apiece, just in case you’re wondering where I got them from. Because the bottom is detachable, it was extremely handy to use
- In the event that you enjoy pork, try cooking this burger with my spicy pig bulgogi recipe.
- Bulgogi (Korean marinated beef): 200g (about 7 ounces)
- A couple of lettuce leaves, washed and chopped to suit the rice bun Perilla leaves, cleaned and stems cut away. Some pickled white radish and napa cabbage Kimchi
- Some Japanese mayonnaise (Kewpie brand)
- Some pickled white radish and napa cabbage Kimchi Steamed short/medium grain white rice (such as Korean rice or sushi rice): 3 1/2 cups
Bulgogi burger sauce (mix these in a bowl)
- 2 1/2 tablespoons brown sugar
- 1 tablespoon soy sauce
- 1 tablespoon water
- 1/2 tablespoon white wine
- 1/4 tablespoon oyster sauce (no msg)
- 1/8 teaspoon chopped garlic
- 1/8 teaspoon sesame oil
Bulgogi burger sauce thickening agent (mix these in a bowl)
- Round cake pans are utilized as a rice bun mold in this recipe (the pan used in this recipe has a diameter of 11.6cm/4.5 inch). Alternatively, 2 tuna cans that have been cleaned and emptied might be used. The following materials: plastic food wrap
- Non-stick baking paper
- If you use a smaller size mold, you may create three medium-sized ones:
- In a small saucepan, prepare the Bulgogi burger sauce. Using a heatproof pan, pour the Bulgogi burger sauce in and bring it to a boil over low heat for 10 to 20 seconds. Stir in the thickening agent until the sauce has reached the desired consistency. (A higher temperature causes the sauce to thicken more quickly.) Scoop out the sauce onto a dish and set it aside
- Place the steamed rice into a large mixing bowl and stir in the rice seasoning sauce I until everything is well combined. Set them aside after thoroughly mixing them. Wrap some plastic wrap over the rice bun mold to keep it from sticking. Fill the rice bun mold halfway with the seasoned rice (from step 2) and carefully shape the rice bun by pressing it down to flatten it with your fingers. The thickness of my rice bun was around 2 cm/0.8 inch in diameter. Gather the food wrap around the rice so that it completely covers it. Allow the rice bun to rest in the mold for approximately 5 minutes. Remove the formed rice buns from the mold (simply take the food wrap away from the buns) and uncover the rice. Repeat step 3 with the remaining rice (until you have made three more rice buns). Rice seasoning sauce II should be applied to the tops of the rice buns. Using low heat, gently crust the seasoned side of the chicken breast for about 3 minutes per side. While it’s cooking, spread the rice seasoning sauce II over top of the bun to make it seem more appealing. Grill it on the other side until it has a little crust on it. Place the bun on a piece of nonstick baking paper so that the rice does not adhere to the dish while it is cooking. This paper may also be used as a wrapping for small items. (Place two rice buns on each nonstick baking sheet lined with parchment paper.) Continue in similar manner for the remainder of the rice buns. Cook the Bulgogi in a pan until it’s completely cooked, around 10 minutes. Assemble the burger according to the instructions below. -Squeeze a little amount of mayonnaise onto the rice buns and evenly distribute it. – If you don’t care for mayonnaise, you may omit this step. – The Bulgogi burger sauce should be spread on the rice buns. – You may also use this sauce to brush on top of the meat. -Place lettuce leaves, perilla leaves, and bulgogi on a baking sheet. – Instead of perilla leaves, you may use lettuce or any other herbs you choose if they are not readily available in your area. – Toss in some pickled white radish slices and/or Kimchi for good measure. – Cover with the rice bun to keep it from falling apart. – The nonstick baking paper should be used to wrap the burger so that you can catch it if anything falls off.
*One tablespoon equals 15 milliliters, and one cup equals 250 milliliters. Calories:1607kcal The nutritional information displayed is an approximation based on data from an online nutritional calculator. It should not be construed as a substitute for the advice of a licensed professional nutritionist. I always like hearing how my recipes turned out for you! Please leave a comment below and tag me on Instagram @MyKoreanKitchen if you enjoyed this dish.