
Pie
How To Shape Burger Buns
Jan
Beautiful Burger Buns
Summer has finally here, and we all know what that means – it’s time for the music festival season to get started! When it comes to long hair, no matter how lovely and feminine it is, it may become exceedingly tough to manage during the hot summer days, as you tend to sweat and your hair might become tangled. If you are unable to cut your hair during the summer months, don’t worry — there is always a remedy for almost every hair issue you may be experiencing. In this case, the solution comes in the form of a wonderful messy bun that is excellent for hippies and other cool ladies who like a nice outdoor music festival – and not only for them!
Instructions
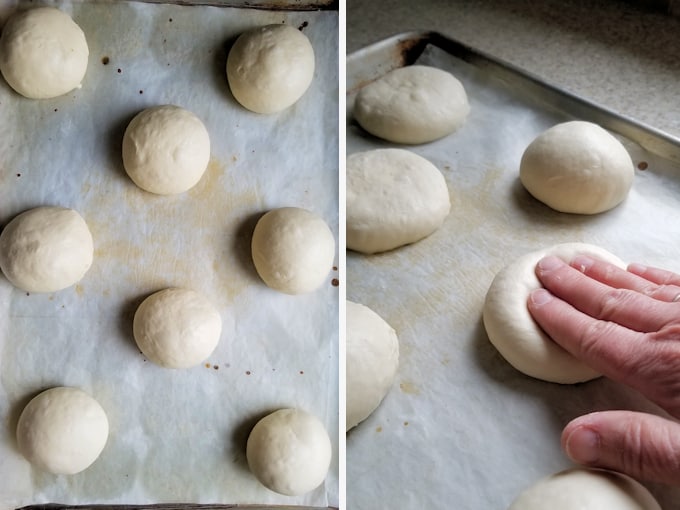
- You may either weigh your flour or measure it by carefully spooning it into a measuring cup and wiping away any excess flour. To prepare the dough, do the following: Prepare the dough by combining and kneading all of the ingredients (by hand, stand mixer, or bread machine) until it is soft and smooth. Allowing the dough to rise for 1 to 2 hours, or until it has about doubled in volume, is recommended. To form the buns, do the following: Gently deflate the dough and divide it into eight pieces (each weighing approximately 100g)
- For information on how to produce smaller or bigger buns, see the “tips” section below. Using your hands, roll each piece into a ball. Use the palm of your hand to flatten each dough ball so that it is approximately 3″ across
- Place the buns on a baking sheet that has been gently oiled or lined with parchment paper. Cover and allow to rise for approximately one hour, or until significantly puffy. Preheat the oven to 375 degrees Fahrenheit near the conclusion of the rising period. Using about half of the melted butter, brush the buns with it. To prepare seeded buns, brush the egg white/water mixture directly into the melted butter
- This will help the seeds stick to the buns. Sprinkle the seeds of your choosing on top of the buns. To prepare the buns, follow these steps: Bake for 15 to 18 minutes, or until the buns are golden brown. As soon as you take them out of the oven, brush them with the remaining melted butter. This will give the buns a satiny, buttery exterior. In order to prevent brushing the seeds off the buns if you’ve created seeded buns, use caution when applying the melted butter. Allow the buns to cool on a cooling rack before slicing them in half horizontally. Use it as a basis for burgers (beef or plant-based) or as a filler for your favorite sandwich. Information on storing leftover buns: Store leftover buns, well wrapped, at room temperature for several days
- Freeze for extended storage.
Tips from our Bakers
- If you like somewhat smaller buns, split the dough into 12 pieces rather than eight pieces. Bake the buns for 12 to 15 minutes instead of 15 to 18 minutes as directed on the package. And how about “slider buns,” which are around 3 inches in diameter? Bake for 12 to 15 minutes, depending on how many pieces of dough you have. To create these buns using our hamburger bun pan, follow these steps: Divide the dough into six pieces (each weighing approximately 128g) and roll them into balls. Simply place the balls into the wells of a hamburger bun pan that has been lightly oiled and gently press them with your hand until they are approximately 3 1/2″ to 4″ wide, or until they have filled the bottom of the wells. Continue to follow the recipe exactly as instructed
- Join Martin Philip, a King Arthur baker, and his family as they work together to create Beautiful Burger Buns from start to finish. Also, make mouth-watering cinnamon buns out of the leftover dough! Watch Martin Bakes at Home – Burger Buns, Cinnamon Rolls, and More Now!
Hamburger Buns
Hamburger buns made from good fresh bread are difficult to come by in Paris. It has been that way for me, at least. For my Sunday cheeseburger, I opted to create my own handmade burger buns so that I could enjoy it in the comfort of my own home. We don’t have much of a choice these days, unfortunately. They are simple to make. I’ll make good on my commitment. All you have to do is be patient and follow the instructions.
How to make hamburger buns
Hamburger buns are a simple dish to prepare. Just be patient and allow them to rest so that they can develop into lovely flowers. In order to make any bread, hamburger buns included, there are four phases to the process: kneading; first fermentation; bread shape; and second fermentation. And, of course, there’s the baking of the bread in the end.
How to make the dough for hamburger buns?
You may make the hamburger buns in a stand mixer or by hand, depending on your preference. * With the use of a stand mixer In the bowl of your stand-mixer, combine the yeast and water until completely dissolved. The water should not be too hot, or the yeast will be killed. It should be a comfortable temperature; 20 degrees Celsius would be ideal! Alternatively, if you are using active dry yeast, allow it to rest for approximately 10 minutes before adding the remaining ingredients. Until you can see little bubbles developing on the surface of the water.
Except for the butter, combine the rest of the ingredients in a large mixing bowl.
Toss in the room-temperature butter and knead on a moderate speed until the butter has been completely integrated into the dough.
When the dough no longer adheres to the sides of the mixing bowl, it is ready to be used.
To make your bread into a ball, wrap it in a damp kitchen towel and let it aside for an hour. It should have at the very least doubled in proportion. This is the second phase in the process of manufacturing your burger buns: the initial fermentation of the dough is completed here.
* Using a pen and paper Warm water should be used to dissolve the yeast. Alternatively, if you are using active dry yeast, allow it to rest for approximately 10 minutes before adding the remaining ingredients. Until you can see little bubbles developing on the surface of the water. Alternatively, it is not essential to wait and you may begin with the recipe immediately. Create a fountain on the kitchen counter by combining the flour, sugar, and salt together. To fill the egg yolk with half of the water, poke a hole on one side of the egg yolk.
- Continue to stir in the remaining water until all of the ingredients are well combined.
- Knead the dough until it is no longer sticking to the counter top of the kitchen.
- To make your bread into a ball, wrap it in a damp kitchen towel and let it aside for an hour.
- This is the second phase in the process of manufacturing your burger buns: the initial fermentation of the dough is completed here.
How to shape burgers buns
Make the hamburger buns either using a stand mixer or by hand, depending on your preferences. * A stand mixer is used to do this. Dissolve the yeast in the water in the bowl of your stand mixer. Using hot water will destroy the yeast. Cool water is preferred. 20 degrees Celsius would be ideal; nevertheless, a little warmth is OK. If you are using active dry yeast, allow it to rest for approximately 10 minutes before continuing with the recipe. Until you can see little bubbles emerging on the surface of the liquid.
- Except for the butter, combine all of the remaining ingredients.
- Toss in the room-temperature butter and knead at a low pace until the butter has been completely mixed into the dough.
- When the dough no longer adheres to the sides of the mixing bowl, it is ready to be shaped.
- A minimum of twofold increase in size was needed.
- * Using a pen and paper.
- If you are using active dry yeast, allow it to rest for approximately 10 minutes before continuing with the recipe.
- Alternatively, it is not essential to wait and you may continue with the recipe.
To fill the egg yolk and half of the water, poke a hole in one side of the egg white.
After you’ve finished mixing everything together, pour in the remaining water.
Knead the dough until it is no longer sticking to the counter top of the baking sheet.
Using a damp kitchen towel, wrap your bread ball in plastic wrap and set it aside for an hour.
The initial fermentation of the dough is the second phase in the process of manufacturing your burger buns.
Hamburger buns resting time (second fermentation)
As soon as you’ve finished shaping the burger buns, put them to a baking sheet lined with parchment paper, cover them with a moist kitchen towel, and let them aside for about 1 hour, or until they have doubled in size (if this happens before the hour, that’s OK). The length of time it takes will be determined by the temperature and humidity conditions you are operating in.
Decorating hamburger buns with sesame seeds
If you wish to use sesame seeds to adorn your hamburger buns, you should do it immediately after forming your burger buns. 1 egg should be beaten. Place the sesame seeds in a small shallow dish and set aside.
Make all of your buns and then paint them with an egg wash using a pastry brush. Turn the bun over and roll it in the sesame seeds to finish them off. Place on a baking sheet lined with parchment paper in the oven. Allow them to rest until they have doubled in size.
How to bake hamburger buns
To begin, preheat your oven to 170 degrees Celsius 15 minutes before the fermentation is to be completed, then set an empty baking tray in the bottom of your oven. If you haven’t already done so, brush the hamburger buns with the beaten egg after they have doubled in size if you haven’t already done so. Sesame seeds are optional. Half a glass of water should be poured into the empty tray just before placing your buns in. Bake for 15 to 17 minutes, or until the top is golden brown.
Freezing hamburger buns
After they have been cooked, hamburger buns can be stored in the freezer. Allow them to cool to ambient temperature before freezing them. You may store the buns in the refrigerator for up to three months. In order to thaw, place the meat in the refrigerator overnight or at room temperature for a few hours. If I’m using frozen hamburger buns, I like to reheat them in the oven before using them. The ingredients used in all of the recipes on this site are all measured using the metric system, which is used around the world.
If you would like to utilize a scale as well, here are some examples: USA,Canada,UK,Australia,France.
You might leave a rating or a comment below if you tried this dish and liked it.
Also, if you post on social media, please tag me with the hashtag #cookwithbelula; I would love to see what you come up with!
Super Soft Burger Buns
These incredibly soft burger buns are a lot of fun to prepare and are also quite simple. They make use of the Tangzhong process, which results in a very soft burger bun that remains soft for days after it is baked. It is possible to make these homemade burger buns in either bun rings or freeform, and they freeze incredibly well.
Super Soft Burger Buns
It’s simple and enjoyable to prepare these extremely soft burger buns. It is made using a technique known as the Tangzhong method, which results in an extremely soft burger bun that remains soft for several days. It is possible to make these homemade burger buns in bun rings or freeform, and they freeze incredibly well.
The role of Tangzhong in bread dough
The Tangzhong method is an Asian technique that includes heating a portion of the flour and water in a bread recipe to make a thick paste, or roux, before adding it to the rest of the ingredients. Tangzhong is made by gelatanising part of the starch in the flour during the manufacturing process. This implies that the flour is able to absorb significantly more water and retains it during the dough-making process as well. This results in an extraordinarily soft loaf that stays soft for a much longer period of time than other types of bread.
The advantage of employing a roux is that the bread dough may be kept ‘lean’ – that is, with very little additional oil and other ingredients – while yet being incredibly supple and soft.
I’d been meaning to work on a burger bun recipe for quite some time, so here we go! Because of the Tangzhong, the bread remains soft for an extended period of time, making them excellent for storing and freezing.
The Ultimate Homemade Burger Bun Recipe
It’s really simple to prepare these Homemade Burger Buns since your mixer performs all of the heavy lifting!
- Creating your own Tangzhong – Tangzhong is prepared by heating together bread flour and milk in a pan until they form a thick paste. In the bowl of a stand mixer, combine the ingredients. To cool down the hot Tangzhong, they add cold milk to it – this is a trick I learned from King Arthur – so that it is not too hot that the yeast is killed. Mix in the other ingredients – Combine all of the ingredients except the butter in a large mixing bowl and whip it up with your mixer. Allow for 10-15 minutes of mixing time, or until the dough is smooth and elastic and pulls away from the sides. Add the butter – Room temperature butter is added, and the mixture is mixed until it is well absorbed. It simply takes a few minutes to do this task. If your butter is too soft, it will melt and become mushy throughout this process. First rise – Form the dough into a ball and place it in a dish of warm water. Alternatively, you may rise it at room temperature, or check further down the text for instructions on how to make an overnight rise
- Using a pastry cutter, cut your dough into whichever number of buns you want and give them a fast pre-form. Then rest them for 10 minutes, quickly shape them again, and lay them aside for their second rise, either in rings or spaced on a baking sheet. Prepare for the second rise – This is another room temperature rise, during which the dough will become extremely puffy
- Egg wash and bake – The egg wash aids in the baking of the buns, which results in a gorgeous golden finish. If you like, you may substitute milk for the water. Egg wash is one of my favorite things. If you desire, you may also include seeds and other ingredients in this section. Then bake them until they are wonderfully brown, allow them to cool on a rack, and then serve them up.
Making Burger Buns with Burger Ring Molds
With the help of these extremely amazing ring molds that my friend Campbell produced for me, I created these burger buns! It is the perfect size for making burger buns, as they are 10cm in diameter and 3cm in height. With the ring, the bun rises uniformly while also developing a pretty attractive ring around the edge, which makes it ideal for burger buns and other bun-shaped items like sandwiches. You are not need to utilize the rings if you do not like to do so; the product will still function well.
How to know when bread is ready to bake
When baking bread, it is critical to judge the progress of the dough by its behavior rather than by the time specified in the recipe. However, while the recipe serves as a decent general guide, the temperature of your dough when it is first made, as well as the weather and the temperature of your space, can all have an impact on how quickly it rises. In order to determine when the dough is ready to be baked, gently probe it with your finger is the best method. If it immediately comes back to life, it is not yet ready to be used.
Remember to prepare your oven around 30 minutes before you anticipate your dough will be ready to ensure that it has enough time to fully warm.
If this does happen, simply place them in the refrigerator to prevent them from over proofing while you prepare your oven to 350 degrees.
How to tell if you have over proofed your buns
This does happen from time to time, and it’s a great disappointment. Either you forget about your buns rising and they overproof, or you leave them proving for an excessive amount of time. Because the yeast creates all of its gas while performing its second proof, it has nothing left to provide when the bread is baked in the oven. It’s a shame, but it does happen. It is likely that your buns will deflate during the egg washing process if you have over proofed them. Then, because there is no gas to raise the bread in the oven, overproofed dough doesn’t do much in the oven.
Scaling the recipe for larger or smaller burger buns
This does happen from time to time, and it’s a major disappointment when it does. Either you forget about your buns rising and they overproof, or you leave them proving for an excessive amount of time and they fail to rise properly. Because the yeast creates all of its gas while undergoing its second proof, it has nothing left to provide in the oven when the bread is baked in the oven. While regrettable, it does occur.
It is likely that your buns will deflate when you egg wash them if you have overproofed them. Because there is no gas to raise the bread in an oven, an overproofed dough does not rise very much in the oven. Although they may appear a little sagging, they should still be edible.
Can you make Burger Buns ahead of time?
To get a head start on creating these soft burger buns, you may let them rise overnight in the refrigerator before baking them. My preferred method is to prepare the dough and then let it to rest on the counter for approximately 15 minutes before putting it into the refrigerator to begin the initial rising process. I tried it overnight, but you could probably get away with 3 hours in the fridge if you wanted to create the dough in the morning and use it later in the day for something else. When dealing with yeasted dough, keep in mind that the fridge is your best friend – if, for whatever reason, the dough is going to rise before you need it, simply drop it in the fridge to slow down the rising period until you are ready to use it.
You should be able to shape the dough into burger buns right out of the fridge, but if it seems a bit stiff, let it aside for about 10 minutes to soften.
Follow the dough’s appearance rather than the time specified in the recipe.
FAQ for Soft Burger Buns
Is it necessary to use bread flour? Yes. It is required for the dough’s strength. If you live anywhere other than the United States, bread flour is frequently referred to as high quality or strong flour. If bread flour is not readily accessible in your country, you might substitute some important wheat gluten to give the loaf more structure. Is it possible to create this recipe by hand? No. It is a very sticky dough that need the use of the mixer to generate strength. What is the best way to store Burger Buns?
- On the first day, I normally eat them raw, then lightly toast them the next day.
- Yep!
- Defrost at room temperature for best results.
- Is it okay to use active dry yeast?
- In order to make the tangzhong, you must first place it in the stand mixer bowl as you would normally, then add the cold milk.
- Add the sugar first, followed by the yeast, and allow it settle for 5-10 minutes, or until frothy.
- Is it possible that the heated Tangzhong will kill the yeast?
The ice-cold milk helps to chill it down.
If you are using active dried yeast, you will need to chill the tangzhong before activating the yeast in lukewarm milk and then continuing the recipe.
Nope!
Take a look at the photographs for buns baked without rings; they are a little shorter, but they work just well.
Yes!
It will fit neatly into a 9″x13″ (20x30cm) pan and will yield 12 sliders when baked in this size.
What happened?
If you are utilizing the rings, you may notice that they have a slight fold around the edge and that the crust has become a bit wrinkled.
You didn’t do anything wrong, believe it or not.
Where did you acquire the rings that you utilized for your project?
Is it possible to include sesame seeds?
Place them on immediately after applying the egg wash.
Is it necessary for me to use the milk powder? You should be alright if you do not include it, however I have not tried it that way yet.
For more Bun and Roll Recipes, check out:
You may write a review below if you tried this dish and want to tell me how it turned out. I would much appreciate your feedback! Also, please remember to tag me on Instagram if you manage to make it there!
A note on salt and oven temperature
It is critical to pay attention to the sort of salt that is required for in a particular recipe. Unless otherwise specified, I use Diamond Crystal salt throughout my recipes; if you want to use another type of kosher salt or plain table salt, you will need to modify your measurements proportionately because some salt is’saltier’ than others. Morton’s salt is twice as salty as table salt, therefore you will only need half the amount. The same may be said for conventional table salt. I’m still working on obtaining gram measurements for salt across my recipes, but I’m getting closer to it.
Changing the temperature of your oven when using the fan or convection setting will be necessary.
Using the double / triple function in the recipe card
My recipe card has a ‘1X, 2X, and 3X button, which you can use to multiply the recipe by the number of times it has been multiplied. This can be used to multiply a recipe by two or three times. Please keep in mind that this simply doubles the amounts of the items shown in the ingredients list, NOT the quantities listed in the technique. If the procedure of the recipe calls for certain amounts or pan sizes (for example, weigh out 150g brown butter), you will need to scale this figure manually.
It is usually a good idea to thoroughly go over a recipe before doubling it to ensure that everything is correct.
You may find a list of my favorite tools and equipment in my blog article, which you can find here.
Why is this recipe in grams?
I give my baking recipes in grams since it is the most precise method to measure ingredients. Cups are not only wrong, but their volume varies from country to country. I’m not going to be able to supply a universal cup measure that will work for everyone. Posting in pounds, on the other hand, eliminates this problem. For those who would like to have the recipe in cups, you are welcome to convert it yourself using Google; but, please don’t ask me to do it since I am not comfortable offering a recipe using a method that I have not personally tried.
If you would want a recommendation, this is the scale that I use.
Description
These incredibly soft burger buns are a lot of fun to prepare and are also quite simple.
They make use of the Tangzhong process, which results in a very soft burger bun that remains soft for days after it is baked. It is possible to make these burger buns in bun rings or freeform, and they freeze incredibly well both ways. Tangzhong
Dough for Burger Buns
- Dough for Hamburger Buns
TANGZHONG
- In a medium saucepan, whisk together the milk and bread flour until smooth. Stir continually while cooking over medium heat until the mixture thickens and forms a paste, about 10 minutes. Remove the pan from the heat and transfer the contents to the bowl of a stand mixer.
BURGER BUN DOUGH
- Add the cold milk and stir to integrate, making sure the mixture is not hotter than lukewarm with your finger before serving (the cold milk should cool the hot tangzhong enough). Combine the sugar, yeast, milk powder, salt, egg, and flour in a mixing bowl. Transfer the mixture to a stand mixer fitted with a dough hook
- Mix the dough on medium speed for 12-15 minutes, or until it is smooth and elastic and has begun to pull away from the edges of the bowl. Remember that it is sticky, but if you have created it by weight, you will not have any problems with it. Make use of a timer and take a break from the mixer if you find it necessary. If the dough still isn’t coming together after that time and you’re concerned, add flour a teaspoon at a time until the dough just comes together
- Mix in the butter for a further 5 minutes, or until it is completely integrated. Smooth and elastic dough that passes the windowpane test should be used to make the doughnuts. Turn the dough out onto a work surface and lightly flour it if necessary before forming it into a tight ball with a bench scraper or your hands. Transfer to a greased mixing basin and enclose the mixing bowl in plastic wrap. Place the dough in a warm place and let it rise until it has doubled in size, about 1 12 hours. Prepare a lightly floured surface for the dough to be turned out on. If you are using bun rings (I used 100mm rings for 90g buns), gently lubricate the rings before using them. Divide the dough into 9 equal parts, with each component weighing around 90 grams. Take one piece of dough at a time and flatten it before tucking it into a ball, then turning it seam side down and rolling into a tight ball by cupping your hand to form a ‘claw’ shape and using the strain from the counter to roll it firmly. Place to one side and loosely cover with plastic wrap. Make a group of dough balls on your counter with a little space between them so that they don’t touch each other and repeat the process with the remaining dough pieces. Set aside the buns for 10 minutes, after which you should give them a brisk roll to tighten them back up. Place them in the rings that have been made or on baking sheets that have been spread apart. Due to their high rising nature, make sure they are placed far enough apart – you may put 5 on one pan and 4 on the other pan. Alternatively, you might space them closer together so that they bake together. The buns can be covered with a lid or some lightly greased plastic wrap, or a second sheet pan turned upside down can be used to serve as a lid. Allow the buns to rise for around 1 12 hours more. You want them to puff out and double in size, and when you softly touch on one of them, it should leave a slight depression that doesn’t quite spring back to its original shape. Take a look at the photographs to see how they seem just after rolling and then rising. Remember that rising time is dependent on your environment, so judge the dough by how it looks rather than by how long it has been rising. Approximately 20 minutes before the dough is ready to be baked, preheat the oven to 360°f / 185°c. Egg wash should be applied to the buns. If you’re baking in rings, only coat the visible portions
- If you’re baking plain buns, brush the corners as well as the center. then bake for 15-18 minutes, or until they are a rich golden brown color, until they are done. Remove the dish from the oven and, if applicable, remove the rings. Allow for 10-15 minutes of cooling time on the pans before transferring to a wire rack to cool fully before serving. While cooling, the buns will wrinkle a bit, and if you used the rings, the edge may not stay fully straight and may fold in on itself a little – this is typical owing to the fact that they are so soft and need not be worried about
Keep leftovers in an airtight jar at room temperature for up to 5 days; they should retain their delicate texture this way. These can also be stored in the freezer. After the first day or two, you can toast the buns if they are still too soft. Bread, Tangzhong, Burger Buns, Milk Bread, Soft Burger Buns are some of the keywords to remember.
Simply Perfect Homemade Hamburger Buns
These delectable Homemade Hamburger Buns will take your burger game to the next level. These brioche-like buns have a light texture and a rich flavor that will leave you wanting more. Someone recently inquired as to whether or not I have a nice recipe for handmade hamburger buns. Yes, I certainly do! Because we are approaching the first long weekend of the Summer season in Canada, it seemed like a good time to offer this recipe, which has been my go-to for years for making hamburger buns. This dish initially appeared in the New York Times some years ago, under the title “Light Brioche Buns,” and has since gained widespread popularity.
Despite the fact that these buns are supplemented with eggs and a little amount of butter for flavor, they manage to be light in texture while being firm enough to handle the entire burger and all of its toppings.
They freeze nicely, so make a couple of batches and store them in the freezer so you’ll always be prepared for a lazy Summer barbecue.
- Notes on the ingredients
- Notes from the cook Instructions on how to roll dough into balls are demonstrated in this video. This recipe should be saved or shared
- Comments, questions, and reviews are welcome.
Ingredient Notes
Bread flour: If you start with bread flour, you’ll receive the best results. Much better, if you start with unbleached bread flour, your results will be even better. That’s not the simplest thing to come across on the shelves of grocery stores here in Canada. Bulk Barn is where I acquire my. In the absence of this, bleached bread flour will suffice. You can also use all-purpose flour, but your buns may not rise nearly as high as they should. Inactive dry yeast must be proofed (soaked) in warm water before use.
I personally do not use dried active yeast and instead prefer to use Instant Yeast (such as SAF Brand).
Therefore, I prove the Instant Yeast in the same manner as instructed in the recipe, unless otherwise specified.
Cook’s Notes
The first thing you need know about this dough is that it is extremely wet and nearly sticky when prepared according to the directions. You want to avoid adding much more flour here if at all possible in order to achieve the best (lightest) outcome. Add only the very minimal amount necessary to ensure that you can handle the dough. This dough is also a slow riser, so be patient and allow it to rise for as long as it takes for it to double in size, or until it is doubled in size. When baking in a warm Summer kitchen, the dough may likely rise a little faster.
I next divide the overall weight by eight to get at the weight of each roll’s dough mixture.
It is important to brush the egg wash onto the dough evenly and completely, making sure to go all the way around the bun and all the way down to the bottom of the bun.
If you’d want to add additional toppings to your handmade buns, sprinkle sesame seeds, poppy seeds, or a “everything” mix on top of the buns just after egg washing them and just before putting them in the oven right before baking them.
These buns keep well in the freezer! Thaw the frozen food at room temperature in the freezer bag or storage container.
Video: How to shape dough into balls
My experience has been that the shape of “the ball” is the one thing that causes folks to get stuck while baking buns. If someone believes that all you have to do is grab a piece of dough and mold or squeeze it into a ball shape, that is understandable. Although it may not seem like it, when it comes to making a “ball” out of dough, there is a strategy to it that involves establishing what is known as surface tension or tightness on the top of the ball. It is this tension that causes the dough to rise higher and smoother on top, as well as to create a wonderful smooth top.
- It’s the quickest and most efficient method I can think of, and it provides excellent results.
- Smooth down the top by stretching it out as much as possible.
- Turn the piece over and squeeze the edges together as they stretch in toward the center.
- Continue to do this all the way around the edges, until the sides are smooth as well.
- Turn the ball over so that the pinched half is on the bottom.
Recipe
- Recipe for handmade hamburger buns that are delicious. This recipe makes 8 buns. Exceptionally well-freeze
- Preparation time: 20 minutes Cooking Time: 15 minutes Time to Rise: 3 hours 3 hours and 35 minutes in total
- 1 cup water, warmed at around 105-110 degrees Fahrenheit
- 3 tablespoons milk, warmed to lukewarm
- 2 teaspoons active dry yeast or ordinary Instant yeast (not fast or rapid rise yeast)
- 1/2 cup white sugar
- 1 big egg, lightly beaten with a fork
- 3 cups bread flour
- 1/3 cup all-purpose flour
- 2 1/2 tablespoons white sugar fine salt to taste
- 2 1/2 tablespoons unsalted butter, at room temperature
For egg wash:
- Warm the water, warmed milk, yeast, and sugar in a small mixing bowl or 2-cup measuring cup until well combined. Allow it stand for 5 minutes or until the mixture begins to bubble. Using a large mixing basin, whisk together the bread flour, all-purpose flour, and salt until thoroughly combined. Toss in the butter. By rubbing the butter into the flour mixture with your finger tips, you will get uniform crumbs. Add the yeast mixture and the beaten egg to the mixing bowl and stir until a wet, sticky dough forms, using a dough scraper or silicone spatula. Scrape the dough out of the bowl with a silicone bowl scraper and onto a counter or work surface that has been lightly floured. At this time, the dough is quite wet and sticky, and it is not really able to be kneaded in the manner in which it would normally be. You will be tempted to dust the surface with flour, but resist the temptation to do so. As an alternative to traditional kneading, use a dough scraper or silicone spatula to lift the dough off the counter and smack it back down on the work surface. (Don’t simply dump it
- Crash it into the ground.) It’s a healing experience:) Using your scraper, flip it over many times on the counter, then lift it up and smack it down on the floor once more. For a number of minutes, keep repeating the slamming/turning motion. You should see that it is adhering to the counter a bit less as time goes by. If the dough does not seem to be advancing after a couple of minutes (it is still quite sticky), softly sprinkle the counter with flour and turn the dough over it to lightly flour (not too much flour). It’s only a little sprinkling). Carry on performing the slam and turn movement for several additional minutes. After approximately 5 minutes or so of this procedure, your dough should be able to come away from the counter without adhering to it. Despite the fact that the dough will still be rather moist, you should be able to shape it into a ball. * Even after 5-7 minutes of labor, if the dough is still clinging to your hands, sprinkle it with a small bit more flour, if necessary, until it no longer sticks but is still lovely and moist
- Using your hands, roll the dough into a ball and lay it in an oiled basin. Cover with plastic wrap and allow it rise until doubled in size, about a half hour. It’s important to note that this dough is a little sluggish to rise. Allow it to rise until it has doubled in size, regardless of how long it takes
- Prepare a large baking sheet by lining it with parchment paper and setting it aside
- Divide the dough into 8 equal pieces by scraping it with a dough scraper. In order to determine the weight of each piece of dough, I like to weigh the dough ball and then divide that weight by 8. I then weigh each piece to that weight, resulting in eight pieces that are precisely identical in size. The individual balls in my most recent baking weighed 101g each. Yours may be a little different.)
- If your dough is still too sticky to mold into balls at this stage, gently sprinkle it with a little amount of flour. *For instructions on how to form each of the eight dough pieces into a ball, please refer to the video above the recipe card. Place the balls on a baking sheet lined with parchment paper, spacing them approximately 2-3 inches apart. Wrap it loosely with a clean kitchen towel and let it aside to rise until doubled in size, about 1-2 hours. On the bottom rack of the oven, place a big shallow roasting pan filled with water. Preheat the oven to 400 degrees Fahrenheit, with a rack in the middle of the oven as well
- After the buns have doubled in size, whisk up the remaining egg and 1 tablespoon water and brush the buns generously. Make careful to brush the whole bun, including the top and sides, as well as the bottom of the pan, because any places you miss will be pale in color once cooked. Alternatively, you might add sesame or poppy seeds on top at this time if you so wish. Bake for 15 minutes, rotating baking sheet 180 degrees halfway through, or until tops are golden brown
- Immediately remove buns to a cooling rack to cool fully.
- Ideally, buns should be consumed on the same day that they are cooked. When cooking ahead, it’s better to freeze the buns because they keep well in the freezer. Place in a freezer bag or container and freeze. The container should be left out at room temperature to thaw. Make sure to read the “Cook’s Notes” at the end of this post, where I give some helpful advice, alternatives, replacements, and modifications for this particular recipe! Calories:260kcal Carbohydrates:42g Protein:8g Fat:5g 2 g of saturated fat Cholesterol:62mg Sodium:462mg Potassium:89mg Fiber:1g Sugar:4g Vitamin A: 200 International Units Calcium:22mg Iron:0.9mg Nutritional information is supplied solely for the purpose of general instruction and should not be used to make personal health-related choices. CourseBreadCuisineAmerican, Canadian
- American, Canadian
- JOIN OUR MAILING LIST to receive updates! A variation on “Light Brioche Buns” by Jane Sigal, which was published in the New York Times. Meet the Author (Meet the Author) Hi! I’m Jennifer, and I’ve been a home cook for more than 30 years. I’ve learnt a lot in the course of putting supper on the table for so many years! I aim to share some of what I’ve learned, as well as some of my favorite recipes, in this blog! Most importantly, I appreciate demonstrating to others that cooking at home can be simple and pleasurable by creating recipes that are simple, tasty, and seasonally inspired. More information about me may be found here. Seasons & Suppers considers it an honor to have been included on these outstanding websites. Have you tried this recipe? Please tell me about it in the comments section below! Receiving input on a dish from someone who has tried it is always beneficial to other cooks:) You are not required to provide your complete name, and your email address will never be made public.
How to Make Perfect Hamburger Buns
Linda delves into the world of culinary facts, mythology, and delectable recipes, one ingredient at a time. Pixabay
Is the Thought of “Homemade” a Horror Story for You?
You claim you’ve never cooked a loaf of bread before? Don’t worry, I’ll take you through the process step by step. What exactly is it? What happened the last time you tried and your bread came out flat and leaden? If you follow my instructions, you will be rewarded with hamburger buns that you can be proud of (and that taste fantastic, too). So let’s get this party started.
Simple Ingredients
The layers of flavors and sensations, as well as the unique combinations of herbs and spices, are all part of what makes certain cuisines so great in their complexity. I’m picturing a hearty French cassoulet, a hearty Italian bolognese, or perhaps a spicy Latin American mole sauce. All of them are bold and complicated, requiring a large list of materials and several hours of preparation time. Each of them, when prepared properly, is spectacular, unforgettable, and heavenly in nature. And then there’s the handmade bread, which is magnificent in its simplicity and elegance.
How They Work Together
Flourishes are the building blocks of a healthy loaf of bread, and protein is a critical component of that foundation (otherwise known as gluten). Contrary to popular belief, gluten is not a harmful chemical in and of itself. It is a nutrient and a fundamental component of many of our diets. When seen under a microscope, protein seems to resemble a spider web; it is this “web” that serves to capture carbon dioxide bubbles in the atmosphere. The starch in flour is another crucial component. When cooked, starch becomes solid and acts as a structural support for protein webs.
- Water combines with starch molecules to form gluten links (webs), which are responsible for holding everything together.
- Salt enhances taste while also chemically altering the gluten, resulting in a stronger gluten protein.
- What is the significance of this?
- (Consider how much more durable a balloon is compared to a bubble.) And,yeast.
- Did you know that?
And why is this so? Sugar is consumed by yeast. The sugar is introduced, digested by the yeast microorganism, and carbon dioxide is produced as a result. It is this trapped gas, which is caught in the webs, that causes your dough to rise.
The Recipe
Many hamburger bun recipes call for the addition of an egg, which results in a thick dough that, although delicious, is a little more difficult to form. To make things simple, I’ll offer you a recipe that will provide a yeasty dough that will be easy to work with and shape.
Ingredients
- 1 1/4 cups whole milk, warmed gently in the microwave (no more than 110°F)
- 1 package (2 1/4 teaspoons) active dry yeast (not instant)
- 1 cup sugar (no more than 1 1/4 teaspoons)
- 1 cup whole milk (no more than 110°F)
- Sugar, softened butter, 3 1/2 cups all-purpose flour, salt, and olive oil for brushing over the molded ready-to-bake buns are the ingredients for this recipe.
Step 1: Mix and Knead
Warm the milk gently in the microwave (no more than 110°F) for 1 1/4 cups (do not use instant); 1 package (2 1/4 teaspoons) active dry yeast, not instant; 1 1/4 cups whole wheat flour (do not use instant); 1 1/4 cups whole wheat flour (do not use instant); 1 1/4 cups whole wheat flour (do not use instant). 1 tablespoon sugar, 2 tablespoons melted butter, 3 1/2 cups all-purpose flour, 1 teaspoon salt, and olive oil for brushing over the formed ready-to-bake buns
Read More From Delishably
1. After you have done kneading the dough, transfer it to a large mixing basin that has been lightly oiled. To ensure that the entire ball of dough gets lubricated, turn the dough over in the bowl several times. Wrap the bowl tightly in plastic wrap and leave it in a warm, draft-free location to dry. 2. Allow the dough to rise in this warm, safe environment for approximately 1 hour, or until it has doubled in size. Using two fingertips to softly and swiftly push into the dough approximately 1/2 inch deep is one method of determining whether the dough has risen sufficiently.
3.
Using your fingers, bring the edges of the dough to the center, and then set the dough on a lightly floured board.
Proofed, punched, and ready to be molded into a form.
Step 3: Shape and Prepare for the Oven
1. Separate the dough into eight equal pieces. 2. Each component should be shaped into a spherical ball. Prepare a baking sheet with light oil or parchment paper and set aside for approximately an hour, or until the buns have become notably puffy and risen in volume. Secondly, prepare the oven to 375 degrees F while the dough is rising. 3. Drizzle the buns with the olive oil and serve.
Step 4: Bake and Test for Doneness
To begin, divide the dough into eight equal pieces. Construct a circular ball out of each piece. Prepare a baking sheet with light oil or parchment paper and set aside for approximately an hour, or until the buns have become notably puffy and risen in the center. Secondly, preheat the oven to 375 degrees F while the dough is rising. Olive oil should be brushed onto the buns in step 3.
How to bake burger buns so that they expand horizontally instead of expanding vertically?
It’s probable that your buns are sticking to the bottom of the tray. If they stick, they will grow vertically rather than horizontally since they are unable to grow horizontally. They’re in a bind. Dust the baking trays with semolina flour, rice flour, and/or fine corn meal, if desired, before baking. If you like, you may gently sprinkle them with white or rye flour, but the aforementioned flours are the best options. To retard the buns, consider spreading parchment paper on the baking sheet and gently coating it with the flours stated above before panning the buns in the oven.
I don’t know what your dough is made of, how you’re shaping them, how much you’re working the dough, or anything else about it.
Buns are often baked with low-protein AP flour and enriched dough (which includes butter, milk, and other ingredients).
They don’t require a great deal of gluten growth or shaping, though. If you work the dough too much, it will retain a form that is very near to the original shape (in this case, of a ball of dough instead of a disc).
40-Minute Hamburger Buns
If your buns are clinging to the bottom of the tray, they are most certainly undercooked. If they stick, they will grow vertically rather than horizontally since they are unable to grow in either direction otherwise. They’ve gotten themselves into a bind. Dust the baking trays with semolina flour, rice flour, and/or fine corn meal, if desired, to prevent sticking. White or rye flour can also be used to lightly dust them, although the aforementioned flours are preferable. To retard the buns, consider spreading parchment paper on the baking sheet and gently coating it with the flours listed above before panning the buns in the oven.
Alternatively, you may use nonstick Silpats or silicone mats, although this would be more expensive if you need to purchase a large number of them.
These factors might also have a role in the issue.
The formation of gluten or the shape of the dough is not required in large quantities.
Makes
1 dozen (dozen) I cook for three men who are huge fans of burgers here on our ranch. These fluffy hamburger buns are the perfect size for their large appetites. Because the buns are so wonderful, I sometimes just serve them with a meal on their own. The author, Jessie McKenney, of Twodot, Montana Every editorial product is chosen on its own merits, while we may be compensated or earn an affiliate commission if you purchase something after clicking on one of our affiliate links. As of the time of writing, the ratings and pricing are correct, and all goods are in stock.
Ingredients
- Active dry yeast, 1 cup plus 2 tablespoons warm water (110 to 115 degrees Fahrenheit), 1/3 cup vegetable oil, 1/4 cup sugar, 1 big egg, room temperature, 1 teaspoon salt, 3 to 3-1/2 cups all-purpose flour
Directions
- Warm water and yeast in a large mixing basin until yeast is completely dissolved. Allow for a 5-minute resting period after adding the oil and sugar. Combine the egg, salt, and just enough flour to create a soft dough
- Set aside. Turn out onto a floured surface and knead for 3-5 minutes, or until the dough is smooth and elastic. Do not allow the sun to rise. Divide the mixture into 12 pieces and roll each piece into a ball. Place 3 inches apart on baking pans that have been buttered. Preheat the oven to 425 degrees Fahrenheit. Cover with plastic wrap and set aside for 10 minutes. Bake for 8-12 minutes, or until the top is golden brown. Remove the baked goods from the pans and place them on wire racks to cool.
Hamburger Bun Tips
Before you can begin combining and kneading the dough, you must first prove the yeast, which involves checking to see if the yeast is still active. Wait at least 5 minutes after mixing the yeast, oil, and sugar until the mixture is bubbly and foamy. This permits the yeast to feed on the sugar and grow into a frothy substance. If this chemical reaction does not take place, the yeast will no longer be beneficial. Check out our full guide to baking bread for even more bread-baking suggestions.
How do you store leftover yeast?
Before you can begin combining and kneading the dough, you must first prove the yeast, which involves checking to see if the yeast is alive. Allow for a minimum of 5 minutes of resting time between the yeast, oil, and sugar combination. When the yeast feeds on sugar, it produces foam, which is beneficial. If this chemical reaction does not take place, the yeast will no longer be beneficial to you. Check out our full guide to baking bread for even more bread-baking advice.
Want a heartier sandwich?
Instead of 12 sections, divide the dough into 8 portions and then form the sandwiches whatever you want them to look.
When you’re ready to bite in, don’t forget to put on the burger toppings as well!
How can I customize this hamburger bun recipe?
These hamburger buns may be made in a variety of shapes and sizes. In the Taste of Home Test Kitchen, we prefer to sprinkle sesame seeds or poppy seeds on top of our dishes. In order to include seeds, slather heated buns with melted butter and top with your preferred toppings. This recipe may also be used to make slider buns or rolls, which are both delicious. To create the rolls, divide the dough into 24 equal pieces and bake until golden brown, about 20 minutes.
Nutrition Facts
1 each: 195 calories, 7 grams of fat (1 gram of saturated fat), 18 milligrams of cholesterol, 204 milligrams of sodium, 29 grams of carbohydrates (5 grams of sugars, 1 gram of fiber), and 5 grams of protein.
Burger Buns
What do you think of the nice burger buns that you receive from posh “burger bars?” Burger buns made of brioche are the best. This bun is similar to the last one, but it is far better and much simpler to create. In this recipe, brioche and Japanese milk bread dough are combined to produce the ultimate burger bun, which I believe to be the best in the world! THE ARTIFACTS USED: Fermentation Station is an abbreviation for Fermentation Station. Fermentation Station is an abbreviation for Fermentation Station.
Bench Scraper is a tool that is used to scrape the surface of a table.
Stand Mixer from KitchenAid BrodTaylor Folding Proofer is a kind of folding proofer.
Bowl Scraper from Ateco INGREDIENTS: Tangzhong’s position is as follows:
- 1 cup (20g) bread flour
- 2 cups (27g) water
- 4 tablespoons (60g) whole milk
In the case of Dough:
- 1 tablespoon (9g) instant yeast
- 2.5 cups (320g) bread flour
- 1 teaspoon (7g) fine sea salt
- 2.5 tablespoons (35g) granulated sugar
- 1/2 cup (120g) full milk at 95 degrees Fahrenheit (30 degrees Celsius)
- 1 whole egg
- 1 egg yolk
- 3 tablespoons (42g) unsalted butter, melted
- 1 teaspoon salt
For Egg Wash, use the following ingredients: DIRECTIONS FOR MAKING THE BREAD DOUGH
- For the tangzhong, combine all of the ingredients in a saucepan over medium heat, continually whisking, until the mixture resembles a paste
- To prepare the primed yeast mixture, combine the water, whole milk, and instant yeast in a mixing bowl. Place in a warm location and allow it sit for 8 minutes
- Add the dry ingredients to the bowl of a stand mixer and mix well. Slowly include the milk and yeast mixture, as well as the tangzhong mix. Allow for homogenization. When the dough has begun to come together, add the egg and egg yolk to the mixture. Then reduce the speed to medium-low until the ingredients are well combined. Continue to add butter in small increments until it is completely combined, meaning that nothing adheres to the sides when the dough is stirred
- Lightly oil a medium-sized bowl, gently fold it in half, and set it seam side down in the refrigerator. Wrap the dough in a moist cloth and set it aside in a warm place to prove for 1–1.5 hours. To form the dough, punch it down and then flour the work surface. Divide the dough into six equal pieces weighing approximately 95–105 g each. Stretching slowly and folding to the center will help to form the individual buns. After you’ve completed the technique for the entire piece of dough, flip it upside down
- Pull the dough towards you after rotating it 90 degrees. Two more times must be completed in order to complete a complete revolution around the whole circumference. Place the formed dough on a sheet pan coated with parchment paper that has a rim. Allow 2.5 inches or 6 centimeters between each other. Cover with a sheet tray of comparable size and shape that has been flipped over so that the dough does not dry out
- Allow to rise for another 1-2 hours at room temperature, or until the volume has doubled
- Before baking, brush the top of the loaf with an egg wash (1 full egg with a splash of milk). Bake for 18 minutes at 375 degrees F (190 degrees C) or until golden brown.
Homemade Hamburger Buns
Chef John’s buns are a must-have! These finished out beautifully – light, with a delicious taste and texture. When cooked with whole wheat flour, it is even more delectable. It’s the only thing I changed about the recipe: I reduced the amount of sugar from 3 tablespoons to 1 tablespoon since 3 tablespoons is much too sweet for my (European) taste and adds extra calories. My first step was to whisk the egg, followed by tossing all the ingredients into my bread-making machine on the dough-making setting, bypassing stages 2 through 6 and starting again at step 7.
Hot dog buns are made by flattening each of the 8 pieces into 15x15cm (6×6-inch) rectangles in step 7, rolling them very tightly and pinning the ends and along the remaining edge, and laying them out on the baking sheet with the remaining side down.
Most helpful critical review
Okay, so I believe they have excellent taste. There is, however, one minor issue. When the cling film is removed, the balloons deflate as a result of the adhesion. We finally settled on flat bread. well, perhaps you shouldn’t use cling film? One area of the body that was revealed was absolutely exquisite. More information can be found at
- 5star values totaled 772
- 4star values totaled 51
- 3star values totaled 13
- 2star values totaled 9
- 1star values totaled 4.
Chef John’s buns are a must-have! These finished out beautifully – light, with a delicious taste and texture. When cooked with whole wheat flour, it is even more delectable. It’s the only thing I changed about the recipe: I reduced the amount of sugar from 3 tablespoons to 1 tablespoon since 3 tablespoons is much too sweet for my (European) taste and adds extra calories. My first step was to whisk the egg, followed by tossing all the ingredients into my bread-making machine on the dough-making setting, bypassing stages 2 through 6 and starting again at step 7.
Hot dog buns are made by flattening each of the 8 pieces into 15x15cm (6×6-inch) rectangles in step 7, rolling them very tightly and pinning the ends and along the remaining edge, and laying them out on the baking sheet with the remaining side down.
- What a simple method to get started with yeast for those who are new to it!
- It took me 3.5 ounces to weigh the dough for each of the buns, and they were more than adequate for a quarter-pound hamburger.
- They were just wonderful.
- Last night, we enjoyed excellent hamburgers prepared by Costco using organic hamburger meat.
- Chef John, you’ve done it again!
- Put all of the ingredients in a large mixing bowl and set the bread machine to the dough cycle.
- I agree with the others who have stated that these are a little on the large side.
Soon after taking his first mouthful, my husband said that I should prepare them every time we eat burgers.
This recipe is a definite keeper!
Because I am a vegan health freak, I was unable to use eggs in this recipe, so I used good ole flax seed (1 tablespoon ground flax + 3 tablespoons water Equals 1 egg) instead.
Due to the fact that whole wheat is heavier than white flour, an additional 1/4 cup of water is required.
Read MoreThis recipe is simple to make and yields a delicious bun.
As others have pointed out, the buns are far too huge for the number of servings.
Size is a matter of personal choice, therefore an 8 may be plenty for you.
You will not be disappointed.
During the first rise, the dough was crawling out of the bowl after only one hour.
The number of regular-sized ones I could have obtained was probably close to 18.
spray the cling wrap!” at the same time.
It got trapped in my buns and deflated them!
We ate flatbread for lunch!
I did reduce the sugar to 1 tablespoon, as advised by another person.
This is a recipe that I will absolutely make again.
So simple, and yet so good!
I placed all of the ingredients in my bread machine and let it do its job, then proceeded to step 7 once the bread had risen.
Thank you for the wonderful recipe!
There is, however, one minor issue.
We finally settled on flat bread.
One area of the body that was revealed was absolutely exquisite.
They are DELICIOUS as hamburger buns, sandwich rolls, or simply as a snack on its own.
I don’t bother with the egg beating.
Most of the time, I use olive or rice bran oil for butter simply because it is more convenient and is a little healthier than butter in terms of fat content.
In a nonstick cookie sheet or on a baking sheet coated with parchment paper, I place the dough (after it has been made into a roll).
Instead, I just wrap them in a thin cotton dish towel and set them aside.
as well as less trouble I’ve made these with and without the egg wash and sesame seeds, and they’re both delicious.
My children, on the other hand, love them without the seeds.
This dish is fantastic!
It doesn’t get any better than this one, believe me.