
Pie
Peach Dessert Where Crust Ingredients For Pie Are Pushed Into Pie Plate By Fingers
Mar
My mouth waters just thinking about homemade deep dish peach pie; does it have the same effect on you? We are lucky to be able to select fresh peaches from Perryhill Farm every year, and they are incredibly delectable to boot! The fact that this is the first time I’ve baked a pie in place of our traditional peach and berry fruit crisp makes me laugh. After the manner in which we were enjoying the fresh peaches, I was genuinely fortunate that there were any left over. There’s nothing quite like a large mouthful of a fresh peach to get your mouth watering.
This dish does not include any eggs, dairy, soy, corn, or nuts.
If xanthan gum or guar gum is not already present, add 1/2 teaspoon to the mixture.
Earth Balance Buttery Sticks or shortening are substituted for butter in the dairy-free version.
- Simply press the dough together with your fingertips once it has been placed in the pie dish to patch any tears that have occurred.
- I haven’t tried any of these recipes yet, but I would be interested in hearing how they turned out if someone did.
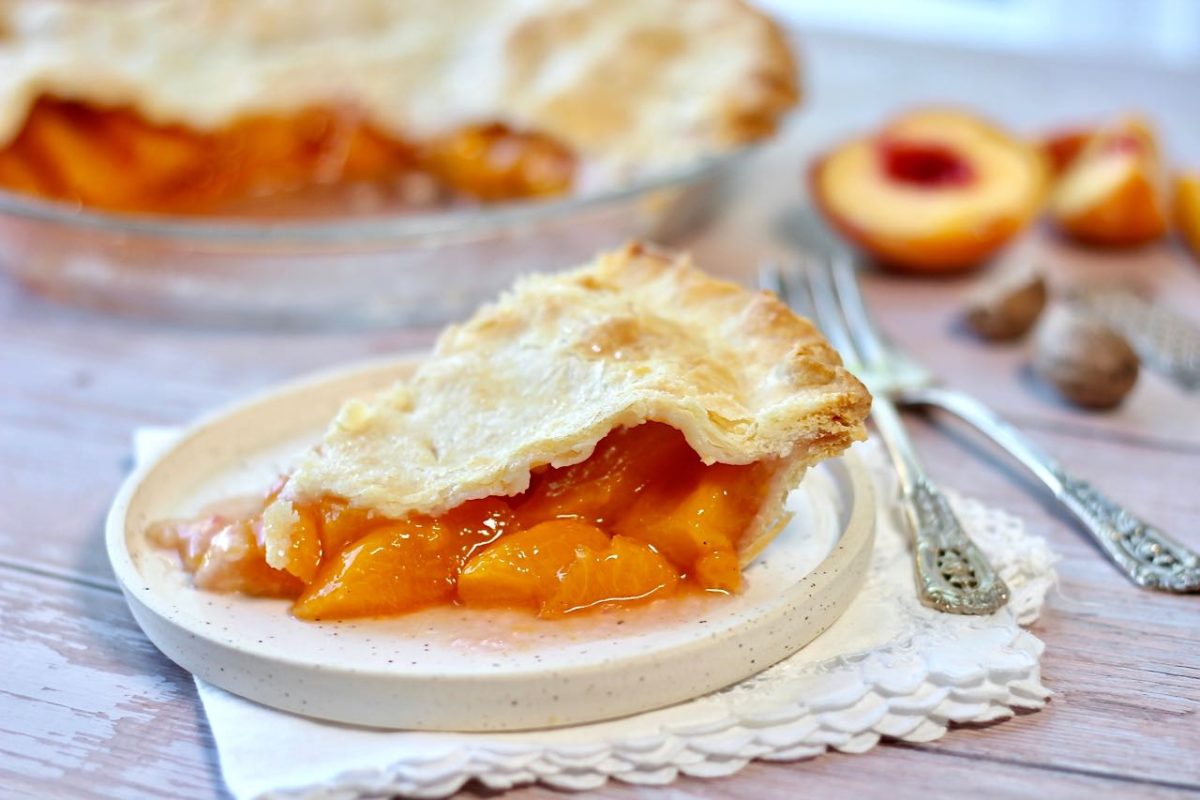
- I’m not joking when I say this pie is loaded full of peaches; when I say “deep dish,” I mean it!
- Additionally, Cool Whip or a dairy-free Coco Whip topping are wonderful options.
- You may alternatively use the crumble topping from this recipe for Deep Dish Apple Crumble Pie as a substitute.
- If you have never tried one before, I strongly advise you to do so.
- Fresh peaches, lemon juice, sugar, cinnamon, salt, and nutmeg are combined in this recipe. Use regular flour or a gluten-free one-to-one blend, together with xanthan gum or guar gum, to make the dough. Corn, potato, arrowroot starch, or tapioca starch are all acceptable substitutes. Using butter or a non-dairy alternative
- Shortening
- sWater
I strongly advise you to cover the sides of the pie during the first half of the baking time or the last half of the baking period. Specifically, deep dish pies benefit from this because it allows the pie to finish cooking without the crust becoming overcooked on the exterior borders. Gluten-free choices are available for this homemade peach pie, which is stuffed with delicious juicy peaches and baked in a flaky crust. Preparation time: 25 minutes 1 hour to prepare 1 hour and 25 minutes is the total time.
Course:Dessert Cuisine:American Dessert, egg-free, fresh peaches, gluten-free, homemade peach pie, Mother’s Day, nut-free, pastry, peach pie, summer cuisine, summer fruit pies Keyword:dessert, egg-free, fresh peaches, gluten-free Servings:8Servings
- For the first half of baking time or the last half of baking time, it is strongly recommended to cover the pie’s edges with foil. When you bake a pie in a deep dish, this permits the pie to finish cooking without overcooking the edges on the exterior. Gluten-free choices are available for this homemade peach pie, which is stuffed with luscious juicy peaches in a flaky crust. 25 minutes for preparation Approximately 1 hour in the kitchen 1hr25mins is the total time. Course:Dessert Cuisine:American The following keywords are used to describe this dessert: eggless, fresh peaches, gluten-free, handmade peach pie, Mother’s Day dessert, nut-free crust for a pie of peaches, summer food for fruit pies in the summer, and summer fruit pies in the summer. Servings:8Servings
- I strongly advise you to cover the sides of the pie during the first half of baking time or the last half of baking time. This permits the pie to finish cooking without the exterior borders being overcooked
- This is especially true for deep dish pies. Homemade peach pie with lovely juicy peaches and a flaky crust that may be made gluten-free is a delicious dessert. Preparation Time: 25 minutes Cooking Time: 1 hour 1 hour and 25 minutes in total Course:Dessert Cuisine:American The following keywords are used to describe this delicacy: eggless, fresh peaches, gluten-free, homemade peach pie, Mother’s Day dessert, nut-free crust for a pie of peaches, summer food for fruit pies in the summer, summer fruit pies in the summer. Servings:8Servings
Please save and pin this image.
peach pie with the best pie crust
Yes, I did go to that place. It’s all right. I assure you that this is a very, very positive development. Despite the fact that I hadpieon my mind when I woke up this morning (which is very usual), I ultimately settled on peach after visiting a roadside farm stand around midday and discovering the most magnificent tree ripened peaches that were nearly the size of my head. But there is one small secret I’ll share with you: I don’t cook pies. No, I don’t believe that at all. Before today, I’d only ever created one dish in my whole life, and it was a complete failure when I was in culinary school.
- So, as I previously stated, I don’t actually cook pies.
- In this season of abundance, peaches are at their most delicious, and the final result is a delightfully flaky crust packed with soft slices of sweet peaches that have been lightly tossed with sugar, vanilla, cinnamon, and cornstarch.
- If you follow my instructions, I’ll get you there in no time.
- And I really don’t want to get into the entire Crisco argument at this point in time.
- To be sure, you have complete freedom to believe and act as you like, but the reality is that in order to make the perfect flaky pie crust, you must use shortening.
- Believe me when I say that I’ve toyed about with both and have been forced to confront the greasy reality on more than one occasion.
- This recipe will provide enough dough for about two pies, but it’s always best to be safe than sorry when it comes to baking.
Please return an hour later.
When you return to your freezer, the water should have the following appearance: You want everything to be extremely, extremely, extremely frigid.
When you freeze your shortening, the gluten formation in the wheat is kept to a minimum, which results in a wonderfully flaky crust every time.
Two tablespoons of salt and one tablespoon of sugar should be added.
Shortening and flour should be combined just enough so that the mixture begins to resemble dough, as shown in the following recipe: Pour in your six ounces of cold water and stir well.
Simply combine the ingredients as well as you can before turning out onto a floured surface.
Finished!
What exactly is it?) and begin preparing the filler.
The skin will just fall right off as a result of this.
Simply peel back the skin with your fingertips, then rinse the peaches under cold water and wipe them dry with a paper towel.
Make even slices out of each peach by flipping it over so that the pit side is facing down and then just using your knife to cut off even slices.
Graze on a peach slice or two, then transfer the slices to a large mixing bowl and sprinkle with one-fourth cup sugara sprinkle of cinnamona teaspoon of vanilla paste (or vanilla extract)and a tablespoon and a half of cornstarch to thicken the mixture.
It’s time to start rolling out the pie dough!
Using a sharp knife, cut the large dough ball in half and insert one half back into the dough ball.
Please bear with me.
Anyway, let’s go on.
Gradually cut around the dish, leaving approximately a half-inch of dough on the edges of the dish And now, carefully (VERY CAREFULLY) take up the dough and immediately spoon it into the baking dish.
Using your fingers, gently push the leftover dough around the sides of the pie.
And, I’ll be honest with you, I’m a crusty old lady.
Observe and learn from my blunders.
Take the last portion of dough out of the freezer and set it aside.
For four dollars, I purchased a pastry cutter from a local culinary supply store; however, you can probably buy one at Target as well.
Friends, this is one of the reasons why I don’t make elaborate dessert preparations such as wedding cakes.
Put the dough ribbons on the pie and carefully weave them together.
Simply reminisce about weaving baskets at a church camp when you were seven years old and you’ll be in good shape to proceed.
You should let the excess dough dangle off the pie for a few moments as you collect your breath and say a brief prayer after you are through weaving.
WE ARE SO CLOSE TO FINISHING!
For this stage, you can use a pastry brush, a meat basting brush, or even your fingertips to apply the glaze.
Ta-dahhhh!
It’s nice to see the rewards of your effort.
If peaches aren’t in season where you live, you might substitute canned peaches for the fresh ones in the recipe.
Once you’ve mastered the crust, the sky is the limit!
Add in the shortening and combine everything with your fingertips until it is smooth.
Turn out the dough on a floured surface and shape it into a ball, then place it in the freezer for at least thirty minutes and up to many months!
A big pot of water should be brought to a boil on the stovetop.
Peaches should be removed using a slotted spoon and the skin should be peeled back.
Using a knife, cut each peach in half and remove the pit before slicing.
Stir everything together and set it aside.
The dough should be smoothed out on a floured surface and gently placed in a greased pie dish, allowing any excess dough to hang over the sides of the dish.
Make a mental note to put it away.
Cut the pastry into long ribbons with a pastry cutter (or just a knife) and thread them around the pie’s edge.
Use one yolk and a little amount of warm water to make an egg wash, which you can use to gently brush all over the top of the pie crust. Preheat the oven to 400 degrees for approximately 34 minutes, or until the top is brown.
Peach Pie
It’s true, I went to that place. You don’t have to worry about it. Please believe me when I say that this is a very, very positive development. As soon as I woke up this morning, I hadpieon my mind (which is very typical), and I ultimately settled on peach after visiting a roadside farm stand about midday and discovering the most magnificent tree ripened peaches that were approximately the size of my head. And now for a little secret: I don’t actually cook pies at all. No, I don’t have any. Really.
- The apple mixture cooked over the flaky pie shell, and the ultimate product was not what one would call a picture-perfect presentation.
- But that just goes to show that if I can cook a pie from scratch, you certainly can as well.
- To get a successful final result when you employ fresh seasonal products, you actually don’t have to exert too much effort.
- Start with the dough, to be precise.
- After hand-washing around thirty dishes, I simply do not have the energy to do any more.
- Neither butter nor butter replacements are going to get you where you want to go.
- In order to be successful, the following are essentials: Start by freezing six ounces of water, two cups of Crisco, five cups of flour, and a half cup of salt in separate containers.
Exit the room now!
Sorry!
The nicer the crust will be, the colder your components must be before you begin.
To begin creating the crust, place your four and a half cups of all-purpose flour in a large mixing bowl and whisk until well combined.
Cut in one and three-fourth cup shortening (if you’re using stick shortening, that’s two sticks minus two tablespoons) and combine thoroughly with your fingertips, working the flour and shortening together.
Although it will appear messy and disjointed at first, trust me when I say that it will be perfect in the end.
You must now place the large lump of dough back into the freezer (are you ready for this?) The pie crust should be chilled for around thirty minutes, which should be enough time to wash your dishes (if you have a dishwasher?).
Toss the peaches gently in boiling water for approximately ten seconds after bringing a big saucepan of water to a boil.
A peach may be peeled quickly and easily with this method.
Each peach should be halved and the pit removed—Mmmmm, I absolutely like peaches in the summer, don’t you think?
Every little thing is just perfect.
Combine all of the ingredients in the following manner: and place it in a separate dish It’s time to start rolling out the pie crust.
Using a sharp knife, cut the large dough ball in half and insert one half back into the dough ball hole.
Please be amused by my sarcasm.
Anyhow, let’s get this party started!
Cut around the dish slowly, leaving approximately a half inch of dough on the sides.
I promise you that this is the most difficult portion of the entire process.
Instead of having too little, it is preferable to have too much hanging over the edge.
And carefully pour in your peach filling, ensuring sure it is well distributed and does not overflow (remember the apple pie incident?
Extra dough can be made by removing a piece from the freezer.
For four dollars, I purchased a pastry cutter from a local culinary supply store.you can probably buy one at Target as well.
Friends, this is one of the reasons why I don’t make elaborate dessert preparations such as wedding cakes.
Put the dough ribbons on the pie and gently weave them together.
If you can weave a basket, you can certainly build a woven lattice top pie, but it will take some work.
The point is that rusticpies require attention as well as other dishes.
Once you’ve cut the dough from around the pie and gently smooshed it together with the crust, you may remove the leftover dough from around the pie.
A simple egg wash may be made with one egg yolk and a small amount of warm water: 1.
To complete this stage, you can use anything from a pastry brush to a meat basting brush to your fingertips.
Ta-dahhhh!
It’s wonderful to see the results of your efforts.
If peaches aren’t in season where you live, you might substitute canned peaches for the fresh ones.
Once you’ve mastered the crust, the sky’s the limit.
Filling: approximately 5 cups sliced peaches (about three large peaches or five tiny peaches—give or take, I don’t bother measuring).
Directions: Combining all of the ingredients in a separate bowl will result in a smoother texture overall.
Using a small amount of water, gently blend the ingredients (it will be a little soggy!) Spread dough out on a floured surface and roll it into a ball; place in the freezer for at least thirty minutes and up to several months.
Finished dough after chilling Using the stovetop, bring a big pot of water to a boil.
Peaches should be removed using a slotted spoon and their skins should be peeled back.
To prepare the peaches, cut them in half and remove the pits before slicing them.
Set aside after stirring to mix.
Fill the dough with the peach filling after pricking the bottom with a fork.
Make a note of it.
Slice into long ribbons using a pastry cutter (or a knife) and weave them on top of the pie to finish it off!
Using your fingers, mash together any excess dough that has accumulated on the edges. Use one yolk and a little warm water to make an egg wash, which you should carefully brush all over the top of the pie. 350°F for approximately 34 minutes, or until golden brown.
HOW TO MAKE PEACH PIE
Peach pie is an easy dessert to prepare, and if you already have pie crust on hand, the process is much simpler. In contrast to the Blueberry Crumble Pie, this recipe will require two rounds of crust. If you just have one round of dough or want to reduce the amount of effort, you could easily make a crumble topping on this pie instead of the pastry crust. All I want is something to complement the delicate flavor of the peaches, nothing to overshadow it. This is the same pastry recipe that I use for my other pies, such as Lemon Meringue Pie, and I will provide it in the recipe section below in case you don’t already have a basic, fool-proof pastry recipe.
- Place the pie dish in the refrigerator to allow the dough to cool while you prepare the filling for your pie.
- This is how I make the majority of my fruit filled pies since chilling the crust prior to baking ensures that the pastry bakes up flaky and beautiful.
- Place the peaches in a large mixing basin and toss them with a tablespoon of lemon juice to combine.
- Afterwards, combine everything until there are no lumps of sugar visible and the peaches are equally coated with sugar.
- Then, before placing the top layer of pie dough, sprinkle additional cinnamon over the top of the peaches and dot with butter to finish it off.
- Just make sure to cut vents into the crust, or use a cookie cutter if you want, so that the steam can leave the pie while it is baking.
- This will prevent the two layers from separating throughout the baking process, and all of the delicious filling will remain within the pie rather than in your oven.
Alternatively, you may make it a bit more attractive by pinching the dough together with your thumb and index fingers to form these little peaks, as shown in the photo below.
Brush the egg wash generously all over the top of the pie.
I also like to sprinkle granulated sugar over the top of the egg wash for this classic peach pie.
Allow the pie to bake for 15 minutes before lowering the temperature to 375 degrees for the balance of the baking time.
Approximately one hour and fifty minutes later, the pie should be a deep golden brown and smelling delectable.
Classic peach pie with a double crust and a scoop of vanilla ice cream on top.
Peach Pie
- 7 cups fresh peaches, peeled and sliced
- 1 tablespoon lemon juice
- 1/3 cup cornstarch
- 3/4 cup granulated sugar
- 1/2 cup dark brown sugar
- 1/2 teaspoon almond essence
- 1 tablespoon cinnamon, divided
- 1/2 teaspoon salt
- 2 tablespoons butter
- 1 big egg for egg wash
- 2 tablespoons flour
- Begin by rolling out the bottom pastry round on a floured board to the desired thickness. Roll the dough out to approximately a 1/4″ thickness and set it in the bottom of an ungreased glass pie pan (see note below). Place the pie in the refrigerator to cool while you prepare the peach filling. To create the filling, combine the peeled and sliced peaches in a large mixing bowl and toss with the lemon juice until well combined. After that, combine both sugars, cornstarch, salt, almond extract, and 1/4 teaspoon of cinnamon in a large mixing bowl. Stir to thoroughly incorporate all of the ingredients until the peaches are completely covered and there are no visible sugar lumps
- Preheat the oven to 425 degrees Fahrenheit. Now, take the pie dish out of the refrigerator and carefully spoon the peach filling onto the bottom pastry layer of the pie plate. Place peaches in a uniform layer on the baking sheet, then sprinkle the remaining cinnamon over the top of the peaches and dot with butter
- Once the top layer of pastry has been rolled out or a lattice top has been created, it may be placed over the top of the peaches, with vents if necessary. Keep pressing down around the whole border of the pie to ensure that the top and bottom layers are completely sealed together. Before baking, prepare the egg wash by whisking together the egg and a couple tablespoons of water, then liberally brushing the top of the pie with the mixture before baking. Pour the pie into the preheated oven and bake for 15 minutes, then decrease the heat to 375 degrees and bake for another 50-60 minutes, or until the pie shell is golden brown. The crust should be a dark golden brown color, and the filling should be bubbling around the edges of the pan. After allowing for complete cooling and setting, slice the cake and serve it immediately.
Flaky Pie Dough
- 52 cups all-purpose flour
- 2 teaspoons salt
- 1 cup tenderflake cubed
- 1 cup cold butter
- 1 big egg
- 1 tablespoon vinegar
- 1 cup cold water
- In a large mixing basin, combine the flour and salt and stir until well incorporated. Add the cubed tenderflake to the flour mixture in a mixing bowl, and then grate the cold butter over the flour mixture to combine. By cutting in the butter and lard with a pastry cutter or two knives, you may achieve the texture you want for your brioche. Fill a 1 cup measuring cup halfway with cold water and add the egg, vinegar, and extra cold water to make it to the 1 cup mark. To mix, use a fork to whisk the ingredients together. Using a 1/3 cup increments, slowly pour the egg mixture over the flour mixture, until the dough comes together. It’s possible that you won’t need the complete amount of liquid. The dough should be divided into three disks, each of which should be wrapped in plastic wrap and placed in the refrigerator for at least 30 minutes. For a double pie crust recipe, you will need two disks, however for a single pie crust recipe, you will only need one disk. The prepared pie dough can keep for a few days in the refrigerator, or it may be frozen for several months.
Epi’s Flakiest, Easiest, No-Rolling-Required Pie Dough
When I see a rolling pin, I break out in cold sweat. When you hear the word “crimping,” you get hives. When you think of the Fourth of July, you get a sinking feeling in your stomach. If any of these syndromes sound familiar to you, you may be one of the millions of people around the world who suffer from Fear of Pie Syndrome (also known as Pie Phobia). Those who suffer from FOPS lead tragically ironic lives: they are terrified of baking pie, but they live to eat it. Consequently, we spent countless hours in the Epicurious Test Kitchen perfecting a remedy: a pie crust that eliminates all of the common pie apprehensions completely.
- There will be no rolling out of the dough.
- How did we come up with a flaky, no-roll pie crust that was so simple to make that you could do it on a Tuesday?
- (Read it and weep with joy, FOPS) Make a dough that is stirred together with melted butter.
- In fact, it’s impossible not to when the dough comes together in approximately 12 seconds.
- Forget about using a food processor or pastry cutter to incorporate the butter; simply melt the butter and stir it in.
- All you need are your own two hands to complete the task.
- Make Dough into a Double-Duty Crumb Topping with this recipe.
Combine the cinnamon and additional sugar and you’ve created a magical crumb topping.
You’ll be grateful to us later for saving you the time and effort of forming a top crust while also adding a delicious contrast of textures to your dish.
You’ve finally gotten your crust!
Instead of rolling your dough into the pan, press it into the pan.
Using a measuring cup with a flat bottom will make this job even easier.
While you are preparing the filling, place the pie pan in the freezer to keep it frozen.
Chelsea Kyle captured the image, and Rhoda Boone styled the food.
This recipe can be transformed from one magnificent mama pie into twelve delightful baby pies that bake up even more quickly and easily (and cool faster, too).
Cook’s Tip: Spray a 12-cup muffin tin with nonstick cooking spray before dividing pie dough evenly among the cups and pressing the dough into the bottom and up the sides of the muffin cups.
These mini pies freeze beautifully (assuming they aren’t all devoured right away, that is).
You can either freeze it for use in a future pie, crumble, or crisp, or spread it out on a baking sheet and bake it at 350°F until it is lightly browned (about 15 minutes). Allow to cool before sprinkling on top of fresh fruit, ice cream, or yogurt.
Foolproof Pie Crust & Peach Pie
- Recipe provided by D’Andre Balaoing of dandre to go.com. Difficulty level: easy (but really spectacular in appearance)
Easy to make, this surefire pie crust recipe is quick and simple to prepare. It is spiced up with a pinch of Spiceology Smoky Honey Habanero Spice combination for a hint of heat, and it is a fantastic match for fruit, chocolate, or custard fillings. The following recipe makes it simple to be a BBQ hero, regardless of whether you’re a seasoned Pastry Chef or a novice who has never turned on an oven. Note: This recipe was developed from the Easy Pie Dough recipe found on Serious Eats.
Foolproof Pie Crust:
Using Spiceology Smoky Honey Habanero Spice combination for a hint of heat, this surefire pie crust recipe is quick and easy to make. It’s the perfect complement with fruit, chocolate, or custard fillings and can be made in under 30 minutes. This recipe makes it simple to be a BBQ hero, whether you’re a seasoned Pastry Chef or a novice who has never turned on an oven before. The Easy Pie Dough recipe from Serious Eats was used to create this dish.
- Two and a half cups all-purpose flour (plus a little extra to dust the work surface)
- 2 tablespoonsSpiceology Smoky Honey Habanero Sweet Spicy Rub
- 2 tablespoonsSpiceology Smoky Honey Habanero Sweet Spicy Rub
- 2 tablespoonsSpiceology Smoky Honey Habanero Sweet Spicy Rub granulated sugar (three teaspoons)
- 2 tablespoons kosher salt, to taste Unsalted butter, cubed and chilled
- 2 12 sticks (20 tablespoons) unsalted butter, cubed and chilled
- A third cup of cold water
- One-and-a-half tablespoons of chilled vodka
Instructions:
- Mix together 2/3 of the flour, the Smoky Honey Habanero Spice Blend, the sugar, and the salt in a food processor until well combined (3-5 brief pulses)
- Adding the butter to the processor and pulsing until the dough begins to clump together and there are no dry flour parts left (2-3 minutes of processing)
- The mixture should hold together when pressed. Using the remaining dry flour, sprinkle it over the formed dough and pulse until the mixture begins to break apart (approximately 5 brief pulses)
- Transfer the dough to a mixing basin
- Place pie dough in a large mixing bowl
- Stir with a rubber spatula or spoon until no stray liquid is left in the bowl and dough forms a ball
- Repeat with remaining dough. Make a generous amount of flour for your work area and rolling pin
- Roll out the dough onto a floured work surface and split in half
- Roll the dough piece together into a rough disk, pressing the rolling pin down onto the dough to produce an even surface
- Set aside. Using one motion, roll the disk out to a 13-inch circular (if using a 9-inch pie pan)
- Flip the dough between rolls to ensure an equal crust, and press any cracks or breaks in the crust closed with your fingers
- Bake for 30 minutes at 350°F (180°C). Transfer the dough to a cookie sheet or pan lined with parchment paper and set it aside
- Flour the work area once again and ready the second dough half for rolling. If you’re making a lattice top (woven), roll half of the dough into an 8 x 13 rectangle (you can use a sheet of office paper as a guide)
- If you’re making a closed crust, roll half of the dough into another 13-inch circle
- If you’re making a lattice top (woven), roll half of the dough into an 8 x 13 rectangle (you can use a sheet of office paper as a guide)
- If you’re Alternatively, cover both pie crusts in plastic wrap and place in the refrigerator for at least 30 minutes before filling and baking the pie. If storing for later use, wrap each crust individually and store frozen for up to 30 days.
Smoky Honey Habanero Peach Filling:
(This recipe makes 6 cups, which is enough to fill a 9-inch pie shell.) Ingredients:
- Yellow peaches, pitted and peeled (about 3 pounds)
- For the sauce, combine 2 teaspoons Spiceology Smoky Honey Habanero Rub with 12 cup granulated sugar, 12 cup cornstarch, the juice and zest of one lime, 1 egg and 1 tablespoon milk, and a dash of demerara or raw sugar for the finishing touch.
Instructions:
- Bake for at least 30 minutes after preheating the oven to 425 degrees Fahrenheit and placing a cast iron pan or other oven-safe skillet in the oven to preheat Fill a medium saucepan halfway with water and heat it to a rolling boil
- Assemble an ice bath by filling a big bowl halfway with water and ice
- Place the peaches in a saucepan and bring to a boil for 20-30 seconds (or longer if the peaches are unripe), then remove from heat and place in an ice bath for 2 minutes to stop the cooling process. Remove the skins and stem pieces from the bath by pressing them off with your fingertips
- Discard the skins and stem pieces. Remove the pits from the peaches and slice them into half-inch-thick slices
- In a medium-sized mixing bowl, combine the Habanero Spice Blend, the salt, the granulated sugar, the cornstarch, the lime zest, and the lime juice
- Whisk in the peach slices until everything is well combined. Set aside for 20-30 minutes to allow the peaches to soften. If you’re making a lattice, cut the 8 x 13 pie crust rectangle into eight 1-inch strips (if you’re making a closed crust)
- If you’re making a lattice, cut or punch out vents or forms in the top crust (if you’re making a closed crust), and leave them aside. Make a cone-shaped bottom pie crust disk to fit into a pie plate by folding it in half twice and pressing it into the pie dish’s center
- Then unfold the crust to fit the pie plate. Use your finger to push the pie crust into the corners of the pie dish, making sure there are no gaps between the crust and the plate. 2 Tablespoons of peach syrup should be added to the peach filling in the crust
- The remaining peach syrup should be discarded. To make the top crust, either arrange lattice strips on top of the peaches, or place a closed crust on top of the peaches. tuck any overhanging crust beneath the bottom crust to seal the pie together
- To make egg-wash, whisk together the egg and milk in a small bowl
- Brush over top of crust. Before baking, sprinkle the pie with demerara sugar and place it in the refrigerator for at least 30 minutes. Place the pie on top of a cast iron pan in the oven and bake for 15 minutes until golden brown. After 15 minutes, decrease the heat to 375F and continue to bake for another 45 minutes (use a pie shield or cover the pie with foil if the top crust begins to color excessively or burn during baking)
- Bake until the pie is golden brown and the peach filling has thickened and bubbles through the lattice or vent(s) in the top crust
- About 30 minutes. Allow for thorough cooling before slicing
Peach Pie with Buttermilk Crust
Approximately 167 peaches have been consumed by me this week. The reason for this is that whenever I go produce shopping and come across enormous, luscious, perfectly ripe, delicious peaches, I feel compelled to buy three or four bags of them at a time. I’m unable to say no. I’ve tried everything I could think of. When I turn around to walk away, this small voice within my head tells me that peaches are not available all year. Because if I don’t eat them right away and cram myself full of them, then it’s going to be a long, peach-free winter ahead of me!
- Because of the tiny voice within my brain, I wouldn’t be eating this pie right this minute.
- I suppose my hubby is included as well.
- I have a thing for peaches, it’s no secret.
- I recall wrinkled my nose in disbelief (since why would you pour “milk” over peaches?) and politely declined her invitation.
- When I asked for another bowl of sugared peaches, I made it clear that I didn’t want any milk this time.
- While this late discovery is likely to have saved me a significant amount of calories over the years, I can’t help but feel guilty for not having put my faith in her sooner.
- Y’all, this pie crust is FAN-TAS-TIC, you guys.
It’s produced from buttermilk, as the name suggests.
Buttermilk.
This pie crust comes out on top.
The cinnamon and nutmeg give it a warm, inviting flavor, and the overtones of vanilla make it the perfect partner for a flaky buttermilk crust.
It’s just.really excellent.
TIC.
TAS.
Even if you don’t want to try this recipe, you can still serve your peaches with a little cream the next time you have them.
Enjoy!
Thank you for taking the time to visit today!
So that I know you were here, please leave a remark below. ♥erin Oh, wait.you’re interested in knowing who won the KitchenAid giveaway, aren’t you? Just keep scrolling down below the recipe and I’ll reveal myself! Baked Peach Pie with a Buttermilk Crumb Crust
- My peach consumption for the week was roughly 167 servings. The reason for this is that whenever I go produce shopping and see large, meaty, perfectly ripe, delicious peaches, I feel compelled to purchase three or four bags of them. I’m at a loss for words. I can’t refuse. Everything I’ve done has been for naught! This small voice in my head then tells me that peaches are not available all year long while I’m walking away from the table. There will be a long, peach-free winter ahead if I don’t eat them all now, if I don’t cram myself full of them. What’s going on is known by that small voice in my brain. Because of the tiny voice within my brain, I wouldn’t be eating this pie at this second. My excitement to put the girls to bed tonight and have some peaceful time with just me, my peach pie, and a small scoop of vanilla ice cream wouldn’t be quite as high. It’s probably also true for my hubby. He knows me well enough by now that I’m confident he won’t interfere with my peach pie-making time again. Peaches are clearly a favorite of mine. Have you have anything? I have a really wonderful recollection from my childhood of my Grandma pouring some sweetened cream over a dish of sugared peaches and delivering it to me with a small wooden spoon. I recall wrinkling my nose (because, after all, why would you pour “milk” over peaches?) and politely accepting her offer of assistance. They tried all they could to persuade me that it was the finest thing that had ever happened to me – but I couldn’t bring myself to accept their arguments. In order to avoid having to ask for another bowl of sugared peaches, I requested one without milk this time. After my grandmother passed away, it wasn’t until I was an adult that I first had peaches and cream for the first time. I’m kicking myself for not believing her all those years ago, even if this late discovery has undoubtedly saved me thousands of calories over the years. Also, this pie is a must-have. For the love of God, this pie crust is OUTSTANDING, you guys. That is understandable given the circumstances. Buttermilk is used in the preparation of this dish. Were you able to pick up on my words? Buttermilk. The flakiest pie crust I have ever made was this one, and I have never, ever attempted to replicate it again. We have a winner with this pie crust. In terms of sweetness and acidity, the filling is a fantastic balance. Because of the cinnamon and nutmeg, it’s a little spicier, and the overtones of vanilla make it the perfect partner for a flaky buttermilk crust. With the cornstarch, you can get a thickening effect without having the filling taste floury (yes, that’s actually a term) or gooey. What can I say, it’s.good? In fact, it’s rather good! SUBJECT: FAN, TAS, TIC Please prepare this before the peaches are gone for the season till next year. Thank you. Even if you don’t want to try this recipe, you can still serve your peaches with a little cream the next time you eat them! Believe me when I say that. Enjoy! Do not forget to visit my Facebook page and follow along – you can also find me on Twitter, Instagram, and Pinterest if you haven’t already done so. Hello, and thank you for visiting! So that I know you were here, please leave me a remark below. ♥erin You’re wondering who won the KitchenAid giveaway, aren’t you? You may find out by scrolling down below the recipe. The Peach Pie with a Buttermilk Crust is delicious.
- 6-8 big peaches
- 12 cup sugar
- 12 teaspoon powder cinnamon
- 14 teaspoon ground nutmeg
- 1 sprinkle of salt
- 14 cup cornstarch
- 12 teaspoon vanilla essence. 8 cups sliced peaches, skin removed.
- In a medium-sized mixing basin, whisk together the flour, sugar, and salt. Cut the butter into 12 inch pieces and stir them into the flour mixture. Toss the butter into the flour to coat it
- Set aside. Clear a big work space, then place the flour and butter in a huge pile on your counter top to start
- Roll or flatten the butter into the flour using a rolling pin. This will allow the butter to be incorporated in sheets, resulting in a flaky crust. Pull the flour mixture back into a pile using a bench scraper or flat turner-spatula, and then roll it out once again. You may also use the scraper to wipe off your rolling pin
- Continue the rolling and stacking procedure until all of the flour has been combined and you have a shaggy, flaky dough to work with. Back in the mixing bowl, throw the dough in the freezer for 15 minutes to enable the butter to chill down once again
- Remove the dough from the freezer after 15 minutes. Toss the dough with cool buttermilk
- Gently mix the dough with your hands and/or a fork until it forms a ball
- Distribute the dough onto a lightly dusted counter top and divide it into two equal halves
- Form each piece of dough into a flattened disk with your hands and wrap it tightly in plastic wrap. Refrigerate for at least one hour and up to three days before serving.
- 8 cups peaches, peeled and sliced, should be placed in a large mixing basin. To a mixing bowl, combine the cornstarch, cinnamon, nutmeg, sugar, vanilla, and a sprinkle of salt
- Whisk until well combined. Make use of a big spatula to carefully fold in all of the ingredients.
- Preheat the oven to 400 degrees Fahrenheit. Prepare a 9-inch pie pan by spraying it with cooking spray and setting it aside
- Removing one disc of dough from the refrigerator and spreading it out into a 13-inch circle on a lightly floured work surface with a rolling pin is the first step. Gently fold the dough in half, then in quarters, to form a log. Transfer the dough to a pie dish and unfold it. Gently press the dough into the desired position with your fingertips. Place the peach filling on the bottom crust and set it aside. Roll out the second disc of dough to a 13-inch round and cut it into 1-inch strips with a sharp knife
- Repeat with the third disc of dough. Using your fingers, squeeze the dough strips together at the edge of the pan to glue it together
- Weave the dough strips together into a lattice design (over/under). Cut away any excess dough with a knife, and then squeeze the dough together to form a beautiful design all around the pie dish. Make an egg wash by whisking together egg and water and softly brushing it over the top of the crust
- Place the whole pie on a large baking sheet and sprinkle with Turbinado sugar
- Bake for 30 minutes. Bake for 45 minutes, or until the filling begins to bubble up around the edges. If the crust becomes too black, lightly cover it with aluminum foil. Place on a wire rack and allow to cool fully before serving. Enjoy
Please accept my thanks on behalf of everyone who took part in the KitchenAid mixer giveaway last week. Kaitlyn Lund has been selected as the winner, which I am delighted to inform! You have 48 hours to respond to my email (be sure to check your spam folder, too!) in order to win your prize. Congratulations, Kaitlyn, and thank you to everyone who took the time to enter. We’ll do it again in the near future. Now, go ahead and create this pie.
Fresh Peach Pie Starts With 1 Great Crust and 6 Perfect Peaches
Another one of summer’s wonderful treats is fresh peach pie, which is available year-round. Because there are so many distinct peach hybrids available now, “peach season” has been extended to include the months of May through September! It’s just a matter of time until peaches start showing up in grocery stores, and before long, roadside vendors will be stocked with fragrant peaches produced closer to home. Fresh ripe peaches are so beautiful, there’s no reason to conceal them under a pie shell.
- A weekday dessert that is elegant enough for a big event, yet affordable and simple enough to cook on a weeknight!
- 1.
- 2.
- 3.
- Placing the pie in the refrigerator for a couple of hours will allow the glaze to harden.
- Check!
Patty Cake Pie Crust Means No Hassle And No Rolling Pin
Seriously, this pie crust was the best thing I discovered in the year 2020. It’s nearly difficult to make a mistake, and it’s as flaky, soft, and wonderful as any pie crust I’ve ever had the pleasure of tasting. A pinch of salt is called for in the recipe. You are well aware of how a little of salt may enhance the flavor of sweet foods. If you don’t want to use it, that’s OK, but the outcome is spectacular! Despite the fact that this oil-based pie crust has been available for a long, I am happy to have discovered it.
Here Is A Pair of Perfectly Practical Peach Pointers
Preparation tip 1: For this pie, you’ll need wonderfully ripe and luscious peaches. If your peaches aren’t quite ripe, you may speed up the process by cutting them in half. Simply place the peaches in a brown paper bag and let them for a day or two. The bag holds in the ethylene gas that the fruit emits, which helps to accelerate the ripening process. That’s quite awesome, isn’t it? Want to accelerate the process even further and have them mature even faster? Put a banana or an apple in there as well for even more ethylene action.Tip 2: This is a quick and easy technique to peel peaches quickly and effortlessly.
Gently place a few peaches at a time into the boiling water; you don’t want to overcrowd the peach slices.
You don’t want to fry the peaches; all you want to do is soften the outermost surface of them.
Remove the peaches from the pan with a slotted spoon or silicone tongs and immediately transfer them to a sink filled with ice cold water. If you don’t use a knife, the peels should come off without difficulty!
It Only Takes 3 Steps To Make The Sunniest Peach Pie Ever
To begin, prepare the patty cake pie dough. In a large mixing basin, whisk together the flour, cooking oil, salt, and a pinch of powdered sugar until everything is uniformly coated. Using your hands, form a ball of dough and set it in the center of a 9-inch pie pan. Using your fingers, pat and press the crust into the desired form. If you like, you can flute the edges of the crust. For best results, prick the crust with a fork to keep it from shrinking before baking it at 375 degrees for 12 to 16 minutes, or until the crust is golden brown.
- Following that, prepare the extremely basic glaze, which will take no more than five minutes!
- Cook over medium heat, continually stirring, until the mixture is thick, clear, and bubbling.
- Remove from heat and mix in one box of peach gelatin until completely dissolved.
- While those items are cooling, peel the peaches according to the instructions in tip 2.
- Now is the time to slice those gorgeous peaches and place them directly into the warm embrace of the patty cake pie shell!
Perfect Peaches With Glorious Glaze Makes A Delicious Dessert
According to the size of the peaches and how high you want to pile them on top of the pie, you may need to use more than six peaches for your dessert. There is enough glaze left over for you to pile even more fruit in the center of the pie and make it even more impressive! In a pie plate, spread out the cooled glaze evenly over the peaches and place it in the refrigerator for at least two hours to enable the gelatin mixture to set up. It turned out beautifully! I was quite delighted with how beautifully the pie sliced and maintained its form.
The photo isn’t particularly appealing, but the pie tasted delicious!
I hope you will try this really easy and delicious crust the next time you make a single crust pie, whether it is for a peach, pumpkin, or pecan pie.
Ingredients
- 1 3/4 cup all-purpose flour
- 1/2 teaspoon salt
- 1/2 cup vegetable oil
- 1 tablespoon powdered sugar, which assists in browning
- Optional: 2 drops yellow food coloring
Instructions
- In a large mixing basin, combine all of the ingredients and stir until equally mixed, being sure to incorporate all of the flour. Then, form the dough into a ball. Place the dough ball in the center of a 9-inch pie pan
- Bake for 30 minutes at 350 degrees. Shape the crust with your fingertips by patting and pushing it into place. If you like, you can flute the edges of the crust. Use a fork to prick the crust all over to prevent it from shrinking
- To blind bake, follow these steps: In a 375-degree oven, bake for approximately 12 to 16 minutes, or until the crust is golden brown. Place the crust on a cooling rack to cool. If you’re making a custard-type pie, bake it as you normally would.
Preparation time: 20 minutes Preparation time: 20 minutes Time allotted: 40 minutes
Ingredients
- One 9-inch pie shell that has been baked. (An oil crust recipe is given with this post.) Six to eight fresh ripe peaches, peeled and sliced
- One cup sugar
- One cup cold water
- Two tablespoons corn starch
- One three-ounce box of peach gelatin
Instructions
- In a medium saucepan, whisk together the cornstarch and sugar until completely blended. Cook over medium heat, stirring constantly, until the liquid is clear, thick, and bubbling
- Remove from heat. Stir in one packet of peach gelatin until it is completely dissolved, then set aside. Allow glaze to cool until it reaches toom temperature. Pour equally over the peaches, being sure to coat all of the fruit. Make sure to chill in the refrigerator for at least two hours so that the gelatin can firm up
- Cut into slices and serve. Serve with whipped cream over top, if preferred. Keep leftovers refrigerated.
Nutrition Information:
1Serving Size (in grams): Calories:534 16 g of total fat 5 g of saturated fat 0 g of Trans Fat 10 g of unsaturated fat Cholesterol:0mg Sodium:286mg Carbohydrates:96g Fiber:5g Sugar:63g Protein:6g Pie makes me giddy with anticipation! If you want to make me happy, please offer me a slice of pie rather than a piece of cake any day! Another round of my favorite pie recipes is included below! Salted Caramelized Onion Pie with Raisins Lemon Meringue Pie (also known as Lemon Meringue Tart) French Silk Pie is a type of pie that is made using silk.
If you loved this recipe, please consider sharing it on your social network sites, such as Facebook, Instagram, Twitter, and Pinterest if you enjoyed it today.
It would certainly tickle my fancy, and I would be eternally thankful, thank you! I encourage you to visit my Facebook page, where I’ll be providing quick, tasty, and family-friendly recipes on a weekly basis.
Wham Bam Pie Crust (+Video)
The Wham Bam Pie Crust is the most simple pie crust you’ve ever made! The pie crust is still delicate and flaky despite the lack of rolling pins, chilled butter, or other preparation.
THE EASIEST AND FLAKIEST PIE CRUST
Pie crusts that are frozen are my favorite. Numerous of them are really good these days, thanks to the efforts of many firms to improve the quality of their components. However, there are occasions when I prefer to use my own pie pans rather than the ones that came with the frozen crusts. And, every now and again, the rustic appearance of a completely handcrafted pie simply does something to me. An uneven, golden, flaky crust that has been crimped by my fingers is one of my favorite things to look at.
NO ROLLING PIN, NO COLD BUTTER, NO TRICKS
However, I require a crust that is simple to prepare. This crust is ideal for any pie that requires only one crust. For example, myBROWN SUGAR PUMPKIN PIE, SOUTHERN-STYLE PECAN PIE, and FARMHOUSE STRAWBERRY PIE are all delicious. Alternatively, savory pies such as COUNTRY TOMATO BACON PIE might be used. It’s nicknamed Wham Bam because you don’t have to worry about cutting in cold butter or shortening like you would with traditional pie crusts, or about adding in ultra cold ice water as you would with traditional pie crusts.
TIPS FOR MAKING THE EASIEST PIE CRUST
There is no kneading or rolling of the dough (unless you really want to.). You combine the ingredients in a mixing bowl and press the mixture into the pie pan with your fingertips. It only takes a short period of time to have it all spread out. However, bear in mind that this is the bottom portion of your pie crust, and it does not need to be show-stoppingly gorgeous. It’s a pretty forgiving language. However, it is also soft and flaky, and when baked, it becomes a gorgeous golden hue. In addition, if you can locate it, use White Lily brand flour in your recipe.
INGREDIENTS NEEDED FOR PIE CRUST: (FULL RECIPE IS AT THE BOTTOM OF THE POST)
- All-purpose flour (I like White Lily), salt, vegetable oil, and water are the ingredients.
HOW TO MAKE WHAM BAM PIE CRUST:
In a medium-sized mixing basin, whisk together the flour and salt. Combine the oil and water in a separate bowl. Combine until everything is well-combined. After that, roll it into a ball. Nonstick cooking spray should be used to coat the pie pan. It’s not absolutely required, but I want to make doubly certain that there is no sticking, and it also makes this dough a little easier to distribute in the dish if necessary. Now, continue pressing down on the ball of dough and spreading it out to the sides of the baking sheet.
- Ensure there is enough dough up the sides so that you can crimp the top edge of your pie crust.
- This is a dough that is highly forgiving.
- That was my fault.
- It’ll reseal itself in no time.
- After that, you may begin to crimp the top edges of the crust as you move around the pan.
- I’m not sure about you, but I enjoy the small faults that occur throughout the baking process.
- It has a rustic feel to it, and it was constructed by hand.
- In this recipe, I used it to make BUTTER CRUMBLE APPLE PIE.
- It’s the perfect basis for any of your one-crust pies you want to make.
- IN ORDER TO PRE-BAKE: Poke holes all over the interior of the crust with a fork (this will prevent the crust from puffing up too much when baking).
Alternatively, if you have beans, you may line the top of the pie with foil and then stuff beans into the crust to weigh it down and prevent it from blowing up. Then bake for approximately 10-15 minutes at 400 degrees Fahrenheit (maybe a tad longer). It should have a golden tint to it.
CRAVING MORE RECIPES?
- 2 teaspoons water
- 1 34 cup all-purpose flour
- 12 teaspoons salt
- 12 cup vegetable oil
- 1 34 cup water
- In a medium-sized mixing bowl, whisk together the flour and salt
- Combine the oil and water in a separate bowl. Combine until everything is well-combined. After that, roll it into a ball. It’ll be a lot of material
- Nonstick cooking spray should be sprayed into a regular pie plate. Using your pie plate, place the ball of dough in the center of it. Begin by pressing down on the dough ball and spreading it out to the sides of the pan. Pull it up the sides as evenly as you can, using all of your might. It will just take a few minutes to do this task. Ensure there is enough dough up the sides so that you can crimp the top edge of your pie crust. if necessary, you can even get your knuckles into the crevice with your fingers. Make careful to push down into the bottom rim of the pan as well, in order to spread out the dough and prevent it from becoming too thick. Then you may begin to crimp the top edges of the crust as you go around the pan. Once it’s finished, fill it with your preferred filling and bake it according to the instructions on your pie recipe.
- If you’re using this crust in a recipe that asks for a pre-baked pie crust, you’ll want to bake it first. Just make sure that you use a fork to poke plenty of little holes all over the crust before you put it in the oven. This will prevent the crust from blowing up excessively during the baking process. Keep in mind that this does not have to be flawless. It is merely a pie crust for the bottom of the pie. It has a rustic feel to it, and it was constructed by hand. That is how it should seem
289 calories|27 grams of carbohydrates|3 grams of protein|18 grams of fat|14 grams of saturated fat|Sodium: 194 milligrams|Potassium: 39 milligrams|Calcium: 5 milligrams|Iron: 1.7 milligrams Notice Regarding Nutrition The original article was published in September 2012, then it was updated and reprinted in October 2019. Like the majority of you, I’m an ordinary home chef who does all in my power to put a decent meal on the table for my family. I like to refer to the recipes on this site as “recipes for the time-pressed chef” (you know who you are).
I hope you’ll find plenty of dishes that you’ll enjoy and that will become family favorites as a result of your visit.
Reader Interactions
All Intellectual Property Rights are Reserved. Unless otherwise stated, all photos and content on The Country Cook are original and are protected by the Digital Millennium Copyright Act, which protects intellectual property rights.
Cup4Cup
One 9-inch pie will be produced.
Ingredients
3 cups of coffee (420 g) Cup4Cup is a multipurpose cup. Flour the equivalent of 2 tablespoons (25 g) 1 teaspoon of granulated sugar (2.5 g) salt that is kosher Cold butter cubes equal 1 cup (225 grams). 1 big egg (around 12 cup) (125 g) buttermilk, served chilled
For Filling:
peeled and cut into 12-inch wedges, 5 cups (610g) peaches Granulated sugar: 1/2 cup (110g) granulated sugar 14 cup (50 grams) brown sugar, tightly packed the amount equal to one tablespoon (15g) the juice of a lemon 1 tbsp. 1 teaspoon (5g) extract de vanille 1 / 4 cup (40g) Cup4Cup is a multipurpose cup. 12 teaspoon of flour (2g) 14 teaspoon of kosher salt (1g) ginger that has been ground 1/8 teaspoon is a unit of measurement (0.5g) cinnamon that has been ground small cubes of butter (about 2 tablespoons, or 30 grams) 1-quart (15-gram) water—for one big egg granulated sugar, for use in sprinkling (optional)
Instructions
- Place all of the dry ingredients in a food processor and pulse until they are uniformly dispersed. In a food processor or blender, pulse the flour mixture until it resembles coarse cornmeal, then add the cold, cubed butter. Make the butter cuts using a pastry cutter or fork if you’re doing it by hand. Place the mixture in a large mixing basin and put it aside
- In a small bowl, whisk together the egg and the buttermilk until well combined. For each ball of dough, make a well in the flour mixture and gently whisk in the egg mixture with a fork until the dough comes together and forms a ball. Wrap it in plastic wrap and place it in the refrigerator for 1 hour.
For the Filling:
- Preheat the oven to 375 degrees Fahrenheit. In a large mixing basin, combine the peaches, sugars, lemon juice, and vanilla extract. Set aside the Cup4Cup flour, salt, ginger, and cinnamon while you prepare the rest of the ingredients. Allow the mixture to rest for approximately 10 minutes at room temperature. In the meanwhile, divide the chilled pie dough in half. Half of the dough should be rolled out into a circle that will fit into the pie dish. Transfer the dough into the pie pan with caution. Using your fingers, gently push it into the pie dish Pie dish lined with half of the previously rolled out pie crust
- Pour in peach mixture
- Bake for 30 minutes at 350 degrees. Dot the top of the filling with the 2 tablespoons of sliced butter, spaced equally across the surface. Using the other half of the pie dough, cover the pie crust with a thin layer of dough. Make a whole crust, or cut the dough into strips and weave them together to form a lattice top. Use a fork or your fingers to crimp the pie dish edges together after trimming away any excess dough around the edge of the pie dish. To prepare the egg wash, whisk together the egg and the water in a small bowl. Lightly sprinkle the coarse sugar on top of the dough once it has been brushed with the egg wash
- Bake for 50-60 minutes on the center rack, or until the filling is bubbling and the crust is golden brown. Allow for at least 1-2 hours of cooling time before serving.