
Buns
How Long Do Honey Buns Last
Jan
Honey Bun 4.0 Oz
This classic pastry is baked with a touch of honey and cinnamon, and then covered with a light glaze to complete the presentation. Fresh:00024300097218 4.0 ounces (net weight) Case Ct.:72 (12/6’s) Case Ct. Fresh 90-day shelf life is recommended. Case Height (in.):17.94Case Width (in.):12.69Case Length (in.):11.63 Gross Case Weight (lbs.):20.00Net Case Weight (lbs.):18.10Case Height (in.):17.94Case Width (in.):12.69Case Length (in.):11.63Case Length (in.):11. Dimensions of the Case Cube in feet and inches (TI/HI:7/4).
for the pallets and the pallet weight (including the pallet).
Contains no more than 2 percent of each of the following ingredients: Agar, Calcium Stearoyl Lactylate, Calcium Carbonate, Agar, Titanium Dioxide, Calcium Sulfate, Preservatives (Calcium Propionate, Potassium Sorbate, Sorbic Acid), Amylase Enzymes, Natural and Artificial Flavors (contains Lemon), DATEM, DATEM DATEM DATEM DATEM DATEM DATEM DATEM INFORMATION ON ALLERGIES: WHEAT, SOY, MILK, AND EGG ARE CONTAINED.
r/AskReddit
This box of Great Value Honey Buns was purchased today, and it has an expiration date of January 14, 2011. My youngster only managed to consume a little bit of it. Honey Bun up close and personal EDIT: For those who are wondering what I want to gain from this experience: What I really want to do is use this occurrence to make things like this happen less frequently in the future. I understand that I am only one person and that this is only one incidence, but I want to do all I can to force the supplier and/or retailer to focus more on quality in order to prevent this from occurring again in the future.
- And to those of you who are unhappy with the food I provide my children.
- It’s not cocaine, but rather bread and sugar.
- For their elementary school, they both participate in basketball and track & field.
- They are both physically healthy and athletic children who eat three full meals a day and complete household duties.
- Thank you for your parenting advise, but kids do deserve a treat every now and then, and there are many worse things than sugar and bread to give them.
It’s Safe to Eat These 13 Foods After They “Expire” — Eat This Not That
Should I keep it or throw it away? Every food item you buy has a shelf life of some sort. With the exception of fresh fruit that isn’t sold in a packaging, practically all food items are labeled with an expiration date to give the consumer an indication of when they should be consumed by the consumer. But those expiration dates—whether they’re labeled with “use by,” “sell by,” or “best by”—are merely designed to serve as guides and do not truly indicate whether or not food is safe to consume.
That implies that, in general, everything can be enjoyed after the expiration date printed on the container.
Nonetheless, as you may have suspected, the time span between a food item’s expiration date and the point at which it becomes spoiled varies depending on the food item and how it is stored.
In light of the COVID-19 epidemic, it would be helpful to know whether or not the things in your pantry are still edible so that you don’t have to make another shopping run.
These experts explain how to distinguish between different types of expiry dates, provide a list of certain items that are particularly shelf-stable and useful to have on hand, and provide advice on how to determine if your food has gone bad.
What do the different dates on your food mean?
It’s possible that you’ve recently realized that some of the things in your pantry or refrigerator are marked with a “use by” or “expiration” date, while others are labeled with a “sell by” or “best by” date. While all of these words speak to the quality of your food rather than the safety of your food (and are intended to be used as approximate estimations), they are nevertheless crucial to bear in mind while you shop for food and prepare meals at your residence. “Food makers consider factors such as product components, the amount of time it takes to distribute the product, and the temperature at which the food is stored when selecting these dates,” explains Sofia Norton, RD, a registered dietitian at Kiss My Keto.
- “”Use By” Dates: “This date is placed on the product by the food maker as the last date suggested for using the product while it is at its best quality.” You will not become sick if you consume it after the “use by” date has passed “According to Toby Amidor, MS, RD, CDN, FAND, and author of The Create-Your-Plate Diabetes Cookbook, diabetes is a lifestyle choice. “It is a quality issue, not a food safety one,” says the expert. “
- “
- “”Expiration” Dates: “The “expiration” date is intended for customers and indicates the latest day on which the product may be deemed fresh. After then, the product’s quality deteriorates, and it may quickly go bad “Norton expresses his views. “The expiry date does not necessarily imply that the product is no longer safe to consume, although it is possible that this will occur shortly after the date of expiration. Consider these to be basic guidelines.” “
- “”Sell By” Dates:”This date informs the store how long the food product should be displayed. However, the item’s qualities (such as freshness, flavor, and consistency) may not be as excellent as it was before the “sell by” date has passed “Amidor expresses himself. “If you consume food beyond the “sell by” date, the nutritional value of the item may be lowered as a result of spoilage (especially after a few months or even years). You will not become unwell if you consume the food after the “sell by” date has passed. It does not serve as a reliable indication of food safety.” “Best By” dates: “This date, once again, pertains to the quality of the product rather than its safety,” Amidor explains. For the optimum flavor and quality, “the food maker recommends using the date shown on the package.”
The fact that each of these dates only applies to objects that have been properly stored is critical to bear in mind. The advisory board for Fitter Living includes Amanda A. Kostro Miller, RD, LDN, who advises on food safety. “Remember that if food was/is not properly handled even before the listed dates, it still has a potential of being contaminated,” she notes. “Example: If milk is not properly refrigerated within two hours after purchasing it at the supermarket, even the most fresh of milk might go bad and become dangerous to drink.
The types of foods that are more or less likely to go bad after their expiration date
The truth is that there are no hard-and-fast rules to follow when it comes to ingesting food after the “best by,” “sell by,” or any other date on the package. However, there are certain general considerations that should be taken into consideration. “When calculating the shelf life of a food item, the most important question to ask oneself is whether or not the food item is vulnerable to bacterial development. Bacteria, in general, require three things in order to thrive: food, moisture, and temperature “Janilyn Hutchings, a qualified food safety specialist at State Food Safety, explains how she got her job.
“Temperatures in refrigerators do not totally prevent germs from developing; rather, they just inhibit the growth of bacteria.
“Opened condiments are an exception to the norm because they tend to be more acidic in nature.” Hutchings points out that the freezer presents a slightly different situation.
The longer food is kept frozen, the more likely it is that its quality will deteriorate.”
What foods that are still good after their expiration date?
The following is a list of specific foods that you can stockpile and that will remain edible well past their “sell by” dates, should the need arise. Shutterstock Norton explains that “eggs are perishable in the same way that most animal foods are, which means they can go bad quickly.” “By properly storing and handling them, you can extend their shelf life by several days. They can be consumed for up to four to five weeks after they are packaged if they are kept in the refrigerator at 40 degrees F.” Shutterstock In the words of Megan Wong, RD, a registered dietitian who works withAlgaeCal, “Bread can last anywhere from five to seven days past its expiration date.” “However, mold should be avoided at all costs, especially if the product is stored in a moist environment.
- It’s best to keep bread stored in a cool, dry environment.
- It will, of course, lose some of its freshness and flavor, but it will still be safe to consume.” Shutterstock “Canned food is one of the least perishable foods available.
- However, you can continue to eat it for several years after that “Norton expresses his views.
- Aside from that, canned foods are vacuum-sealed, which means that there is no oxygen present to cause the food to brown and decompose.” What are some of the other unopened canned goods that made the cut?
- Despite the fact that “the longer the food has been expired, the more likely it is that its flavor will be affected,” she maintains that it is still safe to eat.
- Dried fruit, crackers, and chips are all examples of foods that are high in fat.
- “Because dry components do not contain any moisture, they are less prone to bacterial development in general,” Hutchings explains.
- As a result, it’s frequently employed as a preservative because it’s extremely effective at inhibiting bacterial growth.
- “When things have reached the end of their shelf life, they may begin to develop a white or blue-green mold on the surface.
- The low moisture level in hard cheeses makes it more difficult for germs to develop, which is beneficial because most bacteria prefer damp conditions.
- Shutterstock “Dairy milk may be kept for up to a week after it has passed its expiration date,” explains Wong.
Shutterstock Despite the fact that most nuts are generally stable due to a lack of moisture, Hutchings points out that the satiating items are often heavy in fat, which means they may require a little more attention if they’ve been sitting in your cupboard for a long amount of time past their sell by date.
- Shutterstock “Pasta is a dry product, which helps to ensure that it does not deteriorate quickly.
- Consequently, you can use it safely after the expiration date, although the quality may degrade as a result.
- Shutterstock Beets, carrots, and parsnips are examples of such vegetables.
- “It is generally accepted that the fresher the food is and the greater the amount of water and oil it contains, the more quickly it will degrade.
- According to Norton, unopened yogurt may be consumed for up to three weeks after its expiration date if it has not been opened.
- If you discover that your yogurt has whey that has separated from the curd, don’t be concerned; this is typical and not cause for concern.
- A low-moisture type of sugar, it has an extremely extended shelf life since bacteria and other microorganisms that generally cause food to go bad can’t flourish in such a dry environment, which makes it a good choice for baking and other baking-related applications.
- Because of the extreme acidity, it will destroy any other bacterium that tries to live in honey and cause it to spoil.
- Shutterstock Marinara sauce, like honey, has a high level of acidity.
This acidity aids in the prevention of the tomato sauce from becoming a breeding ground for rotting bacteria. This allows you to use your marinara sauce for months after it has passed its expiration date, and even for weeks after you have opened a jar of sauce.
How do you know if food has gone bad?
As previously stated, most foods may be safely consumed for varied lengths of time after their sell-by dates; nonetheless, this does not rule out the possibility that the vast majority of items will go bad at some point in the future. “When in doubt, utilize your senses of sight, touch, and smell to determine whether or not the food has gone off. If something doesn’t smell right, doesn’t feel right, and doesn’t look right, it probably is “Norton expresses his views. “In the case of ruined milk, the scent will be unpleasantly sour or even rotten to the nose.
While canned items generally survive better than most other foods, there are still several factors that customers should be aware of when purchasing tinned goods.
Devon Golem, PhD, RD, explains that “foods tend to reveal very obvious indicators of spoilage: mold, unpleasant odor, discoloration, and physical disintegration of structural integrity,” among other things.
Food waste as a result of imprecise date labeling is a major issue in the United States.
15 foods you can eat past their expiration dates
Updated2020-07-28T15:28:00 ZEggs have an extended shelf life due to their high water content. Shutterstock
- Expiration dates are frequently used as a guideline rather than as a rigid law, and they are frequently used to relate to the quality of the food rather than the actual safety of the meal. Despite the fact that it is still vital to check the package, there are quite a few items for which the date does not matter
- They include: If you keep dry, boxed pasta in its original packaging, it will survive for a long time. If there is no mold on the bread, it is often OK to consume even if it has “expired.” More articles may be found on the Insider homepage.
It is a frequent misperception that the expiration date marked on packaged food is a hard and fast rule for when you should discard it. In truth, infant formula is one of the few commodities in the United States that has a legally mandated expiration date, which is why “sell by” and “best if used by (or before)” dates are more of a recommendation than a requirement. Rather than referring to food safety, as Paul VanLandingham, a senior faculty member at JohnsonWales University’s Center for Food and Beverage Management, noted in an interview with WebMD, these figures allude to food quality rather than nutrition.
When it comes to these 15 food items, you may frequently ignore the expiration date printed on the container.
You can keep dry, boxed pasta for one to two years past its printed date.
Dry spaghetti keeps for a longer period of time than you may expect. Suzanne Kreiter/The Boston Globe/Getty Images Suzanne Kreiter According to FoodSafety.gov, a food resource from the United States Department of Health and Human Services, dried pasta can be stored for one to two years after it has been printed with an expiration date on it. When it comes to fresh (uncooked) pasta, the sort you’ll find in the refrigerated department of the store beside the Italian cheese, the shelf life is just four to five days beyond the expiration date stamped on the box.
In general, cooked pasta, whether dried or fresh, can be stored in the refrigerator for up to seven days.
When it’s unopened, breakfast cereal lasts six to eight months past the date on the box.
Fresh cereal should be consumed as soon as possible after it has been opened in order to maintain its freshness. If your favorite cereal is opened, it will normally remain fresh for between four and six months. Seth Wenig/Associated Press Cooked cereals, such as oatmeal, on the other hand, will only last four to five days in the refrigerator once they have been made. “Cereals don’t truly go bad after a while. There isn’t much of a problem with the quality of the product. Although it is possible to get sick from eating stale cereal if you leave your cereal box open, it is unlikely that you will get sick from eating it “Emily Broad Leib, the head of the Harvard Food Law and Policy Clinic, spoke with TIMEmagazine about her work.
No matter what date is on the carton, you can use eggs within three to five weeks of purchasing them.
Eggs have a longer shelf life than is often believed. Shutterstock There are a variety of methods for determining whether an egg is poor (such as doing the float test or sniffing it to determine if it has a sulfur smell), but in general, the fresher the egg, the better it will taste. “On the carton, a manufacturer might include a sell-by date or a best-used-by date to ensure that the product remains fresh. There are no regulations in place for this. If you want to know how fresh something is, look at the date “The University of Central Florida’s Rosen College of Hospitality Management has a food safety and sanitation expert on staff.
“The closer you get to the day of purchase, the less fresh the eggs will be.
In most cases, no matter what date is put on the box, e ggs may be safely consumed within three to five weeks after they are purchased.
Raw meat and poultry keep long past their sell-by date if you freeze them.
Just be sure to keep it frozen until you need it. jutia/Shutterstock Although raw meat and poultry may only last a few days in the refrigerator, freezing these things will allow you to store them much past their sell-by date for several months. According to FoodSafety.gov, frozen ground beef can keep for three to four months in the freezer, while a full chicken or turkey may be kept for up to a year in the freezer. “Bacteria that causes food poisoning do not develop in the freezer, thus no matter how long a food has been frozen, it is safe to consume.
Despite the fact that foods that have been frozen for months may be dry and/or taste unpleasant, these foods are still safe to consume “reported on the blog of the US Department of Agriculture, according to the agency’s report.
Raw fish also lasts much longer in the freezer.
If you wish to preserve fish or poultry fresh for an extended length of time, it must be frozen. Photograph courtesy of Lemer Vadim/Shutterstock It is recommended that raw fish be frozen since it will keep for between six and nine months, according to the Eat By Date website. Smoked fish may be stored in the freezer for three to six months, while commercially frozen fish can be stored for 10 to 12 months provided it is not allowed to thaw out. Additionally, unopened canned fish (such as tuna) can be stored for up to five years after the date on the can is listed on the label.
As with many food items, appearance and odor will tell you more about if cheese is safe to eat than the number on the package.
It varies somewhat depending on the sort of cheese you’re consuming. Shutterstock Cheese, in general, has a shelf life that exceeds its expiration date. Even if cheese (whole, chopped, or sliced) becomes moldy, it is generally possible to preserve the product by cutting around the decayed area. According to the Gourmet Cheese Detective, white mold is usual on cheeses with a “bloomy rind” or that have been soft-ripened, such as Camembert and Brie. The majority of colorful molds, such as the orange, blue, and green variants, are not edible, while some are.
You can keep dairy milk five days or more past its printed date.
It’s likely that you’ll notice when your milk has gone bad. Joey Hadden/Insider Photographer The amount of fat in milk determines how long it will last. Although nonfat milk may be kept for seven to ten days beyond the date on the carton, whole milk can be kept for five to seven days after the date on the carton. If milk spoils, it will appear discolored and have a lumpy appearance, as well as emitting a foul stench as it decomposes. The shelf-stable, non-dairy varieties of milk keep for up to a month after they have been opened and refrigerated after opening.
Canned foods have a long shelf life.
Canned foods have a shelf life of many years. Shutterstock Although not all canned goods have an endless shelf life, the majority of them have a shelf life that is greater than their sell-by or best-by dates. In general, canned vegetables and some canned soups are safe to consume for up to a year after they have “expired,” with the exception of very acidic products such as tomatoes and pineapple. The shelf life of canned meats, such as corned beef and SPAM, is significantly greater, lasting between two and five years.
Unopened packages of frozen fruit and frozen vegetables are good for eight to 10 months beyond their printed date.
Fruit will normally last for a lengthy period of time if it is frozen properly. Unopened packets of frozen fruit and frozen veggies may both be stored for eight to ten months after their listed expiration dates, according to Eat By Date. CLICKMANIS/Shutterstock
When unopened and refrigerated, yogurt will last two to three weeks past the date on the container.
Consider storing your yogurt in the freezer. Caroline Praderio/Insider Photographer Unopened yogurt can be kept in the refrigerator for up to two weeks after it has passed its best before date. According to StillTasty, frozen yogurt will last up to two months in the refrigerator.
Bread is usually fine to eat if you don’t see any mold.
If you see mold, though, put it away immediately. courtesy of kongsak sumano/Shutterstock According to StillTasty, packaged bread (such as white bread) may be kept at room temperature for five to seven days if it is stored properly. If you store it in the refrigerator, it will keep its freshness for three to four days before it starts to go bad.
For those who wish to extend the shelf life of their boxed bread, it will remain fresh in the freezer for at least three months. If you do see mold on the bread, though, toss it out immediately.
Unopened jars of peanut butter can keep for up to a year past their printed date.
Preservative-free peanut butter will not last as long as regular peanut butter. Shutterstock image courtesy of White Bear Studio Unopened jars of peanut butter (with preservatives) will keep for up to a year beyond the date on the label, whether or not they are kept refrigerated. Natural peanut butter has a shorter shelf life than processed peanut butter, lasting three to six months if stored in the refrigerator after the expiration date. A sealed jar of another famous hazelnut spread, Nutella, on the other hand, will only last one to two months after the date on the label has passed.
Some condiments, such as ketchup and mustard, are good for a year or two beyond their printed dates if the bottles are unopened.
It’s likely that the ketchup in your refrigerator is still safe to consume. Photograph by L Barwell/Shutterstock An unopened bottle of ketchup will survive six months, whereas an opened bottle of mustard can last up to a year if stored in the refrigerator.
Honey only really spoils if it’s introduced to moisture.
Honey does not provide a conducive environment for germs to thrive. Shutterstock Honey is well-known for having a shelf life that appears to be indefinite, a quality that can be traced to the sticky substance’s chemical make-up. Honey, being a sugar, is a hygroscopic material, meaning that it does not contain much water but may absorb moisture from the surrounding environment. “Honey in its original form has very little moisture,” Amina Harris, executive director of the Honey and Pollination Center at the Robert Mondavi Institute at the University of California, Davis, told Smithsonian Magazine.
They’ve been suffocated by it, to put it bluntly.” Having said that, if honey is exposed to dampness, it will begin to deteriorate.
The gritty texture is created by glucose molecules separating from water during the separation process.
- More information may be found at: 20 foods that can last longer than you believe
- There are eight symptoms that your carton of eggs has gone rotten
- How to tell whether a bottle of alcohol that has been opened has gone bad
- 10 reasons why you could believe food has gone bad when it is still perfectly okay to consume
Something is in the process of loading. More:Features Freelancers have an expiration date. Foods that have been packaged It denotes the presence of an expanding section or menu, as well as the presence of previous and next navigation choices.
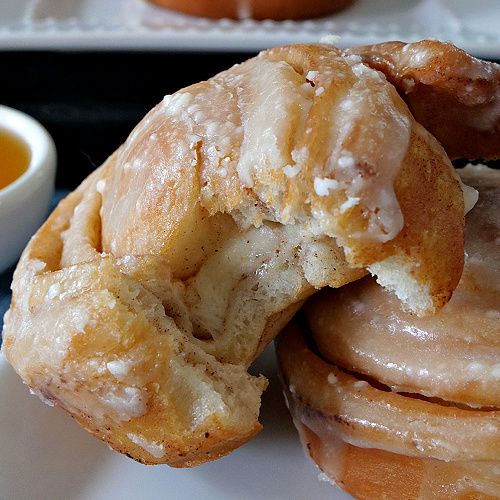
Honey Buns
Homemade honey buns are the best! Soft sweet rolls covered with honey butter frosting are produced in approximately an hour with this simple homemade honey buns recipe from scratch. Honey buns baked from scratch are really hazardous! These seemingly inconsequential small sweet buns are truly delectable. They are also rather simple to create. Although it appears that there are several processes, this is only due to the fact that everything has been thoroughly broken down. And don’t forget about the buns!
They are very delicious! The dough is soft, and the filling is a mixture of brown sugar and cinnamon. The buns are iced with a delicious honey butter frosting that complements the sweetness of the buns. All of this comes together to produce a delectable breakfast or dessert!
How to make homemade honey buns
Begin by melting the butter and milk together in a small saucepan. Allow the mixture to cool to around 100 degrees Fahrenheit. In a large mixing basin, combine the warm water, honey, and yeast until well combined. Gradually incorporate the flour and salt until the dough comes together in a smooth, elastic ball. Allow the dough to rest for approximately 10 minutes after it has been covered. In the meantime, combine all of the filling ingredients until well blended. Spread the filling over the dough once it has been rolled out into a rectangular shape.
Cut the dough into 12 rolls and lay them in the baking pan that has been prepared.
Allow the dough to rest for 15 minutes once it has been covered.
Allow the honey buns to cool for 5 minutes after removing them from the oven.
How to store honey buns
First, combine the butter and milk in a small saucepan over medium heat. Allow the liquid to cool to approximately 100 degrees Fahrenheit before using. Stir add the warm water, honey, and yeast until everything is well combined in a large mixing basin (about 15 minutes). Gradually incorporate the flour and salt until the dough comes together in a smooth, elastic ball of consistency. To rest for approximately 10 minutes, cover the dough with a clean cloth or plastic wrap. In the meantime, combine all of the filling ingredients until well blended.
- Make a long roll of the dough and squeeze the seams together to seal the seams.
- It is easier for me to cut the dough if I use a serrated knife.
- The icing components should be blended just before baking, near the end of baking time.
- To assemble, spread the icing over the heated buns and let it aside for 5 minutes before serving.
How to reheat honey buns
I reheat the honey buns in the microwave for around 10-15 seconds, uncovered, for a total of 15 seconds.
More easy sweet roll recipes!
- Sticky Buns in Under an Hour
- Cinnamon Rolls in Under an Hour
- Caramel Rolls in Under an Hour
Remember to rate the recipe and to leave a comment if you’ve tried this honey bun recipe. Thank you for your support! I appreciate hearing from folks who have tried my recipes and enjoyed them! Follow me on FACEBOOK, INSTAGRAM, and PINTEREST for even more mouth-watering recipes, or subscribe to my recipe newsletters to receive them directly in your inbox.
DOUGH
- 13 cup milk1, 13 cup butter, 2 teaspoons honey, 3 12 teaspoons quick yeast2, 34 cup warm water (105 – 115 degrees Fahrenheit), 3 cups all-purpose flour3, and 12 teaspoons salt
FILLING
- Brown sugar (packed)
- Granulated sugar (four cups)
- One teaspoon cinnamon
- Fourteen cups butter (at room temperature)
ICING
- 1/2 cup powdered sugar
- 1/2 cup honey
- Pinch of salt
- 1 tablespoon melted butter
- Prepare a 9×13-inch metal baking pan with cooking spray and set it aside. In a small saucepan, combine the milk and butter until well combined. Heat over low heat, stirring constantly, just until the butter melts. Cool to around 100-105 degrees Fahrenheit. Fill the bowl of a stand mixer halfway with the milk mixture
- Combine the honey, yeast, and warm water in a mixing bowl. To blend, stir the ingredients together. To the yeast mixture, add 2 cups of flour and a pinch of salt. Mix on a low speed for approximately 1 minute, using a dough hook. While the mixer is still running, gradually add the remaining flour, 12 cup at a time. For about 12 minutes, or until the dough begins to clean the sides of the basin, continue mixing. Knead the dough on a low speed for another 2 minutes, or until it is smooth and elastic to the touch – the dough will still be somewhat sticky to the touch at this point. Place the dough in an oiled mixing basin, rotating it to coat the surface with grease. Cover the dough with a clean, dry dish towel to prevent it from rising. Allow it to rise for approximately 10 minutes in a warm, draft-free environment. Preparing the filling while the dough is rising is recommended. Combine the filling ingredients in a large mixing bowl until well blended. Remove from consideration
- Turn the dough out onto a floured board and roll it into a rectangle measuring 12×16 inches
- Spread the filling on top of the dough. Roll the dough up lengthwise, squeezing the seam together to seal it. Cut into 12 pieces and place in the baking dish that has been prepared. In order to cut the dough, I use a serrated knife. Cover the baking dish with a dish towel and let aside for approximately 15 minutes to allow the dough to rise. Meanwhile, preheat the oven to 350 degrees Fahrenheit. 30 minutes or until the rolls are golden brown and cooked through
- Let the honey buns cool in the pan for 5 minutes before removing them from the pan
- While the buns are cooling, combine the frosting ingredients in a separate bowl. The icing will be very thick. Using a pastry brush, ice the heated buns. Allow the buns to rest for 10-15 minutes before serving.
- Any type of milk, from skim to full, will suffice. However, using a higher fat milk will result in a more soft roll
- A packet of yeast has 2 14 teaspoons of yeast, therefore you will need to use two packets to produce the equivalent of 3 12 teaspoons of yeast. If you want to use active dry yeast, let the yeast mixture remain for 5-10 minutes, or until it becomes frothy, following step 4. It is necessary to start over if your yeast does not froth or your dough will not rise
- You may need to use a bit more or a little less flour in this case. Make a decision based on the appearance and texture of the dough. You want the dough to be smooth and elastic
- Otherwise, it will be tough to work with.
1 honey bun per person Calories: 304 kilocalories (15 percent ) 48 g of carbohydrates (16 percent ) 4 g of protein (8 percent ) 10 g of fat (15 percent ) 6 g of saturated fat (30 percent ) Cholesterol: 26 milligrams (9 percent ) Sodium: 191 milligrams (8 percent ) Potassium: 82 milligrams (2 percent ) 1 gram of dietary fiber (4 percent ) Sugar (23 g) (26 percent ) 320 International Units of Vitamin A (6 percent ) Calcium: 22 milligrams (2 percent ) 1.6 milligrams of iron (9 percent ) Kate was five years old when she received her first cookbook, and she hasn’t stopped cooking since then!
Her mouth-watering dishes have appeared on Food Network, MSN, Better Homes and Gardens, Buzzfeed, The Huffington Post, and other publications. In her spare time, she enjoys spending time with her husband and their five children on their tiny farm, where she cooks and bakes.
Reader Interactions
Essentially, these handmade honey buns are a hybrid of a donut and a cinnamon roll. They have a swirl of cinnamon in them and may be fried or baked depending on your preference. They are a delicious breakfast option or simply a sweet treat to have on hand. Take a look at some of the doughnut recipes as well. From the time I was a small child, my father has been an avid consumer of honey buns. Remember those Debbie snack cakes that come in a box? I believe he has switched to another brand. Those are the foods he eats for breakfast, lunch, and perhaps a late-night snack rather frequently.
Honey Buns is the title of the book, and it is scheduled to be released on April 28th.
Part of her small-town romance series, it has a feisty baker as well as a single millionaire workaholic as the main characters.
Honey Bun Ingredients
I’m sure that with everyone who is now baking bread, the majority of folks will already have these things on hand.
- After the dough has doubled in size and has been smoothed out, combine the following ingredients: all-purpose flour
- Granulated sugar
- Salt
- Ground cinnamon.
- Ingredients: Whole milk
- Instant yeast (I used instant yeast, but active dried yeast will work as well)
- I used whole milk
- Melted butter – I used salted butter because it’s what I had on hand, but unsalted butter works just as well
- Egg: Use a big egg for this recipe because that is what was used in the testing
How to make Honey Buns
To get started, you’ll need to make the dough from scratch. It’s going to be sticky, but I promise you that your honey buns will be incredibly soft and tender as a result of my efforts. In the bowl of a stand mixer, combine the flour, sugar, and salt. I used the dough hooks on my Bosch mixer to make the dough. Give the dry ingredients a quick stir to ensure that the sugar and salt are fully incorporated into the flour. In a separate bowl, whisk together the warm milk and yeast. I placed my milk in a 4 cup measuring cup and microwaved it for 30 seconds, or until the temperature reached approximately 105 to 110 degrees F.
- In a large mixing bowl, whisk together the milk, melted butter, and egg until well combined.
- If the butter is added while the mixture is still hot, it has the potential to kill the yeast.
- Turn the mixer on medium and let it mix for 10 minutes.
- Work the oil into your work surface and hands until the dough is smooth and elastic, about 7 to 10 minutes, or until the dough has a nice elastic stretch to it.
- This can take 1 to 2 hours to rise, depending on the temperature of where your dough is.
- Then I set my dough on the top of my stove so it’s warm, but not hot.
- Make it a 14 inches long and 6 inches wide rectangle.
Coat the top with ground cinnamon.
No butter or oil is needed to make the cinnamon stick.
Start on the longest side.
If it doesn’t stick, add more water.
Cut the dough.
Slide the floss under the roll of dough, cross the two sides of the floss, and pull until it’s cut the dough into a perfect slice.
I thought ¾-inch looked like it was the perfect size.
You can also make these without a mixer.
Stir the dough together with a spatula until the dough comes together. Oil a clean countertop and your hands with vegetable oil. Begin kneading the dough until it has a nice elastic stretch. I haven’t done it by hand, but I would guess 10 to 15 minutes would do the trick.
Baked Honey Buns or Fried Honey Buns
You’re going to have to make a huge decision right now. How about baking or frying these puppies? In either case, they’re very delectable! Fry them, on the other hand, is a lot more labor. In the event that you wish to bake them, space the slices of dough approximately 2 inches apart on a baking sheet coated with parchment paper. Wrap them in plastic wrap and set them aside in a warm location for 30 minutes. The oven should be preheated to 350 degrees F while the honey buns are rising. Once the buns are done, take them from the plastic wrap and bake them for 15 to 18 minutes, or until they are golden brown around the outside.
- Allow the honey buns to cool until they are hard enough to handle without coming apart before serving.
- If you want to make fried honey buns, you may arrange the slices of dough on a baking sheet coated with parchment paper that has been oiled and spaced approximately 12 inches apart.
- Meanwhile, in a big saucepan, heat 3 cups of vegetable oil (or any other oil of your choice) over medium heat until it reaches 320 degrees.
- In addition, you’ll want to prepare your glaze so that it’s ready when you are.
- You may either cut the parchment paper into squares around each bun and gently drop the honey buns into the oil in this manner, or if you oiled the parchment paper as I instructed, you can delicately pick them up and drop them into the oil in the same manner.
- This is a time-consuming process, but the results were worth it: golden fried honey buns every time!
- Place the fried buns on a platter that has been lined with paper towels.
- Allow any excess glaze to drop off and set the item on a sheet of wax paper to finish drying.
Tips for the perfect glaze
- So that the glaze is ready before you fry or bake your honey buns, prepare it beforehand. When making a honey glaze, reduce the amount of melted butter to 5 tablespoons and stir in 1 tablespoon of your preferred honey until smooth. A small amount of this will make the glazing significantly thicker. 1 teaspoon ground cinnamon can be added to the glaze to give it a stronger cinnamon taste.
How long do honey buns last?
Cooking the honey buns in oil is best done the same day they’re made, unless you freeze them. You may preserve them in an airtight jar for up to two days, but the flavor won’t be as good as it would be otherwise. Baking them means they will survive 3 to 4 days if they are stored in an airtight container after baking. More deep-fried confections
Honey Buns
- Preparation time: 1 hourCooking time: 16 minutes Time to get up: 2 hours and 30 minutes 3 hours and 46 minutes in total The following courses are available: breakfast, dessert, and dinner. 14 honey buns (250 kcal per serving)
Honey Buns
- 2 cups all-purpose flour
- 3 tablespoons granulated sugar
- 12 teaspoon salt
- 12 cup plus 3 tablespoons milk
- 2 14 teaspoons (1 packet) instant or active dry yeast
- 2 14 teaspoons (1 packet) baking powder
- 2 14 teaspoons (1 packet) baking soda
- 2 14 teaspoons (1 packet) baking 5 13 tablespoons (13 cup) melted butter
- 1 big egg
- 12 teaspoon vegetable oil
- 1 12 teaspoon ground cinnamon
- 3 cups vegetable oil for frying (optional)
- 5 13 tablespoons (13 cup) melted butter
- 1 large egg
- 1 12 teaspoon powdered cinnamon
Glaze
- 5 – 6 tablespoonsmilk
- 1 teaspoon vanilla essence
- 6 teaspoons butter melted
- 2 cups powdered sugar
Honey Buns
- Add the flour, sugar, and salt to a stand mixer equipped with a dough hook and beat on low speed until combined. Pour the milk into a microwave-safe basin and set aside. 30 seconds in the microwave should enough. The milk should be between 105 and 110 degrees Fahrenheit. Combine the yeast, cooled melted butter, and egg in a mixing bowl. Whisk the egg into the mixture with a fork until well combined. Pour the wet ingredients into the stand mixer and beat on medium speed for 10 minutes until it is well combined. The dough will be somewhat sticky when finished
- Vegetable oil should be used to grease your hands and a big bowl. Take the dough out of the mixer and roll it into a ball with your hands
- Make a well in the bottom of the mixing bowl and pour in the oil. Set aside. Place a plastic cover over the bowl and let the dough to rise until it has doubled in size. This will take around one to two hours. Prepare a cookie sheet by lining it with parchment paper. Nonstick baking spray should be sprayed onto the parchment paper
- As soon as the dough has doubled in size, push it down. Placing the dough on a lightly floured work surface is the first step. Form the dough into a 6-inch by 14-inch rectangle by pressing it down firmly. A rolling pin can be used, but I like to use my hands instead. Using a cinnamon stick, sprinkle the cinnamon on top of the dough. Using your hand, massage the cinnamon into the dough all over it
- Roll the dough starting from the long side
- Once the dough has been wrapped up, secure the edge with a fork or a piece of plastic wrap. This is accomplished by rubbing the dough’s edge with water. Form the seam by pinching the moist edge of the dough into the roll of dough. If the dough isn’t sticking together when you pinch it, dab a bit extra water on the edge and pinch it once more. The dough should be left with the seam facing up since it will be sticky from the water and will likely adhere to the counter if it comes into contact with it. Make 12-inch-thick slices if you like thinner honey buns, or 1-inch-thick slices if you want thicker honey buns. Remove the dough from the oven and slide a piece of floss beneath it, crossing it on both sides at the 12-inch or 1-inch mark. Pull the floss through the dough until it is fully through it. Place the slice of dough, cut side up, on the cookie sheet that has been prepared. Repeat the process with the remaining pieces of dough slices. If you intend to bake them, you should place them 2 inches apart on a baking sheet. If you’re planning on frying them, you may space them 12 inches apart. In order to prevent the slices from drying out, spray them with nonstick baking spray and wrap them in plastic wrap. Allow for 30 minutes of rising time in a warm environment
Baked Honey Buns
- 350 degrees Fahrenheit is the temperature for the oven. Placing the cookie sheet in the oven and baking for 15-18 minutes, or until the edges are beginning to become golden brown, is recommended. While the honey buns are baking, begin preparing the glaze. Remove the honey buns from the oven and set them aside for 10 to 20 minutes to cool completely. Dip the tops of the cookies in the glaze while they are still warm. Remove any extra glaze from the honey bun by tapping the wrist that is holding it. Place the sculpture on a piece of wax paper and allow the glaze to cure.
Fried Honey Buns
- 350 degrees Fahrenheit is the temperature in the oven. Into the oven, bake for 15 to 18 minutes, or until the sides begin to become golden brown, depending on your oven. While the honey buns are baking, start working on the glaze. Turn off the oven and allow for 10 to 20 minutes of cooling time before serving. The frosting should be applied while the cookies are still warm. If there is any extra glaze on your wrist when holding the honey bun, tap it. Place the item on a sheet of wax paper and allow the glaze to cure before moving on.
Glaze
- Combine the butter, powdered sugar, milk, and vanilla extract in a medium mixing bowl until well combined. Whisk until the glaze is smooth and silky
- Set aside.
Calories:250kcal Carbohydrates:35g Protein:4g Fat:11g 7 g of saturated fat Cholesterol:38mg Sodium:178mg Potassium:65mg Fiber:1g Sugar:20g Vitamin A: 328 International Units Calcium:29mg Iron:1mg (Nutrition facts are estimates, and their accuracy cannot be guaranteed.
If you want specific nutrition counseling, please consult a licensed dietitian.) Keyword Baked honey buns, fried honey buns, honey buns, and vanilla glaze are all possibilities.
Does Honey Expire? The Answer Might Surprise You
Is the honey that has passed its sell-by date still edible? Each product that we showcase has been picked and vetted by our editorial staff after being thoroughly researched and tested. If you make a purchase after clicking on one of the links on this page, we may receive a commission. You can usually see an expiration date for honey on the back of the jar, although it’s not always the case. If the expiration date has passed months ago, you might be tempted to put the jar in the trash and go out and buy a new one.
Honey’s health advantages can be enjoyed for a long time after it has passed its expiry date.
What do expiration dates actually mean?
It is only in the case of infant formula that product dating is mandated by the federal government, according to the United States Department of Agriculture. Manufacturers, on the other hand, typically include expiry dates or best-used-by dates to aid retailers in managing inventory and to ensure that customers enjoy consumables while they are at their peak taste and freshness. In other words, many items, such as honey, are still totally safe to consume even after their expiration dates have passed.
Does honey go bad?
Honey is a non-perishable substance, unlike many other foods. When preserved in an air-tight container and not exposed to excessive moisture, it will remain safe to ingest for decades, if not centuries. This is due to the fact that honey has an inherent resistance to absorbing water molecules, making it an undesirable host for bacteria. This does not imply that it will have the same appearance or flavor as the original. Honey will darken, get cloudier, and crystallize as the years go by. If this occurs, there is no need to be concerned.
Can you return crystallized honey to its original state?
A perishable commodity, honey does not expire. When preserved in an air-tight container and not exposed to excessive moisture, it will remain safe to ingest for decades or even centuries. The reason for this is that honey has a natural resistance to absorbing water molecules, making it an undesirable host for bacteria to thrive in. The fact that it will appear and taste different does not imply that it will be identical. Honey will darken, get cloudier, and crystallize as the years go by, so be patient.
In spite of this, the honey is totally safe to eat.
What are some uses for honey?
Jamey’s Vinaigrette with Lemon and Thyme Jamey explains that he uses honey to make his famous lemon-thyme vinaigrette, which he describes as “simple, tasty, and distinctive.” To make a 5-cup batch, use the following ingredients:
- 6 tablespoons sherry vinegar, 1/2 tablespoon lemon juice, 1/6 cup honey, 1/6 cup dijon mustard, 1 tablespoon freshly picked thyme
- 2 cups extra virgin olive oil
- 2 cups orange juice concentrate season with salt and pepper to taste
The “Bless Your Heart” cocktail created by Jen. To make sure she didn’t get left behind, Jen revealed the recipe for her “Bless your heart” drink.
- The “Bless Your Heart” cocktail, created by Jen. To make sure she didn’t get left behind, Jen revealed the recipe for her signature drink, the “Bless your heart.”
Honey bun – Wikipedia
Honey bun
| Commercially-prepared honey buns | |
| Type | Sweet rollandsandwich |
|---|---|
| Place of origin | United States |
| Region or state | North Carolina |
| Created by | |
| Main ingredients | Honey,yeast,cinnamon |
Honey buns are a type of fried yeast pastry that has honey and a swirl of cinnamon in the dough and is covered with icing before being deep fried. Honey buns, in contrast to the majority of sweet rolls, which are often the output of bakeries, are an ubiquitous convenience store and vending machine item.
They are often offered individually wrapped, either alone or in boxes, and are a popular grab-and-go breakfast item that may be eaten cold or warmed.
Culture
In the United States, the honey bun has become a national symbol of hospitality. A variation of the food, called as an iced honey bun, is available that is frosted with icing. Honey buns are also used as cash in United States prisons, where they may be purchased from prison commissaries and exchanged for other items. As of 2010, 270,000 vehicles are sold every month in the state of Florida. In one well reported case, guards in Miami used honey buns to pay for the beating of a teenager in a youth detention center, which resulted in the death of the youngster.
History
According to mythology, Howard Griffin of Griffin Pie Co. in Greensboro, North Carolina, was the inventor of the first honey bun, which was created in 1954. Griffin Pie Co. was bought by Flowers Foods in 1983. Despite the fact that Flowers’ Greensboro bakery is no longer in operation, honey buns continue to be a top seller.
See also
- Cinnamon roll
- List of buns
- List of sweet breads
- Sticky bun
- Sweet roll
- Flowers foods
References
There is nothing more romantic than a cozy breakfast in bed on a Saturday morning! If you make these light and fluffy Honey Buns for Two, your honey bun will be grateful to you for the rest of his life! Whatever the occasion (a great weekend or a regular Tuesday), handmade food is the most meaningful present you could ever give someone else. In these modern times, Matt and I strive to maintain a house full of healthful snacks such as thisPB J Snack Mix or theseAir-Fryer Maple Blueberry Oatmeal on hand, but back in the day, he was all about the prepackaged honey buns from our childhood days.
- This recipe makes just four buns, which will be gobbled in 5 minutes flat, or you may reserve one for the afternoon or, my personal favorite, a midnight snack (see recipe notes).
- It’s ridiculously simple, and the most difficult step is just waiting for the dough to rise.
- The consumption of pastries is a weakness of mine.
- There’s something comforting about a warm loaf of soft doughy baked bread topped with sweet icing and enjoyed with a hot cup of coffee.
IngredientsSubs
- You might also use quick yeast instead of active dry yeast if you like. If you want to use instant yeast instead of active dry yeast, you may skip the process of dissolving the yeast in liquid and just add it to the dough right away. After that, you’ll add the water directly to the flour as well, rather than combining it with the yeast beforehand. Whenever you use instant yeast instead of active dry yeast, lower the amount of yeast you use by 25 percent. If you choose, you may substitute another flour blend for the all-purpose flour. I haven’t tested it with gluten-free flour, but I have had success with wheat flour. Whole milk – We require the fat content of whole milk in our application. Unsalted butter — You may also use salted butter, but you might want to reduce the amount of salt you use by a sprinkle. Egg yolks, granulated sugar, sea salt, and cinnamon are all used in this recipe.
Cooking in canola oil is recommended, although any neutral vegetable oil with a high smoke point will do.
For the glaze
- Pure vanilla essence
- Powdered sugar and honey
- Water
- Sea salt
How to Make
- In a small mixing bowl, whisk together the yeast and warm water until the yeast is completely dissolved. Allow for around 5 minutes till the foam appears. If your yeast does not froth, it is possible that it is bad, and you will need to experiment with different yeast. The ingredients for the dough are combined in the bowl of a stand mixer fitted with a dough hook: flour, milk, butter, egg yolks, sugar, salt, cinnamon, and yeast mixture. After stirring all of the ingredients combined, turn the mixer to low and continue mixing until the dough is soft and elastic. Increase the pace to medium-high and continue to beat for another 3 minutes. If you notice dry particles accumulating at the bottom of the mixer, you may need to stop the mixer every few minutes. Toss everything together with your hands, then continue kneading with the dough hook until you have a consistent ball of dough
- Lightly dust a work surface and roll out the dough on it once it has been lightly floured. Cover the bowl with plastic wrap and allow the dough to rise at warm room temperature until doubled in size, approximately 1 hour. The dough should be rolled out into a rectangle with dimensions of approximately 4 x 10 in. The cinnamon powder should be sprinkled on top of the dough and distributed evenly. The dough should be rolled into a log along the shortest side of the dough. The dough log should be cut into four pieces of similar size. By pushing on the sliced edges of the bun, you may make it a little flatter. If the ends appear to be fraying, try tucking them into one of the other layers to keep them from falling out. Place them on a baking sheet with the sliced side facing up. Cover and let aside for approximately 10 minutes while you heat the oil and prepare the glaze. While the buns are cooling, combine the powdered sugar, honey, water, salt, and vanilla in a large mixing bowl until there are no lumps. Pour 4 cups of oil into a 3-quart pot and bring to a boil. To measure the temperature, attach a candy thermometer to the pan’s side such that the bulb of the thermometer is submerged in the oil to be read. Heat the oil over medium-high heat until it reaches 355 degrees Fahrenheit. Fry one bun at a time in a hot skillet. Gentle lower the bun into the heated oil and let it to cook and brown for 1-2 minutes, or until it is golden brown. Fry for another 1 minute on the other side after flipping. For a further 15 seconds, rotate the bun in the oil, checking to make sure that every part of the bun is drenched with extremely hot oil. Remove the item and place it on a wire rack as soon as possible. Return the oil to 355 degrees Fahrenheit between batches and cook the remaining buns, transferring them to a wire rack when they are finished
- Allow the excess glaze to drip off the buns once they have been dipped in the glaze mixture. Even though the honey buns taste best when eaten immediately, they may be kept in an airtight container for up to 3 days
Can you bake?
Sure! The flavor of the typical fried honey buns will be absent, but they are still wonderful anyway! Preheat the oven to 350 degrees Fahrenheit while the honey buns are rising. After the buns have finished rising, take them from the plastic wrap and bake them for 15 to 18 minutes, or until they are golden brown.
How to store
If you’re frying the honey buns, they’re best eaten the day they’re created, which is terrible. You may preserve them in an airtight jar for up to two days, but the flavor won’t be as as wonderful as it would be otherwise. Just like a stale doughnut from the previous day.
If you fear you won’t be able to finish them all, refrigerate the buns and glaze separately and drizzle the glaze on when you’re ready to eat so they don’t become soggy. Baking them means they will survive 3 to 4 days if they are stored in an airtight container after baking.
Hot Tip
To check that your yeast is still active, measure out the warm liquid for your recipe and sprinkle the yeast and a pinch of sugar on top of the liquid, stirring well. Allow it to sit for a few minutes after you’ve stirred it. If the yeast is still alive and well, it will totally dissolve into the water and the liquid will begin to fizz and bubble. This is something I do every time I prepare a dough that contains live yeast since I’ve been fooled with dead yeast far too many times.
More Breakfast Recipes You’ll Love!
Donuts with a Pumpkin Creme Filling that are simple to make Bacon with Bourbon Brown Sugar Apple Breakfast Cookies with Cinnamon and Oats The old-fashioned way Cherry Breakfast Quesadilla with French Toast (Easy)
I hope youenjoythis recipe! Take a browse around the site andplease let me know if you make anything by leaving a comment and rating the recipe below. Don’t hesitate to reach out if you have any questions, concerns, or requests!
The original version of this piece was published on February 6, 2018.
Ingredients
- A 3/4 teaspoon active dry yeast, 1 tablespoon warm water, 1 cup all-purpose flour, 1/4 cup warmed whole milk, 1 tablespoon unsalted butter, softened, 1 large egg yolk, 2 teaspoons granulated sugar, 1/2 teaspoon sea salt, a pinch of ground cinnamon and 1 teaspoon ground cinnamon, divided
- 4 cups canola oil for frying
For Glaze
- A mixture of 1/2 cup powdered sugar, 1 tablespoon honey, 1 tablespoon water, a little sprinkle of sea salt, and 1/8 teaspoon pure vanilla essence
Instructions
- In a small mixing bowl, whisk together the yeast and warm water until the yeast is completely dissolved. Allow for around 5 minutes till the foam appears. If your yeast does not froth, it is possible that it is bad, and you will need to experiment with different yeast. The ingredients for the dough are combined in the bowl of a stand mixer fitted with a dough hook: flour, milk, butter, egg yolks, sugar, salt, cinnamon, and yeast mixture. After stirring all of the ingredients combined, turn the mixer to low and continue mixing until the dough is soft and elastic. Increase the pace to medium-high and continue to beat for another 3 minutes. If you notice dry particles accumulating at the bottom of the mixer, you may need to stop the mixer every few minutes. Toss everything together with your hands, then continue kneading with the dough hook until you have a consistent ball of dough
- Lightly dust a work surface and roll out the dough on it once it has been lightly floured. Cover the bowl with plastic wrap and allow the dough to rise at warm room temperature until doubled in size, approximately 1 hour. The dough should be rolled out into a rectangle with dimensions of approximately 4 x 10 in. The cinnamon powder should be sprinkled on top of the dough and distributed evenly. The dough should be rolled into a log along the shortest side of the dough. The dough log should be cut into four pieces of similar size. By pushing on the sliced edges of the bun, you may make it a little flatter. If the ends appear to be fraying, try tucking them into one of the other layers to keep them from falling out. Place them on a baking sheet with the sliced side facing up. Cover and let aside for approximately 10 minutes while you heat the oil and prepare the glaze. While the buns are cooling, combine the powdered sugar, honey, water, salt, and vanilla in a large mixing bowl until there are no lumps. Pour 4 cups of oil into a 3-quart pot and bring to a boil. To measure the temperature, attach a candy thermometer to the pan’s side such that the bulb of the thermometer is submerged in the oil to be read. Heat the oil over medium-high heat until it reaches 355 degrees Fahrenheit. Fry one bun at a time in a hot skillet. Gentle lower the bun into the heated oil and let it to cook and brown for 1-2 minutes, or until it is golden brown. Fry for another 1 minute on the other side after flipping. For a further 15 seconds, rotate the bun in the oil, checking to make sure that every part of the bun is drenched with extremely hot oil. Remove the item and place it on a wire rack as soon as possible. Return the oil to 355 degrees Fahrenheit between batches and cook the remaining buns, transferring them to a wire rack when they are finished
- Allow the excess glaze to drip off the buns once they have been dipped in the glaze mixture. Even though the honey buns taste best when eaten immediately, they may be kept in an airtight container for up to 3 days
Nutrition Information:
Yield:4Serving Size: 1Servings per container: Calories:230 13 g of total fat 6 g of saturated fat 0 g of Trans Fat 0 g of unsaturated fat Cholesterol:2mg Sodium:170mg Carbohydrates:26g Fiber:0.5g Sugar:13g Protein:2g