
Food
How To Make Asian Buns
Jan
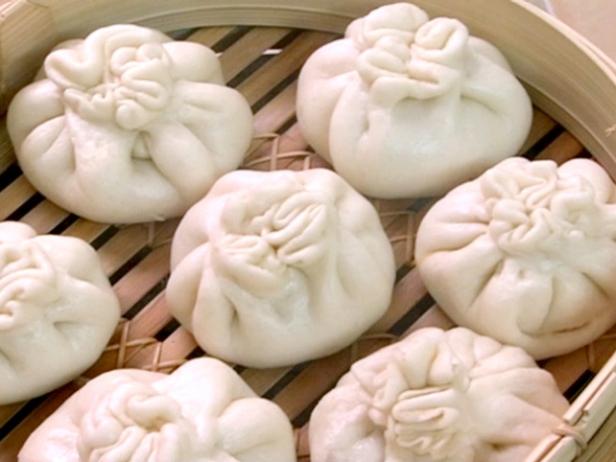
This recipe provided me with the smooth, fluffy texture that I was seeking. As a substitution for 1/2 cup warm water, I used 1/2 cup warm milk, which I believe helped to make the dough even lighter and fluffier than it already was. Because the dough was extremely sticky and difficult to work with, I had to add an additional 1/4 cup of flour to the recipe. It was only after the 3 hours for the first rising that I realized that the dough had a little sour flavor, similar to that of sourdough bread, which became more obvious after steaming the buns (I steamed a golf ball sized amount of dough to test for texture and taste before I rolled and steamed the rest of the dough).
To stuff the bread, I utilized a homemade beef filling recipe that I developed.
UPDATE: *Tip* I’ve successfully doubled the recipe without encountering any difficulties – use the same amount of yeast as in the original recipe (1 TB or around 1 envelope dry yeast), but double all of the other ingredients to achieve the desired result.
Most helpful critical review
Because I was making this recipe for the first time and didn’t want to wind up with an excessive amount of rolls if I didn’t enjoy them, I scaled it down to make 6 rolls instead of 24. While I’m not sure if this was due to the fact that I used allrecipes.com or the recipe itself, I found that I needed to add a LOT more flour than the recipe asked for in order to avoid turning the dough into a watery mush, which threw off the balance of the yeast, baking soda, and sugar. I basically ended up with chewy dinner rolls as a result of my efforts.
- There are 111 5star ratings, 57 4star ratings, 11 3star ratings, 7 2- and 1-star ratings, and 4 1-star ratings.
This recipe provided me with the smooth, fluffy texture that I was seeking. As a substitution for 1/2 cup warm water, I used 1/2 cup warm milk, which I believe helped to make the dough even lighter and fluffier than it already was. Because the dough was extremely sticky and difficult to work with, I had to add an additional 1/4 cup of flour to the recipe. It was only after the 3 hours for the first rising that I realized that the dough had a little sour flavor, similar to that of sourdough bread, which became more obvious after steaming the buns (I steamed a golf ball sized amount of dough to test for texture and taste before I rolled and steamed the rest of the dough).
To stuff the bread, I utilized a homemade beef filling recipe that I developed.
UPDATE: *Tip* I’ve successfully doubled the recipe without encountering any difficulties – use the same amount of yeast as in the original recipe (1 TB or around 1 envelope dry yeast), but double all of the other ingredients to achieve the desired result.
When you’re ready to consume them, simply place them in the refrigerator to defrost for at least overnight before steaming them for 10-15 minutes.
DO NOT allow the buns to come into contact with the water.
I stuffed it with red bean paste, similar to what I used to eat at home in Singapore, and it turned out to be far better than I remembered.
I made sure to follow the instructions to the letter.
However, measurements taken in cups are seldom very exact in any case.
Because I didn’t have a bamboo steamer (although it would have been better in a bamboo steamer because of the scent from the bamboo), I used Alton Brown’s excellent suggestion of putting holes in my disposable pie plate and placed it on top of a metal cookie cutter in a wok to steam the vegetables.
- At the very least, it isn’t enough to disturb me.
- Overall, we are quite pleased with it.
- Thank you so much for taking the time to share.
- All of the ones I’ve tried have failed to deliver the same level of flavor and light texture as this one.
- The dough is quite sticky.
- Due of the extended rise time, I added 1/2 tablespoon of baking soda to the dough to mitigate the “sour” taste that resulted.
- This allowed the dough to quadruple in size in little over an hour and a half (instead of 3.) I packed my buns with a meat/veggie combination and let the buns rise for a further 25 minutes before steaming them in a big steamer.
I think I ate four buns in a single sitting.
These buns didn’t turn out to be particularly white (like in stores.) But it was simply handmade buns, so it didn’t bother me at all!
Also, add little baking powder to your dough to make it more rise.
This is an opportunity to make some extra white buns!
TRY IT OUT AND SEE WHAT YOU THINK!
Everything turned out well, and everyone enjoyed themselves.
- The suggestions made by user Mukinsvivi ROCK made it possible for me to make steamed buns that were really delicious.
- You can punch it down in the manner specified in the directions.
- Obviously, I didn’t use the whole 3/4 cup, but I came very close.
- In order to prevent me from overdoing it, the extra flour was introduced gradually.
- As a result, my buns turned out very white.
- My steamed buns turned out to be rather huge, yielding around 12.
- Because my steaming pot is tiny, it took a long time to steam all of the buns, which were a little reluctant to cling on the steaming plate.
This allows the bottoms of the buns to dry thoroughly.
When I make these again, I might try stuffing them with fruit, just to see how they turn out.
They have a slight chewy texture and are quite light, almost “airy.” I used half of the dough to make 12 buns (as directed by the recipe), and the other half was used to make 6 medium-sized buns (see photo).
The little buns were more difficult to fill with meat filling and were far too fragile to handle.
When assembling the buns, keep in mind that the sides should be thinner than the middle.
I will continue to search for the “ideal” bun recipe, but I will have this one on hand as well.
If you create more than you intend to consume and store it in the refrigerator, remember that when food is not fresh, it becomes unpalatable.
Whether it was the fault of allrecipes.com or the recipe itself, I found that I needed to add far more flour than the recipe asked for in order to avoid turning the mixture into a watery mush.
I basically ended up with chewy dinner rolls as a result of my efforts.
Steamed bao buns
- 525g plain flour, with a little more for dusting
- 525g butter
- 12-tablespoon caster sugar, plus a pinch
- 1 teaspoon quick-action dry yeast
- 50mL milk, 1 tablespoon sunflower oil, plus additional for brushing on top and rubbing on the bottom of the bowl
- 1 tablespoon white vinegar
- 1 teaspoon baking powder
Method
- STEP 1Combine the flour, caster sugar, and 12 tsp salt in a large mixing basin until well combined (see tip). 1 tbsp warm water to dissolve the yeast and a pinch of sugar, then add it to the flour along with the milk, sunflower oil, rice vinegar, and 200ml water to make a dough. Bring everything together to form a dough, adding a little additional water if necessary
- STEP 2Turn the dough out onto a lightly floured work area and knead for 10-15 minutes, or until it is smooth and elastic. Placing the dough in a lightly oiled basin and covering it with a moist towel, allow it to rise for 2 hours, or until it has doubled in size. TO COMPLETE STEP 3: Dump the dough onto a clean work area and punch it down. Rolling out with your hands to flatten the dough, sprinkle over the baking powder, and knead for 5 minutes
- SIXTH STEP: Roll out the dough into a long sausage form that is approximately 3cm thick, then cut into pieces that are approximately 3cm broad – you should have 18 pieces total. Roll each piece of dough into a ball in the palm of your hand and let aside to rest for 2-3 minutes
- Then, one by one, using a rolling pin, flatten out each ball into an oval form that is approximately 3-4mm thick. Oil the dough ovals’ surfaces with a pastry brush, then brush a little oil over the end of a chopstick. Place a greased chopstick in the center of each oval and press down. STEP 6Cut 18 squares of baking paper and place a bun on each square. Fold the dough over the chopstick and slowly take the chopstick out of the dough. Transfer to a baking pan, cover with a clean tea towel, and let to prove in a warm area for 1 hour 30 minutes, or until doubled in size
- STEP 7: Preheat a large steamer over a medium-high heat until it is steaming. To steam the buns, steam them for 8 minutes, or until they are puffed up (you may need to do this in batches). Open each bun and stuff with our barbecued pork and pickled carrot mooli (recipe below). Consume them when they are still warm.
RECIPE TIPS
Up to the conclusion of step 3, the dough may be readily prepared in a mixer fitted with a dough hook.
FREEZING THE BUNS
The buns can be frozen once they have been cooked. Simply reheat in a steamer once it has been defrosted.
Goes well with
Recipe adapted from the February 2015 issue of Good Food magazine.
These Steamed Buns Can Be Filled With Anything Your Heart Desires
They may not be the most attractive steamed buns you’ve ever seen, but don’t let their appearance fool you: they are among the best steamed buns I’ve ever eaten, and they rate high on my list of the best steamed buns I’ve ever eaten. Making steamed buns that resemble beauty queens may take some effort, but the important thing to remember is that what’s on the inside is what counts. Soft but not too cakey, tender yet with a tiny chew, with a faintly sweetened flavour that goes nicely with, um, just about everything.
- I’ve included three different filling alternatives, all of which can be prepared a day ahead of time: a hearty cabbage-pork combination, a versatile miso-carrot mixture that can be turned vegan or pescatarian, and a sweet red bean paste variation that may be served as dessert.
- The steamed bun, known in Chinese as (baozi), literally translates to “a small package”; at its essence, it is a modest bread home that welcomes everything your heart wishes to cram into it and may be consumed at any time of day, on any day of the year.
- In order to maintain consistency in flavor and make the process a bit more accessible for our modern-day lifestyles, I’ve decided to utilize commercial dry yeast in this version of the recipe.
- Traditionally, Chinese steamed buns are made with a special sort of low-protein all-purpose flour, which can be difficult to come by in many regions of the United States.
- First, mix a water roux with cornstarch to maintain the bun texture airy but not dry and powdery.
- This moderately cooked gelatinized mix, which is similar to a tangzhong starter that is widely used in milk bread recipes, will give your bun a little bounce and ideal tackiness.
- Using a microwave or stovetop, bring a portion of the milk to a simmer and whisk it into the flour before adding the remaining milk and bloomed yeast mixture.
Dough made by hand versus dough made with a stand mixer If you’re working by hand, bring the dough together and knead it just until it comes together as a cohesive dough with no dry pockets to avoid burning out your arms and aggravating carpal tunnel syndrome.
Return to the basin after 30 minutes and you will notice that the dough has softened and is simpler to knead than before.
Repeat this fast fold two more times on your dough, and your dough should be ready to use.
I prefer to see and feel the dough transform underneath my hands during the process (it’s extremely peaceful and therapeutic!).
To plead or not to plead?
You’ll want to pleat these buns if you want them to have a typical savory steamed bun appearance.
As with anything else, repetition is key to success.
One hand should be used to fold and hold the pleats in place while the other supports the bottom of the bun and continually presses the filling into the dough to ensure that it is completely enclosed.
If the thought of making a mess of pleated buns gives you the same level of anxiety that I had when making these, you can simply cinch the edges together and flip the bun upside down so that the seams are on the bottom instead of the top.
How to prepare your buns for steaming You may either use a metal steamer basket that fits into a deep pot or traditional bamboo steamers to cook your vegetables and grains.
Because they will expand by at least 2 inches throughout the proofing and baking process, make sure there is at least 2 inches of room between each bun.
Allowing the buns to proof uncovered will result in a glossy, chewy skin developing on the buns.
Allow the dough to prove for a longer period of time, about 1 hour, for a fluffier bun.
Gradual heating and cooling will result in a smoother surface on your buns as well as a more uniformly baked bun when you use this method.
After covering your steamer and turning on the heat, wait until the water comes to a boil before turning the heat down to medium-low.
Uncovering the buns immediately may cause them to shrink and wrinkle as a result of the cold air being sucked into them right once.
– In order to reheat, resteam the vegetables in a steamer basket or in the microwave with a separate dish of boiling water nearby (to simulate a steam environment).
June Xie is a Chinese actress.
Visiting their website may allow you to access the same stuff in a different format, or it may provide you with even more information than you could get elsewhere.
This material was generated and maintained by a third party and imported onto this website in order to assist users in providing their email addresses for further consideration. You may be able to discover further information on this and other related items at the website piano.io.
Asian Steamed Buns
These Asian Steamed Buns will impress all of your guests and family members. If you’re a fan of bao buns like I am, you’ll want to know how to make them yourself at home. Asian buns are time-consuming to make, but they are well worth the effort. When it comes to personal shortcomings, this is a significant one for me. Steamed buns from Asia. They are light and somewhat sweet, and they transport a wide variety of fillings. Additionally referred to as Bao, these buns may be filled with whatever you want.
- Preferably something savory, sweet, and spicy all at the same time, but not too sweet or hot.
- Because we have to prepare the buns first before we can start on the fillings, and I must warn you that this is not a task for the faint of heart.
- The majority of the inspiration for this dish comes from David Chang of Momofuku.
- When I was reading through his recipe, there were a few of stages that caught me by surprise.
- Instead, you sprinkle it on top of the dough after it has gone through its initial rise.
- I wish I could have grasped the physics underlying that maneuver.
- Allow it to continue to rise for another 30 minutes.
Allow them to rest for a further 30 minutes.
After the dough has been allowed to rest, flatten out the dough balls into ovals on a floured surface to finish baking.
Fold it in half.
Place the buns inside the container.
Reduce the heat to a gentle simmer.
Cover the saucepan with a lid.
Cool the buns on a wire rack once they have been baked.
with Bulgogi PorkorAsian BBQ Pulled Pork with a spicy kick.
A participant in the Amazon Services LLC Associates Network, an affiliate advertising program designed to provide a method for sites to earn advertising fees by promoting and referring to Amazon.com, GarlicZest is a participant in the Amazon Services LLC Associates Program.
Asian Steamed Buns
These steamed buns are the ideal vessel for a variety of Asian-inspired fillings! CourseSide DishCuisineInspired by Asian Cuisine Preparation time1 hourCooking time2 hoursTotal time3 hoursServings6 time3 hours
- 1-1/2 cups warm water heated to 105-115 degrees, divided
- 1 teaspoon active dry yeast
- 3 tablespoons plus a pinch of sugar, divided
- 2 tablespoons nonfat dry milk
- 3-1/2 cups cake flour
- 1 1/2 teaspoons baking powder
- Canola oil for brushing bowl
Special equipment:
- A bamboo steamer with a lid
- A big pot with a lid large enough to accommodate the bamboo steamer
- 1/4 cup warm water, yeast, and a sprinkle of sugar are combined in a separate bowl. Allow to stand for 5 to 10 minutes, or until frothy. (If the mixture does not froth, add more yeast and repeat the process.) Whisk in the dry milk and the remaining 3/4 cup warm water until well combined
- In a separate bowl, whisk together the flour and the remaining 3 tablespoons sugar until well combined, then fold in the yeast mixture (do not add baking powder yet) until a dough forms. Using your hands, knead the dough in the bowl until all of the flour is incorporated. Turn out the dough onto a floured surface and knead it for approximately 5 minutes, coating the surface and your hands with just enough flour to keep the dough from sticking, until the dough is elastic and smooth but still somewhat soft. Form the dough into a ball
- Place the dough in a large basin coated with oil and flip to coat. Remove plastic wrap from dough and allow it to rise in a draft-free location at room temperature for about 2 hours, or until it has doubled in size. After punching down the dough, take it to a lightly floured surface and flatten it slightly into a disk with your hands. Bake for 15 minutes at 350°F. Sprinkle baking powder over the center of the dough, then gather the edges and pinch to seal in the baking powder. Knead the dough with just enough flour to keep it from sticking together until the baking powder is completely mixed, about 5 minutes total. Return the dough to the bowl and cover it with plastic wrap, allowing it to rest for 30 minutes. Cut 16 (3-by-2-inch) sheets of parchment paper
- Divide the dough into two equal circles and bake for 30 minutes. Cut each circle into eight pieces that are equal in size. the next step is to gently sprinkle the dough with flour and shape it into balls Place the dough balls on a baking sheet and cover with plastic wrap, allowing the dough to rise. 30 minutes should be given to the dough to rest before proceeding. Prepare 1 piece of dough by rolling it into a 6-by-3-inch oval on a lightly floured surface (as well as your hands and rolling pin). Remove any extra flour from the oval by patting it between your palms, then lay one of the little pieces of parchment paper over half of the bun and fold the other half over the parchment paper to seal the bun. Place the bun on a piece of parchment paper on a large baking sheet and lightly wrap it with plastic wrap to keep it from drying out. Make more buns with the leftover dough and set them aside, loosely covered, for approximately 30 minutes, or until they are slightly risen. Preparing a steamer rack or bamboo steamer (that will fit inside your pot or wok) with parchment paper will help to keep the food from sticking
- Set a big steamer rack (bamboo steamer) inside a large pot (or wok) and fill the pot with enough water to come halfway up the sides of the rack, then bring the pot to a boil. Reduce the heat to a slow, continuous boil. Place the bunsin steamer rack in the center of the room (do not let buns touch). Cover closely and steam for approximately 3 minutes, or until the buns are puffed and cooked all the way through. Buns should be transferred to a dish using tongs. Discard the wax paper and cover the buns loosely in kitchen towels to keep them warm. The remaining buns should be steamed in batches, adding boiling-hot water to the skillet as necessary. It is recommended to steam the buns until totally cool before wrapping them securely in two layers of plastic wrap and chilling for up to 1 day or freezing for up to 1 week. (In the refrigerator, thaw frozen buns that have been covered in plastic wrap.) Preheat oven to 350°F and bake buns, covered in a wet kitchen towel and securely wrapped in foil, for 15 minutes or until soft and cooked through.
302 calories|61 grams of carbohydrates|10 grams of protein|1 gram of fat|16 milligrams of sodium|237 milligrams of potassium|2 grams of fiber|7 grams of sugar|55 milligrams of vitamin A|0.2 milligrams of vitamin C|86 milligrams of calcium|0.8 milligrams of iron
Pin “Asian Steamed Buns” For Later!
Steamed bunsormantou are made from cotton and are soft, puffy, and fluffy. This recipe for Chinese steamed buns is simple, fast, and completely fail-proof, requiring only 20 minutes of active preparation time!
Mantou
Chinese steamed buns, also known as mantou (), are one of the most famous steamed bun recipes in the world of Chinese cuisine. In this post, you will discover the quickest and most straightforward method for making handmade steamed buns, often known as mantou buns. This recipe is really quick, simple, and completely fail-proof. A plate of steaming hot buns will be ready in less than 1 1/2 hours, including proofing time, if you follow the recipe exactly.
Steamed Buns Recipe
Even while mantou buns may be purchased from Chinese grocery shops or restaurants, they are quite simple to cook at home. My steamed buns recipe just calls for four (4) essential components, which are listed below: Although I prefer milk in my mantou recipe, you may use water or soy milk if you like. You may use low-fat or skim milk for whole milk in this recipe, but I recommend using whole milk for the best results.
How to Make Steamed Buns?
Making mantou may be accomplished in two ways. Traditionally, mantou are produced entirely by hand using natural materials. Hands are used to knead the dough together. My approach is the quickest and most straightforward method available. To begin, put the milk, yeast, and sugar in a large mixing bowl. As a result, you will save time because there is no need to “activate” the yeast beforehand. Following that, I kneaded the dough for 6 minutes in a stand mixer fitted with a dough hook. Afterwards, I molded the dough into a log and divided it into eight equal pieces.
Frequently Asked Questions
Even though I don’t advocate freezing them, they may surely be kept in the refrigerator. Leftovers should be placed in a plastic bag and stored in the refrigerator for up to one week. To prepare them for serving, simply reheat them for 1 minute in a steamer or microwave.
How to Make Chinese Steamed Buns Whiter?
Although I do not advocate freezing them, you may store them in the refrigerator. Refrigerate any leftovers for up to a week after putting them in a zip-top bag. To prepare them for serving, simply reheat them for 1 minute in a steamer or in the microwave.
Can I Use this Recipe to Bake Baozi or Bao?
Yes, it is possible. Baozi () or bao are steamed buns with fillings that are popular in China. Steamed bao buns are essentially mantou buns with a filling in the middle. It makes use of the same dough recipe as before.
Is Chinese Steamed Buns the Same as Korean or Japanese?
Some of the dishes in Korean recipes and Japanese recipes are descended from Chinese cuisine.
Steamed bao buns made in Korea and Japan are extremely similar to Chinese bao buns in taste and appearance.
How Many Calories Per Serving?
Some of the recipes in Korean recipes and Japanese foods are derived from Chinese dishes. Steamed bao buns made in Korea and Japan are extremely similar to Chinese bao buns in flavor and appearance.
What Dishes To Serve with this Recipe?
Mantou is best served with condensed milk or soy milk. I offer the following recipes for a filling and nutritious Chinese breakfast. Learn how to make quick and easy dinners! Preparation time: 20 minutesPreparation time: 10 minutes Extra Time is available. 1 hour and 30 minutes Time allotted: 1 hour and 30 minutes
Ingredients
- 2 1/2 teaspoons sugar
- 350 g (12.3 oz or about 2 3/4 cups) all-purpose flour
- 1 cup milk
- 1 teaspoon active dry yeast
Notes
When measuring the flour, please use metric measurements. Whole milk, low-fat milk, and skim milk are all acceptable options. You may use water or soy milk for the milk in this recipe. You may use 1/2 cup heavy whipping cream and half cup whole milk to get the greatest flavor. For those who don’t have access to a stand mixer, knead the dough by hand for 15-20 minutes, or until the dough is smooth on top. If the dough is still sticky after 6 minutes of kneading, you can add another 1-2 teaspoons of flour to help bind the dough together.
To begin, fill the pan or skillet halfway with water, then add a small bowl.
It is possible to lay the steamed buns on a plate and cover the pan or skillet with its lid to keep them steaming.
Nutrition Information
When measuring the flour, please use metric units. Full-fat milk, low-fat milk, and skim milk are all acceptable options for this recipe. Water or soy milk can be substituted for the milk in these recipes. You may use 1/2 cup heavy whipping cream and half cup whole milk to get the greatest taste. For those who don’t have access to a stand mixer, knead the dough by hand for 15-20 minutes, or until it is smooth on the surface. When you have kneaded the dough for 6 minutes, you may add 1-2 teaspoons of flour to help bind the dough together.
Fill the pan or skillet halfway with water before adding a small dish of flour.
In order to keep the steam going, you can set the buns on a plate and cover the pan or skillet with a lid.
How to Make Steamed Bao Buns (Gua Bao Buns)
Do you enjoy bao buns? They’re wonderful for adding an Asian flair to sandwiches, and because they’re created with such simple ingredients, they’re even better than buying them from the bakery in the first place! Bao buns are a wonderful thing to have on hand at all times. Gua Bao is a dish that I particularly enjoy creating, and that is where these bao buns come in. They are a necessary element in the preparation of gua bao, however a variety of other delights can be placed inside these buns as well.
When it comes to the fillings, you have a lot of freedom.
Steamed bao buns have a light, fluffy texture, which is due to the steaming process. The fact that they’re created with such basic ingredients means that you should already have everything you need to prepare them in your cupboard.
Bao Buns cooking process
While the components are simple, the method of creating steamed bao buns may be a little difficult, even with the simple ingredients. So, when you check down below, you’ll find I’ve prepared extremely extensive step-by-step directions, along with images and a video, so you’ll feel as if I’m right there with you in your kitchen, preparing delicious bao buns. I’ve also attached some troubleshooting notes for your reference.
Part 1 – prepare the dough1st rise
- In a large mixing bowl, combine all of the dry ingredients
- Add the wet ingredients to the dry ingredients
- Then, using an electric mixer (although this step can be completed by hand), knead the dough. Allow the dough to rest for 10 minutes once it has been covered. Knead the dough for a minute or two. Allow the dough to rest for another 1 hour or more.
Part 2 – divide the dough
- In a large mixing basin, whisk together all of the dry ingredients. Add the wet components to the dry ingredients and combine well. Use a mixer to knead the dough (this step can be completed by hand, if you prefer.) Allow the dough to rest for 10 minutes after covering it with a damp cloth. Work the dough for one minute. Retiring the dough for around 1 hour is recommended.
Part 3 – form the buns, 2nd risecook
- Each dough ball should be rolled out into a long oval shape. Apply oil to it (this will allow the bun to split more readily afterwards)
- To form the bun, fold the oval dough in half. Place it on a piece of parchment paper
- Then fold it in half. Allow the buns to rise one more before baking
- In the case that you’re using a metal steamer, place some towels beneath the lid to prevent the water from leaking onto the buns. Before serving, steam the buns for a few minutes and then set them aside, covered with a lid. You may either serve the buns right now or save them in the freezer for later use.
The keys to making bao buns and troubleshooting
This is a fairly typical problem with steamed buns, and it’s usually caused by a rapid rise and/or drop in pressure when the buns are being steamed. You should do the following to avoid it:
- Slowly bring the bun dough to a boil in the steamer. Do not bring the water to a boil in the steamer and immediately add the steaming rack. Instead, lay the steamer over the pot of water and begin cooking immediately. As a result, the temperature of the steamer rack would steadily rise
- During the steaming process, use a medium or medium-low heat setting. A combination of high heat and fast steam may also cause the buns to burn. After cooking the buns, allow them to cool for at least 10 minutes without lifting the cover. This is critically crucial. As a result, the pressure in the steamer will gradually decrease.
The buns deflate after steaming
Over-proofing is frequently the source of this problem. If the dough has risen too much, it will expand during the cooking process before collapsing. However, the problematic part is that the proofing time can vary significantly depending on your location and the components you choose (e.g. how fresh your yeast is). In order to avoid this problem, we utilize instant yeast instead of active dry yeast in our recipe. You will, however, need to keep an eye on the dough and use your judgment and expertise to determine when the dough has risen sufficiently.
The buns have expanded too much and look weird
Excessive proofreading might also contribute to this problem. The buns will be particularly fluffy after they are finished baking, and this will have no effect on the flavor, but they will not be as attractive. In order to get the solution, you can refer to the text above.
Afterthoughts
Making flawless bao buns takes a little patience and a lot of experience, but it is possible. However, the end effect is quite satisfying. Once you’ve created them, you’ll discover a plethora of applications for them. Make sandwiches out of them using leftover meat from supper and fresh vegetables, and take them to work for lunch. Add some quick pickled shallots to them for an extra kick of flavor. Believe me when I say that you will discover ways to make bao buns a mainstay in your kitchen. Because making bao buns is a time-consuming procedure, you may (and should!) create more than one batch.
After that, it would be simple to indulge in bao buns whenever the mood hits.
How to use bao buns
Bao bun perfection does need a little patience and practice on the part of the maker. The end outcome, on the other hand, is quite satisfying. There are numerous applications for your creations once you’ve finished them. Make sandwiches out of them using leftover meat from supper and fresh vegetables, and take them to work with you to work. For an extra kick, toss in some fast pickled shallots. It’s true: there are several ways to include bao buns into your cooking routine. It is possible (and recommended!) to make extra bao buns because they are a time-consuming recipe.
It’s easy to store them in the fridge or freezer, so you can have a supply on hand. You’ll have no trouble enjoying bao buns whenever the mood strikes you then! To see one of the greatest ways to eat your bao buns, check out my recipe for Gua Bao.
- Chinese BBQ Pork (Char Siu, )
- Chinese Bang Bang Chicken (Bang Bang Chicken, )
- Chinese Pickled Peppers (Quick Pickled Pao Jiao)
- And more dishes. Duck Breast with Moo Shu Vegetables and Homemade Hoisin Sauce
- Crispy Chinese Duck Breast
Are you interested in learning more about Chinese cooking? To receive the 5-Day Chinese Cooking Crash Course and recipe updates, please sign up for my mailing list here. Be the first to know about new recipes from our 5-Day Chinese Cooking Crash Course! Subscribe
How to Make Steamed Bao Buns (Gua Bao Buns)
- Do you enjoy bao buns? They’re wonderful for adding an Asian flair to sandwiches, and because they’re created with such simple ingredients, they’re even better than buying them from the bakery in the first place! Course:Side Cuisine:Chinese Keyword:restaurant-style Preparation time: 30 minutes Preparation time: 20 minutes 1 hour and 30 minutes of resting time Time allotted: 2 hours and 20 minutes
- 2 cups all-purpose flour
- 3g (1 teaspoon)instant yeast
- 3g (1 teaspoon)baking powder (double-acting)
- 10g (2 teaspoons)sugar
- 1/8 teaspoon salt
- 180ml (3/4 cup)full-fat milk, cool or at room temperature
- Vegetable oil for brushing
- 290g (2 cups)all-purpose flour
Form the Dough + 1st rise
- In the bowl of a stand mixer fitted with the paddle attachment, combine the flour, yeast, baking powder, sugar, and salt. Slowly pour in the milk, stirring constantly using a spoon or spatula to incorporate the flour. Once the liquid has been completely incorporated, switch on the mixer and knead for 5 minutes, or until the dough has formed a hard and gritty ball. Alternative method: Knead the dough with your hands for about 10 minutes until it becomes smooth and elastic. Allow the dough to rest for 10 minutes once it has been covered with plastic wrap. After 10 minutes, knead the dough with your hands for another minute or so, until it is smooth and elastic. Wrap the dish with plastic wrap. Allow the dough to rest for approximately 1 hour, or until it has doubled in size. While the dough is rising, cut out 10 squares of parchment paper approximately the size of your hand to use as a steaming tray for the buns while they steam
- Optional: If you’re cooking the gua bao filling and quick pickled shallots on the same day, prepare them at this time
- Otherwise, wait until the next day.
Divide the dough
- As soon as the dough has doubled in size, gently punch the dough with your palm to remove the air bubbles trapped inside. Knead the dough for 1 minute
- Divide it into 2 equal pieces, and then further split each piece into 5 smaller pieces
- Set the dough aside. In order to achieve a more exact result, weigh the dough to ensure that it weighs 48 grams each piece on the scale
- Using one at a time, work on the dough pieces, shaping them into balls by squeezing the loose ends into the base until the dough is tight and spherical. Then, using a hand that is formed like a dome, roll the dough on the table, softly pushing the dough to make a spherical ball. To keep the dough balls from drying out, place them on a big platter and cover them with plastic wrap
Shape the buns2nd rise
- Place the dough balls on a clean work area with the pinched side facing down. Roll each ball into a 1/4′′ (1/2 cm) thick oval that is twice as long as it is broad (about 2.25″ x 4.5″/ 5.5 cm x 11 cm) with a rolling pin. In order to smooth out the dough oval, flip it over and softly roll it again. Brush a small coating of oil on the top of the dough oval (*Footnote 1), fold the oval in half, and set it on a piece of parchment paper that you previously prepared
- Stack the formed buns in a steamer basket, allowing at least 1 inch (2.5 cm) of space between each bun. Cover and let aside for another 15 to 30 minutes before cooking, or until the dough has increased in size by 1.5 times.
Cook the buns
- As soon as you have finished shaping the first batch of buns, start preparing the steamer by filling the bottom with water. When the buns have risen for the second time, place the covered steamer rack with the raised buns over the steamer and cover the steamer with a lid. In order to prevent water from leaking through the lid of a metal steamer, place two layers of clean kitchen towels between the steamer rack and the container lid. Cook, covered, over medium heat until steam begins to escape from the pot, then reduce the heat to medium-low and continue cooking until the steam stops. Continue to steam for another 10 minutes
- After 10 minutes, turn off the heat but keep the cover on for another 5 minutes to finish steaming. Close the cover tightly for the time being. If the buns are not given enough time to rest, they may deflate. Remove the buns from the oven and place them on a wire rack to cool. The rest of your buns may be cooked in the same steamer as the first batch.
Workflow note
- It is likely that depending on the size of your steamer, you may need to cook the buns in many batches. While you’re heating the first batch of buns, the second or third batches of buns may have been created and rested while you were cooking the first batch. In this scenario, put the buns to a large dish and wrap them tightly in plastic wrap to keep them fresh. Place the buns in the refrigerator to allow the rising to be slowed. Wait until the previous batch of buns has been baked and cooled. Start by removing the buns from the fridge and allowing them to come to room temperature for 2 minutes before beginning to steam them. It is critical not to allow the buns to rise too much throughout the baking process. If the buns are allowed to rest for an excessive amount of time, they will get deflated when steamed.
Serve, storereheat
- Once the buns have been steamed and allowed to cool somewhat, you may use them to create gua bao, serve them with moo shu chicken, or stuff them with any braised meat of your choice. Storage options include storing the steamed buns in an airtight container in the refrigerator for up to 4 days or in a firmly sealed ziplock bag in the freezer for up to three months. If you want to reheat the chilled buns, set them on a dish and cover them with a layer of damp paper towels before heating them in the microwave. If you like a softer outcome, you may steam the buns instead of baking them. In order to reheat the frozen buns, place them immediately in a steamer without first thawing them, and steam until they are completely melted. The buns should be thawed before reheating in the microwave
- Else, they will be soggy.
- If you steam and gently chill the buns, you may use them to create gua bao, serve them with moo shu chicken, or stuff them with any braised meat of your choosing. Storage options for steamed buns include an airtight container in the refrigerator for up to 4 days or a firmly sealed ziplock bag in the freezer for up to 3 months. To reheat the chilled buns, set them on a dish and cover them with a layer of damp paper towels, then heat them in the microwave for 30 seconds or until warm. If you like a softer outcome, you may alternatively steam the buns before baking them. The frozen buns should be placed immediately in a steamer without being thawed beforehand and steam until completely cooked through. For the best results, make sure you defrost the buns beforehand before reheating them in the microwave
Serving:1serving, Calories:118kcal, Carbohydrates: 24g, Protein: 3.5g, Fat: 0.6g, Saturated Fat: 0.2g, Cholesterol: 1 mg, Sodium: 37 mg, Potassium: 72 mg, Fiber: 0.9g, Sugar: 1g, Calcium: 14 mg, Iron: 1 mg Please let us know if you give this dish a go. Comment, rate it (once you’ve tried it), and upload a photo to Instagram with the hashtag #omnivorescookbook to show your support! I’m looking forward to seeing what you come up with.
More homemade dim sum recipes
- Baked BBQ Pork Buns (Char Siu Bao)
- Chinese Scallion Pancakes ()
- Pineapple Buns (Bolo Bao)
- Wonton Soup
- Chinese Turnip Cake (Lo Bak Go, )
- Chinese Turn
Lilja Walter is a member of the Omnivore’s Cookbook team, and she collaborated with Maggie on the development and testing of this particular dish.
Mantou (馒头), Chinese steamed buns
A simple and quick method for making Mantou, or Chinese steamed buns. You will be successful if you follow my precise instructions and watch my lesson video. Mantou (Chinese steamed buns), which are traditionally served during the Chinese New Year (Spring Festival, ), are a traditional dish to celebrate the occasion. This was a necessary ingredient in my mother’s preparations for the most significant event of the year, which took place a few days prior. We created dozens of them in a variety of forms and had a great time eating them during the whole Christmas season.
What is Mantou?
Mántóu (), also known as Mó (), is a Chinese term for simple steamed buns that have their origins in China. They are typically produced from white wheat flour, but other components such as maize flour, sweet potato, and pumpkin may also be used to make the dough, depending on taste. Mantou is a popular staple in Chinese cuisine, and it has a prominent position at the dinner table. Mantou is also a celebratory delicacy that is made during the Chinese New Year in certain places of northern China.
HU jun (, flower rolls) is another famous variant of Mantou, and it is made out of layers of buns seasoned with herbs, spices, and oil.
A quickeasy recipe
In contrast to the conventional approach, which relies solely on yeast as a rising agent, my Mantou recipe asks for both yeast and baking powder, which makes the baking process easier and faster. You may create excellent Mantou using only yeast if you follow the double-proofing technique, which is as follows: Allow the dough to rise until it has more than doubled in size. Individual buns should be formed and allowed to rise again before steaming. This process takes 1-2 hours altogether, depending on the room temperature (my article ” Steamed Bao Buns ” employs the conventional method in this regard).
After the dough has been made, you may begin shaping the buns. Simply allow the buns to rise for around 30 minutes before steaming them. It’s a more efficient and straightforward dish, making it a fantastic choice for busy or inexperienced home chefs alike.
How to make the dough
My recipe yields 6 medium-sized round Mantou, or 4 flower-shaped buns topped with Chinese dates, depending on how large you want them. Here’s what you’ll need to have on hand:
- 250g all-purpose/plain flour
- 1 teaspoon dried active yeast
- 3 tablespoons baking powder
- 1 tablespoon sugar, or to taste
- 1 teaspoon salt 130ml lukewarm water
- 4 Chinese dates (for flower-shaped buns alone)
- 1 teaspoon baking powder
The procedure is straightforward: combine the flour, yeast, and baking powder. Slowly pour in the water. Combine all of the ingredients and knead into a very smooth dough. It should be medium-firm in order to prevent it from sticking to the hands or the work surface.
Knead by hand
The process of kneading the dough by hand until it has a very smooth texture might be time-consuming. To make the process go more smoothly, I always allow the dough to rest for a short period of time once all of the ingredients have been coarsely incorporated. After that, knead the dough until it looks to be uniformly smooth.
Use a stand mixer
Making the dough in a stand mixer is a simple process. Knead for approximately 8 minutes at a low pace. Remove the dough from the bowl and knead it by hand for 1 minute to finish it off.
How to shape Mantou
The dough is now ready to be used. You now have the opportunity to mould them into the shape of your choice (No need to rest before shaping). Divide the dough into equal portions and then work on one section at a time until the dough is finished. For this recipe, I cut them into two distinct shapes (please see my video lesson for more information):
Regular round shape:
- Kneading and folding the dough towards the center of the ball without flipping it over are important steps in the process. In the process of forming the ball, this will result in a smooth exterior surface. As soon as you’ve finished this step, twist the ball between your palms to create a slightly elevated shape.
Festive flower shape:
- Form the dough piece into a long, thin rope by rolling it up tightly. Fold both ends in a “J” shape in opposite directions to form a teepee shape. Then, with each end of the rope towards the center of the rope, bring them together until they connect. Take a pair of chopsticks and place one on either side (in the middle) of the flower shape, then compress to make a flower. Once this is done, insert a Chinese date into the center of the flower.
How long to rest Mantou
My simple Mantou recipe simply takes one period of resting time (unlike the traditional method explained inSteamed Bao Buns). After forming the buns, lay them in the steamer basket to rest for a few minutes before serving. Make careful to allow plenty of space between each bun because they will expand by a factor of two after cooking. The amount of resting time necessary varies based on the temperature of the room. It takes me 30 minutes in a room with a temperature of around 25°C/77°F. Consequently, if it’s cooler in your area, you should lengthen the duration a little, and vice versa.
When the dough is gently pushed, it returns to its original shape.
How to avoid bun collapsing
Are you looking forward to achieving a smooth, faultless completed appearance? If this is the case, avoid overproofing the buns. As can be seen in the image above, the smooth one on the right was allowed to rest for 30 minutes before being steamed in the microwave. The wrinkled one on the left had a 45-minute rest period after a long day. As a result of the extra air trapped inside the bun due to over proofing, a large air pocket has formed inside the bun while it is steaming. It crumbled as soon as the cooking was halted.
I can assure you that this advise has no value after putting it through a number of tests. Because the dough has been properly prepared and rested, you may remove the cover immediately after turning off the heat if you have followed my instructions exactly (just like how dim sum chefs do).
How to steam Mantou
When it comes to bun manufacturing, bamboo steamers are the most effective. Because bamboo is a “breathable” material, the steam does not condense on the surface of the bamboo. Some people say that it imparts a natural bamboo scent to the buns as well as this.
Wrap the lid if using metal ones
If you’re using a metal steamer, I recommend wrapping the metal or glass lid with a clean tea towel before using it. The moisture that forms during the steaming process will be absorbed by the cloth rather than pouring onto the buns, which will impact their smooth look.
Line the basket or brush oil
In order to prevent the buns from adhering to the steamer, you must line your basket with steamer parchment paper, such as the one seen in my photographs (They are available in Asian shops or major online shopping platforms). You may use standard parchment paper to cut out circles and set them below each bun, if you want. In order for them to fit, they must be larger than the uncooked buns. Alternatively, a small coating of oil can be applied on the basket with a brush. It’s very efficient when utilizing metal steamers, as the name implies.
What do you eat with Mantou?
Traditionally, mantou has been a mainstay of many northern Chinese home dinners. Families would eat mantou with many savoury meals, which were typically followed by something less substantial, such as congee, soup, or other similar dishes in the same way that you would eat rice. It’s also a popular breakfast option. Sauces such as fermented bean curd (F R/), black bean sauce (), and other savory condiments can be used to dress the dish up a little. Alternatively, serve it as a burger, sliced open and topped with a fried egg.
When eating mantou as a sweet snack, it is highly traditional to dip it into condensed milk before eating it.
How to store and reheat
It’s so convenient to have some Mantou ready to go when you’re in the mood for them. Once your remaining buns have been allowed to cool fully, store them in an airtight container or plastic bag. The items can be stored in the refrigerator for up to 4 days or in the freezer for up to 2 months. When steamed buns are left out in the cold, they tend to get rigid and hard. You can just reheat them in the steamer to restore their softness and fluffiness after they have been frozen. It takes around 4 minutes for those maintained in the refrigerator and 6 minutes for those kept in the freezer (no need to defrost).
- 250 g all-purpose or plain flour
- 1 teaspoon dried active yeast
- 3 teaspoons baking powder
- 1 teaspoon sugar, or more to taste Water (130 milliliters)
- 4 Chinese dates (optional), for flower-shaped buns (130 milliliters)
Prepare the dough
- IF KNEADING BY HAND: Combine the flour, yeast, baking powder, and sugar in a large mixing bowl. Slowly pour in the water. Mix with chopsticks or a spatula until there is no more loose flour visible. Combine the ingredients and knead quickly to form a dough. Allow for a 10-minute resting period (covered). Knead the dough once more until it is extremely smooth. If you’re using a stand mixer, combine the flour, yeast, baking powder, sugar, and water in a large mixing bowl. Knead on a low speed for about 8 minutes, or until a very smooth dough is formed.
Shape the buns
- IF YOU’RE MAKING ROUND BUNS: Divide the dough into 6 equal-sized portions (4 pieces if you prefer bigger buns). The dough should be kneaded and folded inwards towards the center of the ball, resulting in an exterior surface that is smooth. Please refer to the video below for an example of how to rotate the ball between your hands to generate a slightly elevated shape. IF YOU’RE MAKING FLOWER BUNS: Separate the dough into four equal pieces. One piece should be rolled into a long, thin rope. Fold both ends in a “J” shape in opposite directions to form a teepee shape. Turn each end of the rope in the direction of the center of the rope until they meet. Take a pair of chopsticks and place one on either side (in the middle) of the flower shape, then compress to make a flower. In the center of the flower, place a Chinese date to symbolize prosperity.
Rest the buns
- Place the buns in a steamer basket and set aside (line with steamer parchment paper or brush a thin layer of oil to avoid sticking). Make certain that there is enough of room between each bun. Allow for around 30 minutes of resting time. Buns that have been well-rested should be somewhat larger (not double the size) and extremely smooth on the surface. When the dough is gently pushed, it returns to its original shape (see note 2)
Steam the buns
- In a large saucepan or wok, fill half way with cold water and place the steaming basket within. Cook over a high heat for the first few minutes, then reduce the heat to medium-low until the water has come to a full boil. Count backwards from this instant for ten minutes (add 2 mins if your buns are bigger). Serve when still heated.
Store the buns
- After the buns have been allowed to cool fully, store them in an airtight container or plastic bag. Maintain freshness in the refrigerator for up to 4 days or in the freezer for up to 2 months.
Reheat the buns
- Steam the buns that have been stored in the refrigerator for 5 minutes. Cook for 7 minutes (without defrosting) if the meat is frozen.
1. The flour-to-water ratio will differ based on the kind of flour you choose. 2. Make the necessary adjustments. The completed dough should have a medium firmness to it and should be smooth. 2. The amount of time necessary to soak varies based on the temperature of the room. It takes me 30 minutes in a room with a temperature of around 25°C/77°F. Consequently, if it’s cooler in your area, you should lengthen the duration a little, and vice versa. 3. If you are using a metal steamer, I recommend that you wrap the metal or glass lid with a clean tea towel before using it.
Serving:1bun|
Wei Guo is the author of this piece. Interested in learning more about different forms of Chinese bread? Take a look at myChinese Doughnut Stick,Leavened Scallion Flatbread, andPan-fried Pork Buns for inspiration. Good luck in the kitchen!