
Jan
For everyone who has ever eaten a burger on a lettuce wrap and pretended it was “great,” this recipe for gluten-free buns is for you. I enjoy lettuce just as much as the next person, but it is not a suitable substitute for a hamburger bun.
The no bun burger should be achoice
I normally choose for a lettuce wrap instead of a gluten-free bun, regardless of whether a gluten-free bun is available. Even though it doesn’t make any sense to you considering how I’ve been whining about the bun-less gluten free burger since 2011, bear with me while I explain. Whatever type of burger I’m eating (vegetarian or beef), I don’t like it when it comes with any sort of bread in every mouthful. My digestive system has been like this for as long as I can remember, long before I was even aware that gluten existed.
My gluten-free kid enjoys a bun, and he should be able to have one as well.
However, many of them can only provide you with a lettuce wrap.
Because it is so easy, it can be made ahead of time (up to 3 days) and fits various dietary needs more readily than my gluten free soft hamburger bun recipe from Gluten Free on a ShoestringBakes Bread.
In addition, the cooked rolls freeze really well.
How to make these gluten free buns
Similar to our recipe for gluten-free Japanese milk bread, the dough for these buns is primarily produced by pouring all of the components (first the dry ingredients, then the wet ones) in a big mixing bowl and beating until frothy. Aside from having the appropriate recipe, of course, and using high-quality gluten-free ingredients, there are a few other factors that contribute to the success of this dish. Let’s have a look at them.
Start with a wet dough
If you want any yeasted dough to rise, you must have the right ratio of moist to dry ingredients in your recipe. In baking, if the ratio of wet to dry components is too low, the dry elements (mostly flour) will overpower the wet ones (primarily water), and the yeast will not rise. That is simply the way things work. The temperature of your dough should not be too high or too low for yeast to be active, but it is unusual that the temperature will prohibit your dough from rising. Those poisonous temperatures are at the extreme end of the spectrum.
Shape with plenty of extra flour
I prefer to start with a moist dough when creating this type of dish. Even though it’s more difficult to form and handle, you may generously flour the dough throughout the shaping process without drying it out too much. Simple gentle handling of the dough will ensure that even a larger amount of additional flour will not be incorporated into the core of the dough, where it will suffocate the yeast.
Be patient but don’t let it rise too much
The fact that your dough hasn’t risen sufficiently after shaping may be due to the fact that your kitchen is either too dry or too cold. If you have properly weighed your ingredients (including measuring the water to ensure that you have not undermeasured it) and have properly covered your baking sheet, the dough will rise. If the atmosphere isn’t just ideal, the yeast’s activity will be slowed to a standstill. Be patient as the temperature begins to climb. Because this recipe is prepared in the batter-style (similar to our favorite white sandwich bread), it does not rise as smoothly as recipes prepared with gluten-free bread flour.
In the absence of gluten, or even a very close substitute, the top of the dough will get pitted and cratered at the very end of a normal rise in a recipe like this. When the craters begin to appear, the dough has fully risen and is ready to be brushed with egg wash and baked in a hot oven.
Ingredients and substitutions
Use powdered coconut milk by weight to make this recipe dairy-free in place of the nonfat dry milk or buttermilk powder called for (about 40 grams). Earth Balance buttery sticks should suffice in place of butter in this recipe. Egg-free: There is one egg white in the bread dough, which aids in the rising of the loaves of bread. You might try using aquafaba (the brine from a can of chickpeas) in its place, but I’m afraid I haven’t heard any good things about it when it comes to baking. Alternatively, melted butter or simply a drizzle of olive oil can be used in place of the egg wash on the top of the rolls.
Apple cider vinegar and cream of tartar: Both apple cider vinegar and cream of tartar combine to give these rolls a light and airy texture and appearance.
As an example, you are under no obligation to substituteExpandex modified tapioca starch (which is not the same as ordinary tapioca starch) in this recipe for any amount of the flour.
They also have a longer shelf life than most other foods.
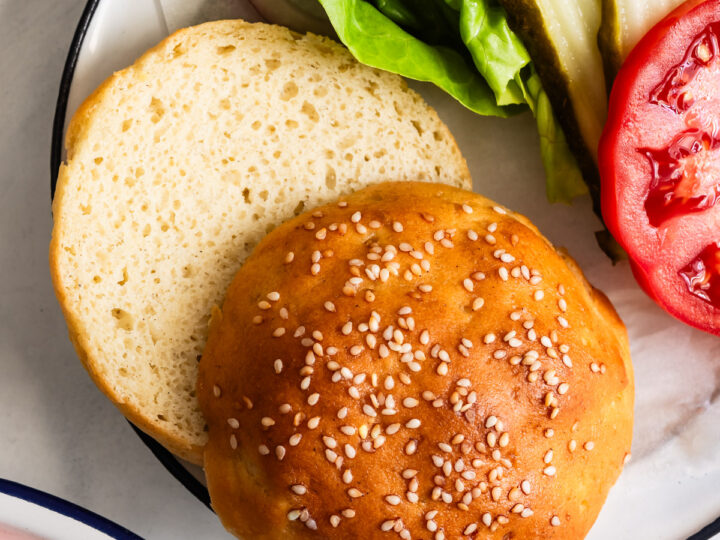
Gluten Free Buns for Hamburgers and Sandwiches
Preparation time: Cooking time: 8 buns (about)
Ingredients
3 1/4 cups (455 g) all-purpose gluten-free flour, plus more flour for sprinkling (I used Better Batter) * xanthan gum (about 1 1/2 tablespoons) (omit if your brand already contains it) (Alternatively, use 1/2 cup + 2 tablespoons (40 g) nonfat dry milk in place of the cultured buttermilk mix powder). Instant yeast (1 tablespoon (9 g) or active dry yeast (1 1/2 teaspoons) 1 tablespoon (9 g) a quarter teaspoon of cream of tartar a quarter teaspoon of baking soda 1 tablespoon (13 g) light brown sugar that has been packed 1 tbsp.
a single egg white (about 25 g), at room temperature 1 1/2 cups (12 ounces) warm water (about 95 degrees Fahrenheit) The following is an example of an egg wash: 1 egg (any size) at room temperature, beaten with 1 tablespoon milk or water Sesame seeds for putting on top of food (optional) *Another option is to use 3 cups (420 g) all purpose gluten free flour instead of 3 1/4 cups (455 g) all purpose gluten free flour and 1/4 cup (36 g)Expandex modified tapioca starch, as well as increasing the water by 2 tablespoons (1 ounce) to 13 ounces (1 1/2 cups + 2 tablespoons) water.
Instructions
- In the bowl of your stand mixer set with the paddle attachment, combine the flour, xanthan gum (optional Expandex), milk powder, yeast, cream of tartar, baking soda, and sugar, whisking constantly with a handheld whisk until thoroughly combined. Whisk in the salt until it is well incorporated. Toss the ingredients in a stand mixer with a medium speed until the dough begins to come together (about 3 to 5 minutes). Increase the speed of the mixer to high and continue to beat until the dough is no longer a ball but has began to resemble whipped cream. Fill a greased container with a tight-fitting lid or a greased bowl with the dough and seal securely. Spray gently with cooking oil spray before transferring to the container. Placing the dough in a warm, draft-free room to rise until it has increased in volume by approximately 150 percent (about an hour), or refrigerating the dough for up to 3 days
- As soon as you’re ready to start making the rolls, line two rimmed baking sheets with parchment paper that hasn’t been bleached and preheat your oven to 400 degrees. If you’ve refrigerated the dough, you may begin working with it immediately after it’s been chilled. You should chill the securely packed dough in the refrigerator for at least 15 minutes before dealing with it if you haven’t already done so, because it’s much easier to handle when it’s cooled. Turn the dough out onto a flat, lightly floured surface and sprinkle with extra flour to coat the top of the dough. Work the dough by squeezing it and kneading it, and turning it over regularly, until it begins to seem smoother and elastic. Divide the dough in half and set one half aside, using a bench scraper or big knife to help with the dividing (cover to prevent its drying out). Making use of the remaining half of the dough, divide it once more into four equal sections. Working with one piece of dough at a time, sprinkle it with additional flour, make it into a ball by squeezing the ends beneath, then roll it with the side of your palm pushed against the surface and guide it into a circle with your fingertips. More flour should be sprinkled over the dough, and it should be pressed into a disk approximately 3/4-inch thick using your fingers and palm. Place the disk on one of the baking sheets that have been prepared. Repeat the process with the remaining pieces of dough, and then with the remaining half of the dough. You’ll end up with eight disks of dough. Preheat the oven to 350 degrees Fahrenheit and set the baking sheets in a warm, draft-free spot until each piece of formed dough has increased in volume by at least 150 percent of its original volume (about an hour). Preheat your oven at 400 degrees Fahrenheit after around 45 minutes. Once the tops of the dough begin to develop pock-marked patterns, stop allowing it to rise any more. Use a sufficient amount of egg wash to brush the tops and sides of the risen buns, then sprinkle with the optional sesame seeds if desired. Placing the rolls in the center of a preheated oven and baking until the rolls are puffed and the tops are a pale golden brown is the goal (about 18 minutes). When measured with an instant-read thermometer, the temperature in the center of each roll should be around 190°F. Allowing the rolls to cool on the baking sheet until they are no longer hot to the touch before slicing and serving, remove the rolls from the oven. Any leftover rolls can be cut, let to cool fully, and then packed firmly in a freezer-safe bag for later use if desired (remove as much air from the bag as possible). Freeze for a maximum of 2 months. Use a toaster set on the light toast setting to defrost the bread.
Gluten Free Hamburger Buns
There’s something extra wonderful about a soft and fluffy gluten-free hamburger bun baked from scratch. It’s one that you can stuff with a gluten-free burger, pulled pork, or shredded beef, and any number of other toppings you like. A gluten-free bun that is still warm from the oven and so fresh that you can sink your teeth into it. I developed this gluten-free hamburger bun recipe years ago, when there were no prepared gluten-free hamburger buns available for purchase in supermarkets (or, if there were, they didn’t taste or have a decent texture here in Alaska).
It broke my heart to watch my daughters having to go without a hamburger bun for an extended period of time – especially when everyone else around them was enjoying one.
Perfecting the best gluten-free hamburger buns
In the same way as mygluten-free cinnamon rolls, gluten-free pie crust, and gluten-free bread were all developed via trial and error, this recipe was developed by trial and error. When a recipe finally comes together, it is really satisfying. Our wheat-eating friends, with whom we socialize on a daily basis, have stated that they prefer the flavor and texture of these gluten-free hamburger buns over the gluten-filled ones they have tried.
Gluten-Free Bread Baking Tips
- In case you’ve never baked wheat-free bread before, it’s vital to understand that your gluten-free dough will be significantly wetter than your wheat-containing dough. Don’t make the mistake of doubling the recipe and adding more flour
- Otherwise, you’ll wind up with a denser bun. Check to see that all of the ingredients are at room temperature (including the flour, eggs, yeast, etc). In order to start baking, I let my “cold” ingredients lay out on the counter for 20 – 30 minutes before I begin. When making gluten-free bread dough, use the paddle attachment (flat beater) on your mixer rather than the whisk attachment or the break hook. Gluten-free bread does not require kneading (for the most part – there are a few recipes out there that do), thus there is no need for a bread hook. The gluten-free buns will rise somewhat higher during the baking process and will appear golden brown when they are finished. Use an instant read thermometer to check the interior temperature of a yeast loaf or yeast rolls to ensure that they have finished baking properly the first time. The interior temperature of a well cooked yeast bread will reach 202 degrees (F). Whenever possible, bake on the center rack of your oven.
Gluten-Free Hamburger Bun Ingredients
Active Dry Yeast – Active dry yeast may be quite unstable, so make sure it’s fresh (not expired) and frothy when proofed before using it. If the yeast isn’t frothy after the proofing period has expired, either the yeast is bad or the water temperature isn’t the proper temperature for baking. Remove it from the equation and start over. Honey — Instead of using cane sugar to sweeten the buns, I use honey in this recipe. Honey assists in the preservation of the dough’s moisture and pliability. These precise individual flours have been used in the development of this recipe.
- A combination of arrowroot starch and tapioca starch is used in this dish; however, if you’re in a hurry, you may use solely tapioca starch.
- In addition to aiding in the binding of the recipe ingredients together, eggs also contribute to the loftiness, or leavening, of the dough.
- The deep, savory flavor that olive oil imparts to gluten-free hamburger buns is one of my favorites, but you may use whatever sort of oil you like in place of olive oil if you prefer.
- If you want a different flavor, white vinegar can be substituted for the apple cider vinegar I used.
Gluten-Free Dough Consistency
Despite the fact that this gluten-free dough is wetter than the normal wheat dough, it is thick enough to hold its shape when free-formed on a baking sheet without falling apart. Unlike cake batter, cookie dough does not have the same consistency as cake batter, nor does it have the same consistency as cookie dough.
How to free-form the gluten-free buns:
- 12 cup of dough should be placed on a baking sheet coated with parchment paper or silicone
- Spread the dough out evenly into a 3.5-inch round using an off-set spatula and set aside. No need to worry about getting the dough to form a perfect circle — just try your best to get it to be round in shape.
If you don’t want to free form the gluten-free hamburger dough and want it to be perfectly consistent, you can use English muffin rings to get the desired results. Grease the insides of the rings well with butter, and then sprinkle with gluten-free flour to finish. Place them on the baking sheet that has been prepared, fill them with dough, and then level the tops out.
How to make Gluten-Free Hot Dog Buns using this recipe
I’ve used this gluten-free hamburger bun recipe to create hot dog buns multiple times, and it’s a keeper.
On a baking sheet, I use my hands to free create the shape of the hot dog buns (just like I do for forming the hamburger buns). Proof and bake the hamburger buns according to the gluten-free hamburger bun recipe listed below.
Gluten-Free Slider Buns
This recipe may be used to produce gluten-free slider buns; simply reduce the size of the buns to those of hamburger bun size. Alternatively, you may make my Gluten-Free Rolls recipe. Because of their size, they’re great to use as slider buns.
Juicy Gluten-Free Hamburgers
Even while it is convenient to have readymade and packed gluten-free hamburger patties on hand in the freezer for quick dinners (I use the Kirkland brand from Costco), when I want to create handmade patties, I follow this recipe:
Gluten-Free Hamburger Ingredients:
- 1-1.5 tablespoons gluten-free Worcestershire sauce
- 2-3 lbs. ground beef (I prefer 85 percent lean/15 percent fat)
- 1 tablespoon dried parsley
- 1 tablespoon dehydrated onion flakes
- 1-1 1/2 teaspoons sea salt
- 1 teaspoon onion powder
- 2 garlic cloves, minced (or 1 teaspoon garlic powder)
- 1 large egg, optional
Directions:
- Prepare a large baking sheet by lining it with aluminum foil. Add all of the ingredients to a large mixing bowl and mix them together with your hands until they are just combined (do not overmix). Make a patty out of the mixture by measuring out 12 cup and forming it with your fingers. Place the patties on a baking sheet and continue until all of the patties have been created. Depending on your preference, grill or pan fry.
Gluten-Free Hamburger Patty Recipe Notes:
Using parchment paper between the layers of patties will help to keep them from sticking together. It’s common for me to prepare these patties ahead of time and store them in the freezer. When we cook them, we put them directly on the grill while they are still frozen. For bacon burgers, I prefer to use this recipe for baking bacon, which I found on Pinterest. Simply add the cooked bacon to your burgers before grilling them. Mmmm! Try this air fryer hamburgers recipe if you want to make your gluten-free hamburgers in the air fryer.
xoxo, Mēgan
Gluten-Free Hamburger Buns Recipe:
- 3 tablespoons honey
- 2 12 teaspoons dry active yeast (NOT quick yeast! )
- One cup warm water (between 110 and 115 degrees Fahrenheit).
Dry Ingredients:
- 1 cup brown rice flour
- 1 cup tapioca starch
- 12 cup arrowroot starch
- 12 cup millet flour
- 12 cup sorghum flour
- 1 tablespoon xanthan gum
- 12 teaspoon sea salt
- 1 teaspoon sea salt
Wet Ingredients:
- At room temperature
- 3 big eggs (at room temperature)
- 13 cup water, 14 cup olive oil, 1 teaspoon apple cider vinegar, and sesame seeds for dusting are all you need.
Instructions
- Prepare two big sheet pans by lining them with parchment paper or silicone baking liners. When you’re ready to start baking, combine the honey and warm water in a small mixing dish and whisk until the honey is almost completely dissolved. Sprinkle in the yeast and give it a brief toss to combine the ingredients. Allow the yeast to prove for 7 minutes (set a timer for this!) before using. – There will be no more and no less time. If you haven’t already, make sure you have the remaining wet and dry ingredients combined and ready to go when the 7 minutes are up. Combine the dry ingredients in a large mixing bowl using a heavy-duty mixer. Pour the egg yolks, oil, water, and vinegar into a separate mixing dish and whisk until combined. When the yeast has finished proving, combine the wet components with the dry ingredients. Stir until it resembles a paste, then add the yeast mixture and stir until well combined. Mix for approximately 30 seconds on the lowest speed setting of your mixer. Mix on medium for about 2 minutes or until the dough is smooth, scraping down the sides of your mixing bowl as needed. If necessary, you may need to pause your mixer and scrape the edges of your bowl a couple more times. Drop 12 cup of dough onto the baking sheet and smooth it out with an offset spatula to form a 4.5-inch round shape. Repeat the process with the remaining dough, arranging four rounds of dough on each baking sheet as a final step. Make a sesame seed sprinkling on each hamburger bun and allow the buns to rise for approximately an hour. Place the muffins in a preheated 375 degree (F) oven for 18 – 20 minutes, or until the tops are a light golden brown. Allow to cool on wire racks before serving.
Notes
Two big sheet pans should be lined with parchment paper or silicone baking liners. When you’re ready to start baking, combine the honey and warm water in a small mixing dish and whisk until the honey is largely dissolved. Stir in the yeast until it is completely dissolved. To prove the yeast, set a timer for 7 minutes (and stick to it! ). “There will be no more time, nor will there be any less time.” If you haven’t already, make sure you have the other wet and dry ingredients combined and ready to go when the seven minutes are up.
- Combine the eggs, oil, water, and vinegar in a separate mixing bowl; set aside.
- Then add the yeast mixture and stir until it’s a bit paste-like.
- Mix on medium for about 2 minutes or until the dough is smooth after scraping down the sides of your bowl.
- Using an offset spatula, spread out a 4.5-inch circle of dough on the baking sheet after dropping 12 cup of it there.
- Set aside for approximately an hour to allow the buns to rise.
- Place the muffins in a preheated 375 degree (F) oven for 18 – 20 minutes, or until the tops are a light golden brown; Set wire racks beneath the baking sheet to cool the baking sheet.
Gluten Free Hamburger Buns – the BEST recipe! Life After Wheat
Finally, a gluten-free hamburger bun that is soft, flexible, and tastes every bit as wonderful as a standard wheat bun has been developed! In fact, we believe you will like it even more than before. This post includes affiliate links for your convenience. If you decide to make a purchase after clicking on one of these links, I will get a small commission at no additional charge to you. Thank you for your contribution to Life After Wheat, which allows me to continue to provide you with free recipes!
I was in the same boat.
Are you on the same page as me?
There is no need for you to suffer in silence, my friends!
Yep, continue reading for a recipe for a gluten-free hamburger bun that is soft, fluffy, and will not break apart when grilled. It’s also very simple to build, and I’ll guide you through each step with images.
WHAT INGREDIENTS DO I NEED?
- I highly recommend using GF Jules for this recipe. Other ingredients: parmesan cheese, sugar, onion salt, yeast, egg, neutral tasting oil (such as avocado or canola), water, and baking powder.
WHICH FLOURS WORK WELL FOR THIS RECIPE?
Not all gluten-free flours are made equal, as some have found. Among our many favorites (see our whole list here), our favorites change depending on what we’re preparing! We are aware that many of you are looking for a low-cost flour mix that will work wonderfully with every recipe, but we have not yet discovered such a combination. Keeping a couple gluten-free flour mixes on hand in the cupboard is well worth it to me and my family in order to ensure that our baked products taste their very best.
You may wish to use whatever flour you have on hand because you may not have the one I recommend, but I have tested this recipe with a variety of other flours and have learned which ones work best through thousands of hours spent testing hundreds of different recipes.
No, this content is not sponsored in any way.
So go ahead and get up a bag of gluten-free Jules flour and thank me later.
HOW TO MAKE GLUTEN FREE HAMBURGER BUNS
In the photographs above, I’ve shown you the step-by-step procedure you’ll need to follow in order to prepare gluten-free hamburger buns. Remember to pay attention to the texture of the dough; it should be too sticky to deal with with your hands, which is why you’ll need to cover your work area with water or oil before shaping it. I recently purchased a hamburger bun pan, which has shown to be really effective! It’s wonderful because it gives the buns a perfect rise and ensures that they are the proper shape and size.
- This recipe is quite simple, since you will only need to add your dry ingredients to the bowl, followed by your wet ones, and then just mix once.
- Using your hands, roll each dough part into a ball and then press softly to flatten into a disc that is 1/2-3/4′′ tall.
- It should rise in a warm location for 30-60 minutes, or until it has doubled in size.
- Is it possible to create this dish without using dairy?
- One reader reported that she substituted almond flour for the parmesan and that the dish came out fantastic.
- This is the first time I’ve tried using an egg replacement in this recipe, but if you do, please report back to let us know how it turned out for you.
- Can I simply use the flour I already have in my pantry instead?
Because gluten free flour blends all act differently, I am unable to guarantee your results if you choose to use a flour blend other than the one I have recommended in this article. WAIT! Don’t let this recipe slip through your fingers — save it for later!
MAKING THIS RECIPE?
We’re looking forward to seeing what you come up with! Take a picture and post it on social media with the hashtag @LifeAfterWheat! OTHER RECIPES THAT YOU MIGHT LIKE INCLUDE:
Instructions
- In the bowl of a stand mixer (or a hand mixer if you don’t have a stand mixer), combine all of the ingredients in the order listed. In order to measure gluten-free flour properly, always mix the flour before scooping it into a measuring cup and leveling it off with the flat side of a knife. 3 minutes on a medium speed, incorporating all ingredients. The dough should be quite sticky when it is finished. Work the dough into 6 equal pieces by coating your working area as well as your hands with oil or water. Use extra water or oil if necessary to keep the dough from sticking to your hands when rolling out each piece into a ball and flattening it into a hamburger bun shape. Place the molded dough in a hamburger bun pan or on a baking sheet coated with parchment paper, spacing them 2-3 inches apart
- Cover loosely with plastic wrap and set aside in a warm location for 30-60 minutes, or until the mixture has about doubled in size. My oven has a quick proof setting, which I utilize. As soon as the buns have risen, brush them with melted butter or egg wash and sprinkle them with everything bagel spice or sesame seeds, if desired. Preheat the oven to 350°F and bake for 20-25 minutes, or until the edges are beginning to brown, until they are crispy. Slice after allowing it to cool fully on a cooling rack. These are best served immediately, but they may be refrigerated at room temperature for up to 2 days or frozen for later use. If they begin to crumble after a couple of days, or if they are thawing from the freezer, simply pop them in the microwave for a few seconds.
Notes
Better Batter and gluten-free Jules flour were used in the testing of this recipe, and I highly recommend using gluten-free Jules. I believe Cup4Cup might also work, but I haven’t tested it yet, so for the best results, stay with gf Jules.
Nutrition Information:
Better Batter and gluten-free Jules flour were used in the testing of this recipe, and I highly recommend using gluten-free Jules for the final product. Cup4Cup could possibly work, but I haven’t tried it yet, so stay with gf Jules for the best results.
Gluten Free Hamburger and Hot Dog Buns
Make a batch of these gluten-free hamburger and hot dog buns this weekend and grill up some hot dogs and hamburgers for the family. One of my favorite things to eat around Memorial Day Weekend is hamburgers and hot dogs, which are also available year-round. But I’ve been eating them for years, either wrapped in lettuce (which is truly delicious) or on its own with a knife and fork. So many store-bought buns have failed me, either because they are too firm or because they are too bread-like in texture.
Do you understand what I’m saying?
So, I’ve finally figured out how to solve my own problem!
What is This Mystery Ingredient?
Some of my readers have requested whether they may use psyllium husks instead of xanthan gum in my bread flour blend, and I am happy to oblige. I informed them that I was genuinely unaware of what I was talking about because I had never dealt with psyllium husk before. In order to learn everything I could about this mysterious ingredient and how it functions in gluten-free baking, I set out to find out everything I could. I made the decision to acquire some online (here) so that I would have some on hand when I was ready to begin exploring.
While going through the procedure, I discovered a few things.
In addition, it makes such enriched breads extremely soft and extensible, which is a bonus.
The results were not pleasing to me when I tried it with my own artisan bread, though.
Artisan bread is regarded to be a lean bread since it has little to no added fats or sugars than other types of bread. The result, as Sheldon would say, was BAZINGA when I put it to my Hawaiian rolldough. A new loaf of bread has been created, and let me tell you, it is wonderful!
Shaping Gluten Free Hamburger Buns
To begin, divide the dough in half with a bench scraper in order to prepare hamburger and hot dog buns at the same time. Remove half of the dough and set it aside while you shape the other half. Make 3-ounce portions of the dough by portioning it out. I measure each one with my scale to ensure that they are all around the same size. Form them into balls using your hands (see myvideofor Hawaiian rolls for how to do this). Place them on a baking sheet lined with parchment paper, about 2 inches apart.
This just assures that they all rise to their feet and do not retreat.
Shaping Gluten Free Hot Dog Buns
Making hot dog buns is a simple process as well. The hair can be rolled into individual ropes, but I wanted a split top bun and was too lazy to do it myself! As a result, I discovered that my strategy was a little more straightforward. Make a 1/2-inch-thick rectangle out of the second half of your dough and set it aside to rest for a few minutes. I had enough dough left enough to create seven 3-ounce-sized hot dog buns out of the rest of my dough. Beginning with strips that are nearly equal in size, begin cutting the dough into strips.
Position your cookies on their side (cut side up) on the opposite half of the baking sheet and set aside.
Repeat the process with the remaining rolls, spacing them approximately 1/2 inch apart.
Proofing the Buns
Cover the rolls with plastic wrap that has been put gently on top so that it does not interfere with the rolls’ ability to rise. I’ve discovered that a tea towel is too porous for gluten-free baking, resulting in the development of a skin on the rolls and their failure to rise any further. It may take anything between 30 minutes and an hour or more for the rolls to rise to their full potential. This is determined by the temperature of the proofing area. Every time I use my oven, I set it to the “warm” setting, which is around 170 degrees.
In that brief period of time, the temperature will not have reached 170 degrees.
Baking Gluten Free Hamburger and Hot Dog Buns
If you’re proving the rolls in the oven (if you’re doing so), remove the rolls from the oven when they’ve nearly doubled in size. Preheat the oven to 375 degrees Fahrenheit (180 degrees Celsius). Make an egg wash by whisking together one egg and a splash or two of water in a small bowl. Use a gentle brush to apply it to each roll. The rolls should be baked for around 15-20 minutes, or until they are golden brown and bounce back when lightly touched.
After removing them from the oven, generously coat them with melted butter to finish them off. Slice open the cookies when they have finished cooling on a wire rack (while still on the baking sheet).
But Wait!There’s a Whole Cup of Sugar in the Dough!Are you serious?
As a first step, I’m attempting to create gluten-free meals that are at least as tasty (if not better) than the foods that my family and I used to consume before turning gluten-free. That is almost never associated with being healthy. This is not a site dedicated to gluten-free meals that are nutritious. I understand that one cup of sugar seems like a lot. But keep in mind that we’re attempting to recreate the feel of something that we remember having back in our BC (before Celiac) days. However, I’ve discovered that occasionally more harsh methods are required.
- Typically, the amount of yeast used in a bread recipe of any sort is more than double the average amount (regular OR gluten free).
- This is critical in order to get the texture we desire: light, fluffy, and soft, all of which are characteristics of gluten-free bread that we sorely miss.
- Take a look at the number of servings that may be created from this one dish as well.
- In only ONE recipe, no less!
- Are you planning to sit down and consume all of those at once?
- They’ll be sleeping blissfully in anticipation of the next time you stop by for a burger or a dog.
- Sure, they could turn out “okay,” and we might end up with buns that are “acceptable.” What I don’t know is that “decent” is not a term I want to use to describe something I’m about to consume.
- My greatest test is to serve my gluten-eating family, particularly my husband, with gluten-free dishes that I have made myself from scratch.
- This weekend, fire up the grill and make that hamburger on a bun that squishes down perfectly, exactly the way we want it.
- Alternatively, simply eat one of each and call it a day!
- 1recipeIMPROVED dough for sweet rolls (see recipe below)
- 1largeegg, to be used for brushing
- 1-2 tablespoons salted butter, melted, for brushing over top
DOUGH:
- 2 tbspwhole psyllium husks or 1 tbsp plus 1 tsp psyllium husk powder
- 1cup (200 g)granulated sugar***(see notes)
- 134tspbaking powder
- 2tbsp plus 112 tbsp (24 g)instant, fast-acting yeast (not active dry yeast)
- 1tspkosher salt
- 114cups (300 ml)who
- In the bowl of a stand mixer fitted with a whisk or the paddle attachment, combine the dry ingredients until well combined. Slowly pour in the milk, followed by the eggs and the butter, while keeping the mixer running on low speed. Increase the speed of the mixer to high and beat for approximately 5 minutes. Smooth and somewhat stretched dough, but still fairly fluid and not at all like bread dough, is what you’re looking for. It’s more like a cookie dough that’s been thinned down
- Remove the paddle attachment and use a bowl scraper or spatula to scrape the dough together into a rough ball or mound, pressing it together as you go. Cover the bowl tightly with plastic wrap and set it aside in a warm, draft-free area for about 2 hours, or until the mixture has at least doubled in volume, if not tripled. It should be light and fluffy, with a frosting-like appearance. Place in the refrigerator for at least 4 hours, but preferably overnight
SHAPING HAMBURGER BUNS:
- Dividing the dough in half and setting one half aside while working with the other half is a good idea. Distribute the dough into sections of around 3-ounce size and roll each portion into a tight ball (watch my video tutorial on how to shape Hawaiian rollshere for more information)
- Place on a baking sheet lined with parchment paper, spacing them approximately 2 inches apart. Flatten each one to approximately 1/2-inch thickness so that they will rise up rather than out of the pan. While preparing the hot dog buns, place a cover over them.
SHAPING HOT DOG BUNS:
- Then, using the remaining half of the dough, roll it out into a rectangle that is approximately 1/2-inch thick. Using a bench scraper or a sharp knife, cut the mixture into strips. Place each strip on its side (cut side up) on the opposite half of the baking sheet and push down lightly until they are approximately one inch thick
- Repeat with the remaining strips.
PROOFING AND BAKING THE BUNS:
- Cover the buns loosely with plastic wrap and set them aside to rise until they have about doubled in size, which can take anywhere from a half hour to an hour and a half, depending on the temperature of your proofing area and the size of your buns. Preheat the oven to 375 degrees Fahrenheit when the buns are almost finished rising. Make an egg wash by whisking one egg with a splash of water until it is smooth and creamy. Apply this to each roll using a brush. Bake the rolls for about 15-20 minutes, or until they are golden brown and spring back when lightly touched
- Remove from the oven. Remove the pan from the oven and coat it with melted butter to finish it off. Allow the meat to cool before slicing and toasting it, or grilling it for hamburgers and/or hot dogs
Buns can be stored at room temperature for up to 2-3 days in a ziptop bag. Alternatively, they may be frozen for up to 3 months if they are individually wrapped and stored in a bigger ziptop bag. Cut the rolls in half (or down the center for split top hot dog buns) and throw them in a pan with a little melted butter to freshen and soften (if you are not eating them immediately). Cover the skillet and set it over low heat for a few minutes to lightly brown the bread. Alternatively, steam for 15-20 seconds in the microwave while covered in a moist paper towel.
***If you clicked on the “go to recipe” button and didn’t see the section in the article where I described why I used a whole cup of sugar, please go back through the page and read that section again.
Recipes for my own bread flour mix were devised after years of hard experimentation to produce what I consider to be a superior gluten free bread that is unmatched in taste and texture.
I cannot guarantee the outcome of this recipe if you do not use my gluten-free bread flour mix, which I developed just for it. Even though store-bought mixes may provide you with a decent outcome, they may not provide you with the results that I intended in my recipe.
Easy Gluten-Free Buns Recipe
There is nothing complicated about these gluten-free buns, which require only a handful of ingredients that you most likely already have in your cupboard. in the case of dough 3 cups gluten-free flour mix (we use Thomas Keller’s Cup4Cup brand, which is available at most grocery stores). 12 quarts of milk 1 packet (214 tablespoons) dried active yeast, dissolved in water 2 tablespoons melted butter, to taste Apple cider vinegar (about 1 tablespoon) 1 egg plus 1 egg white, beatenpinch of saltpinch of sugar for the topping 1 egg plus 1 egg white, beaten 1 egg, lightly beaten 14 cup toasted sesame seeds 1.
- Add the yeast packet and stir until completely dissolved, then let it aside for about 5 minutes.
- Combine the milk and yeast in a separate bowl.
- 3.
- Set aside for approximately one hour on the countertop with a warm, wet towel.
- Using your hands, form the dough into palm-size balls and lay them on the baking sheet.
- To moisten the tops of each bun, dip a brush or a paper towel into the egg mixture and dab it on the buns.
- 5.
- Slow Food was the inspiration for this recipe.
Gluten Free Hamburger or Hot Dog Buns – gfJules
Preparation time: 10 minutes 30 minutes of additional time Preparation time: 10 minutes Time allotted: 50 minutes
Ingredients
- 10 oz. milk OR sparkling water OR gluten-free beer OR club soda OR gingerale – at room temperature
- 3 big eggs (or egg replacement) brought at room temperature
- 3 tbsp. olive oil
- 1 tbsp. apple cider vinegar
- 2 tbsp. honey or agave nectar
- 2 3/4 cups (371 gr.) gfJulesTM All Purpose Gluten Free Flour
- 3 tbsp. gfJulesTM All Purpose Gluten Free Flour
- 3 tb 4 1/4 cup dry milk powder/non-dairy milk powder OR coconut milk powder OR plain potato flakes (16 gr.) 1/4 teaspoon sea salt
- 1 tablespoon granulated cane sugar
- 2 1/4 teaspoon fast rise or bread machine yeast
- 1 cup plain potato flakes (16 gr.) Rolls should be brushed with additional olive oil, egg wash, or milk (dairy or soy, coconut or hemp are all good options)
- Sesame seeds, poppy seeds, or any topping of choice (optional)
Instructions
English muffin rings, mason jar lids, and bun pans should all be prepared by gently oiling the surfaces. Place the rings on a baking sheet lined with parchment paper and set aside. Alternatively, if you have a hamburger bun pan, grease it thoroughly and set it aside. Whisk together the eggs, oil, apple cider vinegar, and honey in a large mixing basin until well combined. In a separate large mixing bowl, whisk together all of the dry ingredients (gfJules Flour, salt, milk powder/potato flakes, and sugar) except the yeast.
- Beat the egg whites while slowly pouring in the milk or sparkling water (or other beverage) to blend the ingredients.
- Increase the mixer speed to high and continue to beat for 3-4 minutes, or until the batter is smooth.
- Using a damp rubber spatula, smooth the tops of the cakes.
- Sprinkle sesame seeds on top of the buns after brushing them lightly with olive oil, egg wash, or milk (optional).
- It is important to not allow the rolls to grow more than twice their original size, otherwise they will rise too much to sustain themselves and may collapse as they cool.
- 205 – 210 degrees Fahrenheit is the internal temperature of the rolls when they are finished baking.
They should have risen to the tops of the pans and be golden brown with a nice crust when they are finished baking. Allow approximately 5 minutes of cooling time in the pans before gently removing from the pans and serving with your favorite burger!
Did you make this recipe?
You may leave a remark (and possibly even a picture!) here, or you can post a photo on Instagram. Make sure to tag me in your post! @gfJules You’ll never want to eat gluten-free buns from a shop or from a frozen package again! Save this recipe for later so you don’t have to miss out on wonderful gluten-free bread ever again! * As with any of my blogs, some of the links may direct you to affiliate websites or promotional coupons. You will not be charged any additional fees if you purchase something via those links, but a small part of the transaction may be returned to this site to assist with its funding.
I’ve also formed a partnership with Hilary’s Eat Well in order to utilize their goods.
For additional information, please see my disclosure policy.
Thank you very much for your assistance!
gfJules Award Winning Products
- Is it possible to use dry Buttermilk Blend in this recipe? I’m attempting to create this using the ingredients I have on hand. Thanks! Reply
- Yes, Debbie, that is correct! Dried buttermilk powder can be substituted for the milk powder in this recipe. ENJOY! ~julesReply
- I used the dry buttermilk and club soda to make these, and they turned out fantastic! I topped them with a “everything except the bagel” seasoning (HEB’s “Bagel not included”), which enhanced their flavor even further. Because they didn’t all fit on the first tray, I had to make two batches. The first batch sunk, but the second batch remained perfectly stable and edible. Because it has more time to increase, we’re making educated guesses. I made a total of 12 buns. I’m definitely going to make these again! Reply
- Oh, Debbie, they’re really stunning! It means a lot to me that you returned to share your photos and to let me know how they came out! Congratulations on your gorgeous buns! ~jules Reply
Hello, Jules. It is preferable if the dried milk powder is either skim or full fat. Please let me know. Regards, Saira Reply
- Hello, Saira. Full fat would be preferable. Take pleasure in the recipe! ~julesReply
The hot dog and hamburger buns have already been prepared. Ginger ale is my preferred beverage over milk. I haven’t had the opportunity to try gluten-free beer yet. I actually get 11 buns out of the recipe, which fills the muffin rings half way. Of all the recipes I’ve tested, this is the one I enjoy the most. Reply
- Kathy, I’m thrilled to hear that you enjoy my gluten-free hamburger and hot dog bun dish! It’s very appreciated that you’ve informed me (and that you’ve shared how many you’re receiving from the recipe – that’s quite useful!) ~jules Reply
Take a look at this picture of the wonderful burger I had over the weekend! Despite the fact that the bun recipe is simple, the end result is a bun that holds together through every flawless mouthful. Reply
- Please accept my apologies for the duplicate post. I didn’t realize the first one had gone through successfully, but it was so excellent that I’m glad to say it again! Reply
I prepared these buns over the holiday weekend and all I have to say is WOW. Insanely simple, and crazy delicious! The bun remained absolutely intact during every mouthful. I used club soda and mashed potato flakes, and that’s the mix I’ll be keeping with going forward. Sorry for the sloppy plate, but I couldn’t stop myself from devouring the burger before I could snap a picture. Thank you so much, Jules. You never fail to impress! Reply
- Deb, your photograph is really stunning! WOW is correct! Please accept my sincere thanks for taking the time to share your photograph of these delectable gluten-free hamburger buns, as well as the ingredients you used to create the recipe (club soda and mashed potato flakes with my gfJules Flour). I’m overjoyed that you enjoyed the buns and relieved that they were not difficult to prepare! ~julesReply
My daughter must consume foods that are low in FODMAPs. I am unable to consume honey, agave, or molasses (no high fructose corn syrup). We’d like to make your hamburger bun recipe, so send us the recipe. What can we use in place of the honey, or can we simply leave it out altogether? Reply
- Thank you for taking the time to respond. Isn’t it possible that the maple syrup will make the buns taste like pancakes? Reply
- Because it’s only 2 tablespoons, it won’t be enough to give much taste. Having said that, you’ll be thinking about it the entire time, so I’m confident you’ll be able to taste it! LOL! Give it a try and let us know what you think. If you find the flavor to be overbearing for any reason, you may reduce the quantity of salt the next time you make pancakes and simply use an equivalent amount of liquid (bubbly water or whatever else you’re using) the next time you create pancakes. Hopefully you won’t hate the tiny bit of flavor that has been added to the buns because it helps to make them especially moist. ~julesReply
- Thank you very much. We’ll be putting them to the test this coming week
- They look fantastic! I’m looking forward to hearing how you like them! ~jules
Hello, Jules! I’ve been a lurker for a long time, but I’ve made this recipe twice now, once for sliders and once for normal buns. We were cooking “hawaiian buns” for burgers tonight, and I was extremely excited to see if I could make any changes to this recipe. I had a lot of success, and I would want to share my modifications with you! I increased the sugar by double and used 8 oz pineapple soda and 2 oz pineapple juice as my liquid ingredients. As a side note, I usually use oiled aluminum foil as my molds since I find that I desire a larger bun than what the mason jar lids provide.
Jules, I’d be interested in hearing your take on this. I suppose I’ll take your sugar level in mind next time, because the soda was fairly sugary as it was. Reply
- Hello, Levi, and thank you very much for your contribution! My gluten-free Hawaiian bread has been in high demand, so I’ll definitely try your modifications and report back to you on how they turn out for me! Now, all that’s left is to locate some pineapple soda! ~julesReply
If I use a bread maker to create this recipe, do I let it rise in the bread maker for one rise or do I remove it from the bread maker immediately after the kneading and go with your instructions from there? Reply
- Thank you for the advice, which I put into practice today. Tonight’s meal will be hamburgers! I guess I put a bit too much effort into each ring since they came out a little higher than I had anticipated, but you live and learn. Finally, the dough was quite sticky
- Do you scrape it out of the basin with a wet spoon or do you use a dry spoon? Making rolls was something I’d never done before, so I wasn’t sure what to anticipate. Reply
- YAY! I’m thrilled with how these came out! Because of the rise, it can be difficult to get the exact quantity of dough into the rings, but that’s part of the excitement of making them each time, isn’t it? When it comes to taking the dough out of the bowl and into the rings, I’ve found that a wet spatula or spoons work best, unless you have a giant ice cream scoop at your disposal (which I oil or wet, as well). Take pleasure in those delicious buns! ~julesReply
The weather is perfect, and I’m eager to fire up the grill! That means hamburger buns, of course! THANK YOU SO MUCH FOR SHARING THIS RECIPE! I don’t have any dry milk or milk substitute powder on hand, nor do I have any potato flakes. Do you believe potato starch or corn starch would be effective alternatives? What is almond flour? What is the ratio? Reply
- I saw from your post in our gfJules Gluten Free Recipe Share Group on Facebook that your gluten free hamburger buns turned out very delicious when you used corn starch instead of milk powder, so BRAVO to you! Your brilliance deserves to be recognized. You were rewarded with delicious hamburger buns, and you were allowed to put your entire grilling skills to use! ~julesReply
- Yes, without a doubt, Gay! I do it all the time, and they are quite effective! I keep them in zipper freezer bags to keep them fresh. ENJOY! ~julesReply
Hello, Jules. I was wondering whether you have tried this recipe with your sourdough starter before. I’ve been making sourdough bread since April, using your starter, and I’m always searching for new ways to include it into my meals. Thank you very much! Reply
- Hello, Kate. Although I have not personally tried it in this recipe, several readers have and have reported that it is effective! Due to the fact that you have some extra gluten-free sourdough starter on hand, I’d love to hear your thoughts! ~julesReply
I’ve just finished making them for the first time. I’m quite pleased with the outcome. I used a silicone burger pan and was a little concerned about not greasing them, but it was not an issue. Thank you very much. Reply
- I’m overjoyed to hear it, Dorothy! Way to go, and congrats on your excellent gluten-free hamburger buns that you baked yourself! ~julesReply
I’m intrigued by the possibility of substituting coconut milk powder, potato flakes, or milk powder for the regular milk. Typically, when milk powder is asked for, it is to increase protein content in order to aid in the formation of structure. Coconut milk is largely made up of sugar, whereas potatoes are mostly made up of starch. Normally, I would not consider these two items to be substitutes for one another. Reply I cooked the hamburger buns yesterday in a burger bun pan that I’ve used only once.
- This recipe yielded a generous amount of batter.
- I’ve been looking for a combination like this for nine years now.
- It is really more hydrated and rises better the longer you mix it (up to 6 minutes).
- The greatest offer makes no guarantee that it will always work, but a simple solution of water and sugar, together with the accompanying bubbles, demonstrates that it is effective.
- It does not have a gritty texture, as is the case with rice-based flours.
- Do not be disheartened if any of your recipes fail.
- The majority of tested recipes that fail do so as a result of “operator error.” If you don’t like how the bread came out, you can use it to create bread crumbs instead.
- Reply
- Dave, I’m delighted to hear it! It certainly warms my heart to know that you are now able to enjoy excellent gluten-free hamburger buns after all these years of searching. Please accept my sincere thanks for taking the time to email me and let me know how much you’re loving my gfJules Flour Blend in general, as well as this specific recipe. Best of luck with your baking! ~julesReply
I just copied and pasted the words precisely as they were written.
They were a hit with the family, so thank you! Reply
- Tina, you’ve done an amazing job! I’m overjoyed to learn this! Congratulations for creating some delicious gluten-free hamburger buns that everyone enjoyed! ~julesReply