
Pie
How To Make Homemade Honey Buns
Jan
Essentially, these handmade honey buns are a hybrid of a donut and a cinnamon roll. They have a swirl of cinnamon in them and may be fried or baked depending on your preference. They are a delicious breakfast option or simply a sweet treat to have on hand. Take a look at some of the doughnut recipes as well. From the time I was a small child, my father has been an avid consumer of honey buns. Remember those Debbie snack cakes that come in a box? I believe he has switched to another brand. Those are the foods he eats for breakfast, lunch, and perhaps a late-night snack rather frequently.
Honey Buns is the title of the book, and it is scheduled to be released on April 28th.
Part of her small-town romance series, it has a feisty baker as well as a single millionaire workaholic as the main characters.
Honey Bun Ingredients
I’m sure that with everyone who is now baking bread, the majority of folks will already have these things on hand.
- After the dough has doubled in size and has been smoothed out, combine the following ingredients: all-purpose flour
- Granulated sugar
- Salt
- Ground cinnamon.
- Ingredients: Whole milk
- Instant yeast (I used instant yeast, but active dried yeast will work as well)
- I used whole milk
- Melted butter – I used salted butter because it’s what I had on hand, but unsalted butter works just as well
- Egg: Use a big egg for this recipe because that is what was used in the testing
How to make Honey Buns
To get started, you’ll need to make the dough from scratch. It’s going to be sticky, but I promise you that your honey buns will be very soft and sensitive as a result of my efforts. In the bowl of a stand mixer, combine the flour, sugar, and salt. I used the dough hooks on my Bosch mixer to make the dough. Give the dry ingredients a short stir to ensure that the sugar and salt are fully incorporated into the flour. In a separate dish, whisk together the heated milk and yeast. I placed my milk in a 4 cup measuring cup and microwaved it for 30 seconds, or until the temperature reached around 105 to 110 degrees F.
- In a large mixing bowl, whisk together the milk, melted butter, and egg until well combined.
- If the butter is added while the mixture is still hot, it has the potential to kill the yeast.
- Set the mixer on medium speed and let it to run for 10 minutes.
- Work the oil into your work surface and hands until the dough is smooth and elastic, approximately 7 to 10 minutes, or until the dough has a wonderful elastic stretch to it.
- It might take anywhere from 1 to 2 hours for the dough to rise, depending on the temperature of the environment in which it is placed.
- Afterwards, I place my dough on the top of my stove, where it will remain warm but not hot.
- Make a rectangle that’s 14 inches long and 6 inches broad to start with.
Sprinkle ground cinnamon over the top of the dish.
The cinnamon stick may be made without the use of any butter or oil.
Begin with the side that is the longest.
If it isn’t sticking, add a little more water.
Make a cut in the dough.
Slide the floss beneath the roll of dough, cross the floss between the two sides of the dough, and pull until the dough is sliced into a perfectly shaped slice.
I decided 34-inch seems to be the ideal size for this project.
These may also be made without the use of a mixer.
Vegetable oil should be applied to a clean tabletop as well as your hands. Using your hands, knead the dough until it has a good elastic stretch to it. I haven’t tried it by hand yet, but I would estimate that it would take 10 to 15 minutes to complete.
Baked Honey Buns or Fried Honey Buns
You’re going to have to make a huge decision right now. How about baking or frying these puppies? In either case, they’re very delectable! Fry them, on the other hand, is a lot more labor. In the event that you wish to bake them, space the slices of dough approximately 2 inches apart on a baking sheet coated with parchment paper. Wrap them in plastic wrap and set them aside in a warm location for 30 minutes. The oven should be preheated to 350 degrees F while the honey buns are rising. Once the buns are done, take them from the plastic wrap and bake them for 15 to 18 minutes, or until they are golden brown around the outside.
- Allow the honey buns to cool until they are hard enough to handle without coming apart before serving.
- If you want to make fried honey buns, you may arrange the slices of dough on a baking sheet coated with parchment paper that has been oiled and spaced approximately 12 inches apart.
- Meanwhile, in a big saucepan, heat 3 cups of vegetable oil (or any other oil of your choice) over medium heat until it reaches 320 degrees.
- In addition, you’ll want to prepare your glaze so that it’s ready when you are.
- You may either cut the parchment paper into squares around each bun and gently drop the honey buns into the oil in this manner, or if you oiled the parchment paper as I instructed, you can delicately pick them up and drop them into the oil in the same manner.
- This is a time-consuming process, but the results were worth it: golden fried honey buns every time!
- Place the fried buns on a platter that has been lined with paper towels.
- Allow any excess glaze to drop off and set the item on a sheet of wax paper to finish drying.
Tips for the perfect glaze
- So that the glaze is ready before you fry or bake your honey buns, prepare it beforehand. When making a honey glaze, reduce the amount of melted butter to 5 tablespoons and stir in 1 tablespoon of your preferred honey until smooth. A small amount of this will make the glazing significantly thicker. 1 teaspoon ground cinnamon can be added to the glaze to give it a stronger cinnamon taste.
How long do honey buns last?
Cooking the honey buns in oil is best done the same day they’re made, unless you freeze them. You may preserve them in an airtight jar for up to two days, but the flavor won’t be as good as it would be otherwise. Baking them means they will survive 3 to 4 days if they are stored in an airtight container after baking. More deep-fried confections
Honey Buns
- Preparation time: 1 hourCooking time: 16 minutes Time to get up: 2 hours and 30 minutes 3 hours and 46 minutes in total The following courses are available: breakfast, dessert, and dinner. 14 honey buns (250 kcal per serving)
Honey Buns
- 2 cups all-purpose flour
- 3 tablespoons granulated sugar
- 12 teaspoon salt
- 12 cup plus 3 tablespoons milk
- 2 14 teaspoons (1 packet) instant or active dry yeast
- 2 14 teaspoons (1 packet) baking powder
- 2 14 teaspoons (1 packet) baking soda
- 2 14 teaspoons (1 packet) baking 5 13 tablespoons (13 cup) melted butter
- 1 big egg
- 12 teaspoon vegetable oil
- 1 12 teaspoon ground cinnamon
- 3 cups vegetable oil for frying (optional)
- 5 13 tablespoons (13 cup) melted butter
- 1 large egg
- 1 12 teaspoon powdered cinnamon
Glaze
- 5 – 6 tablespoonsmilk
- 1 teaspoon vanilla essence
- 6 teaspoons butter melted
- 2 cups powdered sugar
Honey Buns
- Add the flour, sugar, and salt to a stand mixer equipped with a dough hook and beat on low speed until combined. Pour the milk into a microwave-safe basin and set aside. 30 seconds in the microwave should enough. The milk should be between 105 and 110 degrees Fahrenheit. Combine the yeast, cooled melted butter, and egg in a mixing bowl. Whisk the egg into the mixture with a fork until well combined. Pour the wet ingredients into the stand mixer and beat on medium speed for 10 minutes until it is well combined. The dough will be somewhat sticky when finished
- Vegetable oil should be used to grease your hands and a big bowl. Take the dough out of the mixer and roll it into a ball with your hands
- Make a well in the bottom of the mixing bowl and pour in the oil. Set aside. Place a plastic cover over the bowl and let the dough to rise until it has doubled in size. This will take around one to two hours. Prepare a cookie sheet by lining it with parchment paper. Nonstick baking spray should be sprayed onto the parchment paper
- As soon as the dough has doubled in size, push it down. Placing the dough on a lightly floured work surface is the first step. Form the dough into a 6-inch by 14-inch rectangle by pressing it down firmly. A rolling pin can be used, but I like to use my hands instead. Using a cinnamon stick, sprinkle the cinnamon on top of the dough. Using your hand, massage the cinnamon into the dough all over it
- Roll the dough starting from the long side
- Once the dough has been wrapped up, secure the edge with a fork or a piece of plastic wrap. This is accomplished by rubbing the dough’s edge with water. Form the seam by pinching the moist edge of the dough into the roll of dough. If the dough isn’t sticking together when you pinch it, dab a bit extra water on the edge and pinch it once more. The dough should be left with the seam facing up since it will be sticky from the water and will likely adhere to the counter if it comes into contact with it. Make 12-inch-thick slices if you like thinner honey buns, or 1-inch-thick slices if you want thicker honey buns. Remove the dough from the oven and slide a piece of floss beneath it, crossing it on both sides at the 12-inch or 1-inch mark. Pull the floss through the dough until it is fully through it. Place the slice of dough, cut side up, on the cookie sheet that has been prepared. Repeat the process with the remaining pieces of dough slices. If you intend to bake them, you should place them 2 inches apart on a baking sheet. If you’re planning on frying them, you may space them 12 inches apart. In order to prevent the slices from drying out, spray them with nonstick baking spray and wrap them in plastic wrap. Allow for 30 minutes of rising time in a warm environment
Baked Honey Buns
- 350 degrees Fahrenheit is the temperature for the oven. Placing the cookie sheet in the oven and baking for 15-18 minutes, or until the edges are beginning to become golden brown, is recommended. While the honey buns are baking, begin preparing the glaze. Remove the honey buns from the oven and set them aside for 10 to 20 minutes to cool completely. Dip the tops of the cookies in the glaze while they are still warm. Remove any extra glaze from the honey bun by tapping the wrist that is holding it. Place the sculpture on a piece of wax paper and allow the glaze to cure.
Fried Honey Buns
- 3 cups of vegetable oil should be heated until it reaches 320 degrees F. While you’re waiting for the oil to reach the proper temperature, start working on the glaze. Place the honey buns into the oil one or two at a time, depending on their size. I performed them one at a time in order to protect my oil temperature from dipping too low. Once the donuts have turned golden brown, turn them over. Once the opposite side has turned golden brown, transfer the chicken to a tray lined with paper towels to cool. Allow for 5 to 10 minutes of cooling time. The glaze should be dipped into the heated honey bun. Give your wrist a little tap to aid in the dripping of any excess glaze
- Place the sculpture on a piece of wax paper and allow the glaze to cure.
Glaze
- Combine the butter, powdered sugar, milk, and vanilla extract in a medium mixing bowl until well combined. Whisk until the glaze is smooth and silky
- Set aside.
Add the butter, powdered sugar, milk, and vanilla extract to a medium mixing bowl and mix well. Blend everything together until it’s smooth.
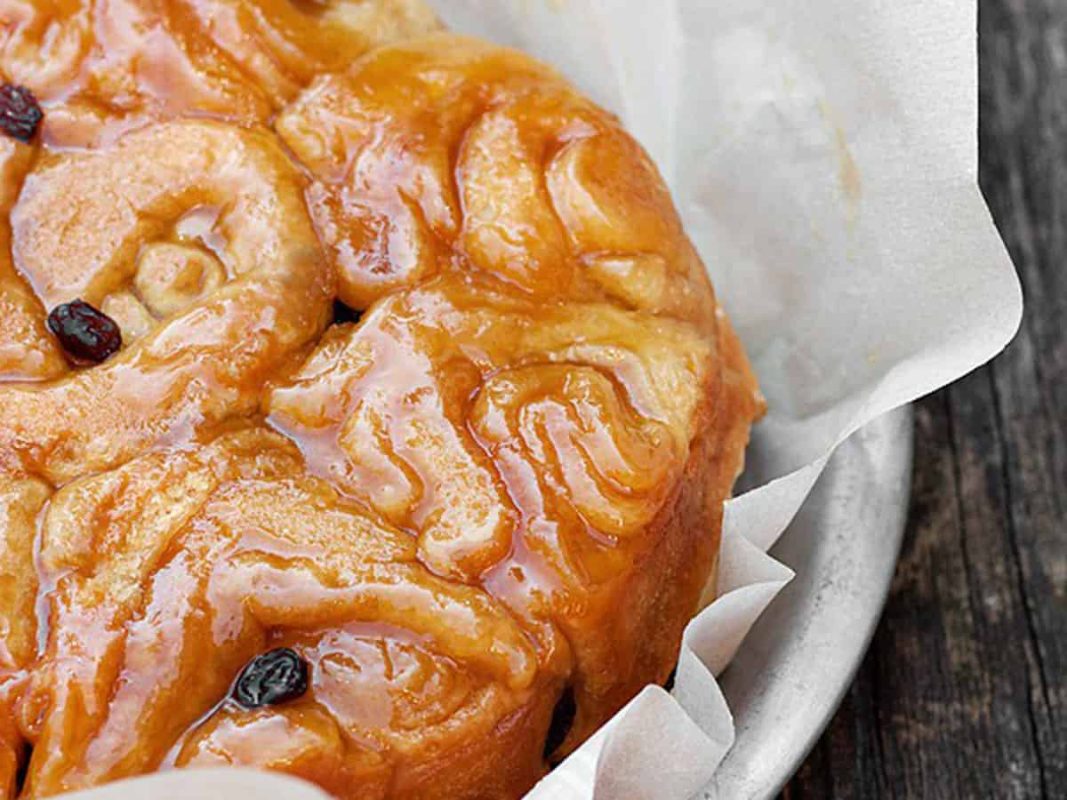
Homemade Honey Buns
These handmade honey buns are rich, delectable, and bursting with flavor, and they’re finished off with the traditional glaze that we all know and love. Find out more about this delicious family delight by visiting the website. Honey buns are a sweet treat. Is there anything more satisfying? No. There isn’t any such thing. When it comes to eating these wonderful goodies, I’m sure you have a plethora of fond recollections of doing so, whether they were prepared at home or purchased from a store.
Honey buns were a staple of my childhood, and they were for my children as well.
In fact, I adore them so much that I decided to create my own version of honey buns from scratch. This recipe for these delectable bakery goodies came to me in three seconds flat, and there was simply no reason for me not to create one for myself. And so I did, in three seconds flat.
Perfect for Breakfast, Brunch, Dessert, or Holidays
Honey buns are one of my favorite baked goods since they are appropriate for any occasion. They’re a delicious after-school snack. They make a fantastic addition to any group. For breakfast, serve them with a cup of coffee. You may also serve them as a side dish at potlucks, parties, and holiday get-togethers. They’re usually tasty and a big hit with the crowd. As far as I can tell, there isn’t a single person who doesn’t enjoy these sweet, sticky bakery delicacies, which makes them the ideal gift for almost every occasion.
They’re quite adaptable!
A Brief History of Honey Buns
At addition to being available pre-packaged in convenience shops or vending machines, honey buns can also be found in bakery sections of grocery stores and bakeries. They’re wonderful, and they’re quite popular as a grab-and-go breakfast or snack for folks who are rushing to work in the morning. But from where did they originate? Despite the fact that the honey bun is a relatively recent addition to the cuisine world, no one appears to be able to pinpoint precisely when and where they first appeared.
in Greensboro, North Carolina, was the first to make the honey bun in 1954, according to tradition.
It’s a bit of a mystery for a meal that’s so young.
Homemade Honey Buns
Although the origins of honey buns and the identity of the person who created them are still a mystery, it is not difficult to see why people are so fond of these treats. They’re very delicious! Everyone loves these sweet, fried delights, which go great with coffee, milk, or simply on their own, and no one ever seems to be able to turn them down. Especially true with my handmade honey buns, which are a personal favorite. Their flavor and texture are identical to those found in the individually-wrapped versions found in convenience stores.
These are far superior to the ones we remember from our childhood, and everyone who has tried them has agreed.
Tips
The process of making these homemade honey buns is quite simple. Because you’ll be rolling out the dough and then rolling it up to form the buns, there will be some physical effort involved, but the materials and real know-how necessary to prepare this dish are both incredibly simple and straightforward. As a result, this section on tips will be brief and sweet. In actuality, I only have two recommendations, but they are quite significant.
Pinch the Dough with Wet Fingers
Make sure your fingers are damp before pinching the ends of the dough log together. This seals the dough log tight, preventing it from unrolling when you cut through it throughout the cutting process.
It is possible that your log will unroll if your fingers are not sufficiently wet or if they are not wet enough. While it will not affect the outcome of the recipe, it will be a significant inconvenience.
Glaze the Honey Buns While Warm
In contrast to cakes and cupcakes, which should be allowed to cool fully before frosting or icing, the handmade honey buns should be warm when the glaze is applied to prevent them from falling apart. While the honey buns are still warm, dip the tops of the buns into the glaze to coat them completely. This will help the glaze to melt a little more and go into all of the nooks and crevices of your honey bun layers more easily.
Serving Homemade Honey Buns
These delectable honey buns are served in the same way as the store-bought type. If you want to serve them as a snack or breakfast, I recommend serving them with coffee or milk. It’s all you need to serve them as dessert or at a potluck if you’re offering them as a dessert. That’s all there is to it!
Storing the Honey Buns
It is possible to keep these homemade honey buns on the counter for up to two days if they are wrapped tightly in aluminum foil or plastic wrap and stored in an airtight container to prevent them from drying out too much. Once they’ve been wrapped in the same way as before, they’ll keep for up to a week in the refrigerator. You may freeze food for up to a month if you need it to last longer. Then wrap them securely in plastic wrap and place them in an airtight, freezer-safe container or a heavy-duty freezer bag to keep them frozen.
While they will still be safe to consume, the texture and flavor of the food will deteriorate with time.
Give These Homemade Honey Buns a Try
In order to truly like honey buns to the extent that I do – and it is probable that you do – you must try this recipe out. These handmade honey buns are incredibly moist and flavorful. All of the flavors and sentiments we associate with the traditional honey buns we remember from our childhoods are present, but they are much improved. Homemade is always preferable, and these honey buns are a great example of that. Try them out as soon as possible! You’ll be so pleased you took the time to read this.
Ingredients to Make Homemade Honey Buns
- Flour, sugar, salt, milk, instant yeast, butter, egg, oil, cinnamon, vanilla extract, vegetable oil, powdered sugar, honey, and a pinch of salt
(The exact measurements are included in the recipe card that follows. )
How to Make Homemade Honey Buns
- Add the flour, sugar, and salt to a stand mixer fitted with a dough hook attachment
- Beat until combined. For approximately 30 seconds, heat milk in a microwave-safe bowl until the milk reaches 110°. After that, combine the heated milk with the yeast, melted butter, and egg. Combine all of the ingredients in a mixing bowl until well-combined. Pour the wet ingredients into a stand mixer and knead for 10 minutes on medium speed. Scrape down the sides of the bowl with a spatula to ensure that all of the ingredients are well combined. Using oil, grease a large mixing bowl. Remove the dough and roll it into a ball. Cover the dough with plastic wrap once it has been placed in the prepared basin. Set aside for approximately 112 hours, or until the dough has doubled in size. Clean hands should be used to press down the dough before transferring it to a lightly floured surface. Form the dough into a rectangle by pressing it out. about 15 inches in length and 8 inches in width
- Cinnamon should be sprinkled over the top of the dough and distributed evenly
- Begin by flattening the dough into a log shape on the long side, dipping your fingers in water and running wet fingers down the border of the dough, pressing the seam together to seal it
- Once the dough log has been sealed, use unscented floss to cut it into 1-inch-size buns. Place the honey buns on a piece of wax paper and coat the tops of the honey buns with nonstick cooking spray before covering with a piece of plastic wrap to prevent them from sticking together. Set aside the dough for another 30 minutes, allowing a small gap between dough pieces to allow for expansion of the dough during the rising process
- In a large skillet, heat the oil over medium heat until shimmering. As soon as the oil is heated, drop each bun, a few at a time, into the hot oil and fry until golden brown on each side
- After removing the honey buns from the oil, set them on a sheet of paper towels to absorb any leftover oil. Make the frosting while the buns are cooling down a little bit.
For The Icing
- In a small mixing bowl, combine all of the icing ingredients and well combine until the icing is smooth. Warm the buns and then dip the tops of them into the frosting. Place the iced honey buns on a baking sheet lined with parchment paper and let aside to solidify. Enjoy
Try These Delicious Homemade Honey Buns Today
- Apple Fritters, Peach Cream Cheese Danish, Apple Cinnamon Hand Pies, and this Caramel Bread Pudding from Great Grub, Delicious Treats are just a few of the delicious desserts you can make with apples.
For the Honey Buns
- 14 cups all-purpose flour
- 14 cups sugar
- 12 teaspoons salt
- 2/3 cup milk
- 1 packet instant yeast
- 13 cup butter, heated and cooled
- 1 egg
- 112 teaspoons vegetable oil
- 2 teaspoons cinnamon
- 2 teaspoons vanilla extract
- 2-212 cups vegetable oil, for frying
For The Icing
- 3 tablespoons melted butter
- 114 cup powdered sugar, sifted
- 2 tablespoons milk
- 2 teaspoons phoney
- 12 teaspoons vanilla essence
For The Honey Buns
- Add the flour, sugar, and salt to a stand mixer fitted with a dough hook attachment
- Beat until combined. For approximately 30 seconds, heat milk in a microwave-safe bowl until the milk reaches 110°. After that, combine the heated milk with the yeast, melted butter, and egg. Combine all of the ingredients in a mixing bowl until well-combined. Pour the wet ingredients into a stand mixer and knead for 10 minutes on medium speed. Scrape down the sides of the bowl with a spatula to ensure that all of the ingredients are well combined. Using oil, grease a large mixing bowl. Remove the dough and roll it into a ball. Cover the dough with plastic wrap once it has been placed in the prepared basin. Set aside for approximately 112 hours, or until the dough has doubled in size. Clean hands should be used to press down the dough before transferring it to a lightly floured surface. Form the dough into a rectangle by pressing it out. about 15 inches in length and 8 inches in width
- Cinnamon should be sprinkled over the top of the dough and distributed evenly
- Begin by flattening the dough into a log shape on the long side, dipping your fingers in water and running wet fingers down the border of the dough, pressing the seam together to seal it
- Once the dough log has been sealed, use unscented floss to cut it into 1-inch-size buns. Place the honey buns on a piece of wax paper and coat the tops of the honey buns with nonstick cooking spray before covering with a piece of plastic wrap to prevent them from sticking together. Set aside the dough for another 30 minutes, allowing a small gap between dough pieces to allow for expansion of the dough during the rising process
- In a large skillet, heat the oil over medium heat until shimmering. As soon as the oil is heated, drop each bun, a few at a time, into the hot oil and fry until golden brown on each side
- After removing the honey buns from the oil, set them on a sheet of paper towels to absorb any leftover oil. Prepare the frosting while the buns are cooling.
For The Icing
- In a small mixing bowl, combine all of the icing ingredients and well combine until the icing is smooth. Warm the buns and then dip the tops of them into the frosting. Place the iced honey buns on a baking sheet lined with wax or parchment paper and let aside to firm. Enjoy
To make the icing smooth, combine the ingredients in a small mixing basin and whisk thoroughly. Place buns on a baking sheet and dip the tops of them into the frosting. Place the iced honey buns on a baking sheet lined with waxed paper or parchment paper and set aside to firm the frosting. Enjoy;
Honey Buns
Homemade honey buns are the best! Soft sweet rolls covered with honey butter frosting are produced in approximately an hour with this simple homemade honey buns recipe from scratch. Honey buns baked from scratch are really hazardous! These seemingly inconsequential small sweet buns are truly delectable. They are also rather simple to create. Although it appears that there are several processes, this is only due to the fact that everything has been thoroughly broken down. And don’t forget about the buns!
They are very delicious! The dough is soft, and the filling is a mixture of brown sugar and cinnamon. The buns are iced with a delicious honey butter frosting that complements the sweetness of the buns. All of this comes together to produce a delectable breakfast or dessert!
How to make homemade honey buns
Begin by melting the butter and milk together in a small saucepan. Allow the mixture to cool to around 100 degrees Fahrenheit. In a large mixing basin, combine the warm water, honey, and yeast until well combined. Gradually incorporate the flour and salt until the dough comes together in a smooth, elastic ball. Allow the dough to rest for approximately 10 minutes after it has been covered. In the meantime, combine all of the filling ingredients until well blended. Spread the filling over the dough once it has been rolled out into a rectangular shape.
Cut the dough into 12 rolls and lay them in the baking pan that has been prepared.
Allow the dough to rest for 15 minutes once it has been covered.
Allow the honey buns to cool for 5 minutes after removing them from the oven.
How to store honey buns
I keep the honey buns at room temperature for up to 3 days, wrapped with plastic wrap.
How to reheat honey buns
I reheat the honey buns in the microwave for around 10-15 seconds, uncovered, for a total of 15 seconds.
More easy sweet roll recipes!
- Sticky Buns in Under an Hour
- Cinnamon Rolls in Under an Hour
- Caramel Rolls in Under an Hour
Remember to rate the recipe and to leave a comment if you’ve tried this honey bun recipe. Thank you for your support! I appreciate hearing from folks who have tried my recipes and enjoyed them! Follow me on FACEBOOK, INSTAGRAM, and PINTEREST for even more mouth-watering recipes, or subscribe to my recipe newsletters to receive them directly in your inbox.
DOUGH
- 13 cup milk1, 13 cup butter, 2 teaspoons honey, 3 12 teaspoons quick yeast2, 34 cup warm water (105 – 115 degrees Fahrenheit), 3 cups all-purpose flour3, and 12 teaspoons salt
FILLING
- Brown sugar (packed)
- Granulated sugar (four cups)
- One teaspoon cinnamon
- Fourteen cups butter (at room temperature)
ICING
- 1/2 cup powdered sugar
- 1/2 cup honey
- Pinch of salt
- 1 tablespoon melted butter
- Prepare a 9×13-inch metal baking pan with cooking spray and set it aside. In a small saucepan, combine the milk and butter until well combined. Heat over low heat, stirring constantly, just until the butter melts. Cool to around 100-105 degrees Fahrenheit. Fill the bowl of a stand mixer halfway with the milk mixture
- Combine the honey, yeast, and warm water in a mixing bowl. To blend, stir the ingredients together. To the yeast mixture, add 2 cups of flour and a pinch of salt. Mix on a low speed for approximately 1 minute, using a dough hook. While the mixer is still running, gradually add the remaining flour, 12 cup at a time. For about 12 minutes, or until the dough begins to clean the sides of the basin, continue mixing. Knead the dough on a low speed for another 2 minutes, or until it is smooth and elastic to the touch – the dough will still be somewhat sticky to the touch at this point. Place the dough in an oiled mixing basin, rotating it to coat the surface with grease. Cover the dough with a clean, dry dish towel to prevent it from rising. Allow it to rise for approximately 10 minutes in a warm, draft-free environment. Preparing the filling while the dough is rising is recommended. Combine the filling ingredients in a large mixing bowl until well blended. Remove from consideration
- Turn the dough out onto a floured board and roll it into a rectangle measuring 12×16 inches
- Spread the filling on top of the dough. Roll the dough up lengthwise, squeezing the seam together to seal it. Cut into 12 pieces and place in the baking dish that has been prepared. In order to cut the dough, I use a serrated knife. Cover the baking dish with a dish towel and let aside for approximately 15 minutes to allow the dough to rise. Meanwhile, preheat the oven to 350 degrees Fahrenheit. 30 minutes or until the rolls are golden brown and cooked through
- Let the honey buns cool in the pan for 5 minutes before removing them from the pan
- While the buns are cooling, combine the frosting ingredients in a separate bowl. The icing will be very thick. Using a pastry brush, ice the heated buns. Allow the buns to rest for 10-15 minutes before serving.
- Any type of milk, from skim to full, will suffice. However, using a higher fat milk will result in a more soft roll
- A packet of yeast has 2 14 teaspoons of yeast, therefore you will need to use two packets to produce the equivalent of 3 12 teaspoons of yeast. If you want to use active dry yeast, let the yeast mixture remain for 5-10 minutes, or until it becomes frothy, following step 4. It is necessary to start over if your yeast does not froth or your dough will not rise
- You may need to use a bit more or a little less flour in this case. Make a decision based on the appearance and texture of the dough. You want the dough to be smooth and elastic
- Otherwise, it will be tough to work with.
1 honey bun per person Calories: 304 kilocalories (15 percent ) 48 g of carbohydrates (16 percent ) 4 g of protein (8 percent ) 10 g of fat (15 percent ) 6 g of saturated fat (30 percent ) Cholesterol: 26 milligrams (9 percent ) Sodium: 191 milligrams (8 percent ) Potassium: 82 milligrams (2 percent ) 1 gram of dietary fiber (4 percent ) Sugar (23 g) (26 percent ) 320 International Units of Vitamin A (6 percent ) Calcium: 22 milligrams (2 percent ) 1.6 milligrams of iron (9 percent ) Kate was five years old when she received her first cookbook, and she hasn’t stopped cooking since then!
Her mouth-watering dishes have appeared on Food Network, MSN, Better Homes and Gardens, Buzzfeed, The Huffington Post, and other publications.
Reader Interactions
Advertisement
Directions
- The first step is to prepare the dough. In a small mixing dish, combine the yeast and warm water. Allow for around 5 minutes till the foam appears. Advertisement
- Step 2
- Using a mixer on medium speed, whisk together the milk, butter, eggs, honey, salt, and vanilla extract. Whisk for 1 minute after adding the yeast mixture. Change to the dough hook and drop the speed to low before adding 4 cups flour. Raising the speed to medium and continuing to knead the dough
- Step 3
- Adding remaining flour, 1/2 cup at a time, mixing until the dough no longer adheres to the sides of the bowl. Increase the speed to medium-high and knead for a total of ten minutes. Alternative: Knead by hand for 15 to 20 minutes, or until the dough is smooth and elastic.
- Step 4: Turn the dough out onto a lightly floured surface and knead for about 5 minutes, or until the dough is extremely smooth and elastic. Set aside until twice in bulk, about 1 hour, in a lightly oiled bowl covered with plastic wrap in a warm, draft-free place. Step 5: Prepare the filling and the topping for the pie: In a medium-sized saucepan, melt the butter over medium heat. Bring the honey, corn syrup, and sugar to a soft simmer over low heat, then remove from the heat. Allow for cooling. Step 6: Punch down the dough once it has been mixed with the mascarpone and crème fraiche. Turn the dough out onto a lightly floured board and divide it into three equal halves. Each should be rolled into a ball. Freeze 2 for a maximum of three months (thaw in the refrigerator before using). Roll the remaining dough into a 10-by-13-1/2-inch rectangle using a rolling pin. Lightly brush the top with honey before spreading the mascarpone mixture evenly on top, leaving a 1-inch border around the edge, and topping with nuts. Begin by rolling the dough into a log from one long side. Seal the seam by pinching it together. Using a sharp knife, cut nine slices 1 1/2 inches thick
- Using an 8-inch square baking pan, pour the honey mixture into the pan. Place the buns on the pan, cut sides down, three buns to a row. Wait until the buns have doubled their size in a warm, draft-free location for 30 to 40 minutes
- 8th step
- Preheat the oven to 375 degrees Fahrenheit. Place the oven rack in the lowest third of the oven. Bake the buns for about 1 hour, flipping halfway through, until they are golden brown and bubbling. (If the buns begin to brown too soon, cover them with aluminum foil.) Place a wire rack on a baking sheet and set aside. Invert the buns onto the rack as soon as possible. Serve immediately after drizzling with honey.
Cook’s Notes
Honey may be kept at room temperature for up to two years. Alternatively, if the honey has stopped flowing freely, place the bottle in warm water; the mild heat will bring the honey back to its liquid condition.
Honey Buns for Two
There is nothing more romantic than a cozy breakfast in bed on a Saturday morning! If you make these light and fluffy Honey Buns for Two, your honey bun will be grateful to you for the rest of his life! Whatever the occasion (a great weekend or a regular Tuesday), handmade food is the most meaningful present you could ever give someone else. In these modern times, Matt and I strive to maintain a house full of healthful snacks such as thisPB J Snack Mix or theseAir-Fryer Maple Blueberry Oatmeal on hand, but back in the day, he was all about the prepackaged honey buns from our childhood days.
This recipe makes just four buns, which will be gobbled in 5 minutes flat, or you may reserve one for the afternoon or, my personal favorite, a midnight snack (see recipe notes).
It’s ridiculously simple, and the most difficult step is just waiting for the dough to rise.
The consumption of pastries is a weakness of mine. I’m not sure how many times I’ve cooked these Overnight Cinnamon Rolls, but it’s a lot. There’s something comforting about a warm loaf of soft doughy baked bread topped with sweet icing and enjoyed with a hot cup of coffee.
IngredientsSubs
- You might also use quick yeast instead of active dry yeast if you like. If you want to use instant yeast instead of active dry yeast, you may skip the process of dissolving the yeast in liquid and just add it to the dough right away. After that, you’ll add the water directly to the flour as well, rather than combining it with the yeast beforehand. Whenever you use instant yeast instead of active dry yeast, lower the amount of yeast you use by 25 percent. If you choose, you may substitute another flour blend for the all-purpose flour. I haven’t tested it with gluten-free flour, but I have had success with wheat flour. Whole milk – We require the fat content of whole milk in our application. Unsalted butter — You may also use salted butter, but you might want to reduce the amount of salt you use by a sprinkle. Egg yolks, granulated sugar, sea salt, and cinnamon are all used in this recipe.
Cooking in canola oil is recommended, although any neutral vegetable oil with a high smoke point will do.
For the glaze
- Pure vanilla essence
- Powdered sugar and honey
- Water
- Sea salt
How to Make
- In a small mixing bowl, whisk together the yeast and warm water until the yeast is completely dissolved. Allow for around 5 minutes till the foam appears. If your yeast does not froth, it is possible that it is bad, and you will need to experiment with different yeast. The ingredients for the dough are combined in the bowl of a stand mixer fitted with a dough hook: flour, milk, butter, egg yolks, sugar, salt, cinnamon, and yeast mixture. After stirring all of the ingredients combined, turn the mixer to low and continue mixing until the dough is soft and elastic. Increase the pace to medium-high and continue to beat for another 3 minutes. If you notice dry particles accumulating at the bottom of the mixer, you may need to stop the mixer every few minutes. Toss everything together with your hands, then continue kneading with the dough hook until you have a consistent ball of dough
- Lightly dust a work surface and roll out the dough on it once it has been lightly floured. Cover the bowl with plastic wrap and allow the dough to rise at warm room temperature until doubled in size, approximately 1 hour. The dough should be rolled out into a rectangle with dimensions of approximately 4 x 10 in. The cinnamon powder should be sprinkled on top of the dough and distributed evenly. The dough should be rolled into a log along the shortest side of the dough. The dough log should be cut into four pieces of similar size. By pushing on the sliced edges of the bun, you may make it a little flatter. If the ends appear to be fraying, try tucking them into one of the other layers to keep them from falling out. Place them on a baking sheet with the sliced side facing up. Cover and let aside for approximately 10 minutes while you heat the oil and prepare the glaze. While the buns are cooling, combine the powdered sugar, honey, water, salt, and vanilla in a large mixing bowl until there are no lumps. Pour 4 cups of oil into a 3-quart pot and bring to a boil. To measure the temperature, attach a candy thermometer to the pan’s side such that the bulb of the thermometer is submerged in the oil to be read. Heat the oil over medium-high heat until it reaches 355 degrees Fahrenheit. Fry one bun at a time in a hot skillet. Gentle lower the bun into the heated oil and let it to cook and brown for 1-2 minutes, or until it is golden brown. Fry for another 1 minute on the other side after flipping. For a further 15 seconds, rotate the bun in the oil, checking to make sure that every part of the bun is drenched with extremely hot oil. Remove the item and place it on a wire rack as soon as possible. Return the oil to 355 degrees Fahrenheit between batches and cook the remaining buns, transferring them to a wire rack when they are finished
- Allow the excess glaze to drip off the buns once they have been dipped in the glaze mixture. Even though the honey buns taste best when eaten immediately, they may be kept in an airtight container for up to 3 days
Can you bake?
Sure! The flavor of the typical fried honey buns will be absent, but they are still wonderful anyway! Preheat the oven to 350 degrees Fahrenheit while the honey buns are rising. After the buns have finished rising, take them from the plastic wrap and bake them for 15 to 18 minutes, or until they are golden brown.
How to store
If you’re frying the honey buns, they’re best eaten the day they’re created, which is terrible. You may preserve them in an airtight jar for up to two days, but the flavor won’t be as as wonderful as it would be otherwise. Just like a stale doughnut from the previous day. If you fear you won’t be able to finish them all, refrigerate the buns and glaze separately and drizzle the glaze on when you’re ready to eat so they don’t become soggy. Baking them means they will survive 3 to 4 days if they are stored in an airtight container after baking.
Hot Tip
To check that your yeast is still active, measure out the warm liquid for your recipe and sprinkle the yeast and a pinch of sugar on top of the liquid, stirring well. Allow it to sit for a few minutes after you’ve stirred it. If the yeast is still alive and well, it will totally dissolve into the water and the liquid will begin to fizz and bubble. This is something I do every time I prepare a dough that contains live yeast since I’ve been fooled with dead yeast far too many times.
More Breakfast Recipes You’ll Love!
Donuts with a Pumpkin Creme Filling that are simple to make Bacon with Bourbon Brown Sugar Apple Breakfast Cookies with Cinnamon and Oats The old-fashioned way Cherry Breakfast Quesadilla with French Toast (Easy)
I hope youenjoythis recipe! Take a browse around the site andplease let me know if you make anything by leaving a comment and rating the recipe below. Don’t hesitate to reach out if you have any questions, concerns, or requests!
The original version of this piece was published on February 6, 2018.
Ingredients
- A 3/4 teaspoon active dry yeast, 1 tablespoon warm water, 1 cup all-purpose flour, 1/4 cup warmed whole milk, 1 tablespoon unsalted butter, softened, 1 large egg yolk, 2 teaspoons granulated sugar, 1/2 teaspoon sea salt, a pinch of ground cinnamon and 1 teaspoon ground cinnamon, divided
- 4 cups canola oil for frying
For Glaze
- A mixture of 1/2 cup powdered sugar, 1 tablespoon honey, 1 tablespoon water, a little sprinkle of sea salt, and 1/8 teaspoon pure vanilla essence
Instructions
- In a small mixing bowl, whisk together the yeast and warm water until the yeast is completely dissolved. Allow for around 5 minutes till the foam appears. If your yeast does not froth, it is possible that it is bad, and you will need to experiment with different yeast. The ingredients for the dough are combined in the bowl of a stand mixer fitted with a dough hook: flour, milk, butter, egg yolks, sugar, salt, cinnamon, and yeast mixture. After stirring all of the ingredients combined, turn the mixer to low and continue mixing until the dough is soft and elastic. Increase the pace to medium-high and continue to beat for another 3 minutes. If you notice dry particles accumulating at the bottom of the mixer, you may need to stop the mixer every few minutes. Toss everything together with your hands, then continue kneading with the dough hook until you have a consistent ball of dough
- Lightly dust a work surface and roll out the dough on it once it has been lightly floured. Cover the bowl with plastic wrap and allow the dough to rise at warm room temperature until doubled in size, approximately 1 hour. The dough should be rolled out into a rectangle with dimensions of approximately 4 x 10 in. The cinnamon powder should be sprinkled on top of the dough and distributed evenly. The dough should be rolled into a log along the shortest side of the dough. The dough log should be cut into four pieces of similar size. By pushing on the sliced edges of the bun, you may make it a little flatter. If the ends appear to be fraying, try tucking them into one of the other layers to keep them from falling out. Place them on a baking sheet with the sliced side facing up. Cover and let aside for approximately 10 minutes while you heat the oil and prepare the glaze. While the buns are cooling, combine the powdered sugar, honey, water, salt, and vanilla in a large mixing bowl until there are no lumps. Pour 4 cups of oil into a 3-quart pot and bring to a boil. To measure the temperature, attach a candy thermometer to the pan’s side such that the bulb of the thermometer is submerged in the oil to be read. Heat the oil over medium-high heat until it reaches 355 degrees Fahrenheit. Fry one bun at a time in a hot skillet. Gentle lower the bun into the heated oil and let it to cook and brown for 1-2 minutes, or until it is golden brown. Fry for another 1 minute on the other side after flipping. For a further 15 seconds, rotate the bun in the oil, checking to make sure that every part of the bun is drenched with extremely hot oil. Remove the item and place it on a wire rack as soon as possible. Return the oil to 355 degrees Fahrenheit between batches and cook the remaining buns, transferring them to a wire rack when they are finished
- Allow the excess glaze to drip off the buns once they have been dipped in the glaze mixture. Even though the honey buns taste best when eaten immediately, they may be kept in an airtight container for up to 3 days
Nutrition Information:
Yield:4Serving Size: 1Servings per container: Calories:230 13 g of total fat 6 g of saturated fat 0 g of Trans Fat 0 g of unsaturated fat Cholesterol:2mg Sodium:170mg Carbohydrates:26g Fiber:0.5g Sugar:13g Protein:2g
Homemade Honey Buns – Farm Bell Recipes
Loading. The same as the popular goodie from the store–but better! CITRDifficulty:EasyCITRDifficulty:EasyCITRDifficulty:Easy Servings:12 Preparation time: 2 hoursCooking time: a few minutes on each side
Ingredients
3 cups unbleached all-purpose flour the equivalent of 2 tablespoons (or two packages) yeast 3/4 cup whole milk a third of a cup of honey 1/4 cup melted butter a half teaspoon of salt 2 quail eggs
Directions
In a large mixing bowl, whisk together 1 1/2 cups of the flour and the yeast. In a small saucepan, cook the milk, honey, butter, and salt over low heat until warm. Pour the heated milk/butter mixture into the mixing bowl with the flour and yeast, stirring to combine. In a separate bowl, whisk together the eggs. Make a smooth paste using an electric mixer by mixing on low for 30 seconds and then high for 3 minutes. Begin by incorporating as much of the remaining cup and a half of flour as possible using a spoon before beginning to knead.
- Allow the dough to rise for approximately one hour in a greased basin.
- Using a half-inch thickness, roll out the dough.
- On a floured surface, spread out the dough flat and fairly thickly, then begin rolling it up from the bottom.
- You could prepare this the night before and have the roll ready to slice and cook the next morning!
- Allow the cut buns to rise for approximately 30 minutes.
- In the event that your oil is too hot, your buns will brown too rapidly on the surface while remaining undercooked on the inside–make certain that your oil temperature allows you to fry for one complete minute each side.
- Honey Glaze with Powdered Sugar: 3 teaspoons of melted butter 1 tblsp.
- Remove the pan from the heat.
- Just enough hot water to thin the glaze to a dripping consistency is all that is needed.
It appeared to balance out the flavor of the glaze just perfectly. If you don’t want to include it, you may leave it out. Breads, Breakfast, Pastries, and Yeast Breads are some of the categories available. Suzanne-McMinnon has submitted a submission. The 13th of February, 2015
Honey Buns Reimagined
In a large mixing basin, whisk together 1 1/2 cups flour and the yeast until well combined. Melt the butter, honey, and salt in a small saucepan over low heat, stirring constantly. Pour the heated milk/butter mixture into the mixing bowl with the flour and yeast, stirring until well combined. In a separate bowl, combine the eggs. Mix on low for 30 seconds, then on high for 3 minutes, using an electric mixer. Begin by incorporating as much of the remaining cup and a half of flour as possible using a spoon before beginning to knead the dough.
- Allow for roughly an hour of rising time in a greased bowl.
- Extend the sheet of paper to a thickness of half an inch.
- On a floured surface, lay out the dough flat and fairly thickly, then begin rolling it up the dough.
- You could prepare this the night before and have the roll ready to slice and cook in the morning.
- Allow 30 minutes for the cut buns to rise.
- In the event that your oil is too hot, your buns will brown too rapidly on the exterior while remaining undercooked on the interior.
- It is recommended that the oil temperature be approximately 365 degrees Fahrenheit.
Sugar and Honey Glaze with Powdered Sugar: Butter (about 3 tablespoons) Honey (about 1 tbsp.) boiling water and freshly grated nutmeg 1 1/2 cups powdered sugar (optional) Melt the butter and honey together in a small saucepan over medium heat.
In a large mixing bowl, combine the powdered sugar and boiling water.
1/4 teaspoon freshly grated nutmeg was used in this recipe.
It’s entirely optional to leave that out.
Suzanne-McMinnon submitted this entry.
- 1/2 cup lukewarm water
- 2 packages active dry yeast
- 1/3 cup sugar plus a pinch, separated
- 2 Tablespoons honey
- 1/2 teaspoon salt
- 1/2 cup lukewarm milk
- 2 large sggs, lightly beaten
- 1/2 cup salted butter, softened
- 4-1/2 cups all-purpose flour (plus a little extra for kneading)
- 4 1/2 cups all-purpose flour (plus a little extra for kneading)
- 4 1/2 cups all
half a cup lukewarm water; 2 packages active dry yeast; 1/3 cup sugar and a pinch of salt, separated; 2 Tablespoon honey; 1/2 teaspoon salt; half a cup lukewarm milk; 2 large eggs, lightly beaten; 1/2 cup salted butter, softened; 4-1/2 cups all-purpose flour (plus a little extra for kneading); 4 1/2 cups all-purpose flour (plus a little extra for kneading); 4 1/2
- 1/4 cup salted butter, melted
- 1/4 cup sugar
- 2 teaspoons honey
- 1/4 cup flour
For the honey glaze, combine the following ingredients:
- Ingredients: 2 cups powdered sugar, 2 tablespoons honey, 3 tablespoons water
Start by placing the yeast in a measuring cup or small bowl and adding lukewarm water to the mixture. Stir everything together and leave it aside for a few minutes while you get ready for the next stage. 3. Place all of the ingredients in a large mixing basin and whisk until well combined. Stir until the sugar is completely dissolved. 3. Pour the milk mixture into a mixing bowl and stir in the proofed yeast. Toss in the eggs and butter. Mix until everything is well-combined. 4. Gradually incorporate the flour, adding only enough to form a smooth dough that comes together and leaves you with a clean basin.
- You may require more or less flour depending on the weather, humidity level, and other factors.
- Knead for approximately 4 minutes on a lightly floured surface after turning out the dough.
- Using the same bowl, use the butter wrapper to clean the interior of the bowl.
- Proof for 1 hour or until the bowl has doubled in size by covering it with plastic wrap or a tea towel and setting it in a warm area.
- Prepare the honey butter filling by combining the butter, honey, and sugar in a mixing bowl.
- Eighth, lay out the proofing dough on a lightly floured surface to form a about 10-inch-by-18-inch rectangular shape.
- Spread the filling over the dough in a uniform layer.
10.
11.
12.
Caution should be exercised when baking them, since the food will continue to cook in the pan as it cools.
Prepare the powdered sugar mixture by mixing it with the honey and water in a small mixing dish until smooth.
When glazing buns, you have two options: do it while they are still warm for a thinner glazed bun, or do it when they are almost cool for an iced bun.
If you have any leftover honey buns, keep them in an airtight jar on your counter or in your pantry for up to three days.
Thank you for taking the time to look through this recipe.
Let us know if you make these by tagging us on Instagram @the chopping block as well as my personal page @yummycrumbfdon A private Facebook community of home chefs who share their culinary exploits is also available at The Chopping Block – please consider joining us!
Honey Buns
Preparation time: 30 minutes Preparation time: 25 minutes Time allotted: 55 minutes
Ingredients:
In order to make the dough
- A mixture of 1/2 cup warm water, two packets of active dry yeast, 1/3 cup sugar plus a sprinkle of salt, separated, two tablespoon honey, and one-half teaspoon salt. Half a cup Lukewarm Milk
- 2 large eggs, lightly beaten
- 1/2 cup salted butter, softened
- 1/2 cup sugar
- Four and a half cups all-purpose flourmore for kneading
In order to make the honey butter filling
- 4 tablespoons salted butter, softened
- 4 tablespoons sugar
- 2 tablespoons honey
In order to make the honey glaze
Instructions:
- Add the lukewarm water, a sprinkle of sugar, and the yeast to a measuring cup or small mixing bowl. Stir everything together and leave it aside for a few minutes while you get ready for the next step. Warm the milk, honey, sugar, and salt in a large mixing basin until well combined. Stir until the powder is completely dissolved. To the milk mixture, add the yeast that has been proofed. Toss in the eggs and butter. To blend, mix until well-combined. Gradually incorporate the flour, adding enough enough to form a smooth dough that comes together and leaves you with a clean bowl at the end of the process. You may require more or less flour depending on the weather, humidity level, and other factors. Place dough on a lightly floured area and knead for approximately 4 minutes. Using the same bowl, use the butter wrapper to clean the interior of the bowl. To prevent the dough from drying out during the proofing process, place it in a large mixing basin and flip it many times to coat it with butter. Proof for 1 hour or until the bowl has doubled in size by covering with cling film or a tea towel in a warm location
- Prepare the Honey Butter filling by combining the butter, honey, and sugar in a mixing bowl. Stir until the mixture is smooth. On a lightly floured surface, lay out the proofed dough into a rectangle roughly 10″ by 18″
- Repeat with remaining dough. Spread the filling over the dough in a uniform layer. Roll up the dough tightly starting from the long length and squeeze the edges together to fasten
- Cut into 12 equal-sized buns and set in a 9X13 pan that has been thoroughly oiled
- Cover the pan and set it aside for another 20 minutes while you pre-heat the oven to 375°F. Remove the lid and bake for 25 minutes, or until the top is just beginning to turn golden brown. Avoid overbaking them since they will continue to cook in the pan as they cool. Preparing the honey glaze while the buns cool is a good idea. Prepare the powdered sugar mixture by mixing it with the honey and water in a small bowl until smooth. There are two alternatives for glazing buns: while they are still warm for a thinner glazed bun, or when they are almost cool for an iced bun (see note below).
Baking, honey buns (recipes), and yeast are some of the topics covered in this section.