
Pie
What Dessert Can I Make With A Pie Crust, Hot Fudge, Cool Whip Help
Mar
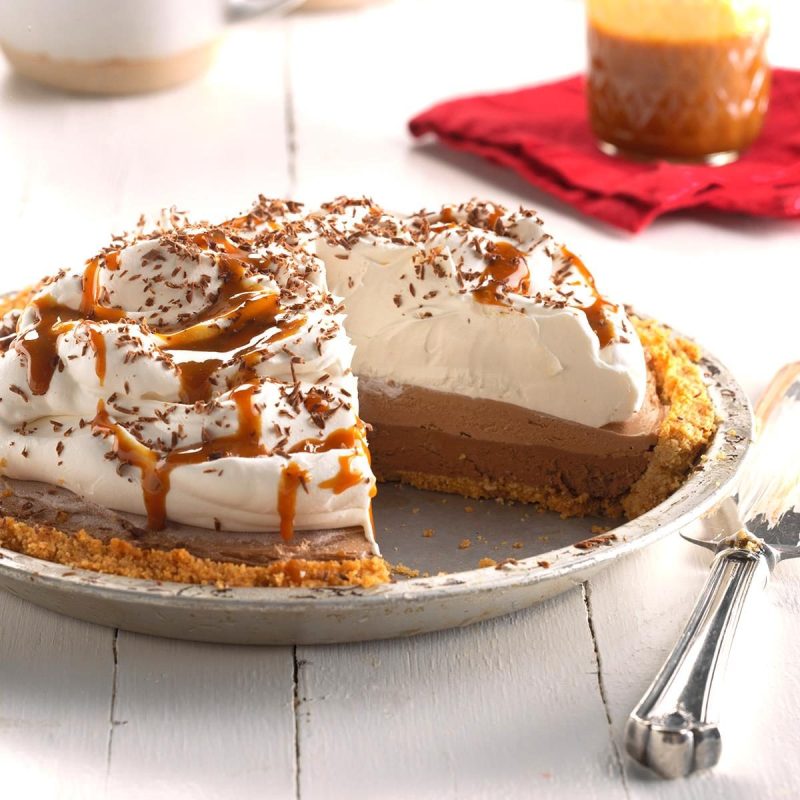
Using pre-made Oreo crust, Cool Whip, quick Jell-O chocolate pudding and half-and-half, this No Bake Chocolate Dessert is simple to create! No baking required! This is a simple dish that can be completed in about 30 minutes. It’s a hit with both children and adults. There is no need to preheat the oven! It is topped with delectable chocolate shavings to complete this double chocolate layer pie. My creation was constructed using milk chocolate Hershey’s bars and grated black chocolate! In contrast to my No Bake Oreo Dessert, where I used crushed Oreos to form the crust, I utilize prepared Oreo crust in this recipe.
Perfect for the hot summer months when you don’t want to turn on the oven!
However, the appearance is different.
In order to create the lighter layer, combine cool whip with the chocolate pudding layer.
TOOLS YOU WILL NEED TO MAKE NO BAKE DESSERT
Making pudding will necessitate the use of a whisk, such as this stainless steel comfortable handle whisk. The use of a spatula will assist you in spreading the layers. While you will be using a vegetable peeler for chocolate embellishment on top, such as this serrated swivel peeler, you will be using a vegetable peeler for the base. I also used a medium-sized bowl, such as one of thesenon-slip stainless steel dishes that come with lids, to prepare the dish.
Ingredients to Make No Bake Chocolate Pudding Cream Pie
- A pre-made Oreo pie crust
- 2 cups half-and-half
- 2 packages chocolate instant pudding – make sure it is INSTANT since this no bake dessert will not work with pudding that has been cooked on the stove top. I made chocolate pudding using Jell-O. Ice cream (1 box)
- Hershey’s milk chocolate bar for chocolate shavings to decorate the pie’s top
- Cool Whip (1 package)
- Dark chocolate is used to make chocolate dust.
Why Make No Bake Double Chocolate Layer Cream Pie
- It’s simple and quick to put together. Use it for potlucks, church events, and birthday parties, especially during the hot summer months
- It’s also good for a variety of other occasions. You may prepare it ahead of time: It is free time or refrigerateit
- There’s no need to turn on your oven. It’s ideal for those hot summer months when you want to keep the house as cool as possible. The Oreo crust and chocolate layers are a hit with the kids.
How to make chocolate pudding mix for this no bake chocolate dessert
Please disregard the directions on the pudding mix’s package label. Two cups of milk per box of MyInstant Chocolate Pudding Mix – Jell-O was recommended by the manufacturer on the carton. This would result in a total of 4 cups for both boxes. However, we will not be adding nearly as much liquid as previously stated. In this recipe, we combine two packages of Instant Chocolate Jell-O pudding mix with a total of two cups of half-and-half milk. The weight of each packet is 3.4 oz. Using half and half instead of milk will result in a higher fat content in the final product.
That’s exactly what we need in order for the layers to be lovely and distinct from one another.
REFRIGERATE EASY NO BAKE CHOCOLATE PUDDING CREAM PIE
Refrigerate the pie for at least 4 hours, if not overnight, to make it easier to cut and divide. The freezer may be used to quickly firm up the layers by placing them in the freezer for 1 to 2 hours. Although the pudding will not yet be frozen, it will be firm enough to split easily at this point in the cooking process.
Step by Step Photo Directions
Remove the pie crust from the packaging, but be sure to keep it enclosed in the aluminum foil. Do not try to remove it by turning it upside down or turning it inside out. Alternatively, it will disintegrate and be destroyed. The crust is quite crumbly and crumbly. Take precautions. Half and half should be added to a medium-sized mixing bowl. Afterwards, add both packages of instant chocolate pudding to the pan. Mix for 2 minutes with a whisk, or until all of the mix has been dissolved. Allow the pudding to lie in the fridge or freezer for a further 5 minutes to thicken up a little more.
- It is necessary to combine the leftover pudding with Cool Whip in order to create the second layer of cake.
- Combine the remaining 12 cups of chocolate pudding in a mixing basin with 12 tablespoons of the Cool Whip packet.
- Place the second layer of Chocolate Pudding/Cool Whip on top of the first layer.
- Spread the Chocolate Pudding/Cool Whip layer using a spatula to ensure that it is evenly distributed: On top of the second layer, spread the leftover Cool Whip.
- I used my spatula to produce the spikes by making quick circular motions with it: Prepare the vegetable peeler, Hershey’s milk chocolate bar, and Hershey’s dark chocolate bar before starting.
- To generate textured chocolate shavings, I used a vegetable peeler with a serrated stainless steel blade to create a rough surface.
- The large strips of milk chocolate are made from Hershey’s milk chocolate, while the finer dust is made from grated bittersweet chocolate.
- Make sure to buy a fair amount of chocolate shavings as well as a little chocolate dust for this recipe.
This No-Bake Chocolate Cream Pie is completely finished! Make sure to put it in the refrigerator for at least 4 hours (preferably over night). You may alternatively put it in the freezer for at least 1 hour before attempting to chop through it.
No Bake Chocolate Pudding Cream Pie
Chocolate Pudding That Doesn’t Need to Be Baked It is simple to prepare Cream Pie utilizing a readymade Oreo crust, Cool Whip, chocolate pudding, and half-and half as ingredients. This double chocolate layer pie is topped with delectable chocolate shavings made from Hershey’s milk chocolate and grated dark chocolate, and it is really scrumptious! Preparation time: 20 minutes Time allotted: 20 minutes Course:Dessert Cuisine:American No bake chocolate cream pie with oreo crust, no bake chocolate pie, no bake chocolate pudding pie, no bake chocolate pudding pie Servings:8
- 1-inch Oreo pie crust
- 2-boxes instant chocolate pudding (such as Jell-O), 3.4 oz each (such as Jell-O)
- 2 cups half and half (or half cream/half milk)
- 8-ounce Cool Whip (1 container) thawed
- 1-milk chocolate bar (such as Hershey’s)
- 1 dark chocolate bar (for garnish)
- 1-inch Oreo pie crust
- Remove the pie crust from the packaging and place it inside the aluminum wrap. Do not flip it upside down or attempt to remove it
- Otherwise, it will disintegrate and be completely ruined.
Prepare Chocolate Pudding
- Removing the pie crust from the packaging and storing it within the aluminum foil is recommended. Do not flip it upside down or attempt to remove it
- Otherwise, it will collapse and be completely ruined.
First Layer
- Fill the pie crust with approximately half of the chocolate pudding mixture. Spread the mixture evenly with a spatula
Second Layer
- Mix together with a spatula the other half of the chocolate pudding in the bowl with the remaining 12 of the Cool Whip package until it forms a smooth, homogeneous consistency. Place the second layer of chocolate pudding and Cool Whip on top of the first layer. Even it out with a spatula if necessary.
Cool Whip Layer
- Spread the leftover Cool Whip on top of the cake. Using a spatula, spread the Cool Whip on top of the second layer of cake. Making the spikes with my spatula was easy
- Using a vegetable peeler, produce ornamental chocolate shavings out of Hershey’s Milk Chocolate and sprinkle them on top of the Cool Whip with a little sprinkle of sea salt. Finally, using the same peeler, grate some dark chocolate on top of everything.
Refrigerate before slicing
- Refrigerate the cake for at least 4 hours or preferably overnight before attempting to slice it! You can also freeze it for at least 1 hour. This step is necessary for the layers to set and become firm
Nutritional Values No-Bake Chocolate Pudding Cream Pie (no baking required) Amount Per Serving (in grams) calories281 calories from fat 117 percent of the daily value* fat13g20 percent saturated fat 8g calories281 calories from fat 50 percent of the total Amount of Cholesterol38mg13 percent Sodium412mg18 percent Potassium213mg6 percent Carbohydrates36g12 percent Fiber 1g4 percent Sodium412mg18 percent Sugar (24g27 percent) Protein (48g8 percent) Vitamin A (380IU) Vitamin A (380IU) Vitamin C (0.8mg1 percent) is an antioxidant.
- Calcium136mg *14 percent Iron0.4mg2 percent chromium A 2000-calorie diet is used to calculate the percent Daily Values (%DV).
- This information has been gathered from internet calculators and databases.
- But hold on, there are even more delectable no-bake treats in store for you later!
- Lemon Pudding Cream Pie that does not need baking as well as delectable Easy Black Forest Cheesecake that doesn’t require baking.
Chocolate Cream Pie
This post may include affiliate links, which means that if you click on a link in this post and make a purchase, I may get a commission at no additional cost to you. All of the opinions expressed are my own. You may read my complete disclosure policy by clicking here. This simple Chocolate Cream Pie recipe may be made in a hurry using store-bought components (such as pie crust, Jello pudding, and Cool Whip), or it can be made totally from scratch using only fresh ingredients. Including both recipes for this wonderful bakery-style pie, which is filled with creamy chocolate pudding and topped with sweetened whipped cream, then baked in a flaky pastry crust to perfection.
Easy as pie!
In one of the bakeries where I worked, we used to prepare these chocolate cream pies, which were delicious. They were really quick to prepare and tasted fantastic! It is, without a doubt, one of the easiest pies to put together, especially if you use pre-made components. This pie is a chocolate lover’s dream come true, and it’s especially good for holidays because it is devoured in no time!
Chocolate Cream Pie vs. Chocolate Pudding Pie
The majority of people believe that Chocolate Cream Pie and Chocolate Pudding Pie are the same thing, however there is a tiny distinction between the two desserts to consider. When we created chocolate cream pie in the bakery, we would combine the whipped cream with the pudding and then put additional whipped cream on top of the pie for decoration. Making the chocolate pudding with whipped cream makes a significant change in the texture of the pudding.
Making a lighter, creamier chocolate pie is the goal. The majority of other recipes simply call for making chocolate pudding for the filling and sprinkling whipped cream on top of the pie. While this is still tasty, it is not the same as a real Chocolate Cream Pie in terms of texture and flavor.
Chocolate Cream Pie — Two Ways
It is possible to make Chocolate Cream Pie entirely from convenience foods, entirely from scratch, or a combination of the two, as you can see in my photo below. You will need the following ingredients for this recipe:
- Pie crust can be produced from scratch or purchased from a store. If I were to purchase a pre-made pie crust, I would use a frozen pie crust and bake it according to the package guidelines. To defrost a frozen Great Value pie crust, pierce the crust all over with a fork and bake it at 400 degrees F for 10 to 12 minutes, follow the directions on the package.
- Dessert: Chocolate Pudding– I have a quick and easy chocolate pudding recipe that uses chocolate chips, but nothing matches the convenience of Jello instant pudding from a box. If you want to make the pudding from a box, you will need milk to combine it with. I use half the quantity specified in the pudding recipe, or one cup less than specified in the pie filling recipe. Because you’ll be folding it with whipped cream, you’ll want it to be rather thick. Once again, if you want to save time, an 8-ounce container of Cool Whip (frozen whipped topping) is the quickest and most convenient option. If you want handmade sweetened whipped cream, all you have to do is whisk heavy cream and powdered sugar together. In this recipe, both can be used interchangeably. The addition of more chocolate to the pie’s top is entirely optional, although it makes for a beautiful finishing touch. I wanted to appear a little more formal, so I went with some chocolate curls. They might be a little finicky, but they make a lovely garnish. To make shavings of chocolate, all you need is a vegetable peeler and a bar of chocolate. Alternatively, micro chocolate chips might be used.
For the Pie Crust
You will need to blind bake the crust for this chocolate cream pie, as well as for any other cream, lemon, or soft-filling pie that you make. This signifies that you are baking the empty crust on its own without any help. You may make a store-bought crust by simply following the directions on the package. You will need flour, salt, butter, and cold water to make a handmade all-butter pastry crust. (A printable version of the recipe card is included at the bottom of this page.)
- Prepare the pie dough and place it in the refrigerator. Then lay out the pie dough, fill it, and crimp it into a 9-inch pie plate. Prick the bottom and edges of the crust with a fork
- Place a piece of parchment paper inside the shell and fill it with raw, dry beans (approximately 12 pounds) to make a pie shell. As baking, the beans act as a weight to hold the crust in place while it bakes. (Please note that these beans are no longer suitable for cooking and eating thereafter, but they can be kept and used for the same purpose in the future.)
- Bake for 20 minutes at 350 degrees Fahrenheit, then remove the paper and beans and bake for another 12-15 minutes, or until the top is golden brown. Allow the crust to cool fully before cutting into it. (See here for a step-by-step guide on how to make pie crust.)
For the Filling
Refrigerate the pie dough while you prepare it. Fill a 9-inch pie plate halfway with the mixture before rolling and crimping the crust. Fill the shell with raw, dry beans (approximately 12 pound) after pricking the bottom and sides with a fork. Place a piece of parchment paper inside the shell and close the lid. As the crust bakes, the beans act as a weight to keep it from falling apart. The beans are no longer edible after cooking and eating them, but they can be kept and used for the same purpose in the future.
Allow for thorough cooling of the crust.
To Assemble
Half of the whipped cream should be combined with the pudding mixture. Fill the pie crust with the chocolate filling and distribute it evenly with a spatula once it has been pre-baked. Sprinkle chocolate curls, chocolate shavings, or small chocolate chips on top of the chocolate pudding layer after spreading the remaining whipped cream on top.
Serving and Storing
In the case of this chocolate cream pie made using instant pudding, it can be sliced and served soon after it has been filled, if desired. If you are using homemade pudding, you may wish to refrigerate the pie for 4+ hours before slicing and serving it to help it firm up. Cover and refrigerate for up to 5 days in the refrigerator after preparing. You may freeze this pie without the chocolate shavings on top if you want to save time. In order to provide an additional layer of protection, I would put plastic wrap directly into the whipped cream and then add a layer of foil over that, or store it in a freezer-safe bag.
After freezing, defrost the pie in the refrigerator overnight before serving.
More HolidayPies
- Fruit pies include Apple Pie, Cherry Crumb Pie, Blueberry Cream Cheese Pie, Key Lime Pie Recipe, Frozen Berry Pie, Jello Coconut Cream Pie Recipe, Lemon Cream Cheese Pie, Razzleberry Pie, Blueberry Pie with frozen blueberries, Cranberry Apple Pie, Caramel Banana Cream Pie, Lemon Key Lime pie, Raspberry pie, and Strawberry Pie.
If You Make This Recipe, Please Rate and Review it in the Comments Below. THANKS!
- Fruit pies include Apple Pie, Cherry Crumb Pie, Blueberry Cream Cheese Pie, Key Lime Pie Recipe, Frozen Berry Pie, Jello Coconut Cream Pie Recipe, Lemon Cream Cheese Pie, Razzleberry Pie, Blueberry Pie with frozen blueberries, Cranberry Apple Pie, Caramel Banana Cream Pie, Lemon Key Lime pie, Raspberry pie, and many more.
Chocolate Pudding
- 1 (5.85oz) big box Instant Chocolate PuddingPie Mix
- 1 (5.85oz) large box Instant Chocolate PuddingPie Mix
- 1 1/2 cups COLD milk
- 1 1/2 cups sugar
Whipped Cream (or use one 8oz tub Cool Whip)
- 1 1/2 cups heavy cream
- 6 tablespoons powdered sugar
- A chocolate bar or mini chocolate chips for shaved chocolate
Instructions
Pie Crust (also known as a pie crust):
- In a large mixing basin, whisk together the flour and salt. Using a fork or pastry blender, break up the butter into small pieces. Fill the container with water. Mix with your hands until the dough comes together into a ball, adding additional water 1 tablespoon at a time if necessary. Make a flat disc of dough, wrap it in plastic wrap, and place it in the freezer for 15 minutes or the refrigerator for 30 minutes
- Flour the counter and rolling pin. Remove the pie crust from its packaging. Roll the dough from the center outwards, rotating the dough after a few rolls, until it is smooth and elastic. Extra flour can be sprinkled below if necessary to keep it from sticking to the counter. To make the crust, continue rolling and twisting the dough until it is approximately 14 inches thick and perfectly spherical. Gently fold the pie dough in half and lift it into a 9-inch pie plate to finish baking. Unfold the crust and press it into the pan. Trim away any extra crust and crimp the edges. Prick the bottom and sides of the crust with a fork. Place a circular piece of parchment paper into the crust and fill it with raw, dry beans
- Bake at 350 degrees Fahrenheit for 20 minutes or until the crust is golden brown. Remove the parchment paper and beans from the baking sheet and bake for another 12-15 minutes, or until the top is golden brown. Allow to cool fully
Chocolate Pudding (recipe below):
- Combine the chocolate pudding mix and milk in a mixing dish. Will thicken in a short period of time. Remove from consideration
Whipped Cream (also known as whipped topping):
- Heavy cream and powdered sugar are whisked together in the bowl of a stand mixer fitted with the whisk attachment until firm peaks form.
- Fold in half of the whipped cream into the chocolate pudding mixture until it is well combined. Pour the chocolate filling into the cooked crust and smooth it out with a spatula until it is level. Using the leftover whipped cream, sprinkle the top with chocolate shavings or micro chocolate chips
- This dessert should be ready to serve practically immediately after preparation. It’s OK to chill the chocolate cream pie for 30-60 minutes before serving if you like, but the filling should be thick enough that it won’t need to be chilled for that long. Enjoy
Notes
- Bake the frozen pie dough in an empty pie shell according to the package guidelines. Refrigerate the pie for at least 4 hours after it has been assembled if you are using homemade chocolate pudding. Follow this instruction to create chocolate curls. In order to utilize Cool Whip, it is necessary to thaw frozen whipped topping in the refrigerator overnight before usage.
Nutrition Information:
Yield:8Serving Measurement: 1/8 cupAmount per serving: Calories:331 20 g of total fat 12 g of saturated fat 1 gram of trans fat 7 g of unsaturated fat Cholesterol:57mg Sodium:268mg Carbohydrates:33g Fiber:1g Sugar:12g Protein:6g This information was given and estimated by Nutritionix, and it should be considered an estimate only. Originally published on September 7, 2012.
Chocolate Pudding Pie
This recipe for Chocolate Pie is one of the simplest you’ll find. Milk, two cartons of chocolate pudding, and Cool Whip are combined to create a scrumptious chocolate pudding pie that even the most inexperienced cook can prepare.
Easy Creamy Chocolate Pie
No-bake chocolate cream pie is a popular treat to make since it is sweet and creamy. In addition, it is simple to prepare!
Why Make This Amazing No Bake Chocolate Cream Pie
First and foremost, everyone enjoys a delicious chocolate pie with Cool Whip on top. To be really honest, they are two of my fave things! You’ll be able to complete this dessert dish in no time! It is really simple to prepare, and you do not have to keep an eye on the oven to ensure that it does not over bake. Bringing this chocolate pudding pie to a variety of events, get-togethers, and potlucks has proven to be a favorite every time. I’m even thinking of bringing two chocolate pies because the first one will disappear so quickly.
Before the celebration is through, people will be clamoring for the recipe you provided.
Does Cool Whip Thicken Pudding?
Yes, cool whip may be used to thicken pudding. Because pudding is traditionally cooked with cold milk, substituting Cool Whip in lieu of or in addition to milk will result in a thicker, creamier pudding. What causes this to work? Because well-whipped cream is mostly composed of milk, the cool whip absorbs and enhances the taste of the pudding mix, resulting in a pudding that is extremely creamy and fluffy.
Does chocolate pie need to be refrigerated?
The cream pie will need to be kept refrigerated at all times since it will go bad very fast if left out on the counter or table. You may refrigerate the chocolate pudding cool whip dessert in its pie plate if you wrap it tightly with aluminum foil before placing it in the refrigerator. If you want to prevent losing part of the cool whip due to it clinging to the foil, insert several toothpicks into the foil to lift it slightly off of the surface of the pan. It’s best to chill the pie before serving it, but leaving it out at room temperature for an hour or two will be OK; just be sure to put it immediately back into the fridge after serving it.
Lifespan of Chocolate Pudding Pie
When cooking chocolate pudding pie, it is best to preserve it in the refrigerator until it is time to serve it. The pie will keep for 4-5 days in the refrigerator if it is stored properly. When it comes time to serve, the pie crust may get slightly soft and the cool whip may begin to deflate. If you want to serve this pie within the first 2-3 days of making it, feel free to prepare it a day ahead of time for your next gathering. However, it will continue to taste absolutely fantastic!
How to freeze this creamy chocolate pie
In order to keep the chocolate pudding pie fresh, it will be stored in the refrigerator while not in use. The pie will last for 4-5 days if it is stored in the refrigerator.
When it comes time to serve, the pie crust may be somewhat soft and the cool whip may be deflated. If you plan on serving this pie within the first 2-3 days after making it, feel free to prepare it a day ahead of time for your next gathering. However, it will continue to taste absolutely fantastic!
Can I Use Whipped Cream?
When creating this chocolate cream pie recipe, I do not recommend using handmade whipped cream as a garnish. Aside from that, you will want to avoid using canned whipped cream entirely. To build a pie out of whipped cream, neither handmade nor canned whipped cream will keep up long enough or have the proper structure. Observe that the whipped cream falls immediately after it has been sprayed out of the can, and that the same would be true of the chocolate pie. In addition, the whipped cream will not hold up to the strain of attempting to fold in the pudding mix for this recipe.
Making this scrumptious pie with simply Cool Whip is your best chance for achieving the greatest results.
Chocolate Pudding Pie Ingredients
Here’s a list of the supplies you’ll need:
- Cocoa powder, instant chocolate pudding mix, Cool Whip, chocolate cookie crumbs for the pie crust
How to Make Chocolate Pudding Pie
- Fill a large mixing bowl halfway with milk
- Pour in the pudding mix
- Using a wire whisk, blend the ingredients until smooth. Mix in the Cool Whip until well combined. Using a large spoon, spoon the filling into the crust and smooth it out evenly
- Refrigerate for 4 hours or until the mixture has firm.
Can I use a different type of crust?
Yes, you may use either a graham cracker crust or a traditional pastry pie crust for this recipe. If you are using a pastry pie crust, you will need to bake it until it is completely baked and cooled before you can add the filling to the crust. See thisMartha Stewart Pie Crustrecipe for a flaky handmade pie crust that is sure to wow everyone.
Love Homemade Pies? Try these recipes!
- Coconut Custard Pie, Fruit of the Forest Pie, German Chocolate Pie, Homemade Key Lime Pie, Old Fashioned Apple Pie, Sour Cream Raisin Pie, and Toll House Pie are some of the desserts you may make.
Favorite Chocolate Desserts and Treats
- Chocolate Pizza, Chocolate Peanut Butter Balls, Chocolate Pudding Cake, Chocolate Sandwich Cookies, Coca Cola Chocolate Cake, Hershey’s Brownies are just a few of the desserts you can make using chocolate.
Here on CopyKat, you can find more of my simple pie recipes as well as the greatest family dessert ideas. Ethel Eynard provided the inspiration for this dish. Located in Jefferson City, Missouri in 1998.
- 1 chocolate cookie crumb pie crust
- 134 cups milk
- 7.8 ounces instant chocolate pudding mix (two 3.9-ounce packets)
- 8 ounces Cool Whip
- 137 cups milk
- Pour the milk into a large mixing basin. Pudding mixes should be added. 2 minutes, or until the mixture is smooth, should be done with a wire whisk. The consistency of the mixture will be thick. Instantaneously fold in the Cool Whip whipped topping
- Fill the crust with the filling and press down firmly. Allow for a 4-hour chilling period or until the pie is set. Add garnishes if desired.
Refrigerate the pie after it has been made. You may substitute a graham cracker crust for the chocolate cookie crust if you want. 272kcal|44g carbohydrate|4 g protein|8g fat|3 g saturated fat|9 mg cholesterol|487 mg sodium|181 mg potassium|1 g fiber|27 g sugar|135IU vitamin A|100 mg calcium|0.9 mg iron
3 Ingredient No-Bake Hershey’s Pie
You are here: Home/3 Ingredient/3 Ingredient No-Bake Hershey’s Pie You are here: Home/3 Ingredient/3 Ingredient No-Bake Hershey’s Pie
This QuickEasy Dessert Recipe Is Simply Irresistible
Hello there, chocolate enthusiast! Check out how simple it is to prepare this creamy, delicious chocolate pie dish in the video below. It only takes three basic ingredients to create a tiny piece of culinary nirvana in your mouth. The fact that Cool Whip makes it so simple to put together tasty sweets is something I appreciate, and this one is no different. Combine it with a small amount of melted chocolate to make the greatest creamy textured pie this world has ever seen. Hershey’s Bars are typically offered in six-packs in the confectionery aisle Because they’re less expensive this way!
Also, don’t forget to put the Cool Whip in the refrigerator so that it has time to thaw out before using it!
Microwave the remaining ingredients until melted.
Fill the pie crust with the mixture, and use a cheese grater to grate the leftover chocolate bits on top to finish off the look.
Refrigerate for a minimum of 2 hours before serving. Are you looking for dessert recipes that are quick and easy to make? This three-ingredient chocolate pie is not only amazingly easy to make, but it is also completely seductive!
- 1 (6-ounce) pre-made graham cracker crust
- 1 (8-ounce) box of Cool Whip (thawed in the refrigerator)
- 6 regular-sized Hershey’s chocolate bars (each bar is approximately 9 ounces)
- 1 cup of whipped topping (optional).
- Break the Hershey’s Bars into small pieces and place them in a microwave-safe dish (you may keep aside a few squares for garnish later if you’d like). Continue heating for 30 seconds increments until the chocolate is melted
- Combine the Cool Whip and melted chocolate in a large mixing bowl until thoroughly mixed. Fill the pie crust with the chocolate cool whip mixture, and use a cheese grater to grate the top of the pie crust to decorate it with any chocolate you’ve set aside earlier. Allow for at least 2 hours of refrigeration and chilling before slicing
Creamy, dreamy and SOOO easy to make!
Prepare this traditional chocolate pie with Cool Whip, which is the quickest and most convenient method to make it! A refreshing and creamy treat that requires only three ingredients for the filling is on the menu this week. You don’t have to be concerned about this recipe because it is failsafe and produces flawless results every time. An indulgent chocolate cream pie that’s cool, creamy, and delicious — what’s not to love? It’s a sumptuous dessert, and I’m happy to report that it’s also a simple one to make!
Easy Chocolate Cream Pie
Whipped cream is responsible for the light and creamy filling of the chocolate cream pie. To prepare the traditional version, you’ll need to whisk up some fresh cream (I have a classic cream pie that’s made this way) and fold it into the filling. I make a chocolate cream pie with a filling of freshly whipped cream, but there are occasions when I don’t want to deal with the hassle of whipping cream. So, here’s a quick and dirty shortcut for you: Topping made of whipped cream. Also known as Cool Whip.
It sets up properly every time, has a thick and creamy texture, and is far simpler to prepare than other desserts.
Ingredients
- Cookie Pie Crust: You may use my peanut butter cookie pie crust or any other sort you choose. baking chocolate (found in the baking aisle) chopped unsweetened chocolate The sweetened condensed milk serves as the pie’s filling. Cool Whip– used for both the filling and the topping, this pie is SO EASY to prepare.
How to Make Chocolate Cream Pie with Cool Whip
Using a microwave, melt the chocolate in 30-second intervals, stirring between each one. Stir it every 30 seconds or so until it’s completely melted and creamy. Allow for five minutes of cooling time. To make the chocolate sauce, pour the sweetened condensed milk into a mixing bowl with the chocolate. Stir until the mixture is smooth. 3.Fold: Gently fold in eight ounces of whipped topping into the chocolate mixture until well combined and smooth. Using a folding motion, run your spatula under the ingredients and gently pull them up and over themselves, starting with the ingredients on the bottom of the pan.
4.Pour the filling into the pie dough: Spread the filling into the pie crust.
Decoration Ideas
When it comes to serving, I prefer to top the pie with whipped topping and sprinkle it with chocolate powder. Alternatively, you may garnish with some grated or shaved semi-sweet chocolate as a finishing touch.
Variations
The crust is the quickest and most versatile method to customize this pie – there are a plethora of alternatives!
- My favorite crust is a peanut butter cookie crust, which I make myself. Making use of Nutter Butters, this dessert is really delicious, especially when combined with chocolate peanut butter. It’s also possible to make an Oreo cookie crust for an even more chocolaty experience
- A Graham cracker crust also works great. You can’t go wrong with a flaky, buttery pastry crust for this pie — it elevates it to a whole new level (except that it isn’t no-bake).
Storage Tips and Making the Pie Ahead
This dish is quite simple. I normally prepare the pie in the morning and then refrigerate it until I’m ready to serve it in the evening. Alternatively, you may prepare it the night before; simply hold off on adding the whipped topping and garnishes until you’re ready to serve it. Remaining pie will keep in the refrigerator for three to four days if stored properly. In part because the filling is made using Cool Whip rather of fresh whipped cream, it will keep a bit longer than one made with fresh whipped cream.
When it comes to this pie, “enjoying the leftovers” is not something we find to be a problem in our household!
It has a tendency to vanish as fast as it appears, which is OK because it is so simple to create another one. This chocolate cream pie is really tempting, and I am confident that you will agree once you try it.
FAQTips
- The following recipe may be used to prepare this dish using fresh whipped cream: It is possible for Cool Whip to crumble if it is overmixed, so be care to fold the chocolate mixture into the whipped topping before serving. Cool whip is used in the preparation of this pie, which allows it to be frozen whole or in slices. In fact, it’s delectable when frozen. Alternatively, you may use any type of whipped topping you choose (low fat, sugar free, etc). If you don’t have unsweetened chocolate, you may use semi-sweet chocolate
- However, the pie will be somewhat sweeter.
More Pie Recipes You Will Enjoy
- Easy Butterfinger Pie Recipe
- Funfetti Birthday Pie
- No Bake Lemon Pie
- S’mores Pie with Only 4 Ingredients
- And many more.
Have you made this recipe?
Use the hashtag itcrazyforcruston or the handle @crazyforcruston on Instagram.
- 4 ounces unsweetened chocolate chopped
- 1 can (14 ounces) sweetened condensed milk
- 12 ounces whipped topping 1peanut butter cookie pie crust Cool Whip (distributed)
- Cook chocolate in a large microwave-safe dish on 50% power for 30 second intervals, stirring between each, until melted and smooth. Remove from microwave and set aside. Allow for 5 minutes of cooling. Blend sweetened condensed milk and chocolate together until they are completely smooth. 8-ounces (1-pound) whipped topping (from an 8-ounce container) is added to the chocolate mixture, which should be folded carefully to avoid breaking up the whipped topping. Spread the chocolate mixture into the pie crust that has been made. Refrigerate for at least 2 hours to let the flavors to blend. Before serving, finish with the remaining whipped topping. To finish, sprinkle the top with cocoa powder or shave some semi-sweet chocolate over it.
One serving contains 134 calories, 11 grams of carbohydrates, 2 grams of protein, 10 grams of fat, 8 grams of saturated fat, 1 milligram of cholesterol, 27 milligrams of sodium, 128 milligrams of potassium, 2 grams of fiber, 8 grams of sugar, 25 micrograms of vitamin A, 36 milligrams of calcium, and 2 milligrams of iron. The nutritional information provided is not guaranteed to be correct. CourseDessertCuisineAmerican Keyword No bake pie, chocolate, cool whip, Rice Krispie treats, peanut butter, and a peanut butter crust are some of the ingredients.
- It’s a chocolate cream pie with Cool Whip on top, and the crust is made of peanut butter cookies.
- Please do not use any of my photographs without first obtaining permission from me.
- Disclaimer: The nutritional information provided is not guaranteed to be correct.
- Sign up for a free account and bookmark your favorite material so that you never lose track of a recipe again.
- More information may be found in mydisclosure’s policy.
Chocolate Pudding Pie
August 3, 2020/by Beth @ The First Year/ Chocolate pudding pie is a delicious no-bake dessert that is suitable for any occasion. It is possible to make a graham cracker or an oreo crust for this chocolate pie with pudding, which is thick and fluffy and delicious. Furthermore, it just only eight ingredients and takes 20 minutes to prepare.
Chocolate pudding pie overview:
- No-bake dessert with only 8 ingredients and 20 minutes of preparation time. thick and fluffy
- May be prepared with graham cracker or oreo pie crust
- Can be served warm or chilled
Pudding pie is an old-fashioned recipe that has been around for a long, long time. There are many various methods to prepare it, including from scratch, but I think the quickest and most convenient method is to use a package of instant pudding mix because it is so quick and simple! I noticed that using heavy cream instead of milk resulted in a pie that was thicker, more stable, and more mousse-like in texture. It will be rather thick when you combine the pudding mix and heavy cream, so if you have a stand mixer, now is an excellent time to use it.
Ingredients
- The following ingredients: instant chocolate pudding mix, heavy cream, cool whip, graham cracker crumbs, brown sugar, and butter
How to Make Chocolate Pie with Pudding
- Process the graham crackers into crumbs in a blender or food processor until they are finely ground
- Combine with the brown sugar and melted butter and press the mixture into a pie pan with the bottom of a measuring cup
Layer2 – the chocolate filling
- Combine the pudding mix and heavy cream in a mixing bowl. The consistency of the mixture will be exceedingly thick. If you have a stand mixer, this is an excellent opportunity to put it to work! The first image in the collage above is: Gently fold in the cool whip until well incorporated. The mixture will become more creamy and fluffy once you have added the cool whip. In the collage above, image number two
- The filling should be spread over the crust.
Layer3 – topping, whipped cream
This pie must be stored in the refrigerator. In addition, it may be frozen for use in a frozen dessert pie! Make care to wrap the pie tightly in plastic wrap to keep it fresh for as long as possible.
Total Time Required
- 4 minutes to prepare the crust
- 5 minutes to prepare the chocolate filling
- 5 minutes to prepare the whipped cream topping
- 4-8 hours to cool in the refrigerator
- 4 minutes to prepare the whipped cream topping
Gluten Free Chocolate Pie
By using gluten-free oreos for the crust, it is quite simple to make this chocolate pie with pudding gluten-free. Natural gluten free components are used in the rest of the dish as well.
Swap the Graham Cracker Crust for Oreo Crust
For those who like an oreo crust, we have a recipe for you!
- 1 box (14.3 ounce) Oreos
- 1/4 cup (1/2 stick) unsalted melted butter
- 1 teaspoon vanilla extract
Blend the Oreos until they are fine crumbs, then combine them with the butter and press them into the pie dish.
Tips
- When you are combining the chocolate filling, it becomes really thick. If you have a stand mixer, this is an excellent opportunity to put it to use
- Using a sharp, thin knife, cut the pie into pieces, and set the pieces aside. Make certain you use two 3.4 oz (or 3.9 oz) boxes rather than the larger 5.1 or 5.9 oz boxes.
Our Favorite Recipes
- Sangria with pina colada
- Brownies from a box that are superior
- Lemon sugar cookies
Chocolate Pudding Pie
- Make this no-bake chocolate pudding pie for any occasion, it’s quick and easy to prepare. It is possible to make a graham cracker or an oreo crust for this chocolate pie with pudding, which is thick and fluffy and delicious. Furthermore, it has only eight components and requires only 20 minutes of preparation time. Preparation time for PrintPinRate: 20 minutes 4-hours of additional time Time allotted: 4 hours 20minutes Servings:12servings
Crust
- 112 cups crushed graham cracker crumbs about 9 graham crackers
- 14 cup brown sugar
- 6 tablespoons lightly salted melted butter a third of a stick
Filling
- Chocolate pudding mix (2 boxes) instant chocolate pudding mix Smaller boxes of 3.4 oz (or 3.9 oz), rather than the larger 5.1 or 5.9 oz ones
- 3-1/2-cupsheavy whipping cream
- 1-1/2-container cool whip (8-ounces thawed)
Topping
- 14 cups powdered sugar and 1 teaspoon vanilla extract
- 1 cup heavy whipping cream
CRUST
- Combine the graham cracker crumbs, brown sugar, and melted butter in a large mixing bowl until well combined. Fill a 9- or 10-inch pie pan with this mixture and press down evenly. To compact the crust, press it down with the bottom of a measuring cup. Put the crust in the refrigerator to cool until you’re ready to fill it.
FILLING
- Using an electric mixer, beat the pudding mix and heavy cream together in a stand mixer or large mixing basin until thoroughly combined. You will not make the pudding mix according per the package directions. If you have a stand mixer, now is an excellent time to use it since the mixture will be extremely thick when you combine the pudding mix and heavy cream
- Add the cool whip and mix on low until everything is blended. This mixture should be spread over the crust. The mixture will become more creamy and fluffy once you have added the cool whip. Refrigerate for 4-8 hours after lining the pie tin with plastic wrap.
Topping
- Refrigerate a metal or glass mixing bowl and beaters for 15 minutes before to serving the pie before cutting into it. Remove the bowl from the freezer and set it aside. Add the heavy cream, powdered sugar, and vanilla extract to a mixing bowl and beat on high speed for 4-5 minutes, or until firm peaks form and the mixture keeps its shape when scooped with a spoon
- Spread the filling onto the pie and decorate with chocolate shavings
Nutritional Information Per Serving: 485 calories|36 grams of carbohydrates|3 grams of protein|37 grams of fat |23 grams of saturated fat |1 gram of polyunsaturated fat|11 grams of monounsaturated fat|1 gram of trans fat|127 milligrams of cholesterol | 344 milligrams of sodium | 145 milligrams of potassium | 1 gram of fiber | 23 grams of sugar|1374 international units of vitamin A|1 milligram of vitamin C|88
Peanut Butter Fudge Pie
Preparation time: 25 minutes plus cooling time
Makes
a total of 8 servings Despite the fact that I prepare this fudgy peanut butter pie on a daily basis for luncheons at our church, I have yet to consume one entire slice. On most occasions, there are only crumbs to be found! It’s simple to put together thanks to a readymade chocolate crust. It’s also a breeze to transport. Recipe photo courtesy of Taste of Home for Peanut Butter Fudge Pie.
Ingredients
- 1 package (8 ounces) softened cream cheese
- 1 cup plus 2 teaspoons creamy peanut butter, divided
- 1 cup plus 2 tablespoons sour cream half-cup sugar
- One 12-ounce box (12 ounces) frozen whipped topping, thawed and split
- 1 chocolate crumb crust (9 inches in diameter)
- 2/3 cup plus 2 tablespoons hot fudge ice cream topping, divided
- 1 chocolate crumb crust (9 inches in diameter)
Directions
- Cream the cream cheese in a large mixing bowl until it is creamy. 1 cup peanut butter and 1 cup sugar should be mixed together. 3 cups whipped topping are folded in
- Spoon into the crust. Heat 2/3 cup hot fudge topping in a microwave-safe dish for 30 seconds on high power. Pour over the peanut butter layer and spread out to the edges of the crust using a knife. Refrigerate for 2 hours before serving. Using the remaining whipped topping, cover the pie with it. Using a slicer, cut into slices. Using two separate plastic bags, place the leftover hot fudge topping and peanut butter in each bag. Remove one corner of each bag and pipe the topping and peanut butter onto each slice of pie.
Nutrition Facts
1 slice has 685 calories, 42 grams of fat (18 grams of saturated fat), 31 milligrams of cholesterol, 394 milligrams of sodium, 63 grams of carbohydrates (38 grams of sugars, 4 grams of fiber), and 14 grams of protein.
No-bake Cool Whip desserts you can prep in minutes
When it comes to dessert recipes (or any dishes, for that matter), I like recipes that are super-simple. It’s a plus if a meal appears to have taken a lot of time and effort to prepare. And here’s a little insider’s information: Anytime you have a tub of whipped topping on hand (such as Cool Whip), it’s possible to whip up a delicious handmade dessert that looks and tastes like it took a lot more time to prepare (see what we did there?). Continue reading if this seems like your cup of tea! In related news, Customers Have Adopted 60 Costco Products That Have Become Cult Classics, and for Good Reason
Creamy lemon cheesecake cupcakes
Try these zesty, light, and creamy cupcakes, which are created with a triple dose of lemon and are a great treat to serve to guests. They’re created with a touch of ricotta cheese and a surprise cookie hidden in the bottom of each one. In addition, the cookie is lemon flavored. In addition, they are created using lemon yogurt. Also, don’t forget to sprinkle the lemon zest on top for an extra burst of lemon flavor. Lemon cupcakes with a light and creamy texture are a delightful treat, and the added plus is that they require no baking.
Creamy lemon cheesecake cupcakes recipe
The light and creamy, no-bake lemon cheesecake cupcakes prepared with Cool Whip are deliciously refreshing, as well as simple to prepare. This recipe serves 6 people. Prepare time: 10 minutes | Inactive time: 2 hours | Total time: 2 hours 10 minutes Preparation time: 10 minutes | Inactive time: 2 hours 10 minutes
Ingredients:
- 2 cups thawed Cool Whip topping (if using)
- 2 tablespoons sugar
- 1/4 cup ricotta cheese
- 2/3 cup (6 ounces) lemon yogurt
- 1/4 cup ricotta cheese a lemon sandwich cookie recipe with the zest of a lemon and yellow sugar sprinkles
Directions:
- Combine the Cool Whip, ricotta cheese, yogurt, and sugar in a medium-sized mixing basin. Mix everything together
- 6 paper cupcake liners should be placed in a muffin tray. Prepare each liner by placing a cookie in the bottom of each liner. Place the Cool Whip mixture on top of the cookie, filling the liner almost to the top of the cookie. Decoratively garnish with lemon zest and yellow sprinkles
- Place the muffin tray in the freezer for approximately 2 hours, or until the Cool Whip mixture is stiff. Serve immediately after removing the frozen portion from the freezer.
Peanut butter and cream chocolate sandwiches
Yes, a combination of salty and sweet is the way to go. These sandwiches are really simple to prepare and delicious to consume. Simply place them in the freezer for a few minutes to allow the filling in the centre to solidify, and then you may have a large mouthful or even a little one if you choose.
These yummies are a simple and delectable twist on the classic ice cream sandwich. Cool Whip and peanut butter are the only ingredients used in the filling, which is easy to make.
Peanut butter and cream chocolate sandwiches recipe
A frozen delicacy produced with only two ingredients: Cool Whip and peanut butter, and a filling that is rich in protein. In this case, the crunchy exterior is a chocolate-covered graham cracker, which is the ideal complement to the salty and sweet interior. This recipe serves 6 people. Approximately 10 minutes of preparation time, 3 hours of inactivity, and a total of 3 hours and 10 minutes.
Ingredients:
- 2 cups thawed Cool Whip topping (if using)
- 2 tablespoons chopped chocolate chips (optional)
- 1/4 cup chunky peanut butter
- 12 graham cracker cookies with chocolate coating
Directions:
- Combine the Cool Whip and peanut butter in a medium-sized mixing bowl. Mix everything together
- Place 6 of the graham cracker cookies on a large dish and put aside. Cool Whip mixture should be applied on top. Using the leftover graham cracker cookies, create sandwiches by layering them on top of the Cool Whip mixture. To decorate the edges of the Cool Whip mixture with chocolate chips (optional), grate chocolate into the mixture. Freeze for about 3 hours, or until the Cool Whip mixture becomes solid. Serve immediately after removing the frozen portion from the freezer.
Crazy-easy raspberry and fudge ice cream
A simple recipe is one thing; but, when you have a crazy-simple recipe, it is ridiculously simple. For example, this ice cream, which is created using Cool Whip. Initially, it is created with only two major components, which are later supplemented with raspberry and fudge. Without a doubt, it’s a piece of cake. Simply place the Cool Whip ice cream components in the freezer to firm up, and when it’s finished, you’ll have ice cream on your hands in no time. Perfect for a hot summer day in the city (or any day, for that matter).
Crazy-easy raspberry and fudge ice cream recipe
Cool Whip and sweetened condensed milk are the two primary components in this ice cream recipe. After that, raspberries and dollops of fudge are added to the mix to give it even more taste. It’s really simple to prepare and even more delicious to consume. This recipe serves 4 people. Preparation time: 10 minutes | Inactivity time: 5 hours | Total time: 5 hours and 10 minutes.
Ingredients:
- 8-ounce container frozen Cool Whip topping
- 1-quart sweetened condensed milk
- 2 tablespoons lemon juice
- 1/4 cup + 2 teaspoons raspberry preserves
- 1/2 cup fresh raspberries
- 1/2-cup hot fudge topping
- Candy sprinkles
Directions:
- Combine the Cool Whip and sweetened condensed milk in a medium-sized mixing bowl. Using a whisk, combine
- Combine the lemon juice and raspberry preserves in a separate bowl. Gently fold in the fresh raspberries until evenly distributed. Fill a shallow freezer-safe dish halfway with the Cool Whip mixture
- Set aside. Dollop on dollops of hot fudge topping and serve. Using a spoon, swirl in the fudge topping, being sure to leave some of the dollops intact. Freeze for at least 5 hours, or until the Cool Whip mixture is firm to the touch. Scoop the ice cream into bowls or on top of ice cream cones and serve immediately. Add candy sprinkles over top for a festive touch.
Mini no-bake Key lime pies
These tiny cuties have a lot of lime in them. Everything about the filling is delectable, but my favorite aspect is how light and fluffy it tastes. They have a delicious flavor and are perfect for a late-night snack. Lime, lime, and more lime will make you pucker a little bit with each taste of this refreshing dish. I believe these taste even better after they’ve been in the fridge for a while since the crust begins to absorb the lime flavor as well.
Mini no-bake Key lime pies recipe
Enjoy this delicious and very simple mini Key lime pie prepared with Cool Whip, yogurt, lime zest, and a prefabricated graham cracker pie crust that requires no baking. This recipe serves 6 people. Preparation time: 10 minutes | Inactivity time: 1 hour | Total time: 1 hour and 10 minutes.
Ingredients:
- 2 cups of coffee Frosting (for the pie): thawed Cool Whip topping 2 containers (6 ounces each) Yogurt with key lime pie flavoring
- 6 small graham cracker crumb pie shells that have been manufactured
- For the pie, 1 lime’s zest will be used
- 1 lime zest for garnishing
- 1 lime juice for cooking
- Approximately 6 dollops Cool Whip topping for garnish a total of 6 tiny lime quarters for garnishing
Directions:
- In a medium-sized mixing bowl, combine the Cool Whip, 1 container of yogurt, and the zest of 1 lime. Stir well to combine. Mix everything together
- Fill the pie shells halfway with the Cool Whip mixture. Distribute the remaining container of yogurt over top of the pie to turn it a light green tint. ( Cool Whip, lime zest, and a lime quarter should be used to decorate the top of each pie. Place the pies in the refrigerator and allow them to cool for about 1 hour before serving.
S’mores shooters
These make-ahead shooters are really simple to create and look adorable when presented. And they’re delectable, especially when the chocolate is mixed in with the Cool Whip and the graham crackers, as they are in this recipe. When creating these, the most difficult aspect is getting all of the ingredients into the shooter glass without leaving a fingerprint on the inside of the shot glass. But don’t be concerned if you make a smudge since you can just cover it up with the following layer of ingredients.
S’mores shooters recipe
A simple, make-ahead dessert that is dressed to impress with the typical layers of delectable s’mores components plus the added benefit of Cool Whip is presented here. This recipe serves 6 people. Time allotted: ten minutes
Ingredients:
- 4 graham crackers crumbled
- 24 tiny marshmallows
- 3/4 cup thick chocolate sauce
- 1 cup Cool Whip topping (thawed)
Directions:
- Add a layer of graham cracker to 6 tall shooter glasses and set aside. Then put a layer of three small marshmallows on top of that. Pour the chocolate sauce over the marshmallows and set aside. Cool Whip can be added on top. Top each serving of pudding with 1 marshmallow, a sprinkling of crushed graham crackers, and a dollop of Cool Whip
- Alternatively, serve cold or at room temperature.
In 2015, this story was first published on the website. The following delicious Costco bakery delicacies will satisfy your sweet tooth:
Ice Cream Pie
A handmade layeredIce Cream Pieis less difficult to make than you would believe! In this Oreo Ice Cream Pie recipe, you’ll find a chocolate cookie crust, Cookies and Cream Ice Cream, fudge sauce, and whipped topping for the finest summer dessert ever.
You may even experiment with different tastes and use the same procedure to produce ice cream pies with different flavors such as mint chocolate chip, pumpkin, strawberry, peanut butter, or peppermint. There are a plethora of alternatives!
Oreo Ice Cream Pie Recipe
My favorite dessert from childhood! Every year in August, my mother baked this ice cream pie for my brother’s birthday celebration. . for pretty much every other warm-weather event that happened to come up on the schedule. It’s the best of all worlds: it’s quick, simple, luxurious, and completely delectable. Our favorite type of crust is one made from scratch, but you may also use one that has already been prepared (such as graham cracker crust). The recipe for this traditional Oreo Ice Cream Pie is provided below, but the same recipe may be used to make any flavor pie that you like.
You may also make substitutions for the chocolate cookie crust such as graham cracker crust.
Ingredients
An overview of the items you’ll need for a layered ice cream pie recipe is provided in this fast video clip. In the printed recipe box at the foot of the post, you’ll find exact measurements as well as step-by-step directions for making the dish.
- Chocolaty wafers or chocolate graham crackers: I prefer to use chocolate wafers, but chocolate graham crackers are also an excellent choice. If you prefer an Oreo cookie crust, you will just need to use a little less butter to account for all of the cream filling in the cookies
- Otherwise, follow the recipe as written. Granulated sugar: to make the crust sweeter
- Butter is used to keep the crust together. ice cream: choose your favorite flavor of ice cream Although I usedCookies and Cream in this instance, just about any flavor will do
- Fudge sauce (at room temperature): Using an open jar of fudge sauce (at room temperature) will give a delightful layer to your pie that you should not skip! I used this particular brand, but any comparable kind should suffice
- Cool Whip: or another frozen whipped topping that is comparable to Cool Whip. Please allow ample time for the Cool Whip to defrost in the refrigerator before constructing the pie
- Otherwise, the pie may get soggy.
How to Make Ice Cream Pie
This procedure is really simple; all you need to do is plan ahead of time and allow plenty of time to relax. Hands-on work is little, but patience is the most difficult aspect of this process to master! Enjoy the finest ever ice cream pie recipe by keeping it simple and delicious!
- Cookie crumbs, sugar and melted butter are mixed together. Using your hands, press the crumbs into a 9-inch pie pan. Preheat the oven to 400° F and bake the crust for approximately 8 minutes. Allow to cool fully
- Filling the pie shell with softened ice cream is the first step in assembling the pie. On top of the ice cream, spread a layer of chocolate sauce and then top with a carton of Cool Whip
- Add sprinkles if you want to dress it up even more. Allow for at least 2 hours of freezing time before slicing and serving
Storage
This pie stays quite well in the freezer, and the crust doesn’t even go mushy as a result of the freezing. If the pie is wrapped firmly, it will keep in the freezer for up to 1 week.
Layered Ice Cream Pie Flavor Variations
- To create an Oreo pie crust (like this), use ordinary graham cracker crumbs, or use Nilla Wafer or gingersnap cookie crumbs. To make an Oreo pie crust (like this), use regular graham cracker crumbs. Turtle: make a chocolate crust and cover it with caramel sauce or fudge sauce (or both), chopped nuts, and Cool Whip. Use chocolate ice cream, French Silk ice cream, or Chocolate Brownie Batter ice cream for the chocolate flavor. Ice cream with mint chocolate chips can be used to make a Grasshopper. Pumpkin: This is a particular favorite of mine because it is wonderful for the entire fall season! a gingersnap cookie crust, pumpkin ice cream, caramel sauce, and Cool Whip are all used in this recipe Christmas Peppermint: a delicious Christmas treat made with peppermint ice cream and crushed candy canes as an embellishment
- Strawberry: make a graham cracker crust and fill it with strawberry ice cream and fudge sauce for a delicious dessert. Ice cream flavors such as peanut butter ice cream, coffee ice cream, chocolate chip ice cream, and cookie dough ice cream are also excellent choices.
Tips for the Best Ever Ice Cream Pie Recipe
- Take note that the Cool Whip should be thawed for at least 4 hours (or up to a day in advance), in the refrigerator, before you want to make the pie. Avoid thawing the whipped topping at room temperature since it will become too soft and “melt.” Make use of a jar of “hot fudge”sauce or a topping made of no-bake chocolate syrup. Instead of a runny mess on top of the ice cream, you want a lovely thick layer of ice cream. In the event that you desire a caramel topping, be sure you use thick caramel sauce rather than caramel syrup. Before assembling the pie, give yourself plenty of time to let the crust to cool completely, and then give yourself even more time to allow the pie to re-freeze for a few hours before serving. Make sure to let the ice cream to soften at room temperature for 5-10 minutes before attempting to distribute the ice cream into the pie shell. You’ll also need to allow the pie to come to room temperature and soften for approximately 5-10 minutes before attempting to cut it into pieces once it’s been re-frozen. There is no need to measure the materials for the filling. I attempted to estimate the amount of ice cream and fudge sauce I used in this recipe, but in reality, all you need to do is fill the pie with ice cream and apply a beautiful, thick layer of fudge sauce on top of that. Decorate the top of the pie with optional rainbow sprinkles, additional cookie crumbs, or any festive sprinkles that are appropriate for the occasion or celebration you’re celebrating
More Easy Ice Cream Dessert Recipes to Try
- 5-Ingredient Ice Cream Sandwich Cake
- Cookie Ice Cream Sandwiches
- Roasted White Peaches with Honeycomb and Vanilla Ice Cream
- 5-Ingredient Ice Cream Sandwich Cake
Ice Cream Pie
Making a handmade layered Ice Cream Pie is less difficult than you would imagine! Combine tastes in whatever way you choose and use any of your favorite combos. From Oreo to pumpkin, mint chocolate chip to strawberry, there’s something for everyone! Course DessertCuisineAmericanKeyword ice cream pie, with oreo cookies pie made of ice cream Preparation time: 15 minutes Preparation time: 8 minutes 3 hours of chilling time 3 hours and 23 minutes is the total time. 8 to 10 slices per serving Calories494kcal
- 6tablespoonssalted butter, melted
- 2 cupschocolate wafer or chocolate graham cracker crumbs
- 14 cupgranulated sugar
- 12cupsfudge sauce, at room temperature
- 8ouncecontainer frozen whipped topping (such as Cool Whip)
- 1quartice cream, softened slightly at room temperature (or more if necessary)
- 1quartice cream, softened slightly at room temperature Sprinkles are an optional garnish.
MAKE THE CRUST:
- Preheat the oven at 400 degrees Fahrenheit. In a medium-sized mixing bowl, combine the chocolate crumbs and the granulated sugar. Mix in the melted butter until everything is well-combined. When you press the crust together with your fingers, it should readily stick together in clumps (if it doesn’t, add 1 tablespoon of melted butter at a time until it gets the desired consistency)
- Press the crust into the bottom and up the sides of a 9-inch pie pan that has not been oiled. When pressing the crust into the plate, I prefer to use the flat bottom of a measuring cup to help press it into the dish evenly. Bake the crust for 8-10 minutes, or until it is golden brown and fragrant. Before assembling the pie, allow the crust to cool fully on a cooling rack.
ASSEMBLE THE PIE:
- In the pie crust, spread the ice cream in an equal layer until it is completely covered. After that, spread a layer of fudge sauce on top, followed by a layer of whipped topping. Add sprinkles if wanted to finish the dish. Place the pie in the freezer for at least 2 hours, or until it is hard and set. Enable the pie to remain on the counter for at least 5 minutes before serving to allow it to soften a little and become easier to slice
- Take note that the Cool Whip should be thawed for at least 4 hours (or up to a day in advance), in the refrigerator, before you want to make the pie. Avoid thawing the whipped topping at room temperature since it will become too soft and “melt.” Make use of a jar of “hot fudge”sauce or a topping made of no-bake chocolate syrup. Instead of a runny mess on top of the ice cream, you want a lovely thick layer of ice cream. In the event that you desire a caramel topping, be sure you use thick caramel sauce rather than caramel syrup. Before assembling the pie, give yourself plenty of time to let the crust to cool completely, and then give yourself even more time to allow the pie to re-freeze for a few hours before serving. Make sure to let the ice cream to soften at room temperature for 5-10 minutes before attempting to distribute the ice cream into the pie shell. You’ll also need to allow the pie to come to room temperature and soften for approximately 5-10 minutes before attempting to cut it into pieces once it’s been re-frozen. There is no need to measure the materials for the filling. I attempted to estimate the amount of ice cream and fudge sauce I used in this recipe, but in reality, all you need to do is fill the pie with ice cream and apply a beautiful, thick layer of fudge sauce on top of that. Decorate the top of the pie with optional rainbow sprinkles, additional cookie crumbs, or any festive sprinkles that are appropriate for the occasion or celebration you’re celebrating
- To create an Oreo pie crust (like this), use ordinary graham cracker crumbs, or use Nilla Wafer or gingersnap cookie crumbs. To make an Oreo pie crust (like this), use regular graham cracker crumbs. Turtle: make a chocolate crust and cover it with caramel sauce or fudge sauce (or both), chopped nuts, and Cool Whip. Use chocolate ice cream, French Silk ice cream, or Chocolate Brownie Batter ice cream for the chocolate flavor. Ice cream with mint chocolate chips can be used to make a Grasshopper. Pumpkin: This is a particular favorite of mine because it is wonderful for the entire fall season! a gingersnap cookie crust, pumpkin ice cream, caramel sauce, and Cool Whip are all used in this recipe Christmas Peppermint: a delicious Christmas treat made with peppermint ice cream and crushed candy canes as an embellishment
- Strawberry: make a graham cracker crust and fill it with strawberry ice cream and fudge sauce for a delicious dessert. Ice cream flavors such as peanut butter ice cream, coffee ice cream, chocolate chip ice cream, and cookie dough ice cream are also excellent choices.
A serving is equal to one tenth of the pie|Calories: 494kcal|Carbohydrates: 64g|Protein: 7g|Fat: 24g|Saturated Fat: 13g|Trans Fat: 1g|Cholesterol: 64mg|Sodium: 317mg|Potassium: 301mg|Fiber: 2g|Sugar: 44g|Vitamin A: 649IU|Vitamin C