
Pie
What Is The Dessert With Fruit In The Center But Not A Pie
Mar
| 4 minutes to read Baker by Nature/Two Cups Flour/Tutti Dolci is a recipe for baking by nature. Summer, how I adore you! This is the season of delectable, fresh fruits. This collection of recipes is perfect if you’re weary of making the same old cobbler or pie over and over. Summer is the ideal time to experiment with new dishes because there are so many fresh fruits available at this time of year. Our collection of dessert recipes includes anything from a creamy layer cake packed with complementing tastes to a fruity spin on a classic treat to the perfect dessert for a summer gathering.
Next time you bring home a box of your favorite fruits, try one of these inventive (and delicious) dishes to put them to good use.
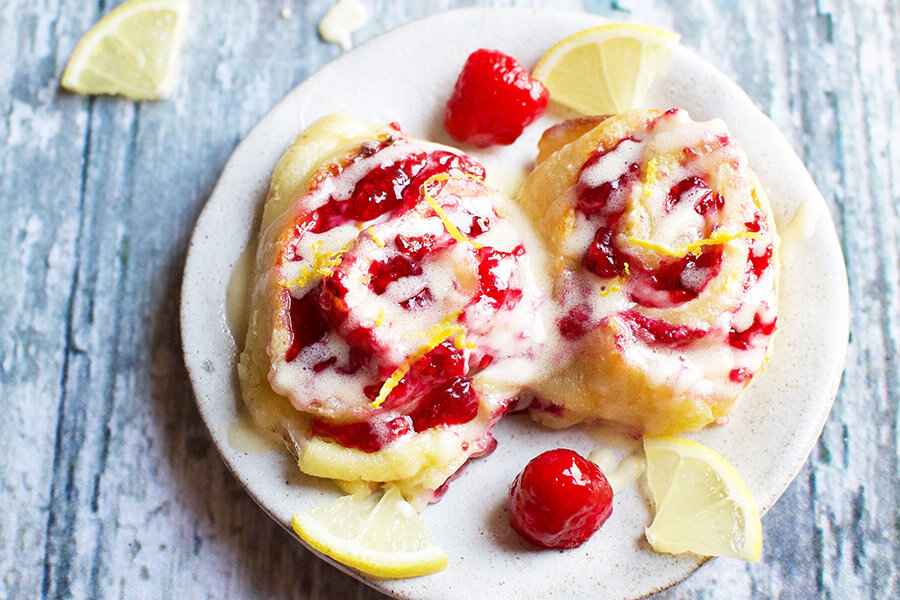
Raspberry Lemon Sweet Rolls
Recipes for a Blue Bowl This recipe for sweet rolls takes a traditional dish and adds a fruity flavor to it. The filling for this soft, easy-to-make brioche dough, on the other hand, is a sweet and tangy blend of raspberries, lemon zest, and vanilla, rather than the traditional sticky cinnamon/brown sugar filling. Afterwards, a beautifully sweet, yet somewhat tangy, cream cheese frosting is spread on top of the baked goods. Recipes for Blue Bowls may be found here: Blue Bowl Recipes
Strawberry Lemonade Cake
Two Cups of Whole Wheat Flour This recipe incorporates the same fruity flavors found in the popular summer cocktail into a simple “naked” cake that is quick and easy to make. The ingredients are straightforward: light lemon cake layers, a gorgeous pink strawberry buttercream icing, and sliced fresh strawberries stacked in between and on top of the cake layers. The sides of each layer are left visible for a clean, contemporary appearance. How to Get the Recipe: Two Cups of Whole Wheat Flour
Classic Raspberry Pavlova
Tutti Dolci (All Sweets) The pavlova is a traditional meringue dessert that is far less scary to make than it appears, especially when fresh raspberries are added to lighten the flavor and make it more refreshing. The basis of the dessert is made of a light and fluffy meringue, which is then topped with fresh raspberry sauce and whipped cream to create a refreshing treat that is excellent for hot summer evenings. Learn how to make the recipe: Tutti Dolci
Strawberry Lemon Muffins
Barley and sage are two of the most common herbs. Dessert lovers will love the combination of sweet berries and zesty citrus in these light and tasty muffins for a refreshing summer dessert (or even a breakfast or brunch treat). The strawberries used in this dish are the show-stoppers. You combine them with a light, lemony batter to make a moist and delectable muffin. You may also sprinkle a little turbinado sugar on top for a little more texture and sweetness if you want. How to Prepare the Recipe: Barley and Sage
Blackberry Orange Vanilla Pound Cake
Tutti Dolci (All Sweets) This meal, which is equal parts indulgent pound cake and fruity summer delight, is everything you could ever wish for in a sweet, tart berry dessert: decadent, tangy, and delicious.
With a swirl of delectable blackberries flowing through the heart of the cake, the classic pound cake is given a new twist. The tangy citrus flavor of the orange and the delicate vanilla frosting on top of the cake are the perfect complements. Learn how to make the recipe: Tutti Dolci
Strawberry Shortcake Layer Cake
Barley and sage are two of the most common herbs. Try this mix of a nude layer cake and a classic strawberry shortcake for a treat that isn’t too difficult to make yet is really wonderful. Shortcake layers are sandwiched between a creamy mascarpone cheese filling and macerated strawberries in this simple dessert. Afterwards, even more of each is heaped on top to create a shortcake that is both delicious and simple to make. How to Get the Recipe: Barley and sage are two of the most common herbs.
Bursting Blueberry Lemon Layer Cake
Harvest that hasn’t quite come together When you make this perfectly balanced sweet layer cake, you can have all of the creamy richness of a classic layer cake while also enjoying a refreshing fruit combination. An airy lemon cake (with a blueberry swirl undulating throughout) is topped with a light and airy blueberry-mascarpone cream frosting for a stunning cake that tastes just as amazing as it looks, and is perfect for any occasion. How to Get the Recipe: Harvest that hasn’t quite come together
Strawberry Pretzel Dessert Tart
Bakery specializing in butternut squash Recall the strawberry and pretzel Jell-O “salad” you surely had at potlucks as a kid? It was probably delicious. Well, here it is in the shape of tart! A buttery, just-salty-enough foundation layer is formed by a crunchy and odd mix of pretzel- and pie-dough crust that is crunchy and distinctive. Then there’s a sweet cream cheese filling, and lastly a top layer of macerated, sliced strawberries to finish things off. A summer party wouldn’t be complete without this deliciously creamy and fruity treat!
White Chocolate Blueberry Cupcakes
Baker by inclination In this light and delicious cake batter, the flavors of lemon and blueberries are exactly the right balance. Sour cream is the secret ingredient that gives it its extra-moist and fluffy texture while keeping it from being excessively sweet. An elegant and creamy white chocolate icing completes this delicious dessert combination. Finish it off with just the proper amount of blueberry drizzle to bring it all together. Learn how to make the recipe at Baker by Nature.
Peach Cobbler Cake
Stephanie’s Delightful Concoctions This sweet, yet precisely spiced, layer cake is a delicious upgrade to the traditional peach cobbler. Fresh peach “salsa” is mixed into the cake layers, which are sandwiched between layers of freshly baked peach pie filling. Final touches include a cinnamon crumb topping on top of the cake, as well as a cinnamon and peach cream cheese icing on the outside. Get the Recipe: Stephanie’s Sweets Treats (in PDF format).
Raspberry Surprise Coconut Snowball Cake
Baker by inclination Raspberries and coconut combine to create an unusual, yet delicious, taste profile. You’ll understand once you’ve tried them both together! The basis of this delicacy is a soft, delectable coconut cake, with layers of tart raspberry filling and sweet coconut cream cheese frosting sandwiched in between. Add frosting and crushed coconut on top to give it the iconic “snowball” appearance. Learn how to make the recipe at Baker by Nature.
Triple Berry Crumb Bars
Tutti Dolci (All Sweets) Exactly what it sounds like, this simple dessert is a mash-up of various fruit pies and basic berry cobblers served in a bar setting! This recipe combines a sweet, crumbly crust with a fruit mixture of raspberries, blueberries, and blackberries to create a delicious dessert. With a crumb topping to finish it off, you’ll have a bar that’s excellent for serving alongside a scoop of ice cream. How to Get the Recipe: Tutti Dolci (All Sweets) These delectable fruit dessert recipes will have you whipping up delectable treats all summer long!
Of course, anytime you’re in the mood for some fruit pies, you may throw some in there as well. For a reason, they’re considered classics in the first place.
How To Make Any Fruit Galette
We independently choose these items, and if you make a purchase after clicking on one of our links, we may receive a commission. Everyone creates stunning galettes in their kitchens. Because this rustic summer dessert is as easy as pastry dough wrapped around fresh fruit, it is a great option for entertaining. Similar to preparing a fruit pie, but with far less effort, transforming summer fruit into a galette will have you feeling like a home-cook hero in no time at all! You’ll still receive the same flaky, toothsome crust and soft filling as you would with a traditional pie, but without all of the trouble and anxiety over broken dough.
An apple galette is a type of French pastry that is similar to a tart or a pie in that it is composed mostly of pastry dough that is wrapped around a filling comprised of fruit, sugar, and butter This free-form pie-like pastry does not require the use of a particular pan; all that is needed is a decent level baking surface.
Here’s a breakdown of what we’ll be talking about.
- The preparation of fruit for galettes
- Preventing a soggy bottom
- And baking the galette are all covered in this section.
How to Make Galette Dough
Galette dough is quite similar to pie crust in appearance. Beginning with a mixture of flour, a little sugar, butter, and just enough water to bring everything together, it goes on to include cornmeal to give it a crunch and some texture. Galette dough may be prepared by hand, but it’s also simple to whip up in a blender or food processor. When making pie crust, combine the dry ingredients first with a few pulses, then add the cold cubed butter and mix until smooth and well combined. Don’t be concerned about totally processing the butter; lumps of butter are quite acceptable in galette dough.
Preparing Fruit for Galettes
Galettes, like pies, may be made with practically any fruit and can even be made savory by adding veggies and cheese. Because of the shorter baking time of a galette, it is necessary to finely slice the fruit in order for the filling to bake at the same time as the crust. Once the fruit has been sliced, it is tossed with a combination of sugar and flour; the flour aids in the absorption of moisture from the fruit and the thickening of the mixture. The filling is also a good location to experiment with different tastes.
- A galette crust cannot be pre-baked, thus many people choose to brush their galette crust with egg white or cover it with a layer of crushed cookies or cake crumbs, both of which are acceptable substitutes for pre-baked galette crusts.
- The ideal jam to use is a light-colored jam such as peach or apricot.
- There is no need to make the edges of the galette dough perfectly straight.
- Place the fruit in the center of the dough and spread it out into an equal layer, leaving a two-inch border around the edge of the dough.
- Repeat the process with the remaining fruit.
- A rich golden brown crust should be achieved on the crust, and the fruit should be bubbling and cooked throughout the galette.
After transferring the galette to a wire rack, let it cool fully before slicing. Trust us when we say that the wait will be well worth it. Prepare this magnificent fruit and pastry dessert that is much easier to prepare than pie by following the instructions provided here.
Ingredients
- One and a half cups all-purpose flour, 1/4 cup finely ground white cornmeal, 1 teaspoon granulated sugar, 1/4 teaspoon salt, 1 stick (8 tablespoons) cold unsalted butter, cubed, and 1/4 cup ice water, split
For stone fruit filling:
- 1/2poundstone fruit (plums, nectarines, or peaches), cut into 1/4- to 1/2-inch-thick slices after being half, pitted, and sliced again 4 / 4 cup turbinado sugar, with a little extra for sprinkling 2tbspall-purpose flour
- 1tbsp ground cinnamon and freshly grated nutmeg
- 1/4tbspsalt
- 1tablespoon unsalted butter, cubed
- 1large egg
- 1tablespoonplus 1 teaspoon water, divided
- 1tablespoonlight-colored jam (such as peach, apple, or mango chutney)
- 1tablespoonlight-
Instructions
- Prepare the dough for the galette. The flour, cornmeal, sugar, and salt should all be mixed together in a food processor fitted with the blade attachment until everything is smooth. Then, using a food processor, pulse the mixture until it resembles coarse crumbs, 7 to 10 cycles. It’s quite acceptable if there are a few huge bits of butter left behind. Using a food processor, drizzle in 2 tablespoons of cold water and pulse until the dough is crumbly in texture but holds together when squeezed, about 4 pulses. If the mixture is too dry, add up to 2 additional teaspoons of cold water, 1 spoonful at a time, and pulse until the dough is chilled completely. Remove the dough from the bowl and place it on a piece of plastic wrap. Flatten the dough into a disk and fully wrap it in the plastic wrap. Refrigerate for 30 minutes to 1 hour before serving. Preheat the oven as follows: Preheat the oven to 400 degrees Fahrenheit with a rack in the centre of the oven
- Roll out the dough. Remove the dough from the plastic wrap and set it on a piece of parchment paper. Place a second piece of paper over the top. To make a 12-inch circular, roll the dough out to approximately 1/8-inch thick. Remove the top layer of paper from the baking sheet and slide the parchment and dough onto the baking sheet
- Prepare the fruit filling. In a large mixing basin, combine the sliced fruit, 1/4 cup turbinado sugar, the flour, the cinnamon, the nutmeg, and the salt
- Set aside. Assemble the galette. Make a mound of fruit filling in the center of the dough, leaving a 2-inch border around the outside. Fold the rim of the dough up and over the border of the filling, overlapping and pleating the dough as you go around the perimeter of the filling. Distribute the cubes of butter evenly over the top of the fruit to finish. 1 tablespoon of water is added to the egg and whisked together. Bake the galette after brushing the crust with the egg wash and sprinkling with more turbinado sugar. Bake for 30 to 35 minutes, or until the crust is a deep golden brown and the fruit is cooked through. Cool fully on a wire rack after removing the parchment paper from the pan with the galette on it. Serve the galette after brushing the fruit with the glaze. 1 teaspoon of water should be added to the jam to dilute it. Glaze the fruit by brushing it with it. Serve the galette by cutting it into wedges.
Recipe Notes
Prepare ahead of time: Preparing the dough ahead of time allows you to store it in the refrigerator for up to 3 days or freeze it for up to 3 months. Storage:Galette is ideally consumed on the same day that it is prepared, if possible. Leftovers can be kept at room temperature for up to 2 days if they are lightly covered. Meghan Splawn is a food editor with a variety of skills. Meghan works as a Food Editor for Kitchn’s Skills content, which includes recipes and tutorials. She specializes in everyday baking, family cuisine, and capturing natural light in her photographs.
Meghan holds a bachelor’s degree in baking and pastry arts and spent the first ten years of her professional life as a member of Alton Brown’s culinary team.
is a weekly podcast on food and family that she co-hosts with her husband.
Do You Even Know What a Cobbler Is?
Peach cobbler with vanilla ice cream is a classic dessert. Ellie Skrzat writes for the publication Slate. I was recently taken aback by the widespread usage of the term “cobbler” by the general population without regard for context. The first result when you Google “peach cobbler” returns Paula Deen’s ostensiblecobbler recipe, which I largely blame for this. Deen’s recipe is a ruse to get you into trouble: A thin cake batter is spread on top of the cooked peaches, and the whole thing is baked until the batter is raised above the fruit, according to her recipe.
- However, you might wonder if a clafoutis by any other name wouldn’t be just as sweet.
- ) What is the significance of this?
- If I live in a world where common ignorance causes crisps, which are a magnificent and important category of dessert in their own right, to be classified as a completely separate category of dessert, I will be very unhappy.
- There are an astounding number of different ways to prepare fresh fruit, and referring to every fruit dessert as a “cobbler” obscures the uniqueness of each one.
- So, what exactly is a cobbler, exactly?
- A cobbler is a dessert consisting of sugared (and often spiced) fruit topped with a sweetened biscuit topping and baked until the fruit is tender and the topping is golden .
- Meanwhile, the rest of the fruit’s juices mingle with the sugar and whatever thickener you’ve added to it (usually cornstarch or flour) to form a hot, sticky syrup that is best appreciated when juxtaposed with a scoop of vanilla ice cream .
By “selectivity,” I mean choosing good, ripe fruit—in this case, peaches .
(Youcanuse frozen fruit, though it departs from the spirit of cobbler, which, like the other desserts mentioned above, is traditionally a way to make a dent in a bumper crop of fresh fruit.
It needs only a little sugar, and a lot of lemon juice to balance it out .
) The biscuit layer is sweeter thannormal biscuits, but it should not be as sweet as cake .
)Restraint is also required with the quantity of topping (which derives from a batter, like drop biscuits, rather than a dough, like rolled biscuits) (which derives from a batter, like drop biscuits, rather than a dough, like rolled biscuits) .
If you use enough batter to completely cover the fruit, you’ll end up with a cobbler that’s far too bready, more like an upside-down cake .One final, unusually specific note: In this recipe, a 9-inch square pan means exactly that .
Heat the oven to 375°F .
Transfer the mixture to a 9-inch square pan and bake for 10 minutes .2.
Add the butter and blend with a pastry cutter or your fingers until the mixture resembles coarse crumbs .
Remove the pan from the oven and drop the batter in large, evenly spaced dollops on top of the peaches .
Continue baking until the topping is golden brown and the peaches are tender, 30 to 35 minutes . Serve warm with vanilla ice cream .Previously inYou’re Doing It Wrong :Madeleine sBlueberry Muffin sCrème Brûl éeApple ButterWaterme lonBanana Pudding Pie
Pie, Cobbler, Tart, Crumble
A spectacular indicator that spring has arrived in Washington, DC is the presence of fully bloomed cherry blossoms, which herald the arrival of warmer weather, clearer sky, and an abundance of fresh fruit – cherries included, of course! There is no more delectable way to appreciate fresh fruit and berries than by incorporating them into a great dessert recipe. There are a variety of fruit desserts to choose from such as cobbler, crumble, tart, and more today to encourage you to branch out from the traditional pie and try something new.
- Bake it in a pie pan with sloping sides and a few inches of height, which should have a couple of inches of depth.
- Pies can be either sweet or savory in nature.
- Baked in tart pans, which are shallow and have ridged or fluted sides, these desserts are delicious.
- Tarts are never made with a second crust and can be either sweet or savory in flavor.
- After the fruit has been placed in a dish (it may be made in either a pie pan or a baking dish), dollops of biscuit dough or batter are placed on top of the dish.
- Instead of a biscuit topping, the fruit is covered with what looks like a streusel-like substance that turns crumbly when baked.
- Buckle– A buckle is a type of cobbler that is turned upside down.
With time, the buckle bakes up and the fruit falls to the bottom of dish, causing the cake to buckle up in the middle.
They’re essentially cobblers that are prepared on the stovetop rather than in the oven.
Galette— A galette is a rustic dessert that is flat and freeform in shape.
The galette is cooked on a baking sheet after the edges of the dough are folded over the filling.
Even the name is a love song to your taste senses, as is the recipe.
It has a rich, cherry filling that is finished off with an almond and cinnamon streusel topping, as well as a bonus crumble layer in the middle.
The heat is required for the cornstarch to begin thickening.
TOOLS:Ramekins Bakeware Baking Sheet Medium Pot Wooden Spoon Pastry Brush a medium-sized bowl It is possible that the tools section will contain affiliate links to goods that we are familiar with and enjoy. TECHNIQUES: Making a crumble topping for a cake Preparing an alginate Baking
- Frozen dark red cherries (one pound bag)
- 1/4 cup sugar
- 2 teaspoons freshly squeezed lemon juice
- 1 tablespoon Kirsch (cherry brandy)
- 4 tablespoons cornstarch
- 1 teaspoon vanilla extract
For the Topping:
- 1/2 cup rolled oats
- 2 tablespoons finely-chopped almonds
- 1 tablespoon brown sugar
- 1/8 teaspoon cinnamon
- 2 tablespoons melted butter
- Whipped cream (optional)
- 2 teaspoons flour
Instructions
- The oven should be preheated at 400 degrees Fahrenheit. Lightly brush the melted butter into the bottoms of four 6-ounce ramekins. Make a baking sheet out of parchment paper and set it aside. Prepare the filling by doing the following: In a medium-sized saucepan, combine the cherries and sugar until well combined. Cook over medium heat for 4 to 5 minutes, or until the fruit has softened and is beginning to bubble lightly around the edges. In a small bowl, whisk together the lemon juice, Kirsch, and cornstarch until well combined. Cook, stirring frequently, until the filling comes to a boil and the sauce thickens, about a minute, until the cherries are soft. Prepare the topping by mixing together all of the dry ingredients in a medium-sized mixing basin. Stir in the melted butter with a fork until the mixture is well-combined and crumbly
- Assemble the crumbles as follows: Distribute half of the fruit among the four greased ramekins and set aside. Half of the crumb topping should be sprinkled over the fruit. Fill the ramekins halfway with the remaining fruit and sprinkle equally with the remaining topping
- Bake for 15-17 minutes, or until the fruit is bubbling and the crumbs are golden brown on the top. Allow for 5-10 minutes of cooling time before serving. the number of servings (or the yield): 4
© 2022 Copyright 2020 www.CookingClarified.com
It is possible that this content contains affiliate links. Please take the time to read my disclosure policy. Homemade sweets are something that I certainly received from my mother, and it is something I adore cooking and eating. Throughout my youth, I recall always looking forward to the pleasant surprise that would occur after supper was served. Every dinner in my family was always ended with a sweet treat, whether it was a more complex dish or a fast batch of cookies or homemade shakes (my father’s speciality).
As a result, fruit cobblers, pies, and other desserts were always a hit.
As a result, I’d like to share with you our super-easy fruit galette recipe.
Grab any leftover fruit you have in your refrigerator and put it to good use.
Description
This rustic fruit galette, which takes only 5 minutes to prepare and tastes like summer, will become a family favorite.
- 1 refrigerated pie crust (9 inch)
- 2 tablespoons sugar (plus 1 tablespoon for dusting over crust)
- 1 tablespoon cornstarch
- 1 big egg, beaten
- 1 cup heavy cream
- 2–3 cups of fresh fruit, cut into bite-sized pieces (I used strawberries, blueberries, and a nectarine for this one
- You could use whatever fruit you choose).
- Preheat the oven to 425 degrees Fahrenheit. Pie dough should be gently unfolded and laid out on a baking sheet coated with parchment paper or on a baking stone
- In a second dish, carefully combine the (sliced) fruit, sugar, and cornstarch until well combined. Then drain through a fine mesh strainer to remove any remaining fluids. (Even baking this will release a lot of gas!) Then, using a 2-inch border, pour the mixture into the center of the pie crust that has been unrolled. Then, fold the exposed border up and over the edge of the fruit, pinching the pleats together. Then, using a pastry brush, paint the egg onto the crust and sprinkle with the remaining teaspoon of sugar. Bake in the preheated oven for 12 to 15 minutes, or until the crust is gently browned. Warm or at room temperature are both acceptable serving temperatures.
Rustic French Apple Tart
This French apple tart, which is similar to an apple pie but does not require a pie pan, is composed of a thin layer of cinnamon-scented apples on top of a buttery, flaky crust. The image that comes to mind when we think of French sweets is generally of posh pâtisseries filled with towers of pastel-colored macarons and glossy fruit tarts. However, when the French bake at home, they keep things as simple as possible. “No matter how stylish the hostess, her handmade dessert usually looked as rustic as if it had come from a farmhousegrand-mère,” writes one of my favorite culinary writers, Dorie Greenspan, of her time living in France.
In fact, she adds that the recipes are so tried and true that “many French women prepare them without recipes, orau pif.” This free-form French apple dessert is the kind of thing a French cook would whip together on the spur of the moment.
I understand that the very notion of making a handmade pastry crust might send some people fleeing for the hills, but this tart dough is almost flawless and simple to roll out – plus it comes together in under a minute in a food processor — Furthermore, the beauty of a free-form tart is that you don’t have to mess with crimping the dough into a pie dish; instead, you simply drape it over the fruit in a casual manner.
Because of its faults, this dish has a certain allure.
What you’ll need to make a french apple tart
Just a word of caution before we get started on the recipe: you might be tempted to stuff the pie with more apples, but trust me when I say that less is more with this sort of dish. A significant amount of liquid is released by the apples, which can seep out of the pie and create a mess of the crust and your oven.
It’s also important to select baking-friendly apples, such as Fuji and Granny Smith varieties as well as Jonagold and Jonathan varieties, Golden Delicious, Gala, and Honey Crisp varieties. They’ll turn into applesauce if you don’t do this.
How to make a french apple tart
Make the pastry first, and then proceed with the rest of the recipe. Combine the flour, salt, and sugar in a food processor equipped with a steel blade and pulse until smooth. Briefly pulse to blend, then add the pieces of chilled butter one at a time until well combined. Process for only 5 seconds, or until the butter is the size of peas, depending on your processor. Sprinkle the cold water over the mixture and process for approximately 5 seconds, or until the mixture is wet and extremely crumbly.
- Work the dough in small circular motions just until it comes together into a cohesive ball.
- Make sure to re-flour your work area and to lightly sprinkle the dough with flour.
- While you are preparing the filling, transfer the dough to a baking sheet lined with parchment paper and place in the refrigerator (you will be rolling the dough out further on the parchment paper, so go ahead and clean your work area).
- Combine the sugar, vanilla, cinnamon, melted butter, and salt in a mixing bowl.
- Remove the dough from the refrigerator and place it on the counter with the parchment paper on top.
- It’s quite OK if the edges are a touch ragged.
- 1 tablespoon of flour should be sprinkled equally over the pastry.
Don’t be concerned about making things appear flawless!
Using a free-form motion, fold the edges of the dough over the apples, working your way around the apple slices and forming pleats as you go.
Brush the pleated dough with the beaten egg, using a pastry brush, to ensure that it is equally coated.
Then, while you’re preheating the oven, place the constructed tart in the refrigerator for 15 to 20 minutes.
Remove the pan from the oven and set it aside to cool.
Heat in the microwave for about 20 seconds, or until the mixture begins to bubble.
Transfer the tart to a serving dish or cutting board by using two big spatulas to help it along.
Slice and serve immediately, either warm or at room temperature. The tart is best served the same day it is cooked, but leftovers can be kept on the counter for a few days if they are lightly covered with plastic wrap.
You may also like
- French Apple Cake, Apple Cobbler, Perfect Apple Pie, Apple Pecan Crisp, Baked Apple French Toast, Apple Strudel, and Plum Galette are some of the recipes you’ll find here.
Rustic French Apple Tart
This French apple tart, which is similar to an apple pie but does not require a pie pan, is composed of a thin layer of cinnamon-scented apples on top of a buttery, flaky crust.
Ingredients
- 2 tablespoons granulated sugar
- 1 1/2 cups all-purpose flour, spooned and smoothed
- 1/2 teaspoon salt one and a half sticks (about 12 tablespoons) of extremely cold unsalted butter, cut into 1/2-inch pieces
- 1/4 cup extremely chilled water
For the Filling
- 1/3 cup sugar
- 1 teaspoon vanilla extract
- 1 teaspoon cinnamon
- 2 tablespoons unsalted butter, melted
- 1/4 teaspoon salt
- 1-3/4 pounds baking apples (3 big) (see note)
- 1/3 cup sugar
For AssemblingBaking
- 1 tablespoon all-purpose flour
- 1 egg, lightly beaten
- 2 tablespoons turbinado sugar
- 1 tablespoon apricot jelly or jam, optional for glaze
- 1 tablespoon butter, softened
Instructions
- Make the crust by combining the following ingredients: Prepare a baking sheet by lining it with parchment paper. Combine the flour, salt, and sugar in a food processor equipped with a steel blade and pulse until smooth. Combine by pulsing for a few seconds. Process for about 5 seconds, or until the butter is the size of peas, until the butter is smooth and creamy. Sprinkle the cold water over the mixture and process for approximately 5 seconds, or until the mixture is wet and extremely crumbly. Turn out the dough onto a work surface that has been lightly dusted with flour and knead a few times, just until it comes together into a cohesive ball. Form the dough into a disk using your hands. Make sure to re-flour your work area and to lightly sprinkle the dough with flour. Roll the dough into a circle 8 to 10 inches in diameter, rotating it as you go and adding extra flour as needed to keep it from sticking to the rolling pin or counter. Transfer the dough to a baking sheet lined with parchment paper and place in the refrigerator while you make the filling (you’ll be rolling the dough out even further on the parchment paper, so go ahead and clean your work area)
- Make the filling by following these steps: Apples should be peeled, cored, and cut into 1/8-inch-thick slices (you should have approximately 4 cups total), and placed in a large mixing basin. Toss in the sugar, vanilla, cinnamon, melted butter, and salt until everything is well-combined. Remove the dough from the refrigerator and place it on the counter with the parchment paper on top. Roll the dough out onto the parchment paper into a 14-inch circle that is approximately 1/8 inch thick, right on the parchment paper. It’s quite OK if the edges are a touch ragged. Replacing the parchment paper and dough on the baking sheet – the pastry should curve up the edge of the pan
- And Assemble the tart as follows: Sprinkle the flour over the pastry in a uniform layer. To assemble the apple slices on top, arrange them in overlapping concentric circles until they are 3 inches from the edge. Don’t be concerned about making things appear flawless! It won’t make much of a difference in the end result, and you don’t want the dough to become too warm. Using a free-form motion, fold the edges of the dough over the apples, working your way around the apple slices and forming pleats as you go. Using a pinch of dough from the edge, repair any tears that have occurred. Brush the pleated dough with the beaten egg, using a pastry brush, to ensure that it is equally coated. 1 tablespoon of the turbinado sugar should be sprinkled over the top crust, and 1 tablespoon should be sprinkled over the fruit. Refrigerate the tart for 15 to 20 minutes after it has been made
- In the meantime, preheat the oven to 350°. In addition, place an oven rack in the center of the oven. Place the pan in the oven and bake for 55 to 65 minutes, or until the apples are soft and the crust is golden and crisp. This is quite OK if part of the tart’s liquid drips onto the pan.) After baking, scrape any burned parts from the tart once it has finished baking.) The juices will burn on the pan, but the tart itself should be alright. Remove the pie from the pan and set it aside to cool. While the tart is cooling, prepare the optional glaze. In a small mixing bowl, combine the apricot jam and 1-1/2 tablespoons water until well combined. Heat in the microwave for about 20 seconds, or until the mixture begins to bubble. Toss the apples with the apricot syrup, using a pastry brush, then move the tart to a serving dish or cutting board with two big spatulas. Slice and serve immediately, either warm or at room temperature. Even though the tart is best served the same day it is cooked, leftovers can be kept on the counter for a few days if they are kept loosely covered. Note: Make careful to use baking apples that will keep their form when cooked, such as Honeycrisp, Jonagold, Fuji, Granny Smith, or Golden Delicious, to ensure a successful outcome. Additionally, for the finest flavor, combine a variety of varietals. Prepare Ahead of Time: The dough may be made up to 3 days ahead of time and stored in the refrigerator. To make rolling easier, let it sit at room temperature for approximately 15 minutes or until it becomes malleable. Instructions for Making a Freezer-Friendly Recipe: The constructed tart can be frozen for up to 3 months after it has been formed. To freeze the tart, set it on a baking sheet and store it in the freezer until it is completely frozen, then wrap it firmly. (Be sure to brush the tart with the beaten egg and sprinkle the sugar onto the crust just before baking it.) Directly from the freezer, bake the cookies. (It may take a few more minutes to bake from frozen, depending on your oven.)
Nutrition Information
It is powered by
- Caloric intake per slice (eight servings)
- Fat intake per slice (21 g)
- Saturated fat intake per slice (13 g)
- Carbohydrate intake per slice (49 g)
- Sugar intake per slice (26 g)
- Fiber intake per slice (three grams)
- Protein intake per slice (4 grams)
- Sodium intake per slice (195 mg)
- Cholesterol intake per slice (73 mg).
This website has been developed and published only for the purpose of providing information. Neither I nor the Food and Drug Administration are qualified nutritionists, and the nutritional information on this site has not been examined or approved in any way by a nutritionist or the FDA. It should not be assumed that nutritional information is provided as a guarantee; rather, it is provided as a convenience. Edamam.com, a nutritional calculator on the internet, was used to calculate the information.
A variety of factors, including as the product kinds or brands that are purchased, natural changes in fresh produce, and the method that ingredients are prepared, affect the nutritional information that is provided by a particular recipe.
Using your favourite nutrition calculator, you should calculate the nutritional information for a specific dish using the exact components that were used in the recipe in order to receive the most accurate nutritional information.
See more recipes:
Three Berry Fruit Cobbler is a delicious dessert made with three different types of berries. Kathy Gunst is the author of this piece. It’s scorching outside. On certain days, it’s too hot to even think about baking, much alone do it. In contrast, summer is a season for fruit, and if you’re like me, you’ll want to take advantage of all of the delicious berries and stone fruit (such as juicy peaches, nectarines, cherries and apricots) that are currently available at farmers markets. It has been a summer tradition for me to visit a nearby “pick-your-own” (PYO) farm and bring home buckets of fresh fruit.
- What really is in a name?
- An apple crisp is a simple dessert made out of apples baked in an oven dish with a crumbly topping made up of oats, flour, butter, and spices.
- It’s also referred to as a “crumble,” albeit crumbles are less likely to contain oats and are more likely to have a streusel-like topping.
- The cobbled-like look of the biscuit topping is thought to be the inspiration for the name.
- This straightforward pie is the epitome of a light and refreshing summer treat.
- Sweetened condensed milk is combined with egg yolks and plenty of fresh lime juice and zest to create this delicious dessert.
The mixture is cooked for 15 minutes in a prefabricated graham cracker pie shell (don’t judge me) and then let to cool completely. Immediately before serving, top the pie with a crown of whipped cream and garnish it with fresh summer berries and toasted coconut. Serve immediately.
More from WBUR
- A fruit cobbler with three berries Kathy Gunst is the author of the following piece titled Out in the open, it’s scorching! Even the mention of the word “baking” might be uncomfortable on certain days. In contrast, summer is a season for fruit, and if you’re like me, you’ll want to take advantage of all of the delicious berries and stone fruit (such as juicy peaches, nectarines, cherries and apricots) that are readily available at farmers markets right now. It has been a summer routine for me to visit a nearby “pick-your-own” (PYO) farm and bring home buckets of fresh fruit. When the first chilly day arrives, I get to work creating jams, jellies, and preserves, and I always bake a few pies, crisps, crumbles, and cobblers to share with friends and neighbors. What exactly is contained within a name? A fantastic fruit dessert is referred to by the terms crisps, cobblers, and crumbles, among others. An apple crisp is a simple dessert made out of apples baked in an oven dish with a crumbly topping made up of oats, flour, butter and spices. The objective is to bake it until the fruit is tender and practically boiling over, and the topping is golden brown and “crisp,” according to the recipe. Occasionally, it is referred to as a “crumble,” albeit crumbles are less likely to contain oats and are more likely to have a streusel-like topping instead. A cobbler varies from a fruit crisp in that the fruit is baked with some type of dough on top — typically a biscuit-like crown topping — before being served warm or chilled. The biscuit topping has a cobbled look, which may be the inspiration for the name. Summer Berry and Lime Pie is another recipe I’ve prepared. In terms of summer desserts, this straightforward pie is the epitome of light and airy. As opposed to a “icebox cake,” this cake only has to be baked for 15 minutes (just enough time to overheat your already hot kitchen) and then allowed to cool for several hours before being served. Condensed milk, egg yolks, and plenty of lime juice and zest are combined together in a mixing bowl. 15 minutes later, it is removed from the oven and allowed to cool completely in a prefabricated graham cracker pie shell (no judgment here). Serve the pie with a whipped cream crown on top, as well as fresh summer berries and toasted coconut around the edge just before serving.
The following features are shared by all three of these rustic fruit desserts: They are mostly concerned with showcasing the greatest fruit of the season. None of them are picky or difficult to complete, nor do they need a significant amount of time. However, they all have a significant “wow!” element. To avoid overheating my kitchen on really hot summer days, I prefer to bake in the early morning or late afternoon, after the sun has set, rather than throughout the day. I can also make the dessert first thing in the morning and put it in the oven as soon as we go down to supper.
Three Berry Fruit Cobbler
Three Berry Fruit Cobbler is a delicious dessert made with three different types of berries (Kathy Gunst) Using blueberries, raspberries, and strawberries, combine them with a pinch of sugar and spread them out in the bottom of a circular baking dish. To top the fruit, a fast biscuit dough is made and cut into six biscuits with a biscuit cutter. It takes only 25 to 30 minutes in the oven to create a sweet, bubbling summer fruit dessert with a crunchy, buttery biscuit topping that is sure to please.
The cobbler may be prepared 4 to 6 hours ahead of time and stored in the refrigerator until ready to bake.
This recipe serves 4 to 6 people.
- Strawberries, hulled and sliced in half or quarters, depending on their size
- 1 1/2 cups whipped cream 12 cups blueberries, 12 to 1 cup raspberries, 13 cup sugar, 12 tablespoons cornstarch
The biscuit is as follows:
- 2 cups flour (240 grams)
- 2 tablespoons sugar
- 1 teaspoon baking powder
- 1 teaspoon fine salt
- 12 teaspoon baking soda
- 2 cups flour (240 grams). 4 tablespoons cool buttermilk (plus 1 tablespoon) 1 stick unsalted butter, chilled and sliced into tiny cubes To glaze the biscuit tops, combine 2 tablespoons milk and 1 tablespoon sugar in a mixing bowl.
Instructions
- Preparing the berries: In an 8 12 inch round baking dish or pie plate, gently mix the berries with the sugar and cornstarch until the sugar is completely dissolved. While you’re making the biscuit dough, set it aside. Make the biscuit topping as follows: In a large mixing basin, whisk together the flour, sugar, baking powder, salt, and baking soda. Working the butter into the flour mixture with a pastry cutter or your fingertips until the butter is the size of peas is the goal here. Pour the buttermilk over the flour mixture and stir with a wooden spoon just until the ingredients are well combined. Using well-floured hands, knead the dough until it develops a shaggy texture. Distribute the dough onto a lightly floured work surface and form it into a rectangle with your hands. Fold it in half, then in half again, and you’ll get a square (this helps build layers in the biscuit). Repeat the process 2 to 3 more times. Roll the biscuit dough out to an 8 by 6 inch rectangle, about 1 inch thick, with a well-floured rolling pin. Set the biscuit dough aside. Make six biscuits out of the dough using a 2 12 inch biscuit cutter (or a 2 12 inch glass). Organize the scraps and reroll them if necessary. Place the biscuits on top of the fruit, being sure to leave a little gap between each biscuit and the fruit. Refrigerate for 15 minutes to an hour to allow flavors to blend. 425 degrees Fahrenheit is the temperature in the oven. The milk should be delicately brushed onto the tops of each biscuit using a pastry brush or the back of a kitchen spoon. Sugar should be sprinkled on the biscuits. Bake for 25 to 30 minutes on the middle shelf, or until the biscuits are golden brown and do not appear to be mushy, and the fruit is bubbling around the edges. Whether heated or at room temperature, your choice.
Blueberry — Or Any Fruit — Crisp
Crispy Blueberry Muffins (Kathy Gunst) The dessert I resort to when I have little time and only a few ingredients on hand is this one. Just a few ingredients: some summer fruit — whether it’s freshly picked strawberries or frozen peaches and nectarines, as well as apricots and apricot nectar later in the season, as well as apples and pear nectar later in the season; flour; light brown sugar; butter; and a pinch of spices. Making the crisp takes less than 10 minutes and it has to bake for 45 minutes to be fully cooked.
A crisp is a delicious dessert, snack, or breakfast option when served with a strong cup of coffee or tea.
This recipe serves 4 to 6 people.
- Blueberries, or other berries, pitted cherries, stone fruit (or any mix of these), or a combination of these A pinch of ground ginger and 2 tablespoons light brown sugar are all you need.
The crunchy topping consists of:
- 112 cups granola (use your favorite variety)*
- 1 cup flour
- 13 cup light brown sugar
- A pinch (about 18 teaspoon) ground ginger
- A pinch of cinnamon
- A pinch of salt
- 1 12 cups granola (use your favorite variety)* 1 stick unsalted cold butter, cut into tiny pieces
- 1 cup granulated sugar
In the absence of granola, 1 12 cups quick oats combined with a few chopped almonds and raisins can be substituted for the cereal. Instructions
- Preheat the oven to 375 degrees Fahrenheit. Combine the fruit, sugar, and ginger in an 8-inch round baking dish, pie plate, or large dish (or 4 one-cup ramekins)
- Bake for 30 minutes at 350°F. Make the icing by combining the following ingredients: In a medium-sized mixing bowl, combine the granola or oats, the flour, the sugar, the ginger, the cinnamon, and the salt. Working with your hands or a pastry cutter, incorporate the butter into the mixture until it is the size of peas. Gently push down with your fingers to produce a blanket of topping over the fruit. Bake for around 35 to 45 minutes on the middle shelf, or until the topping is crisp and golden brown, depending on your oven. Serve hot, warm, or cold
- If desired.
Summer Lime, Blueberry And Coconut Quick Pie
Quick Pie with Summer Lime, Blueberries, and Coconut (Kathy Gunst) As a result, it does not truly qualify as a “icebox pie” because it is only in the oven for 15 minutes. If, on the other hand, you use a prefabricated graham cracker crust, the pie comes together in no time at all. However, it must be refrigerated for at least 2 hours (and ideally 4 hours) before to serving time.
There are several variations of this pie that may be created with lime or lemon juice, blueberries, or any other berry on top of it. Freshly chopped mint can also be sprinkled on top of the pie before baking. Ingredients for 6 people
- 1 prefabricated graham cracker crust (9-inch diameter)
- 1 14-ounce can sweetened condensed milk
- 4 egg yolks
- 12 cup lime juice (approximately 4 to 5 small-medium limes)
- 1 9-inch readymade graham cracker crust 1 12 teaspoons grated lime zest from one or two limes
- 1 cup heavy cream
- 12 tablespoons sugar
- 1 teaspoon vanilla extract
- 1 cup blueberries, raspberries, blackberries, and or pitted and halved cherries
- 1 cup blueberries, raspberries, blackberries, and or pitted and halved cherries 1 to 2 tablespoons roughly chopped fresh mint, optional
- 13 cup unsweetened coconut flakes, toasted*
- 1 to 2 tablespoons unsweetened coconut flakes, toasted*
- 1 to 2 teaspoons unsweetened coconut flakes, toasted*
Using a baking sheet, spread the coconut flakes out and bake for about 8 minutes at 350 degrees, or until they are just starting to turn golden brown. Allow to cool before using. Instructions
- Preheat the oven to 350 degrees. In a large mixing basin, rapidly whisk together the condensed milk, egg yolks, and lime juice until smooth. Whisk in the lime zest until well combined. In a prepared pie crust, pour the ingredients and bake on the middle shelf for about 15 minutes, or until the filling is set. Wiggle the pie shell slightly
- The contents should not seem liquid or loose when you do so. Remove from the oven and set aside to cool. Cover loosely with plastic wrap and place in the refrigerator for approximately 2 hours or overnight, or until cold. Just before serving, whisk the cream until it forms soft peaks. Whisk in the sugar and vanilla for another 2 to 3 minutes after adding the sugar. Spread the whipped cream on top of the pie once it has cooled. Place the blueberries around the sides of the dish and sprinkle the toasted coconut on top, along with the mint, if using.
Other Summer Dessert Ideas:
- The Strawberry Glazed Pie, the Summer Peach Pie, the Blueberry Lemon Pie with Crostadas, and the Lemon Tart are all excellent choices.
Recipes Using Pie Filling, Other Than Pie! – Shelf Cooking
You’ve finished with the meal and cleaned up the kitchen. However, there is still something lurking in the shadows that you are unsure how to deal with. All of that left-over canned pie filling is a disaster! So you went a little crazy and bought a little too much? We understand what you’re saying. In addition to pie, there are a plethora of other dishes you can create with all of that pie filling. We understand that when you find a fantastic deal on baking goods, it might be tempting to stock up on as much as you can.
Alternatively, you may have only required half of the can of filling and are unsure what to do with the remaining portion.
Whenever you find yourself completely submerged in pie filling and unsure of what to do, we’ve got you covered!
FAST NO-BAKE RECIPES WITH PIE FILLING
The search is over if you’re looking for something quick and easy that doesn’t require the use of an oven. This delicious dish is made even better by the inclusion of the canned pie filling in the recipe. Fill in the blanks with any flavor you have on hand that sounds tasty.
- For a fruity twist on overnight oats the next morning, mix in a small amount of pie filling before cooking the oatmeal overnight. Cheesecake Parfaits – In a large mixing bowl, combine two 8-ounce packages of cream cheese, 3 tablespoons heavy cream, and 5 tablespoons sugar. Finish with a squeeze of lemon juice and a dash of vanilla extract. Place a glass on top of the crushed graham cracker crumbs, then the cream cheese filling, and finally the remaining pie filling on top of that. Mmmmm
- Trifle– In a trifle bowl or glass mixing bowl, layer delicious bits of angel food cake, vanilla pudding, and fruit pie filling until well-combined. Continue layering until the bowl is completely filled or you run out of ingredients. Sandwich Cookies– Everyone has a go-to cookie recipe that they swear by. Instead of baking the cookies, you could make a batch and then fill the center with vanilla ice cream and fruit pie filling for a delicious sandwich treat. Take advantage of those store-bought angel food cakes and top them with some pie filling and whipped topping for a delicious dessert. Vanilla or plain yogurt, leftover pie filling, and granola are mixed together in a glass for a filling breakfast parfait.
Don’t those all sound absolutely incredible?! Prepare just one — or all! — of these recipes that call for pie filling, and you’ll find yourself wishing you had more to work with!
EASY BAKED DESSERTS
When it comes time to prepare a delicious dessert for a family meal that is both warm and cozy, you may make one of these simple alternatives by combining all of those cans of pie filling together. Just one question: do you mind if we drop over for dessert?
- Pumpkin Dessert – Do you have any leftover pumpkin pie filling from your Christmas meal? Cook yourself a batch of this delectable pumpkin pie from Taste of Home. Use our favorite cobbler recipe and add whatever leftover fruit pie filling you have lying around. Dump Cake– A basic dump cake is the simplest type of cake to make. In the bottom of a baking dish, spread a layer of the remaining pie filling to cover it completely. After that, equally distribute the cake mix from the box. Finally, arrange thin slices of butter on top of the dish in a uniform layer. Preheat the oven to 350°F degrees and bake for 35-40 minutes. Layer Cake– This is a cake that is quite easy to make. Make two or more cake rounds out of your favorite boxed cake mix using the directions on the box. When assembling the cake, use the remaining filling between layers as a cake filling instead of piping it in between layers. YUMMY
- Pocket Pies– Make use of whatever leftover pie crusts you have. Using a circular cookie cutter, cut the dough into 4′′ circles. Fill one side of the pie shell with pie filling and fold over. With a fork, seal the edges. Using an egg white, brush the crust. Preheat the oven to 425°F and bake for 15 minutes, or until the top is golden brown. Preheat the oven to 350 degrees Fahrenheit for the fruit bars. Then combine 1 cup butter, 2 cups sugar, and 1 teaspoon salt in a large mixing bowl. Using an electric mixer, beat in 4 eggs and 1 teaspoon vanilla essence. To produce a dough, gradually add 3 cups of flour to the ingredients until it comes together. 3/4 of the dough should be spread in a greased baking pan. Then, using a spatula, put the pie filling on top. Finally, place spoonfuls of the leftover dough on top of the finished product. Bake for 35-40 minutes, or until the top is golden brown. You may serve it as is or sprinkle powdered sugar on top for a little bit extra.
There is no need to panic if your cupboard is stuffed to the brim with cans of pumpkin pie filling or if you have made a large amount of the stuffing for a holiday feast. We put up an ENTIRE fantastic post crammed full of dishes that you can make with any leftover pumpkin you have on hand. You may be certain that we have your back!
CAN YOU FREEZE LEFTOVER PIE FILLING FOR LATER?
Yes, in a nutshell, is the answer. By freezing the filling and storing it for later, you can solve this problem the shelf cooking manner. If you want to be even more efficient, freeze whatever is left in the form of your pie plate. To accomplish this, follow these steps:
- Firstly, line the bottom of a pie pan with heavy-duty aluminum foil, leaving overhanging corners, and then add your filling to the pan
- Metal pie pans are the most effective for the freezing process since they convey cold more effectively and distribute the frozen pie filling more evenly. Place the pan on a cookie sheet to make it more sturdy, and then freeze it until the filling has solidified. Once the filling has frozen firm, you may remove it from the pan by folding the aluminum foil over the top and lifting it out of the pan. Once the filling has been removed, place it in a freezer bag and freeze the fillings for three to four months.
Advice from the pros: If you just have a portion of a can of pie filling remaining, you will not be able to fill a metal pie plate!
Make use of an empty ice cube tray in this situation and fill the cubes with any remaining pie filling you have. Once it has been frozen, remove it from the freezer and cover it in saran wrap inside a freezer bag. Make a smoothie or a single-serve dessert with the cubes, or just eat them plain.
HOW TO BAKE FROZEN PIE FILLING
What’s more, guess what?! We’ve got the finest news for you! The frozen filling does not even need to be thawed before it can be used! To make use of your frozen pie filling, follow these steps:
- Take remove the pie plate that you used to freeze the filling and set it aside. Line the pie pan with a pie crust, which may be handmade or purchased, and then dust with a couple tablespoons of flour or cornstarch. Any excess “liquid” that occurs from freezing the filling will be thickened as a result of this. Place the frozen fruit filled disk directly on top of the crust and bake until golden brown. Note: Depending on the size (and depth) of the pie, you may need to increase the baking time by 20 to 45 minutes to ensure that the filling is properly cooked.
Tell us in the comments section below what kind of pie filling you normally have on hand and what you have planned for this weekend! Do you want to learn more about how to prepare delectable dishes?
- Make Grandma’s famous meatloaf for a hearty supper that everyone will enjoy. Learn how to transform leftovers into something completely different. Make our delectable handmade ice cream to accompany your dessert.
Pie will catch up with you later!