
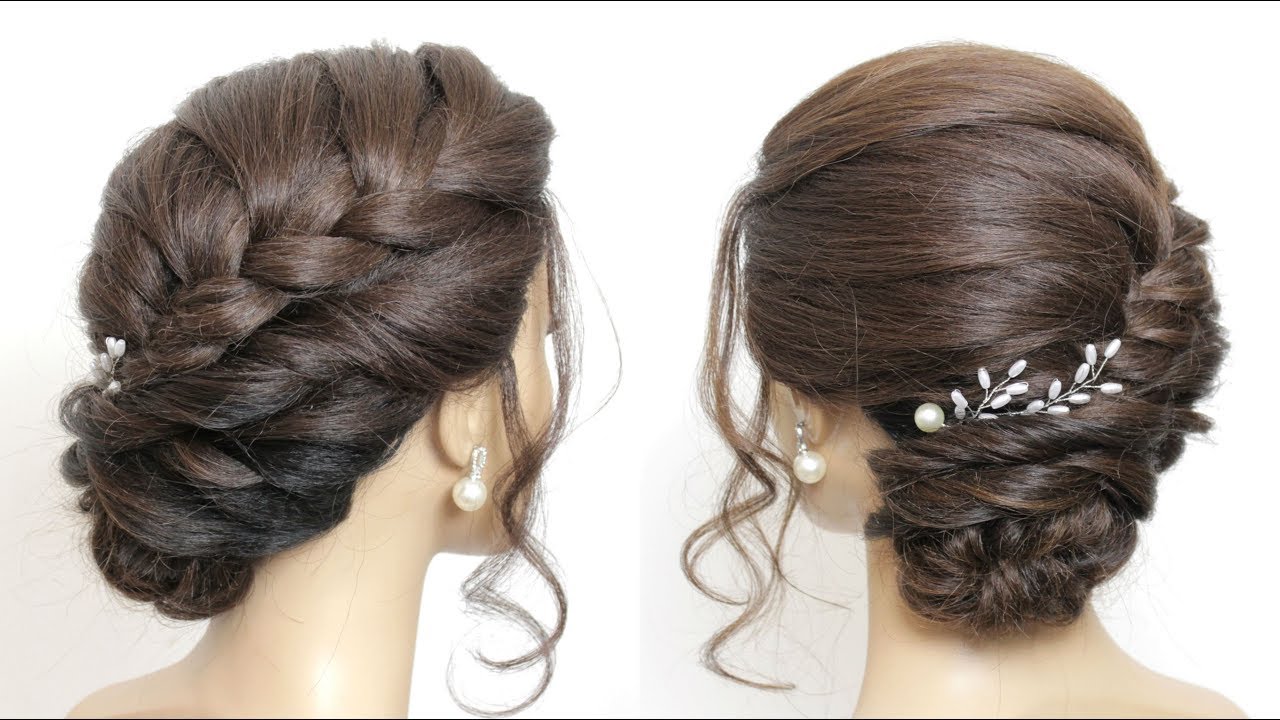
Buns
How To Do Side Buns With Long Hair
Jan
Documentation Download Documentation Download Documentation The side bun is a fast and attractive hairstyle that can be worn with any type of hair. A variety of options allow you to customize it for everything from a casual beach vacation to an important special event. Side buns are typically made in the “messy” style, with hair that is lightly secured and wisps flowing loosely from the bun. When going out for a relaxed day or evening, a side bun is ideal. To prepare for a business meeting, wedding, or other formal event, brush up on your side bun styling.
- 1 Begin with freshly cleaned hair. Always avoid styling newly washed hair if as all possible. When you leave your hair unwashed for one day, hair styling becomes simpler and lasts longer.
- In the event that your hair becomes oily after a day, wash it and sprinkle it with asea salt spray.
- 2Comb your hair out of tangles. Starting with the ends of your hair, brush or comb it through until it is smooth. Gradually increase the pressure on your hair until it is perfectly smooth. Use a spray-on detangler for thick hair or knots that are particularly difficult to remove
- 3 Increase (or reduce) the volume. Side buns require the appropriate amount of volume in order to appear beautiful. Thin buns are prone to falling out soon. Thick buns may end up sticking forth excessively. You might do any of the following to deal with these issues:
- Curling your fine, limp hair before you begin will help to prevent frizz. After that, apply a tiny quantity of mousse or gel on it and crush it up. Just make sure it doesn’t become “crunchy.” Apply an anti-frizz serum from the ears all the way down to the ends of thick, curly hair to treat it.
- 4Make a deep part in the middle of your hair. Most of your hair should be combed to the side where you want your bun. Draw a line across your hair with the comb. (Optional) You may use hairspray to keep the portion in place if you apply it gently. 5 Reposition the hair that has sprung up to the proper side. You should back comb your hair. Only do this to the roots of your hair towards the back of your head. It will help to give your hair a little more volume. Take cautious not to get caught in knots.
- Optional, especially if your hair is thick or curly
- Yet, it is recommended.
- 6At the base of your head, gather all of your hair. In the meantime, brush your hair to smooth out any lumps that may have formed throughout the process. Make a tight knot on your hair and secure it with an elastic hair band. Using this method, you can keep the bun in place
- 7 Bring a couple wisps of smoke down with you. Now is the time to pluck out any hairs that are hanging around your ears and letting them fall naturally on your shoulders and back. Create a framing for your face by placing the wisps in front of your ears. Make sure not to let too much hair hang loose, otherwise your final style will be messy.
- This step is optional, however sometimes wisps will tumble down on their own without any assistance. You can pin your hair to the side of your head with a bobby pin or a discrete barrette if you don’t want it to dangle over your face.
- 1Take a little part of hair and gather it. Keep the hair between your thumb and fingers for the time being. Never collect more hair than these two fingers are capable of holding at one moment. 2 Make a back comb through your hair. One hand should be holding the piece of your hair that is facing outward. Tease your hair towards the direction of your head using a comb. For those who are bothered by split ends, use the thumb and fingers of your dominant hand to gently move your hair toward your head.
- In the event that back combing is not your thing, consider twisting each part of hair separately for this stage.
- 3Put your combed hair in a bun in the back. Keep this portion firmly in your mind. Place a bobby pin in the center to hold it in place. Hook the bobby pin into the elastic within the bun as much as feasible if at all possible. 4Repeat. Continue with the steps outlined above until you’re completed. Maintain the position of your bun so that it drapes to one side of your neck. 5 Ensure that the bun is secure. Extra bobby pins can be used to secure errant locks. With a little hairspray, you can keep the bun in place
- Three, gather the combed hair in the back of your head. Continue to keep this part close to your chest. Place a bobby pin in the center to keep it from moving. Hook the bobby pin into the elastic within the bun as much as feasible if it is possible. 4Repeat. To finish, repeat the preceding steps several times. Maintain the position of your bun so that it drapes to one side of your neck
- 5 Make a bun and tie it up tight! Keep loose locks in place with more bobby pins. Hairspray can be used to hold the bun in place.
- 1Division your ponytail into two halves is a good idea. Remove any difficult tangles from each part by brushing or combing it. Carry the front portion of the dress over your shoulder. Take the other portion in your palm, and braid it with the first section. Maintain a diagonal angle with the hair. Make a conventional three-part braid in the manner of your choice. Continue to weave until you reach the end of the rope. Secure the end with a tiny elastic band
- 3Loosen each braid one turn at a time. Make a fist with your thumb and place it over the braid. Each portion of the body should be pushed outward and upward. Fourth, this will expand the braid and give it texture. Each braid should be pinned up. Roll the braid in the direction of the elastic band at the base of your skull. As you do this, be sure your hair is not in your face. To keep the braid in place, use a bobby pin to secure it. 5Secure the chignon by placing the braids very near to each other so that they appear to be one intertwined mass. Bobby pins should be used to secure the chignon on your head. The quantity of bobby pins required varies from one individual to another. Extra grip can be achieved by spraying with hairspray
- 6 Using a pin, secure any residual wisps. Gather any strands of hair that are dangling from your face. Attach them to the base of the chignon using bobby pins. Make an effort to conceal the ends of your hair in a chignon.
- This step is optional if you wish to keep a tress at the side of your face
- Nonetheless, it is recommended.
- 1Twist the ponytail a little. Begin at the base of your skull. Continue to go in a downhill direction. Allow your hair to wrap into a spiral as you twist and twist it. Continue to twist the hair, enabling it to coil around the higher elements of the ponytail
- 2tie the ponytail into a bun. Use an elastic band to secure the item. The bottom section of the bun should be secured to the beginning of the ponytail. If you have long hair, it should be styled in a sophisticated spiral that hangs from the side of your head. There will be tufts of hair protruding from the surface
- 3 Ensure that the bun is secure. Pinch long strands of hair that are protruding from the base of your head together. Bobby pins are the most effective tool for this. Additional bobby pins can be used to secure the sides of the bun to your head as well as the top. Hairspray can be used to create a long-lasting grip.
- If any stray strands begin to peep through the bun, pin them back in place.
Create a new question
- If you have thick hair, you can still do this. Question Yes! It’s possible that you’ll need to use more bobby pins and hairspray than usual. Question Is it okay to do it with damp hair, despite the fact that it states not to? Styling damp hair is not suggested due to the fact that wet hair is more sensitive and will break more quickly
- Question Do you know what you should do to give your hair more volume if you have straight hair on top and curly hair below? You might get some argan and Moroccan oil and use it to condition your hair after you wash or comb it. However, not excessively
- Question My hair is a little on the short side. Is it still possible for me to accomplish this? In a way, yes. I recommend that you use a bun mold (the spongy thing that looks like a doughnut). It will give the appearance of a thicker bun.
Inquire about something There are 200 characters remaining. Include your email address so that you may be notified when this question has been resolved. Submit
- Hair extensions should be brushed out before being placed in your natural hair if you’re wearing them. Use a root spray to give your hair more volume at the crown of your head. If you have a lot of fly-away wisps, spray the back of a comb (tooth side up) with hairspray to smooth them down. Using your comb, gently slide it down your hair
- An elegant corsage or genuine flower can be pinned to the side of the bun for an elegant wedding or other super-formal occasion.
Thank you for submitting a suggestion for consideration!
- Your suggestion has been received and will be considered.
Things You’ll Need
- Sea salt spray (optional), regular-sized elastic hair band, hairspray, curling iron (optional), mousse or gel (optional), detangler, anti-frizz serum, small elastic bands
About This Article
Summary of the ArticleXA side bun is a simple, charming hairstyle that can be worn on practically any event. Begin with unclean hair, which is simpler to style in the long run. Brush your hair thoroughly through to smooth out any knots, and then use a hair product to finish it off. Make a deep side part and then pull your hair back into a ponytail at the base of your neck to finish the look. To create a basic side bun, twist your ponytail until it forms a spiral and pins it in place. Then, using another hair tie and a few bobby pins, secure the bun in place.
After that, gather each backcombed section of hair and secure it with a bobby pin.
Continue reading to find out how to create a formal side bun!
The writers of this page have together authored a page that has been read 171,339 times.
Did this article help you?
As a girl with bob-length hair, I understand the frustration of waking up late and wanting nothing more than to toss your hair up in a messy bun, only to find yourself unable to do so because you don’t have enough hair to do so. Please do not misunderstand me. I really enjoy having short hair. However, the messy-bun existence is one that I occasionally yearn for. There is some bad news, though, in that buns with short hair aren’t nearly as straightforward as they are for people who have 12 inches of hair to play around with.
In fact, it’s more than probable that this will happen.
For all of my short-haired sisters out there, this one is for you.
On the days when you don’t feel like pulling out your curling iron or straightening iron, simply refer to this list for inspiration. Continue reading for a step-by-step approach to successfully pulling off buns for short hair.
Braided Topknot
Getty 1.Distribute a dry texture spray, such as Obrie’sDry Texturizing Spray($22), evenly throughout hair to provide more grip. 2.Pull your hair into a super-high ponytail and tie it with an elastic band. Don’t be concerned about making things seem nice! 3.Pull the ponytail all the way down and secure it with a clear elastic band at the bottom. Using a bobby pin, bind the braid around itself, starting at the base and working your way up the length. 5.After the braid has been coiled all the way up into a bun, fasten it with a couple more bobby pins to finish it off.
7.Spray your hair with a flexible-hold hairspray.
8.
Sporty Space Buns
Getty1.Space buns are all the rage this summer, and now it’s your opportunity to show off your own style. To finish, part your hair down the center and spray all over with Rusk’sTexture Dry Finishing Spray ($25). 2.Pull the hair from either side of your head into a high, tight ponytail on one side. Wrap each ponytail around itself and tie it with a couple of bobby pins to finish the look. 4.The more muddled, the better! Pull each bun outward to add volume, then pull out a few loose strands to frame your face with a few loose strands.
Boho Double Knot
Image courtesy of Getty1. A dry shampoo, such as Living Proof’sPerfect Hair Day (PhD) Dry Shampoo ($25), or a greattexture spray is the key to this casual summer style. Spray evenly from the middle of the shaft to the ends. 2.Split your hair into four equal portions, two on either side of the front and two on either side of the back, and pin them up in a high ponytail. 3.Take a portion from the rear of the bun and coil it around the base to form a bun shape. Bobby pins can be used to keep the hair in place.
You should be left with two areas that have not been touched up front.
Roll the tail of the front piece over the rear bun and secure it with a safety pin.
Take a few face-framing items and you’re ready to go!
Bedhead Bun
Getty1.Have you not heard the news? Compared to the topknot of yesteryear, the low bunis is incomparably cooler and colder to wear. To create the desired effect, softly back-comb the hair at the top of your head to give it lift. Make a loose, sloppy ponytail at the back of your neck and tie it off with an elastic band.
Simply hold it in place for the time being; do not bind it with an elastic. (3) Twist the ponytail around itself using your other hand to form a bun shape, and fasten with pins. 4.Tousle the top of the hair and leave a few short strands in the front for a no-frills bedhead appearance.
Messy Half-Knot
Getty1.For short-haired girls, this is the ultimate bun to achieve. Begin with strands that have not been washed. It doesn’t matter how filthy the environment is. Using your hair, create two sections on either side of your crown. Keep the components as straight as possible because they will be apparent in the final product. 3.Make a high ponytail out of the hair between the two pieces and place it exactly on top of your head. Make sure not to drag the ponytail through the elastic on the final loop; otherwise, you’ll end up with a loose bun.
Instead of leaving the ends sticking out the bottom of the bun, just wrap them around the base of the bun and pin them in place!
Modern Milkmaid Bun
Getty1. Although this is more of an updo than a classic bun, it still serves the purpose of keeping your hair out of your face in a stylish manner. Begin by splitting your hair down the center and dividing it into two equal parts with your fingers. To give your hair near the crown of your head a little additional volume, back-comb it a few times. 3) Create a French braid on one side of your head, starting near to your face and working your way out to form a braided pigtail. 4. Clear elastic is used to keep it in place.
Using a bobby pin, pin the end of the first French braid behind your head to keep it in place.
7.Spray the braid with a medium-hold hair spray, such as L’Oréal Tecni, to keep it in place.
Classic Ballet Bun
This laidback variation on the traditional ballerina bun is polished and easy, as shown in the image above by Getty1. In order to begin, pull your hair back into a ponytail at the very top of your head. In the event that you have shorter pieces that fall out, pin them up at the back of your head with a bobby pin. Secondly, open the elastic and draw the hair up halfway through to form a loop to give the topknot a larger appearance. 3.Take the excess length that was left over from the loop and coil it around the base of the loop to conceal the elastic band.
Sleek Low Bun
Getty1.A slicked-back hairstyle that screams “cool chick” will have you looking as effortlessly elegant as Rihanna. This is one of the few occasions in which Rihanna wore her natural, blown-out hair without the use of extensions. Before you begin, smooth your hair back into a bun with a boar bristle brush, such as the DenmanBoar Bristle Ceramic Brush ($26). Secondly, let some of your flyaways and sideburns to dangle loosely. Don’t be concerned with everything being in exactly the right position.
3.Pull your hair back into a ponytail with the help of an elastic. Make a coiled, twisted ponytail out of the ends of your hair. Take a second elastic band and wrap it around your topknot to secure it.
Embellished Top Knot
With a slicked-back hairdo that screams cool girl, you may seem as effortless as Rihanna. Getty1. The fact that Rihanna’s hair is blown out and not styled is one of the few instances in which she has done so without extensions. To begin, smooth your hair back into a bun with a boar bristle brush such as the DenmanBoar Bristle Ceramic Brush ($26). a couple of your flyaways and sideburns should be left untied If nothing is in its proper position, don’t stress about it! Using the brush, swoop and smooth down your baby hairs while applying a hardworking pomade such as Hick’sEdge Control ($13).
4.
To keep your topknot in place, use a second elastic band.
Backwards Braided Bun
Getty1.Achieve Rihanna’s easy charm with a slicked-back hairdo that screams “cool chick.” This is one of the few occasions in which Rihanna sported her natural, blown-out hair without the use of extensions. To begin, smooth your hair back into a bun with a boar bristle brush, such as the DenmanBoar Bristle Ceramic Brush ($26). Secondly, let some of your flyaways and sideburns to dangle freely. Don’t be concerned with everything being in its proper position. Take a hardworking pomade, like as Hick’sEdge Control ($13), and swoop and smooth it down your baby hairs with the brush.
4.Twist the ends of your ponytail around each other in a coiled, twisted fashion.
40 Casual and Formal Side Bun Hairstyles for 2021
The side bun is one of those hairstyles that is flattering on practically every woman who tries it on. You will look pulled together without appearing to be overly fussy with this charming, flirtatious, and flexible updo. There are countless variations on the side ‘do, and whatever one you select will be determined by your unique style, preference, and the occasion. If you’re looking for some inspiration on how to create a sophisticated side style, take a look at the amazing and inventive styles featured below.
Side Bun Hairstyles for Medium Length and Long Hair
It is one of those hairstyles that is flattering on practically all ladies, the side bun. You will look pulled together without appearing overly fussy with this playful, flirtatious, and flexible updo! Side ‘dos may be worn in a variety of ways, and the style you pick will be determined by your particular taste, preference, and the occasion. Consider the amazing and unique looks featured below if you’re looking for some ideas on how to achieve a sophisticated side style.
1: Twisted Up Side Bun
Side buns can be tucked under, but they can be be twisted upwards as well. A tiny, single braid is used to highlight the bun, which is pushed to one side and then curled up towards the ear to complete the look. Due to the little elevation of the crown, the front aspect of this updo is much more appealing.
2: Loose and Curly Side Bun
When worn on the side of the head, a twisted side bun adds a touch of elaborate yet unforced design to an otherwise plain appearance.
The hair is twisted into a bun, with the twists starting at the sides and working their way up. Several huge clumps of hair are taken out of the nape of the neck, where they remain for a while.
3: Blonde Wavy Side Updo
The combination of blonde hair color and wavy texture will undoubtedly give your trendy side updo a stylish lift. Remove a few strands from the bun with your fingers or the end of a rat tail comb for a more unkempt appearance after it has been secured with pins.
4: Braided Crown and Curly Bun
Curly side buns are an excellent choice for those with shorter hair. Combine your bun with a braided feature of your choosing, such as a crown braid or braided bangs, for example. A bouffant is also a positive for most loose curly updos since it adds volume.
5: Light Brown Messy Side Bun
When you have shorter hair, curly side buns are a terrific choice. You may pair your bun with any braided feature of your choosing, such as a crown braid or braided bangs, for example. Most loose curly updos benefit from a bouffant as well.
6: Elegant French Braid/Side Bun Combo
Buns are a must-have for formal occasions such as prom, weddings, and black tie affairs (and look great in images). A thick, twisting French braid that sweeps over your head and around the bun from one side to the other will make your bun stand out, as seen in this style by @braidsbyjordan.
7: Low Messy Bun with Loose Curls
Never be surprised if total strangers start making second takes when they see you sporting a super fashionable, attention-getting side bun in your hair. With a super-dark ombre and caramel ends, the hair is a sharp difference in terms of color, and loose curls are juxtaposed against the smooth upper strands for a dramatic effect.
8: Twisted Bridal Updo
Never be surprised if total strangers start making second takes when they see you sporting a super fashionable and attention-grabbing side bun. Loose curls are paired against smooth upper strands in this super-dark ombre with caramel ends, which creates a dramatic color contrast.
9: Delicate Side Bun with Garnish
With its delicate loose bun and beautiful dangling tendrils, this trendy messy updo is the definition of chic and carefree. For a little more glitter, we recommend adding a piece of costume jewelry to perfectly groomed hair that you already own. We also recommend running a curling iron over parts of hair before pinning everything in place.
10: Grecian Goddess Fishtail Braid
Side updos like this one were made for posting on social media. Although you are not have to be a Grecian goddess in order to wear this wonderfully gorgeous multi-fishtail braid, you will most likely end up looking like one after the style is completed. Make sure to leave a few loose hanging tendrils in the front to give the hair a haphazard appearance.
11: Rustic Romantic Low Bun
With French braids, this low messy bun with French braids is the definition of rural chic and would be most ideal for a rustic wedding or similar ceremony in the countryside. Try matching a messed-up updo with a beautiful red lip for a hint of sophistication to bring the look together.
12: Edgy, Elegant High Updo
This low messy bun with French braids is the epitome of rural elegance and would be most ideal for a rustic wedding or similar ceremony in the country. Adding a beautiful red lip to a messy updo may add a touch of refinement to an otherwise plain look.
13: Sleek Folded Design
This low side bun hairstyle from @salonxvi is one of the more beautiful low side bun hairstyles you can sport.
It can easily transition from a day at the office to a night out with your pals. The key is to keep your strands as sleek as possible, and to use a pomade or serum to smooth down any excess frizz.
14: Messy and Curly Loose Updo
Is there anything more sultry than this low sloppy updo with balayage coloring and a big fishtail braid? Delicate tendrils that frame the model’s face help to balance out the minor unruliness in the rear, while also amplifying and increasing the volume throughout the entire look. Makeup and jewelry should be kept to a minimum.
15: Wrapping French Braid
Although this braided side bun appears to be one of those styles you see while browsing through Instagram (and are afraid you will never be able to pull it off), this look is really rather simple to accomplish. To begin, separate your hair to the side and create a French braid along the hairline, wrapping it around a tight braided bun.
16: Red Dutch Braid-to-Bun
Perfect for the bride, bridesmaids, or even the mother of the bride, this crimson side bun with a thick, face-framing braid will have you looking like the most beautiful woman in the room. If you want to keep your hair smooth and in place, you may leave a few light strands dangling in the front to give it a more natural look.
17: Gorgeous Loose Braid to Flat Bun
This super cuteDutch braid into bunstyle is perfect for a boho wedding or even just a night out with friends. It’s perfect for a natural-looking bride. What’s the best part? The style is extremely low-maintenance, requiring only a curling iron, some intermediate braiding abilities, and a large number of pins to achieve.
18: Multi-Braid Bun Style
The best style for you if your hair color is substantially different on the ends is this very noticeable style. Even more stunning are the several types of braids used on this model, which includes a Dutch, French, and traditional braid all woven together in a single, harmonious design.
19: Cherry Knot Bun with Twist Braid
With its popularity extending back decades-if not centuries-side haircuts have remained timeless and exquisite in their simplicity. So why not give your classic hairdo a modern twist by giving it a sloppy finish and an edgy deep rouge color? @sadiejcre8s demonstrates how to do it by combining a conventional bun with braids and a rich burgundy and cherry color combination on Instagram.
20: Classic Side Bun with Flowers
When worn with embellishments for special occasions, such as this exquisite pink floral arrangement, asymmetrically fashioned buns are perfectly ideal. When styling your updo with flowers or jewelry, be sure to keep the rest of your hair straight and simple in order to bring the most attention to the bouquet or jewelry clip.
21: Ethereal Curly Updo
This magnificent, wedding-ready loose bun is made even more appealing by the fact that it is made of two major components. The first is, without a question, the multi-component braids, which effortlessly and gracefully weave enormous pieces of hair together. The second feature is the stunning balayage coloring, which helps to bring out the individuality of each and every strand.
22: Modern Ballerina Bun
Not every bun hairstyle need the use of elaborate, inventive weaving techniques or outlandish colour treatments.
Instead, as this photo demonstrates, some of the most stunning buns are also among of the easiest hairstyles for long hair, needing only a short pullback of the hair, a little braiding, and lots of hairspray to bring everything together in a lovely way.
23: Messy Bun with French Braid and Highlights
The chunky accents in this stylish low side bun by @goldplaited_ assist to draw attention to the stark color difference. Despite the fact that the model in this photo has substantially thicker hair, ladies with thinner hair may still get the same appearance by using a volumizing mousse and hairspray on their ends.
24: Curled Side Updo with Soft Tendrils
It’s a good idea to consider a curly updo pulled to the side, like this one, if you’re attending a wedding (or if you’re the bride!) Not only do the soft curls add incredible volume, but the low bun can also be seen from the side, which makes it very attractive in images.
25: Romantic Royal Updo with Headband
The variety of side bun hairstyles is endless, and each one is intriguing in its own way. However, when teamed with a sleek, halo-like headband, you’ll be sure to stand out from the crowd. We recommend one that sparkles or is embellished with gems so that you can definitely make a statement when you arrive at your big occasion.
26: Side Bun with Hair Accessory
This side bun is perfect for formal occasions such as weddings, proms, and black-tie galas since it is simple and streamlined in style while remaining lovely from every perspective. The golden tresses are gathered into a neat bun, with not a single hair out of position. The enormous flower hair item, which serves as the last touch and instantly elevates the outfit, completes the look.
27: Low and Sleek Hairstyle
The low bun with no hair escaping at the sides or the neck provides a streamlined profile based on soft and slow lines, which is particularly effective in the summer. A single exposed bobby pin appears to be the only thing keeping the updo together. It provides you a highly supple and, as a result, feminine appearance.
28: Black Formal Side Bun
A sophisticated updo like this can withstand a tough day at the office as well as a scorching night out on the town in the same outfit. Stunning jet black hair is styled into a sleek, professional bun that is slightly moved to one side. Besides that, there’s a side part as well as a twisted area that looks like bangs and runs into the bun.
29: Black Side Bun with Flower
Simple elegance is demonstrated by this side bun, which demonstrates that when it comes to an updo, less is more in this case. The hair is divided in the center and combed to the sides for a smooth look. It is then collected into a compact bun and completed with a stunning light pink flower that is put just at the base of the bun for a finishing touch of elegance.
30: Chunky Braid and Side Bun
Styles with braids are quite adaptable, as they may be worn as a half-updo or as a full-updo depending on your preference. It’s completed with a bun, but you could alternatively wear your hair loosely cascading down the side of your neck like this untidy Dutch braid over the nape.
31: Multi-Twist Side Bun
If you have fine hair, you’ll need to think outside the box in order to make it appear thicker and more voluminous in appearance. A bun may make it more difficult to get this look, but it is achievable.
A pompadour will provide a great lift to the front of the head. Tease the roots and create loose twists all over the top of the head. Bring the ends of your hair to one side, backcomb it, and form it into a sloppy bun with plenty of air within.
32: Braid and Twisted Loose Bun
In order to make your hair appear thicker and more voluminous if your hair is fine, you must be inventive in your styling techniques. A bun may make it more difficult to get this look, but it is still achievable. When worn in the front, it will provide a beautiful lift. Tidy up the roots and create loose twists all over your body. Make a sloppy bun with air within by bringing the ends of your hair to one side and backcombing it. –
33: Side Bun with Side Bang
When it comes to side buns, there aren’t many things you can do to make them seem horrible. In this adorable design, the hair is teased at the crown, the bangs are parted deeply on the side, and the bun is twisted and pinched into a gorgeous roll. This hairstyle might be used for a wedding as well as a casual stylish updo for a night out.
34: Chunky Bun with Rope Braid
This twisted bun is simple to make, despite the fact that it appears to be complicated at first glance. With no previous combing or moderate teasing, style it as a disheveled hairdo with no prior combing. Begin by braiding an aside rope braid near to the scalp, and when you reach the neck, do a simple twist out of the freely hanging locks to complete the look. Roll it into a loose bun and secure it with a pin.
35: Side Bun with Teased Crown
Intentionally unkempt side bun hairstyles may be just as appealing as they are when they are sculpted and polished, so experiment with different looks. With the addition of a bouffant and a tiny braided headband, this is an excellent example of a casual updo that has been raised to the level of a sophisticated haircut.
36: Side Bun with Braid and Bangs
Using the same concept of a crown braid, bouffant, side bun, and fringe, this updo is a little different when done on brown hair with highlights. Avoid being intimidated by the prospect of trying to replicate someone else’s hairdo; you will never look precisely like someone else. Every aspect of your updo, including the color of your hair, its length, and texture, is important, and the final outcome is always a little bit or a lot different depending on how you style it.
37: Braided ‘Do with Dimensional Coloring
Hair color usually takes a backseat when it comes to wearing a side bun hairstyle, with the texture taking precedence over color in this case. Although the coloring in this sample is subtle, it adds a wonderful degree of depth and texture to the hair.
38: Sleek Braid and Side Updo
In this variation, the blonde side bun is wonderfully clean and lovely, as seen in the photo above. In addition to being simple to style, side braids and twisted buns are a stunning and comfy casual hairdo for school or work that can be worn with almost anything.
39: Side Bun with Up-Swept Bangs
Adding bangs to a bun updo is usually a wonderful finishing touch. These bangs have been swept up and to the side with carelessness, and the messily curled bun contributes to the same carefree attitude as the bangs.
40: Textured Curly Hairstyle
Incorporating texture into side bun hairstyles is advantageous since texture always results in an increase in volume and depth. Using curly locks that have been lightly braided and twisted, this updo creates an elaborate and inspiring pattern.
The options for side buns are countless, whether you want a sloppy look or one that is more polished and elegant. There are so many beautiful side styles to select from. Side buns are here to stay, and they’re perfect for everyday casual situations as well as more formal ones.
Try This Two-Minute Messy Side Bun Tutorial To Look Polished Fast
My mornings seem to consist of a hurried succession of dashes out of the house to meet the day. It’s unusual that I have time to do anything with my hair other than a short brush, followed by the wearing of a hat that I’m compelled to wear all day due to the circumstances surrounding me. I’ve got the quickest two-minute messy side bun that is flawless and that you can apply on yourself in the morning to look professional all day to help you out. However, this style may be worn on wet or clean hair as well as unwashed hair on the second or third day.
Supplies:
Step 1: Using dry shampoo, saturate your hair all over. Hair should be loosely fastened to the side with a rubber band in Step 2. Pulling the rubber band down can help to release the hair. Step 3: Separate your hair into two portions and pin them back. Step 4: Take two portions and twist them together until you reach the bottom of the cylinder. Taking the twisted ponytail, tie it into a bun. Step 6: Step 6: Tuck the end of the bun into the middle of the bun to form a type of knot. Step 7: Use bobby pins to hold the bun around the outside and a couple in the center to make sure it is firm in the middle.
- 4 Quick and Easy Tutorials for Stunning Post-Workout Hair
- Tutorial for a Five-Minute Hair Updo (That Will Last the Whole Day)
- The 10 Best and Most Simple Ways to Put Your Hair Up That Aren’t a Ponytail
25 Low Bun Hairstyles That You Can Create Yourself!
Just because something appears to be complicated does not imply that it is impossible to do on your own. Rather than relying on a professional or a buddy, you only require a few really stylish videos to guide you through the process. These 25 low bun hairstyles are simple enough to do yourself at home in front of the mirror with no effort!
1. Romantic
View this stunning, romantic, low bun hairdo from Weddingomania for inspiration. It’s a little tattered, but it’s still full of femininity.
2. Knotted
View this stunning, romantic, low bun hairstyle from Weddingomania for yourself. Although a little tattered, it’s still really feminine.
3. Chignon
Discover a classic low chignon that you’ll want to master and carry in your back pocket at all times. Pop Haircuts has all of the information.
4. Rope Twist
What do you think a rope twist bun would sound like? It has a textural effect, it is entertaining, and it is suitable for all hair types. Take a look at Hair Romance for some inspiration.
5. Scarf
Add a stylish scarf on your bun to make it stand out! We learn how to create this hairstyle in a jiffy thanks to Brit + Co.
6. Sophicated
This lovely, classy twisted bun was featured on Elle, and we are head over heels in love with it. It’s a haircut that can be dressed up or down for every occasion, any day of the week, without fail!
7. Yarn
The use of yarn is another another unique method to embellish your bun. Check out A Beautiful Mess for the whole scoop on this project.
8. Intricate
You may also use yarn to embellish your bun in an unusual way. Check out A Beautiful Mess for the whole scoop on this one!
9. TuckRoll
Take a look at this stylish tuck and roll from Refinery29. It’s fashionable, it’s young, and you can accessorize it to your heart’s content.
10. 3 Buns
When it comes to buns, sometimes three are better than one!
A Cup of Jo demonstrates how to make it happen while also styling it perfectly.
11. Messy
With the guidance of The Small Things Blog, you can create the most beautiful messy bun you’ve ever seen. If you style it correctly, you may wear it to work or on a night out with your pals!
12. Braided
Braids are one of our favorite hairstyles, especially when they’re done in a charming and graceful manner. And Missy Sue shows us how to mix a bow, a braid, and a bun in one look!
13. Net
The Bride Link has an extremely elegant net bun that you can get your hands on. Use it for work, or style it and wear it to your wedding reception!
14. Gatsby
With a low bun in the manner of the Great Gatsby, you’ll be the talk of the party. Click here to view this YouTube video for more information.
15. Voluminous
Get the party started with a low bun in the manner of The Great Gatsby. For further information, please see this YouTube video.
16. Wrapped
An additional elegant style that incorporates some wrapping may be seen here. Styloholic has everything you’re looking for.
17. Tails
An additional elegant style that incorporates some wrapping may be found below. Styleholic has everything you need.
18. Waved
Learn how to wave your hair and then use the texture to create this stunning low bun style by seeing the guide.
19. 2 Minute
To discover how to create this elegant low bun in only two minutes, watch this YouTube video. It’s really simple!
20. Sides
A low bun with side-detailed details is provided by The Freckled Fox, which we like. Whether you accessorize or allow it to speak for itself, it is really stunning.
21. Fishtail
Over at The Beauty Place, you can learn how to make a fishtail braid and then utilize it to construct a bun. It’s a one-of-a-kind piece with a lot of fascinating texture.
22.Petal
Another lovely, low bun hairdo that we’re drooling about is this one from Martha Stewart. Mimi Taylor has the inside scoop on everything.
23. Bohemian
A gorgeous, bohemian aura permeates this low bun, and we like every bit of it’s romanticism and playfulness that it contains. Once Wed is where you’ll find it.
24. Gibson
The Gibson tuck is a light and stylish hairstyle that may be learned right here. We adore the sophisticated, stylish appearance.
25. Side Braid
Here’s another low bun that’s been finished with a braid for added interest. This video by AndInspired by This tells us how to make it stand out by including a side appeal!
Two Buns Are Better Than One: Double Bun Hair Tutorial
As we all know, two buns are always preferable to one, which is why today’s DIY hair lesson is a double bun! Despite the fact that this hairstyle is a little more whimsical than others, it is also really utilitarian due to the fact that it is extremely secure. So you could wear it for a casual day with friends or something more active like doing errands, exercising, or playing double dutch with a group of pals. Put yourself in touch with your inner Miley Cyrus with this 5-minute double bun DIY.
As is often the case, two buns are preferable than one, thus today’sDIY hair lesson is a double bun!
However, it is also really utilitarian.
So you could wear it for a casual day with friends or something more active like doing errands, exercising, or playing double dutch with a group of people. With this 5-minute double bun DIY, you can channel your inner Miley Cyrus. The items you’ll require are as follows:
How to Do a Two Buns Hairstyle With Sophie Hannah Richardson
After all, why limit yourself to one bun when you could have two buns? Space buns are another term for the two bun hairstyle that was made popular by Star Wars heroine Princess Leia (therefore the other common name for the hairstyle: space buns). After then, it became fashionable in the 1990s thanks to celebrities such as the Spice Girls and Gwen Stefani (during herNo Doubtdays). Fast forward to the present day, and this haircut can be found pretty much anywhere—from festivals to your local streets to the red carpet and runway, and everywhere in between.
the festival hair queen!) to demonstrate how to get them.
First, we’ll have a look at what to do.
Divide your hair into two sections.
After all, why limit yourself to one bun when you could have two? It was Princess Leia, who made the two bun hairstyle famous (hence the hairstyle’s alternate common name: space buns), who made the two bun hairstyle widely popular. Next, celebrities such as the Spice Girls and Gwen Stefani popularized it in the 1990s (during herNo Doubtdays). Take a step forward to the present day, and this haircut can be found almost anywhere—from festivals to your neighborhood streets to the red carpet and the runway.
Rest assured, this is an outfit you’ll want to wear all summer long (and into the fall).
Tease and twist your pigtail.
It’s now time to get down to business! Take your first ponytail and gently twist it all the way down to the end of your hair. Repeat with your second ponytail. Step number three.
Create a bun.
To make a bun form, begin by wrapping your hair around the base of the ponytail and continuing to wrap until you have a bun shape. Once you’ve achieved the desired shape, pin it in place with as many bobby pins as necessary to keep the style in place. Step number four.
Create your second bun.
To construct your second bun, tease and twist your second ponytail like you did with the first. Step number five.
Your two buns hairstyle is complete!
The result is a pair of sparkling double low buns that will steal the show at your next gathering! Suggestions for styling: Worried that your perfectly coiffed buns may come undone? Put some VO5 Ultimate Hold Hairspray on them and they’ll be ready for any party you can throw. In addition to helping to keep your buns in place all day, this fast-drying hairspray will also protect your hair from frizz and humidity. Isn’t that interesting?
Sign up to our newsletter and get exclusive hair care tips and tricks from the experts at All Things Hair.
Articles before and after this one
Hot Right Now
If you have long hair, a messy bun is the perfect way to show off the volume in your locks. Muddled buns will never go out of style, and with good reason! If you have long hair, we have lots of messy style bun variations that are completely lovely and simple to attempt on your long hair this season!
How to Style Messy Bun for Long Hair
Firstly, the texture of your hair should be taken into consideration while designing a sloppy bun. Would you want a straight bun, waves, or perhaps curls, or something in between? Once you’ve made your decision, add a heat protection to your hair and blow dry it. From there, you may style your hair in gentle waves or straighten it with a flatiron if that is what you like to achieve. Pull all of your hair up into a high ponytail and secure it with a hair tie. Although the height of your bun is entirely up to you, keep in mind that high buns are really fashionable right now, so you really can’t go wrong with this look.
- If you do this, your hair will have a small lift and a beautiful texture.
- It’s now time to concentrate on the ponytail.
- Then, using a second hair tie to wrap around the ponytail and make a little teardrop bun, leaving the majority of the hair out, finish your look.
- Once you’ve completed the ponytail piece, pull some hair on the top of the head in the same manner as you did on the ponytail portion to give the bun texture.
- This will provide to the loose and loopy appearance that is essential for this style.
Last but not least, don’t forget to drag a few wispy bits down to frame the face with your hair. This delivers the perfect unkempt, casual look to your hairstyle. Give your hair another short spritz of hairspray if you’d like, and you’ll be ready to face the day!
How To Do A Messy Bun With Long Hair?
Contrary to what you may have heard on the internet, it is feasible to wear a sloppy bun with long hair in a professional setting. There’s a bit more work needed, but if you keep just a few easy rules in mind, you’ll discover that a sloppy bun and long hair are not mutually incompatible. For those of you who are attempting to plan for a busy day when you won’t have a lot of time to worry about how your hair looks or who want to get that effortlessly disheveled appearance, keep reading to find out the best method to make this exquisite style work with your hair.
There Are Different Kinds Of Messy Bun
There are a plethora of sloppy bun types to choose from. We’ll go over each of these one at a time, going over the steps involved in each one before moving on to the next step.
The Low Messy Bun
You’ll have no trouble pulling off this look if you’re striving for easy cool.
- While your hair is down, use dry shampoo to cleanse the roots of your hair. Apply the shampoo with care, one part at a time, over your entire head, and rinse well. Take all of your hair and draw it back into a low ponytail, which you can fix with a decent scrunchie. Continue to loop your ponytail through the scrunchie a second and third time. If you have really long hair, you might be able to loop it halfway through a third time. Your ponytail should now be snugly above the scrunchie, with the scrunchie resting comfortably on your neck. To conceal the elastic scrunchie, take a tiny part of your hair (14 to 12 inches wide, or 1-2 finger widths) and secure it underneath the bun
- The rest of the bun should be secured so that it lays low on the back of your head, just above the collarbone
- The ends should be softly fanned Spritz your hair with a medium-hold hairspray, allowing a few loose strands to fall about your face if you so wish
The Messy Bun For Bangs
This messy bun with long hair is perfect for individuals who already have bangs or those who want to seem as though they had bangs but do not actually have them.
- Immediately following the use of dry shampoo, gather all of your long hair and tie it into a high ponytail
- In the case of people who do not have bangs, take a little portion of their ponytail and pull it forward so that it falls just over the top of their forehead. As a result, a fringe will appear. hairpins on the top of your head to hold your fringe in place
- Fancifully fan out your brand-new bangs. Take what’s left of your ponytail and divide it into two half, as seen below. Wrapping each part around itself to form a high bun is simple. Bobby pins at the base of your sloppy hairdo will keep it in place. A person’s total quantity of bobby pins will differ from one another. Straighten the fringe with a flat iron, taking care to bend the fringe under just a little bit as you go
- And Using a hairspray with a low hold, style your hair.
The High Messy Bun
Immediately following the use of dry shampoo, gather all of your long hair and tie it into a high ponytail. In the case of people who do not have bangs, take a little portion of the ponytail and pull it forward until it falls just over the top of your forehead. Thus, a fringe will be formed. Hairpins on the top of your head should be used to fix your fringe. Fancifully fan out your brand-new bangs: Take what’s left of your ponytail and divide it in half, as shown below. Make a high bun by wrapping each side over itself.
A person’s need for bobby pins will differ from one another.
- Immediately following the use of dry shampoo, gather all of your long hair and draw it up into a high ponytail
- For individuals who do not have bangs, take a little portion of the ponytail and pull it forward so that it falls just over the top of your forehead. A fringe will be created as a result. hairpins on the top of your head to keep your fringe in place
- Fancifully fan out your brand-new bangs
- Take what’s left of your ponytail and divide it in half, like shown. Wrapping each part around itself to form a high bun is recommended. Using bobby pins at the base of your untidy bun, keep it in place. A person’s need for bobby pins will differ from one to another. Straighten the fringe using a flat iron, taking care to bend it under just a little bit as you go. Spritz your hair with a hairspray with a low hold
Style An Elegant Messy Bun With Long Hair
It’s not that tough to coerce your long hair and a messy bun into a state of peaceful cohabitation. It only takes a few more minutes and the correct style products to achieve this look. When done correctly, a sloppy bun with long hair provides a style that is at once relaxed and elegant without being overdone. Anyone of these styles will have you turning heads in no time, whether you’re simply looking to switch up your appearance a little before a hard day at the office or getting ready for your friend’s wedding.
Here are 30 of the best messy buns for ladies with long hair that we’ve gathered for you to enjoy.
1. Messy Bun withPastel Pink Hair
Many women choose hair colors that are outside of the typical color palette of blondes, browns, and burgundies, and this is not uncommon at all. Here, we have a stunning long messy top bun with beautiful pink accents that is great for the season. Gather all of your hair at the crown of your head and pull it into a ponytail carefully.
Consider the look of a superhigh ponytail. Now, wrap your hair around the hair tie and tuck it inconveniently, not caring about the stray hairs that have appeared. Allow some loose strands of hair to fall about your face and behind your neck to give extra drama to the appearance.
2. LooseMessy Bun
If you want to wear a messy hair bun to prom or as a bridesmaid, this variation is done with such panache that it is suitable for both occasions. Small sections of hair should be created first, followed by delicate waves running down the length of your hair, with a bit more curl towards the ends. More volume may be generated with a curling rod in this sloppy bun for long hair, which is an attractive style. While dividing your hair into two sections, one below the other, in such a way that the buns overlap, you should create two buns.
Hairspray should be used to set the hairstyle.
3. Accessorized Top Bun
Have you been given a hand-me-down hair brooch for your wedding? There’s no better way to wear it than as an accessory to a messy bun. Long ombre hair is the best method to show off your vibrant hues, and there is no better way to do it. Maintain a subtle wave at the bottom of your hair while keeping the bulk of your hair straight and smooth throughout the rest of your hair length. Gather your hair into a top bun and tuck it in at the base. Make use of your hair brooch to help support the tucked-in sections of your hair while also serving as a stunning highlight for your hair.
4. Long Messy Bun withFishtail Braid
Is your wedding hair brooch a hand-me-down from a friend? A sloppy bun is the ideal way to wear it, and there’s nothing more stylish about it. The best approach to show off your ombre hair is to let it grow long and naturally wavy. Maintain a delicate wave at the bottom of your hair while keeping the remainder of your hair straight and smooth for the most part of its length. Tie a top bun around your head and tuck it in at the bottom. Make use of your hair brooch to help support the tucked-in sections of your hair while also serving as a lovely highlight for your overall look!
5. Knotted Top Bun
You should try this messy bun style if you have incredibly straight, superlong hair, as it will look great on you. Make a basic twisted top bun and scatter some loose strands around your temples for a more natural look. If you want to go for a heavy makeup look with a highly sophisticated appearance, this is the dress for you.
6. High Volume Bun
Make a sloppy bun with a lot of volume that’s excellent for a wedding or to match with a garment that has a gorgeous back detail. This bun is ideal for women with long, wavy hair. Begin by gathering a section of your hair from the front and fixing it at the crown area, then creating a sloppy bun. Curl the tendrils that are dangling from the sloppy hair knot using a curling iron to give them a little additional oomph. A single rose or a few smaller flowers may be used to add a floral touch to your hairdo as an additional finishing touch.
7. Side Parted Hair with Top Bun
Make a sloppy bun with a lot of volume that’s excellent for a wedding or to match with a garment that has a lovely back! With long, wavy hair, this bun is ideal. Begin by gathering a section of your hair from the front and fixing it at the crown area, then forming a sloppy bun.
Curl the tendrils that are dangling from the sloppy hair knot using a curling iron to give them a little additional oomph! A single rose or a bunch of lesser flowers may be used to give a floral touch to your haircut as an extra touch.
8. Top Bun withCurly hair
If you believe that fine curly hair cannot be fashioned into a professional-looking bun, you are completely mistaken. When done on long curly hair, a basic sloppy bun will look much better than when done on short hair. Furthermore, the natural curls give the bun a voluminous appearance. To finalize the appearance, gently pluck any stray strands of hair on the sides.
9.Half Up Half Down Hairstyle
With this creative half up half down hairdo, you can show off your long, lovely tresses while still sporting a messy top bun. This sloppy bun for long hair looks great on both wavy and straight hair, and it’s easy to do.
10. Messy Bun with Tiara
This is one of those untidy buns for long hair that also serves to draw attention to your face features. Make a high bun and wrap a tiara over it to complete the look. Hair strands that have fallen out of your hair can also be tucked into your tiara.
11. Bun with Ombre Highlights
A messy bun is an easy way to show off ombre highlights on long hair in this straightforward variant. This is a style that, on the other hand, fits well with long, straight hair. As a result of the way your straight hair falls loosely on either side your face as part of your bun, you have a lovely disheveled appearance all over.
12. High Volume Knotted Bun
This looks quite similar to the untidy knotted bun. Except that you must use the ends of the bun as strays instead of just adhering to the front hair, which is more difficult. Make a criss-cross pattern with the ends of your messy bun in the crown area, and make sure they are visible from the front.
13. Twin Buns
Why settle for a sloppy bun when you can have a pair? Choose a center division and leave a few hair strands in the front on either side of the face. Continue to style your hair in top messy buns with long hair on either side, remembering to maintain your hairstyle untidy rather than fixing the textures.
14. Elizabethan Low Bun
Consider the low buns from the countryside of the past as an example. This loose haircut is ideal for women who are in a hurry and like to make things as simple as possible. To complete the style, twist your long hair into a sloppy bun and secure it with a hair stick.
15. Sleek and Top Bun
Pull your hair securely into a high ponytail, then use the remainder of your ponytail to make a sloppy bun with the rest of your hair. Twist and tuck your long hair into a loose bun to make a sloppy bun for your long locks. This top bun mixes a tightly tied hairstyle in the front with a highly sloppy bun in the rear for a completely different look. This untidy hair bun with long hair looks great on ladies who have a lot smaller face than the rest of the population.
16. Loosely Braided Bun
Begin with a traditional loose braid from the front and work your way back to a loose messy bun at the back to complete the look. Don’t forget to untangle any stray strands of hair from the bun as well as from behind the ear as well.
17. Waterfall Braided Bun
A sloppy bun that is virtually hard to describe as messy because it is so flawless. If you’re wondering how to achieve a messy bun with long hair, we’ve got you covered there as well. In order to create your loose tendril, first part a little section of hair at the front of your head.
Begin with a waterfall braid that will be used as a braided tiara and lay it aside for now. Gather your hair into a ponytail and tuck it into a bun using a volumizing foundation to give it some oomph. Take the braided section of hair and tuck it into the bun as shown.
18. Bun with Long Loose Strands
In order to get an extremely voluminous messy high bun, you must form numerous ponytails over your scalp and then mix them together. The less short layers you have in the front, the better. Long hair can function as loose tendrils, and don’t be scared to take more than three segments of stray hairs from a single section. Make use of a sufficient number of bobby pins to fix your high volume bun.
19. Knotted Messy Hairdo with Brooch
When it comes to untidy buns for long hair, hair brooches are the most popular accessory. Using your fingers, tie a knotted bun at the bottom of your hair that is loosely collected at the top. Pull the bun rather than tug it to produce a voluminous bun. To tuck your hair and embellish your bun, use a succession of little hair brooches to tuck it in. It is ideal for weddings and romantic dates when the bun is a little sloppy and the hair is long.
20. DenselyBraided Updo
When it comes to messy buns for long hair, hair brooches are all the rage. Using your fingers, tie a knotted bun at the bottom of your hair that is collected loosely at the bottom. Pull the bun rather than tug it to produce a voluminous bun. To tuck your hair and embellish your bun, use a number of miniature hair brooches in a row. Perfect for weddings and romantic dates, the unkempt bun with long hair is a great option.
21. Twin Braided Low Bun
Begin by creating two braids on either side of your head, starting a few inches above your ear, and securing them with a bobby pin in the middle. Create a low bun out of the remainder of your hair, including the braids, to get a supermessy look for the occasion. Some loose tendrils at the front of the hairstyle will complete the look.
22. Braided Half Up Hairstyle
To make the top bun, gather your long hair into a half-up half-down hairdo and tie it off in the back. While the rest of your hair is let to hang freely, braid a section of your hair to match your long messy hair bun on top, which will look great. Mesmerizing Half braided hairstyles for black women have become increasingly popular.
23. Simple High Volume Loose Bun
In order to accomplish this messy bun for long hair to obtain a girl next door style, you’ll need a hair tie and a puffy bun base. This look is excellent for a tough workout or a day at school, so be creative! After you’ve finished styling your ponytail, gently wrap your hair over the bun base and pin it in place on the inside using bobby pins. Make sure the ponytail is loosely collected, and allow some strands to fall on your temples to complete the look.
24. Multiple Messy Buns
Simply divide your hair into pieces vertically and begin with messy buns on each segment to complete the look! You may create up to four messy buns with this multiple messy bun hairstyle, which is simple to style even if you have long hair.
25. Low Messy Bun withMiddle Part
Make a center parting and wear your hair in a low ponytail that you can simply adapt into a sloppy bun with ease. This sloppy hair bun style is ideal for women who have long, thin hair that lacks volume and is lacking in body.
26.Dutch Braidwith Side Bun
Using your long hair, start with a side dutch braid and carry it all the way around to the other side to make an extremely messy side bun.
Depending on your desire, you can braid the hair freely or securely. As an additional touch of decoration, you may use little flowers. Side French Braid Hairstyles for Women that are hypnotic
27. Loose Top Knot Bun with Flowers
In order to highlight your long hair, this basic sloppy top bun is finished with faux flowers at the bottom of the bun.
28. The PerfectBrunetteBun
Make an extremely voluminous messy bun with your long hair by starting with a bun base and building up from there. Opt for loose tendrils a little over the back of your neck and at the side of your head.
29. Uneven Bun
This runway-ready style is surprisingly simple to pull off. Simply ensure that your hair is uneven at the front and that your top bun is sloppy in the rear. Make use of a setting spray to keep your hairstyle in place.
30. CurledBridal Bun
Work your way through a low bun, removing a few stray strands from the bun as you go. Applying pressure on the loose strands with a curling iron, curl them tightly and tuck them into the bun. Long-haired brides may look stylish in a sloppy bun! No matter what sort of hair you have, these sloppy buns for long hair may be fitted into your style with relative ease. In the event that you discovered your favorite from the list, try it on and wear that untidy hair bun!