
Buns
How To Do Space Buns Short Hair
Jan
How to Do Space Buns on Short Hair
Documentation Download Documentation Download Documentation Finding amazing hairstyles for short hair might be difficult when you have short hair. If you have shorter hair, you can still construct space buns in a variety of styles, which is fortunate. Separate your hair into two pieces and pin both sections together into two space buns, fixing any stray hairs with bobby pins. Alternatively, pull the top portion of your hair into a half-updo for space buns. When you create your space buns, braiding your hair is a terrific technique to make sure that all of your hair is fastened and done evenly.
- Hair should be brushed and parted in a way that it is ready to be pushed up. Use a hair brush or comb to detangle your hair if it has become tangled. Part your hair down the center with a comb to ensure that you have equal amounts of hair in each buns. 2 Make two pigtails using the upper half of your hair and tie them off. Pull half of your hair from up behind your ear to one side of your part, with your hair evenly parted on either side of your part. Your half-up space bun will be created from a piece of your hair like this: Once you’ve collected the pigtail, secure it with a little hair band to ensure that it doesn’t slide about. To make a pigtail on the other side of your component, follow the same procedure as before
- Hair should be brushed and parted in a way that it may be pulled up easily. Using a comb or a hair brush, detangle any tangles in your hair. Use a comb to separate your hair approximately down the center, ensuring that you have equal amounts of hair in each buns. 2 Making use of the top half of your hair, create two pigtails. Pull half of your hair from up behind your ear to one side of your part, with your hair equally parted on the other side. This is the portion of hair that you’ll utilize to create your half-up space bun styling. Make a little hair elastic to secure the pigtail in place so that it doesn’t move while you are walking. To make a pigtail on the other side of your component, follow the same procedure as above
- 3 Using your fingers, twist one pigtail all the way down the length of it. Grasp one pigtail between your index and middle fingers and spin it until it begins to twist. Continually do this until the entire pigtail is twisted all the way down to the end
- Twist your ponytail tightly if you desire little space buns, whereas twisting your pigtail loosely will help you get larger space buns.
- 4 Form a bun by wrapping the twisted pigtail in a circle around itself. While maintaining the twist in your ponytail, begin looping the pigtail around itself at the point where the elastic is located. To style the ponytail, wrap your fingers around it in a circle until it forms a bun.
- One hand should be used to hold the bottom of your ponytail to maintain the twist in place, and the other hand should be used to guide the pigtail in a circle around itself
- 5 Secure the bun in place with bobby pins to prevent it from falling out. With one hand, secure the bun in place while using the other to put bobby pins into your hair to hold the bun in place. Make sure the bobby pins are equally distributed throughout the bun so that it doesn’t shift, and pin back any stray hairs that emerge from the bun if necessary.
- The bobby pins should be inserted far enough into the bun so that they are not visible but yet give adequate support. The greater the number of bobby pins you employ, the more secure your space buns will be.
- Sixth, repeat the same with the other pigtail to create the second bun. Twist the second pigtail in the same manner as you did the first one. Using bobby pins, fix it in place by wrapping it around in a circle at the base of the elastic.
- Try loosening areas of your bun with your fingers or using bobby pins to make your second space bun seem more comparable to the first if the first doesn’t look just right.
- 7Adjust the style of the bottom half of your hair to your liking. While keeping the top half of your hair in two space buns, you may choose whether or not to style the remainder of your hair at this point. If desired, use a curling iron to create soft curls, or a flat iron to straighten your hair if you prefer
- 1 After combing out any knots, part your hair down the center and pin it up. Because your space buns will encompass practically all of your hair, part your hair starting at the front of your head and working your way all the way down to the rear of your head. Form a straight line with a comb and, if necessary, use a mirror to assist you view the back of your head
- While a straight part is preferred, it is not necessary to fret if your part is not flawless. If you want to separate your hair into two sections, you can use huge hair clips.
- While a straight section is preferred, don’t be concerned if yours isn’t quite straight. In order to separate your two portions, you may use huge hair clips.
- Examine your pigtails in the mirror to determine if they are equally distributed on your head. It is possible to make them more symmetrical by re-doing the ones that are unbalanced or uneven
- However, this is not always possible. If you want space buns that look like Princess Leia’s, tie them closer to your ears so that they’re on either side of your head
- Otherwise, knot them further away from your ears.
- 3 Tease the hair in your pigtail to add extra volume to the style. You may tease your ponytail with one hand while holding the pigtail out with the other. Towards order to tease your hair, comb or brush it in the direction of your scalp rather than down the length of your hair. This will add additional volume to your bun and make it appear more full-bodied.
- Avoid over-teasing your hair since it will cause damage. To tease your ponytail, use three to five strokes of the comb and check to see if it helps it seem fuller before teasing it even more.
- 4 Create a bun by wrapping the pigtail around itself in a circle. Make a bun out of your teased ponytail by guiding it around in a circle with your fingertips. You will be able to tell how little or huge your bun is by how firmly or loosely you wrap it.
- Wrap your bun loosely if you want a larger bun, or firmly if you want a smaller and more secure bun.
- Wrap your bun loosely if you want a larger bun, or firmly if you want a smaller and more secure bun
- To test your bun to determine if it’s secure or not, insert the bobby pins and let go of the bun. Give your hair a tiny shake, and check if the bun moves or not. It may be necessary to add extra bobby pins to hold it in place if it begins to shift.
- 6 To construct the second bun, repeat the previous procedures on the other side of the bun. Just as you did with the first ponytail, tease the other pigtail as well. Using your fingers, twirl the pigtail over itself to make a bun, wrapping it as securely or loosely as you did the other. The second bun should be secured in place using bobby pins.
- In order to make a smaller bun appear larger, use your fingers to gently pull on the hairs of the larger bun
- If one of your buns is smaller than the other, use your fingers to gently pull on the smaller bun
- Pin back any loose hairs at the nape of your neck with the use of bobby pins. Because your hair is short, you’re likely to have a few stray strands that didn’t manage to remain in your space buns. Gather these hairs together at the back of your head and fix them in place with a bobby pin so that they do not interfere with the rest of your hair. If necessary, check in a mirror to ensure that they are all pinned up properly.
- Pin back any loose hairs at the nape of your neck using an assortment of bobby pins. You’ll most likely have a few hairs that didn’t manage to remain put in your space buns since your hair is short and wavy like mine. Use a bobby pin to bind these hairs together at the back of your head so that they are flush with the rest of your hairstyle. If necessary, check in a mirror to ensure that they are all pinned up.
- If you don’t want your hair to fly away, wear braided pigtails instead of knotted ones. Create two pigtails by collecting equal pieces of your hair and tying each one with an elastic to keep it in place when you’ve finished styling it. Pull each pigtail all the way through and bind it with an elastic band at the end of each braiding section. It will be much easier to twist the pigtail into a bun now since the hair will be much more secure.
- It’s possible to braid pigtails whether you’re making a half-up or a full-space bun
- 2 Style your hair in a double dutch braid at the front of your head for a fashionable effect. Start by braiding the first portion of your hair, starting above the outer corner of your eye and working your way down the rest of your hair. As you work your way back around your head, gather additional hair into the braid. Stop the dutch braid when you reach the point where you want your space bun to rest, and pull the rest of your hair into a pigtail to finish off the look. The dutch braid and pigtail should be secured with an elastic, and the side should be finished with a bun.
- Repeat the process with the other piece of your hair, resulting in two dutch braids at the top of your head that lead into your two space buns. To prevent your dutch braid from coming undone when you attempt to collect the remainder of your hair into a pigtail, bind it with an elastic first
- Otherwise, it will come undone.
- 3 Tie the short hairs at the back of your neck together so that they are not loose. Part your hair all the way down the back of your head and use clips to divide the two sides. Turn your head over and begin braiding one side of your hair, starting at the base of your neck and working your way up the length of your head. Continue building your bun until you reach the top of your head, where you will fasten the braid with an elastic band.
- This procedure should be repeated on the opposite side of your portion in order to generate the other bun as well. Make one more pass through your hair with the back of your head flipped over for a smoother appearance. Continue to draw your hair into the braid as you work your way up the length of your hair.
Create a new question
- Question What can I do to make working with the hair a little more pleasant? Janet Miranda is a woman who works in the fashion industry. Hairstylist and makeup artist with years of experience Janet Miranda is a professional hairstylist and makeup artist, as well as the founder of Be.NYLA, a hair and makeup company. A makeup and hair artist with over 15 years of expertise, Janet specializes in commercial and editorial advertising and hair for runway shows, special events, television, and films. She received training at the Vidal Sassoon Academy as well as with prominent hair and cosmetics professionals from companies such as MAC Cosmetics and Redken. Janet has worked on five seasons of New York Fashion Week and one season of Project Runway, among other things. Brands like Armani Exchange, Neutrogena, and Pantene are among those she is adding to her increasing client roster. Janet’s art has appeared on television shows such as CBS, Brides Magazine, 100 Layer Cake, Style Me Pretty, Green Wedding Shoes, Ireland Image Brides Magazine, and Elle Japan. She has also written for several publications. Hairstylist with years of experience Expert Advice from a Makeup Artist I believe that pomade is particularly beneficial in this situation since it may give the hair a tack and grit that makes it much simpler to work with
- Question Can you tell me how I can make my braids stay together while I’m working on them? Janet Miranda is a woman who works in the fashion industry. Hairstylist and makeup artist with years of experience Janet Miranda is a professional hairstylist and makeup artist, as well as the founder of Be.NYLA, a hair and makeup company. A makeup and hair artist with over 15 years of expertise, Janet specializes in commercial and editorial advertising and hair for runway shows, special events, television, and films. She received training at the Vidal Sassoon Academy as well as with prominent hair and cosmetics professionals from companies such as MAC Cosmetics and Redken. Janet has worked on five seasons of New York Fashion Week and one season of Project Runway, among other things. Brands like Armani Exchange, Neutrogena, and Pantene are among those she is adding to her increasing client roster. Janet’s art has appeared on television shows such as CBS, Brides Magazine, 100 Layer Cake, Style Me Pretty, Green Wedding Shoes, Ireland Image Brides Magazine, and Elle Japan. She has also written for several publications. An answer from a professional hairstylist and makeup artist Before you begin, try to have your hair a touch moist to prevent frizz. Creating space buns is generally more simpler when the hair is a bit moist, and it is difficult to maintain braids together when the hair is completely dried
- For example,
Inquire about something There are 200 characters remaining. Include your email address so that you may be notified when this question has been resolved. Submit
- Inquire about a problem a total of 200 characters are still available Fill up the blanks with your email address to be notified when your query is answered. Submit
Things You’ll Need
- Small hair elastics, Bobby pins, a mirror, and hairspray (optional) are all items you’ll need.
About This Article
Small hair elastics, Bobby pins, a mirror, and hairspray (optional) are all need for this look.
Did this article help you?
As a girl with bob-length hair, I understand the frustration of waking up late and wanting nothing more than to toss your hair up in a messy bun, only to find yourself unable to do so because you don’t have enough hair to do so. Please do not misunderstand me. I really enjoy having short hair. However, the messy-bun existence is one that I occasionally yearn for. There is some bad news, though, in that buns with short hair aren’t nearly as straightforward as they are for people who have 12 inches of hair to play around with.
In fact, it’s more than probable that this will happen.
For all of my short-haired sisters out there, this one is for you.
On the days when you don’t feel like pulling out your curling iron or straightening iron, simply refer to this list for inspiration.
Braided Topknot
As a girl with bob-length hair, I understand the frustration of waking up late and wanting nothing more than to toss your hair up in a messy bun, only to find yourself unable to do so because you don’t have enough hair to go around. Let me be clear: I’m not a hater. My short hair is one of my favorite things about myself. Nonetheless, the life with a messy bun is one that I occasionally yearn for. There is some bad news, though, in that buns with short hair aren’t nearly as straightforward as they are for people who have 12 inches of hair to play around with.
As a matter of fact, that is very doable.
This one is specifically for my short-haired sisters.
Simply refer to this list on days when you don’t feel like pulling out your curling iron or straightening iron. Continue reading for a step-by-step approach to successfully pulling off buns for short hair!
Sporty Space Buns
Getty1.Space buns are all the rage this summer, and now it’s your opportunity to show off your own style. To finish, part your hair down the center and spray all over with Rusk’sTexture Dry Finishing Spray ($25). 2.Pull the hair from either side of your head into a high, tight ponytail on one side. Wrap each ponytail around itself and tie it with a couple of bobby pins to finish the look. 4.The more muddled, the better! Pull each bun outward to add volume, then pull out a few loose strands to frame your face with a few loose strands.
Boho Double Knot
Image courtesy of Getty1. A dry shampoo, such as Living Proof’sPerfect Hair Day (PhD) Dry Shampoo ($25), or a greattexture spray is the key to this casual summer style. Spray evenly from the middle of the shaft to the ends. 2.Split your hair into four equal portions, two on either side of the front and two on either side of the back, and pin them up in a high ponytail. 3.Take a portion from the rear of the bun and coil it around the base to form a bun shape. Bobby pins can be used to keep the hair in place.
You should be left with two areas that have not been touched up front.
Roll the tail of the front piece over the rear bun and secure it with a safety pin.
Take a few face-framing items and you’re ready to go!
Bedhead Bun
Getty1.Have you not heard the news? Compared to the topknot of yesteryear, the low bunis is incomparably cooler and colder to wear. To create the desired effect, softly back-comb the hair at the top of your head to give it lift. Make a loose, sloppy ponytail at the back of your neck and tie it off with an elastic band. Simply hold it in place for the time being; do not bind it with an elastic. (3) Twist the ponytail around itself using your other hand to form a bun shape, and fasten with pins.
Messy Half-Knot
Getty1.For short-haired girls, this is the ultimate bun to achieve. Begin with strands that have not been washed. It doesn’t matter how filthy the environment is. Using your hair, create two sections on either side of your crown. Keep the components as straight as possible because they will be apparent in the final product. 3.Make a high ponytail out of the hair between the two pieces and place it exactly on top of your head. Make sure not to drag the ponytail through the elastic on the final loop; otherwise, you’ll end up with a loose bun.
Instead of leaving the ends sticking out the bottom of the bun, just wrap them around the base of the bun and pin them in place!
Modern Milkmaid Bun
Getty1. Although this is more of an updo than a classic bun, it still serves the purpose of keeping your hair out of your face in a stylish manner. Begin by splitting your hair down the center and dividing it into two equal parts with your fingers. To give your hair near the crown of your head a little additional volume, back-comb it a few times. 3) Create a French braid on one side of your head, starting near to your face and working your way out to form a braided pigtail. 4. Clear elastic is used to keep it in place.
Using a bobby pin, pin the end of the first French braid behind your head to keep it in place.
7.Spray the braid with a medium-hold hair spray, such as L’Oréal Tecni, to keep it in place. Art Infinium 3 Medium Hold Working Spray ($17) is a medium hold working spray.
Classic Ballet Bun
This laidback variation on the traditional ballerina bun is polished and easy, as shown in the image above by Getty1. In order to begin, pull your hair back into a ponytail at the very top of your head. In the event that you have shorter pieces that fall out, pin them up at the back of your head with a bobby pin. Secondly, open the elastic and draw the hair up halfway through to form a loop to give the topknot a larger appearance. 3.Take the excess length that was left over from the loop and coil it around the base of the loop to conceal the elastic band.
Sleek Low Bun
This laidback twist on the traditional ballerina bun is polished and easy, as seen on Getty1. In order to start, pull your hair back into a ponytail at the very top of your head. With a bobby pin, secure any shorter bits that have fallen out at the back of the head. Secondly, open the elastic and draw the hair up halfway through to form a loop to give the topknot a larger look. 3.Coil the excess length left over from the loop around the base so that it is no longer visible. Secure with pins and spray with your preferred hairspray to complete the look!
Embellished Top Knot
Getty1. Hair ornaments are timeless and will never go out of style. Furthermore, they quickly transform any bun from plain to badass. Take inspiration from Issa Rae’s Black Panthermoviepremiere performance. Begin by parting your hair into three sections in the center of your head with a rattail comb, such as Krest’sPintail Combs ($5). 2.After that, braid three little cornrows and tie them together at the crown of your head or wherever you want your bun to end up. 3.Put your hair and the ends of your three braids into a ponytail and secure it with an elastic band.
Using circular motions, wrap your braid around the rest of your hair to form a braided topknot.
6.
Install gold cuffs throughout your braid to give it a little extra flair.
Backwards Braided Bun
Getty1.If you have piecey bangs and want to style them in a lob or bob, this is the style for you. Allow your bangs to hang loosely in the front and frame your face in the back. Begin by dividing your hair into three medium-sized portions at the back of your head. 2.In the back of your head, braid three medium-sized cornrows, halting at the crown of your head and braiding in the direction of your ponytail. 3.After that, pull your hair into a ponytail. Using a rubber band or a hair tie, pull your braids into a ponytail once you’ve completed braiding them.
Don’t be concerned about further flyaways. Keep in mind that the objective here is a sloppy bun. spray of Sexy HairSmooth Sexy Hair SmoothSeal Anti-FrizzShine ($20) to add a modest sheen to your style and to give it a polished finish.
Create Space Buns for Short Hair in 7 Easy Steps
Are you looking for a unique hairstyle? Adding space buns to your casual, daily style may give a quirky and amusing element to your ensemble. On a very hot day, this haircut might also help you feel more comfortable. If you have short hair, this may not be an issue. What if you have short hair and want to put it in space buns? The answer is a resounding affirmative! Continue reading to find out how to style space buns for short hair.
7 Easy Steps to Create Space Buns for Short Hair
Make a center part in your hair and separate your tresses into two vertical portions using a comb. After that, take a smaller slice from each side and place it on top. Step number three.
Tie each section
Make a pigtail out of the smaller part on one side by tying it with an elastic. Repeat the process on the opposite side. Step number five.
Get teasin’
Using a tail comb, tease the ends of each pigtail. This will assist to give your hair more volume and make your buns appear fuller. Step 6: Organize your thoughts and feelings about the situation.
Time for buns
Form a bun by twisting one pigtail and wrapping it over the base of the other. Bobby pins can be used to keep the hair in place. Repeat the process on the opposite side. Step 7 – Organize your time and resources.
Done!
Enjoy your space buns for short hair and your short hairstyles. When you’re going out with your buddies on the weekends, this hairdo is excellent. You can do anything in style with this hairstyle, whether you’re watching a movie, spending a day playing arcade games, or simply catching up over coffee and a good book. Simply finger comb or scrunch the remainder of your hair to add a touch of texture to maintain this look casual and comfortable. Use the following links to purchase the goods you’ll need to complete this look: DOVE Hairfall Rescue Shampoo is a product that was developed to help those who are experiencing hair loss.
Other Hairstyles for Short Hair
Take a look at these similarly stylish hairstyles that you may try as well.
1. Chignon for short hair
Chignoning your hair will make you look more elegant and refined. Photograph courtesy of Natasha Estelle Are you planning a special trip? Dress up your long gown or cocktail dress with an elegantchignon for short hair to complete the look. Then, for a sophisticated nighttime look, finish with a little smoky black eyeshadow and neutral lips. Who says you can’t wear your hair in this traditional updo if you have short hair?
2. Half up top knot for short hair
This half-up hairdo offers a whimsical element to your overall appearance. The half up top knot hairstyle is similar to space buns for short hair in that it adds a whimsical element to your overall look. If you have a bob or lob and want to keep strands away from your face, this is a good technique to style your hair. Additionally, you may sport this ‘do to outdoor concerts and music festivals to inject some flair into your ensemble.
3. Short hair braids
A short hairdo with little side braids is edgy and modern. Try out this ‘do right now. To get a hip and original style, experiment with short hair braids and pigtails. An ensemble consisting of denim jackets, shorts, and ankle boots that is informal and on the street is perfect for short hair braids. In addition, you may wear this style from day to night. When you decide to hit the clubs after nightfall, you may simply change into your party attire for the occasion. There are a variety of ways to experiment with your bob or lob hairstyle.
If you have short hair, experiment with space buns and have a good time with it.
Following that, read: Especially if you’ve been wearing your hair in a straight style for a long time, why not try curly hair? If you’re looking for something to spice up your bob or lob, short hair curls is a good place to start. Articles before and after this one
How to Do Space Buns + Space Bun Hairstyle Ideas
Aren’t space buns just the cutest thing ever? If you look around on the internet, it appears that space bun hairstyles are popular. Whether you are searching for sloppy space buns, braided space buns, low space buns, or half-up space buns, we will provide you with the necessary information in this post. Continue reading to find out how to make space buns the simplest way.
What are space buns?
Despite the fact that some individuals style them as low space buns or as a half-up hairstyle, the majority of people consider space buns to be two buns on top of your head.
(Example of two buns on the top of the head aka “space buns.”)
Space buns can be styled in the same way as sloppy buns. Alternatively, you may do ballerina buns. You may even want to experiment with braided buns. There’s a hairdo for every occasion, even formal occasions. What I like about the space bun hairstyle is that it is easygoing and enjoyable. It’s something I can’t seem to get enough of. Check out these simple step-by-step instructions on how to create beautiful space buns for your hair if you’re interested in doing the same with your hair. But first and foremost, here’s what you’ll need to get things started.
Space Buns Step By Step Instructions
You’ll need to prepare your hair for space buns before you can start styling it in them. First and foremost, brush your hair. This will assist you in keeping your hair free of knots and tangles after washing it.
2. Split your hair.
Now that you’ve finished cleaning your teeth, let’s go on to the next stage. Using a comb, separate your hair into two portions. In an ideal situation, you would split it along the center, resulting in two equal portions. Because I’m a stickler for perfection, I recommend separating your hair as straight and evenly as you possibly can. To create the portion, a pick or a small comb might be used. Make use of a mirror to double-check the accuracy of your space buns component. It is important to take your time with this stage since uneven volumes of hair can ruin your entire space bun hair style.
3. Add the ponytails.
Let’s get started with the ponytails once you’ve divided your hair into two equal sections. What you want to do is clump a piece of your hair together in one place. After that, pull your hair into a ponytail. Then position it so that it rests on the top and back of your head. You want to make sure that all of the bumps and clusters are smooth and uniform. As for the positioning of the hair, you may simply alter it later on to suit your own desire. Just keep in mind that the base of the ponytail will be the location of your space bun.
Make sure the second one is identical in appearance to the first one.
4. Start working on the space buns.
It’s time to put the finishing touches on your ponytails by creating your space buns. Wrap the length of your hair around the base of your ponytail; this will serve as the focal point of your space buns. Next, use bobby pins to hold the freshly created buns in place while they dry.
I would recommend that you use bobby pins that are the same color as your hair (or accessories, if there are any). This will allow you to get a seamless appearance. If you need assistance with this stage, you may view this video instruction on space buns.
5. Seal it with your spray.
You don’t want all of your hard work to go to waste once you’ve finished both sides, do you? Now that you have your space buns in position, the following step is to secure them. Make use of hairspray to get this look. After you’ve finished styling your adorable space buns, spritz them with hair spray.
Space Bun Hairstyle Ideas
Are you looking for additional space bun designs? Here are some fashionable suggestions for you to consider!
1. Space buns with braids
Do you want to learn how to create space buns with braids? Braided space buns elevate your look to a higher level of sophistication.
2. Half up space buns
Interested in learning how to achieve space buns with braids? Read on. Braided space buns elevate your look to a higher level of refinement and sophistication.
3. Messy Space Buns
What female doesn’t like a messed-up hairstyle? Messy space buns, on the other hand? That’s even better! Messy space buns are a great casual hairstyle for any occasion and can be worn at any time of year.
4. Space Buns For Short Hair
An untidy bun is one of the most beloved looks among females. Awkward-looking space buns, on the other hand: That’s even more impressive. Makeup-free space buns are a great look for any occasion, no matter what time of year it is.
5. Curly Hair Space Buns
Space buns may be worn by curly females as well! Your curls will give your space buns an extra layer of volume and elegance.
6. Low Space Buns
When most people think of space buns, they see them as being high on the head, yet low space buns are also quite popular. Follow along with this technique to achieve a fashionable low space buns appearance.
Space Bun Inspiration
When most people think of space buns, they think of them as being high on the head, however low space buns are also quite fashionable. Follow along with this guide to achieve a fashionable low space buns appearance.
1. Half Up Pink Space Buns
We can’t get enough of these adorable pink space buns that are half up.
2. Braided Pink + Rainbow Space Buns
What do you get when you combine a rainbow and space buns? Talk about a match made in heaven with these couple!
3. Edgy Purple Space Buns
Totally punk, these chaotic space buns with a flash of purple are perfect for a night out.
4. Space buns on natural hair with gold accents
Make your space buns more interesting by adding some unique decorations like these!
5. Low space buns with braids
This is a style that I’m really enamored with. Everything about these space buns is wonderful, from the braids to the buns to the buns themselves!
6. Space buns for kids
Can you believe how cute these space buns on this tiny child are? Space buns are a truly unique and entertaining mommy and me look.
With space buns, boring hair is a thing of the past.
Do you want to infuse a sense of playfulness and carefreeness into your personal style? Then you should try space buns! They were huge in the 1990s and are now making a resurgence in the 2000s. Are you looking for additional fashionable hairstyles?
- In 2021, you may experiment with 20 different fun rainbow hair color ideas. Try these 30 rose gold hairstyles for a fresh look in 2021. 50 Stunning Long Layered Hairstyles for the Year 2021
- How to Curl Your Hair With a Curling Wand: Tips and Tricks You Should Know
- Nine of the best dreadlock shampoos to use in 2021
25 Stunning Messy Buns for Short Hair
If you have short hair, you may be dissatisfied with the limited number of hairstyles available to you as a result of your lack of hair length. When it comes to short hair, messy buns are sometimes disregarded since some women assume that buns are out of the question. Meanwhile, messy buns are a startling new hairstyle that can be worn by any woman, regardless of her hair length, and it looks amazing on anybody.
If you have short hair, this style will not be appropriate for you, of course. A sloppy bun, however, may be created provided you have at least some length in your hair, such as that from a short bob or a shag.
How to Make a Messy Bun for Short Hair
Learning how to arrange your short hair in a messy bun will allow you to have a unique hairdo on every day of the week. Here are a few simple steps to creating a stunning bun.
i) Curl Your Locks
If you already have curly or wavy hair, you’re in luck, and you can move forward to the following stage. Adding texture to your hair is essential to creating a sloppy bun. It is for this reason that you must use a curling iron. Most enjoyable about this phase is that you are not required to generate clean and visually beautiful waves. Make whatever you can out of what you have. It shouldn’t take more than 5 minutes to complete.
ii) Brush Your Hair
This step can be skipped if your hair is already curly or wavy, in which case you are in luck. Adding texture to your hair is necessary for a sloppy bun. As a result, you’ll want to get a curling iron out. Most enjoyable about this phase is that you are not required to create clean and visually beautiful waves. Anything you can must suffice. If you can, limit yourself to no more than 5 minutes.
iii) Tease Your Locks
Take the top strands and gently raise them off the ground. Holding the strand aloft, use a fine-toothed comb to comb through the hair from roots to ends while holding the strand up. Make teasing movements to add extra volume to your hair. Repeat the process with the remaining top strands.
iv) Make A Ponytail
Pulling up the top strands can help you to see more clearly. Comb through the hair from the roots to the ends while keeping each individual strand in place with a fine-toothed comb. Using teasing motions, add extra volume to your hairstyle. Make sure you do this with all of the top strands in the same manner.
v) Finish the Bun
Insert the end of the ponytail into the elastic band at the base of the ponytail. It is possible to use bobby pins to bind the free strands if the hair is too short for this. In order to achieve a messy bun hairstyle with long hair, follow the steps in the following tutorial:
Best Short Messy Bun Hairstyles
Messy buns with short hair may transform your appearance no matter what the occasion is. A messy bun may help you make a statement, whether you’re having a poor hair day or attending a wedding. If you know how to build a bun and maintain it in place, you will be prepared for any hair difficulties. These hairstyles are perfect for those occasions when you don’t have time to wash your hair or whenever you want to project a wild image. Businesswomen, on the other hand, are partial to untidy buns.
1. High and Messy
Creating a messy bun for short hair is quite simple and doesn’t need much work on your part. All you have to do is gather some of the top strands together and twist them into a bun around an elastic band to complete the look. It is possible to tie the bun with a single strand of hair if your locks are thick enough.
2. Short Bob Bun
If you want to make your messy bun stand out, you’ll need to gently brush all of your hair upwards and pin the top section in place with bobby pins.
In order to produce a full-size bun with the hair that is too short and thin, you would need to draw an outline of a bun. You may also have a look at these women’s bun hairstyles.
3. Smart braiding
Continue to braid the top of your head’s hair in order to outline your little and sloppy bun even more effectively. It is not necessary to have a lot of hair length in order to create this braid. It’s okay to wear a stacked bob for this hairdo.
4. Pinned coils
Bobby pins can assist you in creating a messy bun for short hair that cannot be secured into a ponytail. Brush the hair to give it additional texture, and then use the pins to arrange the bottom locks into a false bun to complete the look. Pretty Braided Bun Hairstyles for Women
5. Small and fun
It’s time to put your flawless and voluminous bun on hold, especially if you have short locks. Instead, embrace the modest and playful little buns that you can whip up without too much effort instead. Then secure the hair with an elastic band, and you’re done!
6. Double trouble
Why not create two buns if you’re already capable of making one? On short hair, two buns will appear to be the same size as one bun. They do, however, give your image greater volume as well as a delightful Minnie Mouse aspect. Make yourself appear younger and more confident!
7. Be loose
Make a bun out of the strands on top of your head by using them as an elastic band. Any female with short hair will appreciate the enormous volume that can be achieved by wrapping one section of hair around another. Pins should be used to keep the masterpiece together.
8. High hair
Buns can be held in place with an elastic band made from the strands at the top of your head. Any female with short hair will appreciate the enormous volume that may be achieved by wrapping one segment of hair around another. Keep your creation together with pins.
9. Go wild
This is a fantastic solution for women who have pixies in their hair. You’re probably wondering how you’re going to put your hair up in a lovely bun even if you don’t appear to have enough hair for it. All that is required is that you utilize your imagination and take pleasure in the outcome.
10. Pin it up
Using simple pins to secure your hair into a bun is an easy method to get started. Organize your hair into a loose ponytail and pin the ends up for a playful appearance. You may get this look with any short, a-line, or asymmetrical bob hairstyle.
11. Mini ponytail
What you see is exactly what you get. A very little ponytail that is tucked into the elastic band to give the look of a lovely bun. This hairstyle may be created without the use of a mirror or a hairbrush. One of the most convenient hair styling solutions available!
12. Low braiding
When you have short, thin hair, a low braiding technique may make your untidy bun seem fantastic. Grab as much hair as you can from wherever it is available and braid it. After that, form a tiny bun at the bottom of the cake. Braids and buns look fantastic when worn together.
13. Hair extensions
If you want a high and attractive messy bun but you just have a pixie, don’t panic, hair extensions can help you achieve your goal! Making the extensions part of the ponytail is as simple as 1-2-3! You can have the most gorgeous bun in the world in only a few short minutes.
14.Wedding hairstyles with long hair
In the event that you have a big occasion coming up, a messy bun for short hair may be a superb choice of hairstyle for you.
Even the smallest bob may be transformed into a masterpiece by a trained stylist. Put your confidence in the hands of a spiritual guide.
15. Quick and stylish
Creating a quick and easy bun at the very top of your head is ideal if you have more hair on top than you have at the bottom of your head. This amusing tiny bun is no longer the preserve of housewives; even the most fashionable of women are donning them on a daily basis.
16. Closed eyes
Creating a quick and easy bun at the very top of your head is ideal if you have more hair on top than you have at the bottom of your hair. It is no longer the preserve of housewives; even the most beautiful of women are seen sporting this amusing tiny bun every day.
17. Loose strands
Tieing loose strands together to give the look of a messy bun on short hair is an old method that never goes out of style. Simply curl each strand of hair tightly to give the appearance of thicker hair before pinning them up.
18. Diamond bun
Making use of hair accessories to make a bun is a wise decision. When you choose the appropriate headband or elastic band, you may transform your little and sloppy bun into a diamond beauty in minutes. If you’re celebrating a particular event, it might be an excellent pick.
19. Up and away
To construct a bun, it’s a good idea to use accessories. You may transform a modest and sloppy bun into a beautiful diamond masterpiece with the help of the correct headband or elastic band. If you’re celebrating a particular event, this might be an excellent pick.
20. Donut Bun
Take advantage of the fact that you have enough hair for a little donut bun to create a nice bun out of your unruly hair. This is a fantastic tip for those with short tresses. The appearance of a little and tidy bun on teased manes is always pleasing. Long, angled bob hairstyles are the best.
21. Low Messy Bun for Short Hair
Take advantage of the fact that you have enough hair for a little donut bun to create a nice bun out of your unruly locks. Short tresses will like this method. If you have teased manes, a little and clean bun always looks great! Curly Bob Hairstyles with an Angle
22. Half Up Messy Bun for Short Hair
You may also pull the top part of your short hair up into a bun or ponytail as an alternative method to style it. Use a curling iron to add volume to the bottom half of your hair, or leave it as it is naturally curly.
23. Messy Short Space Buns
Space buns may have been reserved for children in the past, but by straightening your hair and placing little parts to frame your face, you can transform them into something more adult-like. Accessorize with your favorite clips from your collection.
24. Messy Short Curly Bun
On certain days, all you want to do is collect your curly hair into a fashionable updo and call it a day. This top bun with a few scattered lumps or bumps takes about a minute to do and is perfect for all-day use.
25. Top Bun for Short Straight Hair
The top bun is a popular hairstyle for ladies because it exudes an air of easy coolness. Short straight hair should be gathered into a tiny bun, with little portions of hair left to frame the face or tuck behind the ears when the bun is finished.
After reading this article, you should have a better understanding of how to create the most spectacular messy bun on short hair. Bun lovers no longer have to worry about their hair being too short. Try one of these recipes out for yourself!
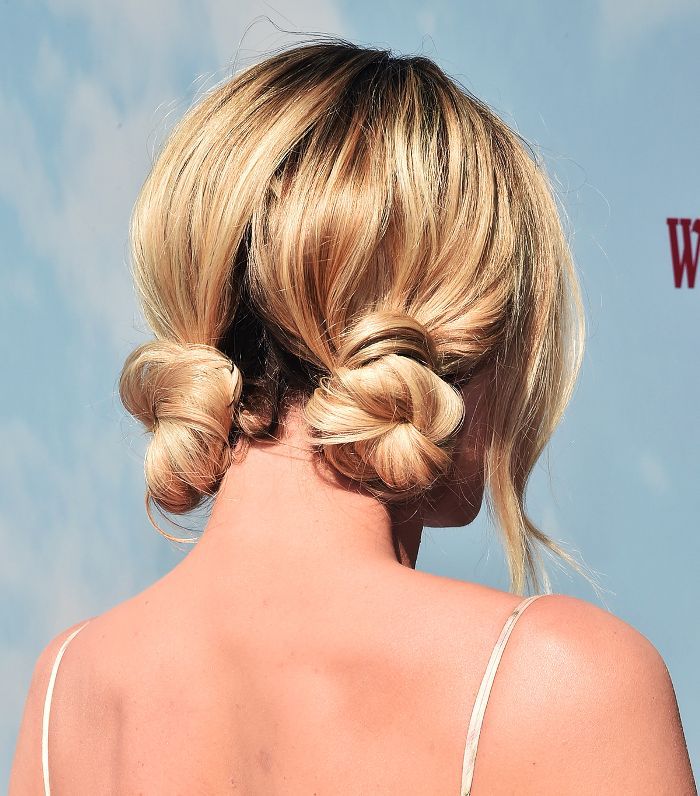
How to Do Space Buns
Messy buns, ballerina buns, braided buns – it’s safe to say that there’s a perfect bun hairstyle for any occasion out there. When it comes to errands, a sloppy bun is appropriate, a ballerina bun is appropriate for an interview, and a braided bun is appropriate for a special occasion. But what about the joyful, carefree bun hairdo that we can’t seem to get enough of these days? The hairdo with space buns! You can safely argue that this hairstyle is out of this world—but it’s not out of reach for you.
HOW TO GET A SPACE BUNS HAIRSTYLE
Gather your materials and then begin working on your space bun style. What you’ll need is the following: a brush for your hair Elastics that are transparent Bobby pins are a kind of pin. Advanced Hairstyle from L’Oréal Paris LOCK IT DOWN Controlling the Weather Hairspray How to get the look:
STEP1: BRUSH YOUR HAIR
While this step may seem self-explanatory, it’s critical to begin by combing your mane to verify that it’s free of any tangles or knots before proceeding.
STEP2: PART YOUR HAIR
By making a center part in your hair, you may divide it into two equal portions. It is critical to ensure that your part is as straight as possible, with the equal amount of hair on either side, since this will make or break your overall space bun appearance!
STEP3: CREATE SOME PONYTAILS
One part of hair should be gathered and tied into a ponytail at the top of your head, toward the back. Make sure to smooth out any kinks that may occur during the process. Your ponytail’s location can be customized to suit your needs; however, bear in mind that the base of your ponytail will be located where your space bun is. Following the completion of one ponytail on one side of your portion, proceed to build a duplicate ponytail on the other side. You don’t want your space buns to seem asymmetrical, so make sure you duplicate your positioning!
STEP4: MAKE YOUR BUNS
To make your space buns, you’ll want to wrap the length of your hair around the base of your ponytail from the front to the back. Hold this freshly created bun in place as you pin it down with bobby pins to finish it off. Make sure to use bobby pins that are the same color as your hair for a seamless appearance! Repeat the process on the opposite side.
STEP5: SEAL THE DEAL
Hairspray should be used to finish the appearance since you don’t want all of your hard work to go to waste. That’s all there is to it, unless you want to go all out and accessorize your space buns for a truly beautiful look. More on it in a moment!
3 WAYS TO MAKE YOUR SPACE BUNS OTHER-WORLDLY
Want to improve the look of your space bun style even further? There are a variety of ways you can make your space buns seem extraterrestrial, and we’ve included three of our favorites below.
OPTION1: ADD COLOR
Surely you agree that such a colorful haircut goes wonderfully with such a joyful color palette? Make your buns pop with a temporary hair color from theL’Oréal Paris Colorista 1-Day Spray or theL’Oréal Paris Colorista Hair Makeup 1-Day Colorlines. Get creative with your hair color!
It’s easy to maintain your space buns hairdo with temporary hair colors from both lines because they wash away in only one shampoo. Instead of going full out with color, you may use the wash out hair color to highlight your roots only—this is one of our favorite festival season looks.
OPTION2: ADD GLITTER
Besides being a major hair color trend right now (hello, festival hair), glitter roots are also the perfect technique to help your space buns style seem like it came straight out of the Milky Way. Sprinkle some glitter throughout your roots and finish the look with some hairspray for a quick and easy look.
OPTION3: ADD FUN HAIR TIES
When everything is said and done, there is no easier way to personalize a space buns hairstyle than by using a few colorful hair ties to bring it all together. Remove the transparent elastics from your wardrobe and replace them with cuffs, coils, and bows. After you’ve finished building your space buns, you can dress them up with a colorful accessory such as a hair clip or a flower crown. You have the entire universe of accessorizing at your disposal. Now that you’ve learned how to do space buns, as well as a few tips and tricks for taking your space buns hairdo to the next level, why not learn how to create the ideal makeup look to go with them?
Space Buns: How To Do Space Buns On Your Hair (for Newbies)
Space buns are the most unique of all the bun hairstyles available. It’s likely that you’ve seen this look on a variety of beauty blogs and social media platforms, particularly on Instagram accounts and Pinterest boards. Many celebrities, including Britney Spears, Gwen Stefani, Ariana Grande, Yara Shahidi, Ciara, and Tracee Ellis Ross, have also had the haircut. The sassy look is quite fashionable right now, and it’s easy to see why. Space buns are sassy and full of attitude, much like their namesake.
This guide will walk you through the process step by step.
What Are Space Buns?
Spacing buns are a straightforward design that consists of two high buns on either side of the head. Space buns are based on a couple of historical sources, which are detailed below. Despite the fact that her space buns hairstyle was located lower on the head than the normal space buns hairstyle, they are quite similar to Princess Leia’s hallmark buns. Squash Blossom Buns, which are worn by Native American Hopi women, are another source of design inspiration. It was customary for a lady to dress in this manner to signal that she was single.
If you leave your hair in its natural curly form, the space buns will seem textured.
How to Do Space Buns
PERFECT DOUBLE BUNS – CURLY HAIR | jasmeannnnnnnnnnnnnnnnnnnnnnnnnnnnnnnnnnnnnnnnnnnnnnnnnnnnnnnnnnnnnnnnnnnnnnnnnnnn There are two primary sorts of space buns, and we’ll go through each of them in a little more detail below. Textured space buns are a great option if you want frizz and structure in your hair.
Create sleek space buns, on the other hand, if you like a smoother, more polished appearance. Depending on the ultimate result you want to achieve, the stages you take to make your space buns will differ. In the following sections, we’ll show you how to make both sorts of space buns from scratch.
Gather Your Supplies
The worst thing that may happen when executing any style is realizing that you don’t have the proper equipment and resources for the task at hand. Before you begin, you need acquire all of the essential items. These include:
- Detangling Comb: A wide-toothed comb should be used to reduce breakage
- A rat-toothed comb should be used for parting
- Gel: Use an alcohol-free gel that will not cause your hair to become brittle. Use a gentle boar bristle brush to apply the product. Edge Control: Excellent for achieving clean edges. Ties for your hair: We prefer cloth hair ties that do not have a metal clasp to reduce snagging. Holding Spray
- Bobby Pins
- Soft Bristle Toothbrush (if you like placed edges)
- Silk or satin scarf
- Shampoo
- Conditioner
- Moisturizer
- Heat Protectant
- Styler for curl definition (optional)
Prepare Your Natural Hair for Space Buns
It is not possible to get the desired look by doing space buns on dry, unwashed natural hair. There are a few measures you’ll need to follow in order to prepare your natural hair for your space buns.
Wash Your Hair
For a fresh start, we recommend shampooing your hair with a sulfate-free shampoo to provide a beautiful clean slate. This is because shampoos without sulfates are typically gentle on your hair, which is why we mention “sulfate-free.” If you opt to use a sulfate shampoo, keep in mind that it may cause your hair to become brittle.
Condition
After you’ve washed your hair, condition it, or deep condition it. This step is critical, especially if you intend to keep the style for a few of days. Make use of a moisturizing conditioner or a deep conditioner of your preference. Read this article to learn how to deep condition your hair at home with products you already have.
Moisturize
Consider devoting a few minutes to applying a hair moisturizer to your hair, since hydrated hair behaves better than dry, crispy hair. Don’t miss the moisturizing process if you want your hair to be as supple and cooperative as possible. A moisturizing spray, a moisturizing lotion, or your favorite essential oil might be used to achieve this result. Just make sure you don’t overdo it with the moisturizer, especially if you’re going for a sleek space bun look.
Apply a Styler
It’s important to take a few minutes to moisturise your hair since hydrated hair behaves far better than dry, crunchy hair. Never miss the moisturizing stage in order to keep your hair as supple and cooperative as possible. Your favorite essential oil or a moisturizing spray can be used in place of a moisturizing cream. However, be careful not to overapply the moisturizer, especially if you intend to style your hair in a sleek space bun style.
Stretch Your Hair (only for Sleek Space Buns)
If you want your space buns to be extremely sleek, you’ll need to manage your hair into a more sleek form. This step is optional because space buns do not need to be smooth, but if you want your hair to be sleek, follow the instructions below to learn how to stretch your hair before creating your space bun. In order to expand your hair, you can employ a variety of techniques, which are detailed below:
Stretch with Braids
- Using a comb or your fingers, divide your hair into various portions and pin them up. Hair should be divided into two or more pieces, as a general rule of thumb. However, depending on the thickness of your hair, you may need to divide it into multiple portions. Braid each portion all the way down to the ends of the braid. To prevent braids from unraveling prematurely, secure them with a ponytail holder or rubber band at the end of each row. Allowing your hair to air dry is recommended. Take the braids apart
French braids
- Using a comb or your fingers, divide your hair into multiple pieces. Hair should be divided into two or more portions as a general rule of thumb. If your hair is really thick, you may need to divide it into multiple portions. Using the braiding technique, braid each part all the way to the ends. To prevent braids from unraveling prematurely, secure them using a ponytail holder or rubber band at the ends of the hair. Allowing your hair to dry naturally is recommended. The braids need to be unraveled.
The instructions in this post will walk you through how to put french braids on your hair in depth and step-by-step.
Banding
I STRETCH MY TYPE 4 NATURAL HAIR WITHOUT USING HEAT AND WHILE MAINTAINING LENGTH
- Make two low ponytails on either side of your head, one on each side of your head. Ponytail holders should be used to secure each ponytail. Wrap extra ponytail holders or a wide flexible band around the length of your hair many times until you reach the ends
- Then repeat the process. Allow for total air drying of your hair. Remove the ponytail holders/band from your hair.
Blow Dry
Alternatively, blow drying your hair may be used for a more expedient approach of expanding your hair. We advocate reducing the usage of heat to the greatest extent feasible. You may, however, utilize the “cool” setting on your blow dryer to stretch your hair as it dries to achieve this effect.
While blow-drying your hair, spread it out with a brush as you go. If you want to utilize the high heat setting on your blow dryer, make sure to use a heat protectant before doing so.
Straighten Your Hair (only for Sleek Space Buns)
Straightening your hair before creating incredibly sleek space buns is a good idea. Prevent heat damage to your hair by using a heat protectant before straightening your hair. Take the following precautions to reduce the likelihood of heat damage occurring:
- Prepare your hair by detangling it before you begin straightening it. Heat protectant should be applied evenly throughout the hair, making sure that all of the strands are protected
- Using a comb, separate your hair into four portions. Small pieces of hair should be flat ironed from root to tip. Make sure you don’t skip over any sections more than once. Read this article to find out how to flat iron your hair without causing heat harm to it. Repeat the previous process on your whole head of hair
In the event that you do not wish to straighten your hair, go to the following step.
Do the Ponytails
Continue to the following step if you don’t want to straighten your hair beforehand.
Lay Down Stray Hairs
Space buns can be smooth or textured, but the hair above the ponytail holder (your roots) should be flat and laid regardless of which style you choose. Apply some gel to your roots and brush it through your hair to get a smooth finish. In order to get a smooth bun, make certain that the gel you use will not cause your hair to revert back to its original form. If you want the look of neatly set edges, consider using edge control gel. It should be applied to the hair around your hairline, and your baby hairs should be styled how you desire.
Using this product will offer you greater control over your hairs and will not pull them out.
Use a Scarf to Set Your Roots
You’ve been through a lot in order to bring your hair to this stage. A silk or satin scarf is essential for establishing your roots. Tie the scarf around your hairline; this will help to flatten the roots even further. Leave the scarf on for a few minutes while you proceed to the following phase, when you will construct your space buns hairdo.
Create Your Space Buns
It is likely that the most difficult element of the styling procedure will be creating your space buns. To make your space buns, do the following steps:
- Make a rope out of your loose hair by twisting it around itself many times. Make a circular motion with your hair around the base of your ponytail
- This will secure it. Make use of bobby pins to hold the ends in place
It may take a few tries to get the buns to look round, but once you get the hang of it, they’ll look perfect.
For Short Hair
Using adonut bun maker, which you will wrap your hair around, you may get a fuller look if your hair is short or you want more volume.
Braided Space Buns
You may also build a braided bun to add a little extra flare to your look. Make a three-strand braid from the roots to the ends of your hair, wrap the braid around the base of your ponytail, and fasten with bobby pins.
Freeze the Style in Place
If you choose, you may spritz your hair with a holding spray to keep it in place. It helps the style to endure longer, decreases flyaways, and improves the general stability of the bun by adding more volume to it. Once you’ve removed the silk scarf from your hair, you’re finished.
How to Do Space Buns on Natural Hair
Flourishing Space Buns | Natural Hairstyles
How to Do Space Buns With Straight Hair
The Double Bunsl! Hair Tutorial – Two Bunsl!
Pros and Cons of Space Buns
Space buns exude a sassiness and a sense of playfulness that few other hairstyles can match. While the style is fashionable and attractive, it has both advantages and disadvantages that you should be aware of.
Pros
No other hairstyle can match the sassiness and whimsy that space buns exude. Despite the fact that the style is fashionable and attractive, there are certain advantages and disadvantages to consider.
- Look that is youthful and fun. No one can dispute the sense of wonderment that space buns elicit. It’s simple to accomplish. It will not take much work to repeat the style once or twice after you have done it the first time or two times. Versatility. Space buns can be made in a variety of ways. You may wear them textured, sleek, or even sloppy according on your preference. You may make them as unique as you’d like. Examples include half space buns, low space buns, classic space buns (as seen in this article), high space buns (also featured in this page), and a variety of other shapes and sizes. Your alternatives are only limited by your ability to think creatively. If you want your buns to stand out even more, you can dye your hair a different color. Protective. Despite the fact that space buns are not a long-term style, they offer protective properties due to the fact that they compel you to tuck your ends away.
Cons
- An appearance that is youthful and fun It’s impossible to deny that space buns generate a sense of wonderment
- The process is straightforward. It will not take much effort to repeat the style once or twice once you have practiced it. Versatility. Many different variations of space buns are available. Depending on your style, you may go textured, slick, or even sloppy with your accessories. Make them unique to you by adding your own personal touch. Examples include half space buns, low space buns, classic space buns (as seen in this page), high space buns (also featured in this article), and a variety of other shapes and sizes The only thing that limits your possibilities is your imagination. If you want your buns to stand out even more, you can use a little hair color. Protective. Despite the fact that space buns are not a long-term style, they do offer protective properties due to the fact that they compel you to tuck your ends away.
Related Articles
- The Different Types of Messy Buns and How to Make Them
- How to Style Bantu Knots on Straight Hair
- Natural Hair Afro Puff Updo
- How to Style Bantu Knots on Straight Hair
Dos and Don’ts of Space Buns
In order to have a pleasant experience with your space buns, make sure you follow the guidelines outlined below.
Dos
- Reduce the amount of heat you utilize. It is possible that heat will be required in the pursuit of flawlessly slim space buns. However, it is advisable to keep the temperature as low as possible. Utilize the “cool” setting on your blow dryer if at all possible
- Take your time while separating your hair. When the section of the bun is straight, space buns appear much nicer. Make your own own style statement. You can add bangs to the style before tying your hair into the two ponytails
- However, this is not necessary.
Don’ts
- Make sure your ponytails are not too tight. Traction alopecia is extremely difficult to treat, thus prevention is essential! Tie your ponytail holders tightly around the root of your ponytails, but avoid wrapping them around too many times at the same time. Space buns should not be done too frequently. We understand what you’re saying. Because space buns are so stunning, you may find yourself tempted to wear them every single day of the week. Having said that, it is recommended that you allow your hair to rest for a week or longer after wearing it in space buns.
After reading this article, you should know everything there is to know about how to make space buns.